
Farm Newsletter
Week #16, September 6, 2018
- On: September 05, 2018
 0
0
It’s too wet. That’s all we think about. This isn’t news; you’ve experienced the endless rains too. Honestly, this is a difficult moment for us. Our crew is struggling with the rain, mud and mosquitos. It’s hard to keep our spirits up.
Some items in this week’s box have more water than usual and are more perishable as a result. Keep an eye on your produce and be strategic about what you use first. Everything we pack in the CSA boxes is in good shape, but some things might have a shorter shelf life. Our summer crops are fading away. We’ll continue to pick tomatoes as long as at the flavor is decent. Peppers and zucchini remain productive and good quality, which we appreciate. Lettuce, sweet corn, cucumbers are finished for the season, probably Swiss chard too. This is probably the final melon.
We look forward to fall crops. Carrots, greens, cabbage, broccoli, cauliflower and winter squash all look great, and will be productive if the weather turns dry. We need some sun and wind. The sweet potatoes remain a mystery until we start digging them. We’ve got several bean plantings scheduled for harvest over the next month.
Farming means accepting the weather but how can we avoid reacting to it? We’re pretty philosophical by this point in our farming careers but it hurts to watch lovely crops melt down in the rain. We’ve had wet spells before but rarely for more than a month. A series of wet months is different. Our workers soldier on. They are amazing. Tuesday was a sunny day and we tried to store that energy before today’s rain. Beth, Steve and the crew.

Ellen and Sena head back to the buildings. The crew have kept their spirits up despite soaked clothes, soaked socks and predatory mosquitos. We used our rain coats with mosquito nets on Monday. Trust me, that’s a steamy combination. I asked Steve “who do you think will quit today?” He said “me.”
Veggie List and Veggie Notes
Week #16, Sept 6/7, 2018
– weekly shares
– purple EOW
– moon sampler
Carrots, 1.7 lb
Plum tomatoes, ~2 lb
Slicing tomatoes, ~2 lb
Muskmelon or red watermelon (by site)
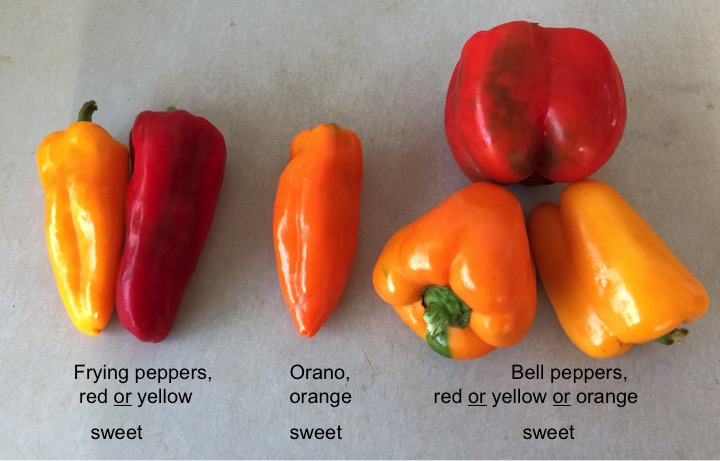
Red frying peppers (or Oranos), 3 – 4
Bell pepper, 1 – 2, red, yellow, orange or purple
Green zucchini, 1 big or 2 small
Yellow onion, 1 or 2
Poblano chiles, 3
Garlic, 1 bulb
– Some sites get eggplant.
– Some sites get lettuce.
Next week’s box will probably contain Romano beans, red potatoes, tomatoes, peppers, zucchini, onions, some type of greens, and more.
Tomatoes – The tomatoes are hanging in there. We have a few plum tomato varieties that are just ripening, so those are the best right now. The beautiful orange plum tomatoes are finally ready en masse this week. We will keep picking plum &/or slicing tomatoes until the flavor gets weak. As usual, we send a mix of fully ripe and slightly underripe tomatoes to ripen at room temperature. Watch your tomatoes closely. If spots develop, use quickly or refrigerate.
Melons – Everyone gets one large melon or two small ones. We’ll distribute watermelons and muskmelons by site. The watermelons will hold well. Muskmelons are ripe and should be eaten in the next few days.
Green zucchini – These nice zucchini are from a new field, so quality is high again. We’ve included some big ones but they are tender because picked from young, healthy plants.
Garlic – This is German Extra Hardy, a variety with big, fat cloves. This variety grew well for us this year. We’ll increase this type in our fall planting.
Lettuce – Wash well! There’s lots of grit because of splashed soil. These are small; we had to strip off a lot of outer leaves. Think about cutting a little higher than usual above the base when you prep your lettuce, to avoid rusty spots on the lower stem.
Peppers:
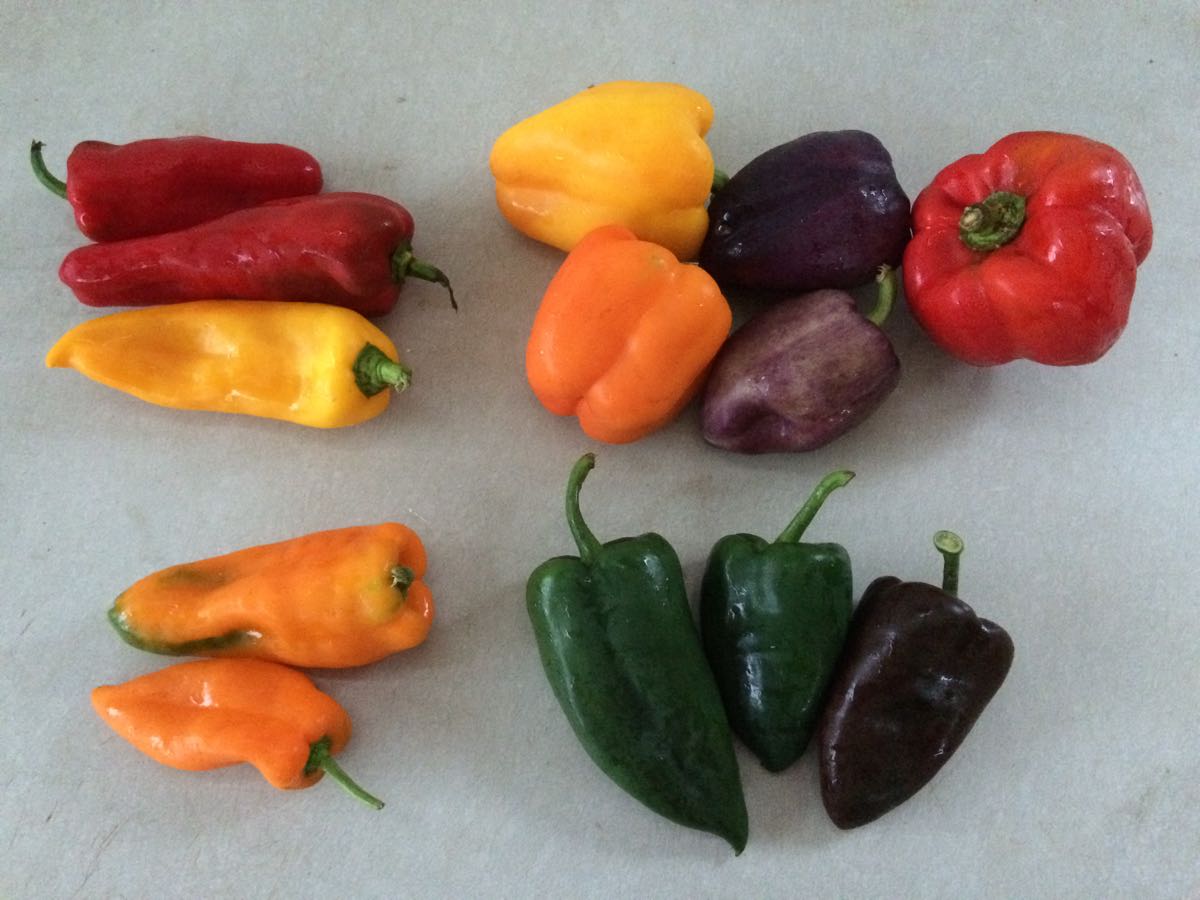
You will receives some of these peppers. I photographed more to help you identify the different types by shape, size and color.
Clockwise from top left;
– Frying peppers (slender; red or yellow; SWEET) – These peppers are thin-walled with low moisture, which allows them to fry readily in hot oil. Excellent raw or cooked.
– Bell peppers (blocky; various colors; SWEET) Bell peppers are thicker-walled and juicy, great for eating raw in salads or roasting on the grill. Your bell pepper this week could be yellow, orange, red or purple. Purple peppers taste like green bells.
– Poblano chiles (triangular, shiny; red or brown; MILDLY HOT) – Poblanos are the creme de la creme of chiles. They have lots of great flavor in combination with manageable heat. Roast and add to soup or casseroles. To reduce heat, remove the seeds and midveins.
– Oranos (slender; orange or orange and green; SWEET) – These are snacking peppers, with excellent flavor and few seeds.
RECIPES
Visit our 2018 Recipe Log or our 2017 Recipe Log or join our Facebook discussion group.
LOCAL THYME/ Comforting Classics
Garlicky Glazed Carrot
Pan Seared Chicken Breasts with Garlicky White Wine Reduction Sauce with Tomatoes
Nigel Slater’s Eggplant Tomato Curry
Peppers Piedmontese
LOCAL THYME/ Outside the Box Recipes
Indian Moong Dal with Carrot and Tomato
Quick Chopped Kalamata Tomato Relish Crostini
Eggplant Falafel
Smoked Trout Salad with Peppers
LOCAL THYME/ Quick and Easy Meal
Poblanos Rajas Scramble
RECIPES FROM LAUREN
GRILLED CARROTS, STEAK & ONION WITH SMOKY FISH SAUCE
Recipe adapted slightly from Six Seasons
I had this at a potluck a few months ago and fell in love with Portland chef Joshua McFadden and his beautiful cookbook Six Season immediately. I think this is probably the fifth or sixth recipe I’ve adapted for you all from this cookbook so if you are loving these recipes, it’s really time you checked it out yourselves. Lauren.
Takes 1 hour.
Serves 4.
1 pound steak (skirt, tri-tip, rib-eye or other cut that’s tasty grilled)
Kosher salt
Freshly ground black pepper
2 pounds trimmed and peeled carrots, split lengthwise into quarters
1 large yellow onion, cut into fat slices
Olive oil
1 or 2 lime wedges
Smoky Fish Sauce:
1/2 cup fish sauce
2 poblanos seeded, de-ribbed and minced
1/4 cup white wine vinegar
4 garlic cloves, minced
2 tablespoons sugar
- Season the steak with 1 teaspoon salt and several twists of pepper then heat a gas grill to medium.
- Prepare your sauce by combining all ingredients in a small bowl and stirring until sugar dissolves then adding 2 tablespoons water. Let sit on counter to marinate while you cook.
- Once preheated, arrange the carrots and onion slices on the grill. Cook, turning every couple minutes, until they are starting to soften and brown a bit (the carrots should be about as soft as a cooked beet, and the onions should be tender and juicy but not yet significantly charred), about 15 minutes.
- Increase the grill heat to medium-high, blot any moisture off the steak, and add it to the grill. Cook to medium-rare, 3 to 5 minutes per side, depending on how thick it is. Leave the vegetables on while cooking the steaks but keep an eye on them to make sure they’re not charring too much. A few dark edges are nice, but take them off if they are getting more blackened than that.
- Take everything off the grill. Let the steak rest as you cut the carrots at an angle into long slices and cut the onion rings in half; they will likely fall apart at this point.
- After the steak has rested for at least five minutes, cut it across the grain into thin strips. Place the steak, carrots and onions into a large bowl and pour on 1/2 cup of the spicy fish sauce (the batch makes more like 2 cups; save the remaining to drizzle over grilled meats, to marinate some chicken, or to use as a dressing for roasted vegetables (particularly poatoes). Also add any steak juices that have accumulated on the resting plate or cutting board to the bowl. Toss, taste, and add more sauce if you need for the flavors to be bright and flavorful.
- Drizzle with olive oil, a bit more salt and pepper, and a few squirts from the lime before serving.
.
VEGETARIAN STUFFED PEPPERS
Takes 1 hour, 30 minutes (only 30 minutes active).
Serves 4-6.
3 tablespoons butter
1 onion, diced
3/4 teaspoon Kosher salt
1/4 teaspoon freshly ground black pepper
1 orano pepper, cut into 1/4-inch dice
1 zucchini, cut into 1/4-inch dice
1 eggplant (if you got one), cut into 1/4-inch dice
2 garlic cloves, minced
2 pounds plum tomatoes, cored, seeded and diced
2 teaspoon cumin
1 teaspoon chili powder
1/2 teaspoon red pepper flakes
1/2 teaspoon dried oregano
1 cup cooked quinoa
1 can black beans
4 red frying peppers, cut in half, seeds and ribs removed
1 bell pepper, cut in half, seeds and ribs removed
1-2 avocados, optional
Sour cream, optional
Hot sauce, optional
Fresh lime juice, optional
- Preheat oven to 375 degrees.
- In a large saucepan, melt butter over medium heat. Add onion, salt and pepper and cook until softened and fragrant, about 5 minutes. Add pepper, zucchini and eggplant (if using) and saute 10 minutes longer. Finally, add garlic and saute until that is fragrant (about 5 minutes more). Stir in tomatoes and spices followed by quinoa and beans. Cook for 5-10 minutes until tomatoes aren’t too liquidy.
- Stuff each pepper half with quinoa mixture. They will likely be heaping. Place peppers with room between them in a 9×13-inch baking dish. Pour a few tablespoons of water into the pan to help steam the peppers. Cover with foil and bake for 30 minutes. Remove foil and bake for 20 minutes more until peppers are soft and lightly browned.
- Serve warm with sliced avocado, sour cream, hot sauce, and/or lime juice.
.

Week #15, August 30/31, 2018
- On: August 29, 2018
- 0
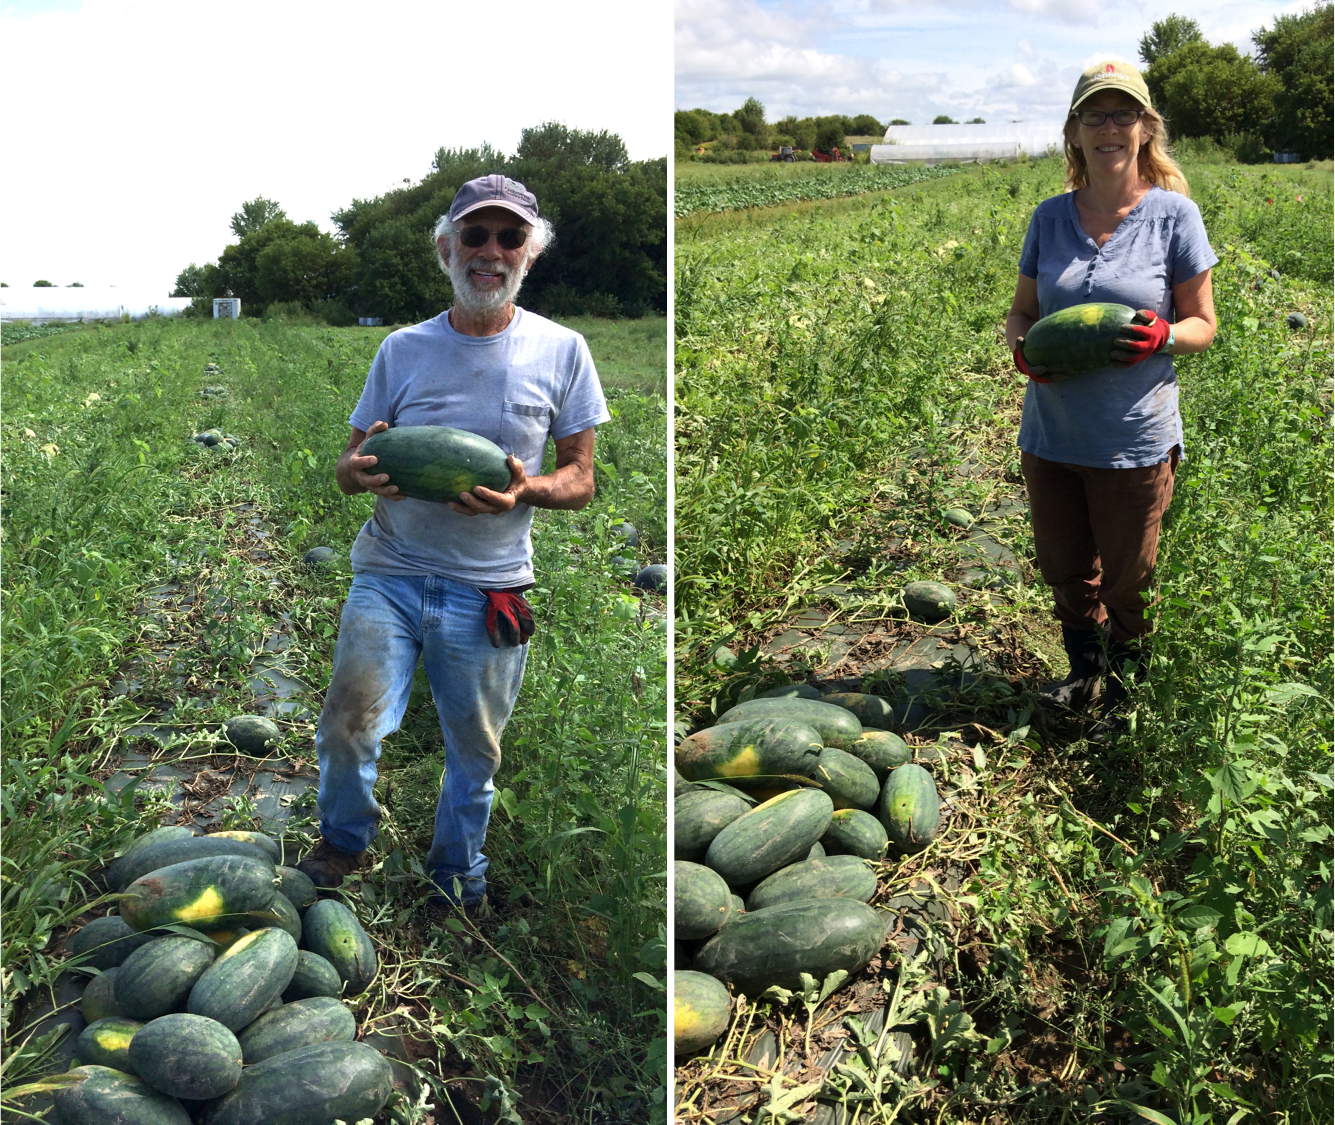
Steve and I picked melons together today, something we do a few times each season and the traditional way to celebrate one’s 20th anniversary. What?? Not everyone celebrates this way? I’m pretty sure 20 years is the “melon anniversary.” “Paper anniversary” for the first year, cotton for the second, etc. We look forward to celebrating our 25th “red pepper” anniversary. Honestly, china and silver are overrated.
It was crazy to get married in late August; we neglect every anniversary. We planned our wedding for August to gather our families in Wisconsin during the summer. It worked well, with a lovely wedding and reception at Folklore Village in Dodgeville. What a beautiful place. The reception was potluck and all our friends brought their best cooking. August was great for the wedding, but now we tend to work right through our anniversary each year. Steve and I will go out to dinner this weekend to celebrate properly, and will be sure to order melon salad. Beth
Farm News and Tomato Update

From our fenceline, this is the view past our neighbor’s prairie and down to the Evansville wildlife area.
Rain continues for us, but not as torrential as last week. We got a mere 1.5 inches this week. Our farm gets wet and muddy but doesn’t flood. There’s good drainage into the broad wildlife area at the northern edge of our farm. We hope you are all faring OK. We watch the flood maps in Madison and across Wisconsin and hope for the best for our friends and CSA members.
This week’s tomatoes are better than last week because of lighter rain. We offered extra slicing tomatoes for sale this week. Our first priority is always to fill the CSA boxes. Once we have 4 or 5 pounds picked for each CSA box, then we can sell extra tomatoes to members. We might have extra plum tomatoes to sell next week. Those are in good shape. Watch for emails from us next Tuesday/Wednesday (Thursday sites) or Wednesday/Thursday (Friday sites).
We are not going to host a tomato upick this summer. First, we need to conserve the tomatoes for the CSA boxes. Second, they are a difficult pick this year. Leave this harvest to the professionals. We’ll try again next season.
Veggie List and Veggie Notes
Week #15, Aug 30/31, 2018
– weekly shares
– green EOW
It’s a salsa box!
Sweet corn, 9 – 10 ears
Watermelon, red (most sites) or yellow (2 sites)
Slicing tomatoes, ~5 lb
Romaine lettuce, 1 medium
Colored bell peppers, 2
Red frying OR Oranos peppers, 2
Zucchini/ squash, 1 small (most sites)
Red onions, 1 or 2
Jalapeno chile (HOT), 1
Cilantro, 1 bunch
Garlic, 1 bulb
Next week’s box will probably contain tomatoes, peppers, zucchini, carrots, onions, Romano beans, and more.
Sweet corn – This Steve’s favorite variety again, “Vision.” Most ears have worms at the tip, following a big moth migration. When corn is likely to have worms, I just cut the tips off the ears before husking. It makes handling the corn more pleasant.
Watermelon – Most sites get a small red watermelon, a variety called “Dark Belle,” bred to produce personal-sized melons. This is a great size for CSA when the boxes are so full. One or two sites get a yellow watermelon instead.
Garlic – The first garlic!
RECIPES
Visit our 2018 Recipe Log or our 2017 Recipe Log or join our Facebook discussion group.
LOCAL THYME/ Comforting Classics
Simmered Tomato and Jalapeño Salsa
Vegetarian Tortilla Soup
Refried Bean and Corn Enchiladas
Tomato, Ham, Cheese Omelette
LOCAL THYME/ Outside the Box Recipes
Spiced Shrimp with Corn Cakes
Watermelon, Corn and Black Bean Salsa
Snapper Veracruz
North African Roasted Vegetable Salad
LOCAL THYME/ Quick and Easy Meal
BLT
Recipes from Lauren
GRILLED VEGETABLES WITH SWEET CORN POLENTA
Serves 2 as a meal or 4 as a side.
Takes 30 minutes.
1 red onion, peeled and cut into 1/2-inch wide slices
2 tablespoons olive oil, divided
1-1/2 teaspoon Kosher salt, divided plus more to taste
1/4 teaspoon freshly ground black peppers
3 red peppers (a mix of fryers and bells is fine)
2-3 tomatoes, cored and diced
2 tablespoons butter
2 garlic cloves, minced
1 jalapeno, seeded and diced
1 cup whole milk
1 cup water
1/2 cup cornmeal
2-3 ears of corn, kernels removed
1 tablespoon maple syrup
1/2 tablespoons red wine vinegar, plus more to taste
1/4 cup chopped cilantro, optional
- Preheat your grill to medium high heat. Alternatively, if you don’t have a grill, preheat the broiler of your oven.
- In a medium bowl combine onion with 1 tablespoon olive oil, 1/2 teaspoon kosher salt and pepper. Toss gently to combine. Place on preheated grill. Also place whole peppers on grill (no oil or seasoning necessary). Grill for 15-20 minutes until onions are charred on both sides and peppers are blackened on all sides. The onions may get done first but probably just 4-5 minutes before.
- Meanwhile, get your polenta going. You can easily walk away from your grilling veggies for 5 minute intervals to do this inside, but if you have a burner on your grill, by all means use that to make the polenta!
- Melt butter in a medium sauce pan over medium low heat. Add garlic, jalapeno and remaining salt. Cook until fragrant and softened, about 5 minutes then add milk and water. Turn burner to medium high and continue cooking mixture until it just begins to get foamy. (This should take about five minutes. Watch the pot carefully at this time since once it gets foamy, the mixture quickly rises to the top of the pan). Remove the pan from the burner and turn it to medium low. Slowly add the polenta to your pot, stirring with a metal whisk as you go. Return to burner and cook for 10 minutes, whisking occasionally. Add corn and cook 5 minutes longer.
- Remove grilled onions to the same bowl you prepped them in. Add peppers once charred and cover bowl with a plate for 5 minutes. Remove skins from peppers followed by tops and sides. Roughly chop the peppers and return to bowl. Add remaining tablespoon olive oil, maple syrup and vinegar. Toss to coat.
- Serve polenta warm with diced tomatoes, and grilled veggies. Sprinkle with cilantro if using. Taste and adjust flavors as desired. I added a little more balsamic and salt.
.
TOMATO PIE
Takes 2 hours (a little more if making the crust from scratch)
Serves 4-6
1 batch favorite store-bough pie crust (or make your own; my favorite tomato pie crust is here)
4-5 pounds tomatoes
2 tablespoons butter
1 red onion, sliced
4 garlic cloves, minced
1/2 teaspoon kosher salt
1/4 teaspoon freshly ground black pepper
1/2 cup mayonnaise
1-1/2 cups shredded havarti (or other favorite cheese to pair with tomato; something simple like cheddar or swiss would work just fine)
1/4 cup finely grated Parmesan
1 teaspoon dried thyme
3 pieces cooked, thick-cut bacon
1. Preheat oven to 475 degrees.
2. If making your crust from scratch, get this going first so it has plenty of time to chill in the freezer. If not, hop to step 3.
3. Core and cut tomatoes into 1/4-inch slices. Lay tomato slices on two large baking sheets so that they overlap slightly but are mostly in a single layer. This may take four pounds of tomatoes or it may take five depending on how thick your slices are. Drizzle with olive oil (probably a tablespoon or two for both pans) and sprinkle with salt and pepper. Roast in preheated oven for 45 minutes until the tomatoes look dehydrated and most of the liquid has evaporated.
4. Then, work on preparing your filling. In a large saute pan, melt butter over medium heat. Add onion and saute for five minutes until softened. Add garlic and continue cooking for 20 minutes until onions are beginning to caramelize.
5. In a medium bowl, combine mayonnaise, havarti, parmesan, thyme and bacon. Stir until smooth. Once onions are done cooking, add those to the mix. Stir to combine.
6. By now your tomatoes should be done cooking. Remove them from the oven and reduce the temperature to 375 degrees. Roll out the crust and place in a 9 or 10-inch pie pan. Place aluminum foil and pie weights (or rice or dried beans) inside and bake for 15 minutes.
7. Remove crust from oven. Pour onion mixture over the bottom. Add sliced roasted tomatoes and bake for 45- 55 minutes until the crust is golden. Let cool at least 5 minutes before devouring.
.
Week #14, August 20/21, 2018
- On: August 22, 2018
- 0
Weather report
Occasionally, I ask Steve what information he’d like to share in the newsletter. Without fail, he says “the heat wave,” “how wet it is,” or “what a windy week.” Weather is a big deal for any farm. I stopped writing about weather in the newsletter after a few years when it became monotonous. Also, I try to obsess less about the weather than Steve does. This week is different because of the intense rain on Monday.
We are fine and the farm is fine. Thank you to everyone who expressed concern. We were lucky (!) to get just 3 inches, combined with Friday’s rain for a total of 6 inches. That left our fields muddy but undamaged. We are usually grumpy about 6″ but that’s nothing compared to the 11″ and 15 ” that fell in Middleton and Cross Plains respectively. The news footage was terrible. Tipi members in that area, we hope you are OK. We’re hoping for the best for our farmer friends west of Madison too. Word is still trickling in how everyone fared.
Heavy rain takes a toll. Repeated rain takes a toll. It’s worth discussing how this summer’s extended wet weather has affected the farm. We’ve had wet spells before but this is a genuinely wet summer. Too much rain has lasting effects.
Too much rain = weeds. The fields are too wet to cultivate or hoe. Our fall crops are getting so, so weedy. Steve is anxious about recovering control of those fields.
Too much rain = disease. Oh, the tomato plants are not happy. In messages with farmer friends yesterday, everyone was sad about their tomato fields. Leaf diseases are rampant. Enjoy this week’s tomatoes because we don’t know how long we’ll have them. Weather like this shortens a tomato season. There’s not much we can do about it. We really need the rain to stop before it causes trouble with our fall brassica crops (broccoli, cabbage, cauliflower, greens). They look fine so far but wet weather causes problems as the nights get cooler in fall.
Too much rain = rot. We harvested tomatoes a little underripe this week because the ripest fruits split. We also picked bell peppers less ripe than usual. If water sits in the sunken area of a pepper crown, there’s too much risk it will go bad. It’s better to pick the pepper early. Storage life can be shorter too because the fruits are fragile and loaded with water. It’s not a disease problem, but some vegetables are less flavorful if they mature during wet weather. Tomatoes in particular can taste watery and diluted. They have their best, concentrated flavor under sunny, dry conditions.
What’s the upside? What’s done well this season? It has been a ridiculously productive summer for every crop in the cucurbit (squash) family. That’s muskmelons, watermelons, cucumbers, zucchini, etc. I was concerned about overwhelming you with cucumbers but kept sending them. That’s the CSA deal, right? When a crop thrives, we all share in the bounty. We hope the winter squash and pumpkins do as well. We’ll find out next month. Beth
Irony

Our daughter worked at a Chocolate Shoppe ice cream shop this summer. (She also interned at Olbrich Gardens.) Check out her work t-shirt. That gave us such a laugh.
#2 Grade Red Peppers
I write about pepper grading every year. Returning members can say “yeah, yeah” and skip ahead. New members, please read.
Many of the red bell peppers we send in the CSA boxes will be our #2 grade. We do this to avoid waste and to deliver good value to our CSA members. The #2 grade peppers are excellent eating quality, but are not quite pretty enough to sell to stores. As a result, we place a much lower value on these peppers. This allows us to provide generous amounts of peppers over the course of the season. We feel this is a good exchange, even if it means you occasionally open a pepper and find that it needs trimming. Here are the reasons that peppers are downgraded from #1 grade to #2 grade:
- They may have a minor blemish, or
- They may have minor insect damage, or
- They may be very ripe and beginning to wrinkle. (These are especially sweet and delicious as they are fully ripe. These cannot be sold to stores because their shelf life is short. You will find that the texture is less crisp than a #1 grade pepper, but the flavor more than makes up for it.)
- They might be partially red and partially green.
- Others are just too small.
The eating quality is fine (or excellent) for all these #2 peppers. We throw away ALL peppers that we suspect have rot inside (although one may occasionally slip through in either #1 or #2 grade.)
This week’s peppers
This week’s peppers are a mix of #1 and #2 grade. Everyone receives some of the sweet peppers above, for a total about four peppers.
– Frying peppers are thin-walled with low moisture, which allows them to fry readily in hot oil. They are so fragrant! Identify this week’s frying peppers by their slender shape and color (red or yellow).
– Oranos are sweet snacking peppers. They resemble frying peppers but don’t fry as well. If you get an Orano, just eat it as a snack. The flavor is excellent and they have few seeds. All Oranos peppers are orange (or orange and green.)
– Bell peppers are thicker-walled and juicy, great for eating raw in salads or roasting on the grill. This week’s bells are mostly red, but a few sites will get an orange or yellow bell.
Veggie List and Veggie Notes
Week #14, August 20/21, 2018
Weekly, purple EOW, sun SMP
Sweet corn, 9 – 10 ears
‘New Orchid’ orange watermelon
Tomatoes, plum, ~1.6 lb
Tomatoes, slicing, ~3.3 lb
Cucumber, 1
Silver Slicer cuke, 1
Colored bell peppers, 2
Frying peppers OR Orano, 2
Yellow onion, 1 or 2
Cilantro, 1 bunch
Next week’s box will probably contain melon, peppers, tomatoes, onions, hot pepper, garlic, an herb and more.
Sweet corn – This week’s variety is ‘Fabulous.’ The seed breeders are not modest but they don’t need to be. This is a very excellent corn variety. We got a lot of positive feedback about last week’s corn. This batch is just as good, maybe better.
‘New Orchid’ watermelon – This is my (Beth) favorite type of watermelon, with beautiful sherbet orange color, great flavor and texture.
Tomatoes – OK, we’ve hit peak tomato season. This week, more tomatoes than usual are slightly underripe; the ripest tomatoes split after the heavy rain.
Storage: Store at room temperate on your kitchen counter. Watch closely. If soft spots develop, eat quickly.
Other storage: If there are more than you can use, just freeze the extras. We freeze plum tomatoes intact and whole. When it’s time to use them, we run the frozen tomatoes under tepid water and the skins slip right off. This should work with slicers too. It’s OK to cut up either type and freeze in a bag or container to save freezer space.
Yellow onion – This is the first storage onion of the season. These have lower moisture than sweet Walla Wallas, so these will fry nicely. Storage: please refrigerate this week’s onion to be sure it stays in good shape.
RECIPES
Visit our 2018 Recipe Log or our 2017 Recipe Log or join our Facebook discussion group.
LOCAL THYME/ Comforting Classics
Watermelon Cucumber Feta Skewers
Corn, Pepper and Tomato Flatbreads
Black Beans and Yellow Rice
Chicken Cacciatore
LOCAL THYME/ Outside the Box Recipes
Watermelon Vinaigrette
Mexican Corn Salad
Stuffed Pepper Soup
Tomato Salad with Lime and Herbs
LOCAL THYME/ Quick & Easy Meal
Quinoa Salad with Watermelon, Cucumber and Cilantro
RECIPES FROM LAUREN
SUMMER TIME PIZZA
Serves 2-4.
Takes 30 minutes (if using store-bought or already prepared dough; takes 90 minutes if making dough from scratch).
1 batch favorite pizza dough
1 large red bell pepper
2 tablespoons olive oil, divided
3/4 cup whole-milk ricotta (or tomato sauce or pesto if you prefer)
2-3 tomatoes, cored and sliced
1/4 yellow onion, thinly sliced
2 ears corn, cooked however you find easiest (in a pot of boiling water for 3 minutes, on the grill or in the microwave)
1 cup shredded mozzarella
1/2 teaspoon Kosher salt
1/4 teaspoon freshly ground black pepper
1/4 teaspoon red pepper flakes
2-3 tablespoons roughly chopped cilantro
- If making your dough from scratch (and it isn’t already prepped) make that first and get it rising.
- Preheat the broiler of your oven to high. Place a small piece of parchment paper on your pizza pan. Add red pepper and roast under high heat of broiler for 10-12 minutes, rotating occasionally until all sides are blackened. (This can also be done on a grill if you are using it for some other reason).
- As soon as the peppers are done in the oven turn off the broiler and preheat the oven to 525 degrees (or as hot as the oven will go). Place your pizza pan in the oven immediately (even as it preheats).
- Let red pepper sit for 5 minutes outside of the oven and then peel off skin as best you can. Remove the seeds from the pepper and slice thinly.
- Roll out your risen pizza dough. Remove the pan from the oven and quickly drizzle with a tablespoon of oil. Add pizza dough. It hopefully will sizzle a bit. Using a spatula, spread ricotta over dough followed by tomatoes, peppers, onions and sweet corn. Add mozzarella then sprinkle with salt, pepper and red pepper flakes. Drizzle with remaining tablespoon oil and then place in hot oven. Bake for 10-13 minutes until crust begins to turn golden brown. If the cheese is nicely browned, perfect! If not, feel free to turn the broiler back on for just a couple minutes.
- Serve warm with a sprinkle of cilantro and more salt to taste.
.
WATERMELON GAZPACHO
Adapted slightly from Bon Appetit
Serves 2-4.
Takes 25 minutes (excluding time to chill gazpacho).
4 cups cubed watermelon, seeds removed
2 pounds tomatoes, cored and roughly chopped
1 cucumber, peeled, seeded and roughly chopped
1/2 Silver Slicer, peeled, seeded and roughly chopped
1 red frying pepper, seeds removed and roughly chopped
2 tablespoons olive oil
2 tablespoons Sherry vinegar (or red wine vinegar)
Kosher salt
Freshly ground black pepper
For serving:
1/4 cup almonds, toasted and coarsely chopped
2 ounces feta, crumbled
1/4 cup Greek yogurt
3 tablespoons whole milk
1 cup watermelon (cut into 1/2-inch pieces)
1/2 silver slicer, seeded, peeled and cut into 1/2-inch pieces
More olive oil
More Kosher salt
More freshly ground black pepper
- Puree watermelon, tomato, cucumber, red pepper, oil, and vinegar in a food processor or blender until smooth.
- Transfer to a large bowl; season with salt and pepper. Cover and chill for at least 1 hours before serving.
- To prepare topping, combine feta, yogurt and milk in a small bowl. Whisk with a fork until combined. It won’t be smooth because of the feta; that’s how it should be so don’t stress.
- Serve chilled gazpacho with a dollop of feta mixture, some almonds, some cubed watermelon and cucumbers, a drizzle of olive oil and more salt and pepper.
.
Week #13, August 16/17, 2018
- On: August 15, 2018
- 0
Badger!
I looked up and found a curious badger watching me. I was lucky to catch a video snippet.

The badger has taken up residence in our sand pit, near the place I found a badger living last year. Apparently it’s a prime spot! The sand pit walls are steep and sandy but stabilized by young trees growing at the rim. The wooden boards in the photo cover a cubby that our son Ari dug as a secret hiding place years ago.
This sand pit has been a wonderful place for our family. It was dug when the previous owners sold sand for road construction. Our kids spent countless hours digging in their own enormous sand box, hunting for fossils, sledding down the slopes or having bonfires with friends. Steve still digs sand to fill farm potholes.
Over the years, it’s become wilder as the surrounding area grew up with shrubs and trees. The kids don’t play there any more. I’m the only visitor, there to tend prairie plants I’ve seeded on the walls. Badgers, skunks, raccoons, deer and farm cats all visit the sand pit now. (I have a trail camera.) It’s been interesting to watch this develop on our small farm, especially because the pit is quite close to farm buildings.
The facial markings for this year’s badger are different enough from last year’s resident that I think it’s a new visitor. I suspect it has lived in the sand pit all summer, as I’ve seen extensive tunneling and characteristic prints. I didn’t mention the tunnels to Steve. One weekend, he spent hours hauling away sand by tractor. The badger didn’t seem to care; it stayed in residence and as active as ever.
I doubt I’ll see this one again in person. Last year’s sighting was prolonged. The badger popped its head out to watch me for about 3 minutes. I returned to look for it every day but never saw it again. Our outdated trail camera captured a few blurry images but that’s all. This year’s encounter was shorter. I’ll return to look for it (from a distance!) but might not see it again. It’s time for us to get a better trail camera, Beth
Veggie List and Veggie Notes
Week #13, August 16/17, 2018
Weekly shares & green EOW
Sweet corn, ~9
Carrots, 2 lb
Muskmelon, 1
Tomatoes, plum, ~2.3 lb
Tomatoes, slicing, ~1.7 lb
Cucumbers, 2 – 3
Silver Slicer cukes, 2 or 4
Red bell &/or frying peppers, ~3
Walla Walla onion, 1 or 2
Basil, generous bunch
– A few sites get an eggplant or a handful of pickles.
Next week’s box will probably contain tomatoes, peppers, melon, cucumbers, an herb and more.
Sweet corn – This variety (named “Enchanted”) is new to us. Organically-raised sweet corn seed is rare so we were glad to try it. Unfortunately, too many husks strip off as we pick the corn. See photo. Handle it gently to avoid bruising since some ears have lost protective husks.
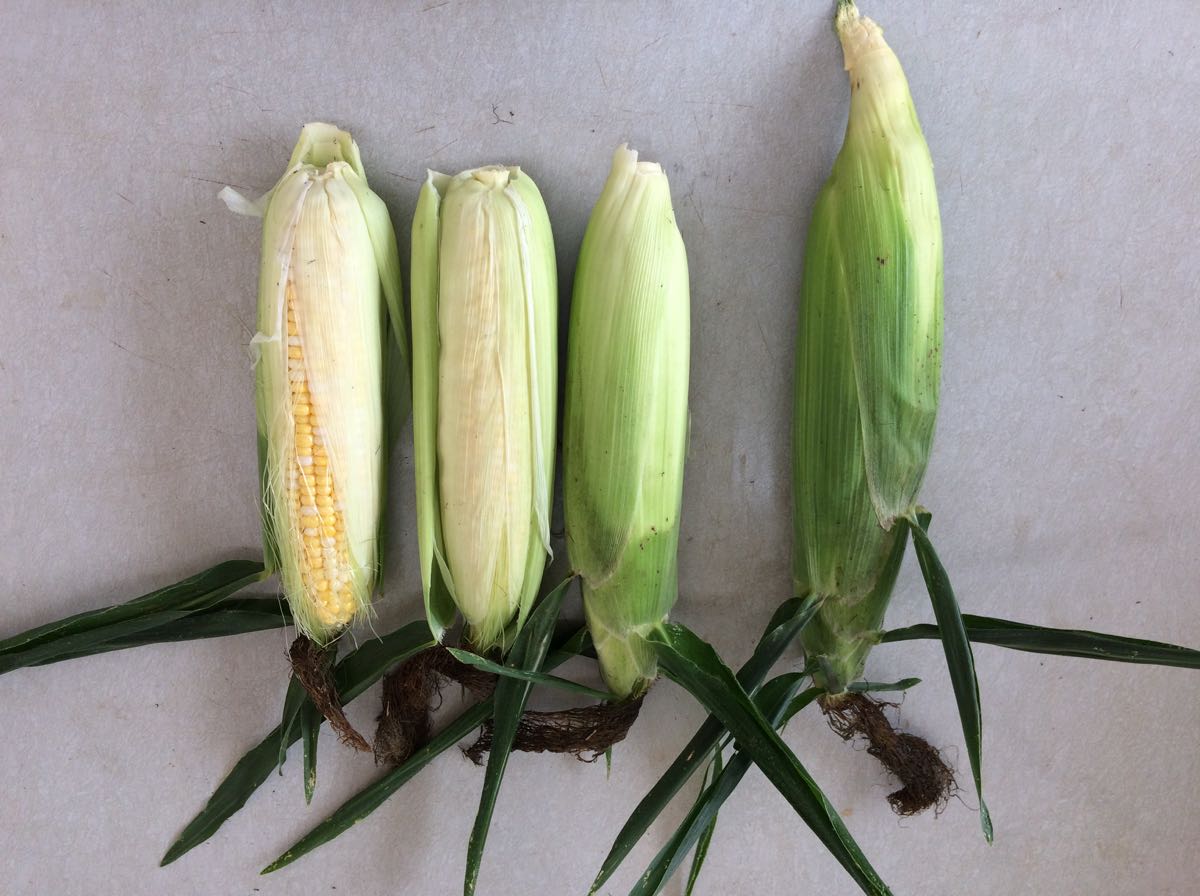
As we snapped off the stems, husks pulled away on some ears. See the two ears on right. We can’t leave the stems on or the corn doesn’t fit in the CSA boxes. The ear on the left isn’t snapped properly and you can see how much longer it is. We will not be growing this variety again.
RECIPES
Visit our 2018 Recipe Log or our 2017 Recipe Log or join our Facebook discussion group.

LOCAL THYME/ Comforting Classics
Orecchiette with Tomato Concasse
Prosciutto and Melon
Tomato, Cucumber and Corn Panzanella
Shrimp or Cashew Biriyani
LOCAL THYME/ Outside the Box Recipes
Basil Oil Marinated Caprese Salad
Orange Blossom Water Scented Melon with Basil
Sweet Corn and Basil Lasagna
Cinnamon Carrot Pie
LOCAL THYME/ Quick & Easy Meal
Black Bean, Shredded Carrot and Pepper Burrito
Recipes from Lauren
LOW-MAINTENANCE FREEZER LASAGNA
I know lasagna may not scream summer, but hear me out. I love making lasagna this time of year, when abundance can be overwhelming, for a lot of reasons. First, it is a really effective way to “deal with” several vegetables in one massive dish that will feed your family for several days. I think a hearty batch of lasagna can round out your week when most of what you are eating are hearty vegetable side dishes and loads of fresh delicious simple salads.
However, what I really recommend folks do is make this lasagna as a simple way to preserve the bounty inherent in August for later in the year. I love making this recipe and freezing it before the baking step (you can freeze in Pyrexes or those nice aluminum pans from the grocery store; either can go straight into the oven) and cooking it up any night I run short on time and don’t know what to make for dinner, or (even better) I wait until December when local veggies are less plentiful and I am really craving summer flavor. Lauren.
Makes 6 hefty servings
Takes 1 hour, 50 minutes
1 tablespoon + 1 teaspoon Kosher salt, divided
8 ounces lasagna noodles
1 pound ground beef or Italian sausage (vegetarian? substitute 1-2 cups of cubed eggplant!)
1 onion, diced
3-4 carrots, peeled and diced
2 red peppers, diced
1-2 pounds tomatoes, cored and roughly chopped
16 ounces cottage cheese or ricotta
1 whole egg
1 teaspoon dried parsley
1/2 teaspoon dried basil
1/2 teaspoon dried oregano
4 cups favorite pasta sauce (homemade is great; but the jarred stuff works too!)
3 to 4 cups shredded mozzarella cheese
Ω cup Parmesan cheese
- Preheat oven to 350 degrees F (if baking lasagna right after assembling) and grease 9◊13 baking dish.
- Bring a large pot water to a boil on the stove top. Add 1 tablespoon Kosher salt. Cook pasta according to package directions and drain.
- Combine meat with onion, carrots, peppers and tomatoes in a large skillet. Sprinkle with 1/2 teaspoon Kosher salt. Cook over medium heat for 10-15 minutes until carrots get a little caramelized and meat is fully cooked.
- Mix cottage cheese (or ricotta), egg, remaining 1/2 teaspoon Kosher salt and dried herbs in a large bowl.
- Spread approximately one cup of sauce on the bottom of baking dish. Place a third of the noodles on top of the sauce. Add another cup of sauce followed by half of the meat mixture, half of the cottage cheese (or ricotta) mixture, and a third of the mozzarella. Top with another third noodles, another cup of sauce, and the rest of the meat mixture and cottage cheese mixture. Cover with another third of the mozzarella followed by the rest of the noodles and sauce. Top with the remaining mozzarella and Parmesan. The lasagna can be refrigerated or frozen at this point. Let lasagna defrost in the refrigerator for a day prior to baking.
- Cover with foil. Bake at 350 degrees for 1 hour. Increase baking time if lasagna is cold. Remove foil and bake uncovered for 5-10 minutes for top cheese to brown (or place under the broiler for a minute or two). Let stand 15 to 20 minutes before serving.
.
TOMATO & CORN PANZANELLA
Adapted from Six Seasons
Honestly, the corn, tomatoes, Walla Wallas and cucumbers are perfect after the second step. These fresh veggies with a tough of vinegar, salt and pepper are a dream snack so feel free to stop right there. But if you’re feeling a little fancier go a bit further and follow the recipe for the torn croutons from Joshua McFadden’s great Six Seasons cookbook and add the toasted walnuts, Parmesan and basil! You’ll be thrilled either way. Lauren.
Serves 4-6 as side or 2-3 as a meal
Takes 30 minutes if making the croutons, 15 minutes if not
4 ears corn, shucked
1-2 pounds tomatoes, the more shapes, sizes and colors the better, cored and sliced or cut into wedges (or some of both)
1/2 Walla Walla onion, thinly sliced
2 cucumbers or silver slicer, cut in half lengthwise, seeded and sliced
1/4 cup white wine vinegar
1 teaspoon Kosher salt
1/4 teaspoon freshly ground black pepper
1 cup toasted walnuts
1/2 cup fresh grated Parmesan
3 cups torn croutons (recipe below)
1/4 cup olive oil
1 handful basil leaves, cut into a chiffonade
- Bring a large pot of water to a boil. If making the torn croutons, also preheat your oven to 400 degrees at this time.
- Once water is boiling, add corn to pot and cook for 4 minutes. Once finished cooking, drain and rinse under cold water until cool enough to handle. Using a knife, cut kernels of corn off ear.
- Place corn in a large bowl with tomatoes, onion and cucumber. Add vinegar, salt and pepper. Toss gently with a spatula to combine.
- Add walnuts, Parmesan and torn croutons and toss again. Drizzle with olive oil and sprinkle with basil. Serve chilled or at room temperature.
.
Torn Croutons
1/2 loaf favorite fancy bread (6-8 ounces), I used Pepitas Polenta from Madison Sourdough
2 tablespoons olive oil
1/2 teaspoon Kosher salt
1/4 teaspoon freshly ground black pepper
Tear loaf into bite-size pieces. The pieces can and should be uneven to allow for different amounts of soft and crispy pieces. Add pieces to a baking sheet, drizzle with olive oil and sprinkle with salt and pepper. Bake for 15 minutes until crispy on the edges but not cooked all the way through.
.
Week #12, August 9/10, 2018
- On: August 08, 2018
- 0
Small victory
We have beautiful basil for you, despite the dreaded Japanese beetles. I’ve spent the last two weeks plucking beetles from our new basil planting (among a few other jobs of course.) As I explained last week, if you trap the first Japanese beetles to arrive in an area, you can discourage other beetles from congregating. Each morning, I knock as many as I can into a pail of soapy water. Morning is best, while they are still sluggish.
A member said this sounds like a lot of work. Nope; it’s an easy, quiet job. We plant the later basil patches near the buildings, where they are convenient for this small job. If we can keep ahead of the beetles, and if downy mildew doesn’t blow into WI, then maybe I will have some extra basil to sell. We’ll see. Beth

There’s still some damage on the leaves but it’s not bad. The most beetles I’ve caught in one day was about 100. The photo above was a better day.
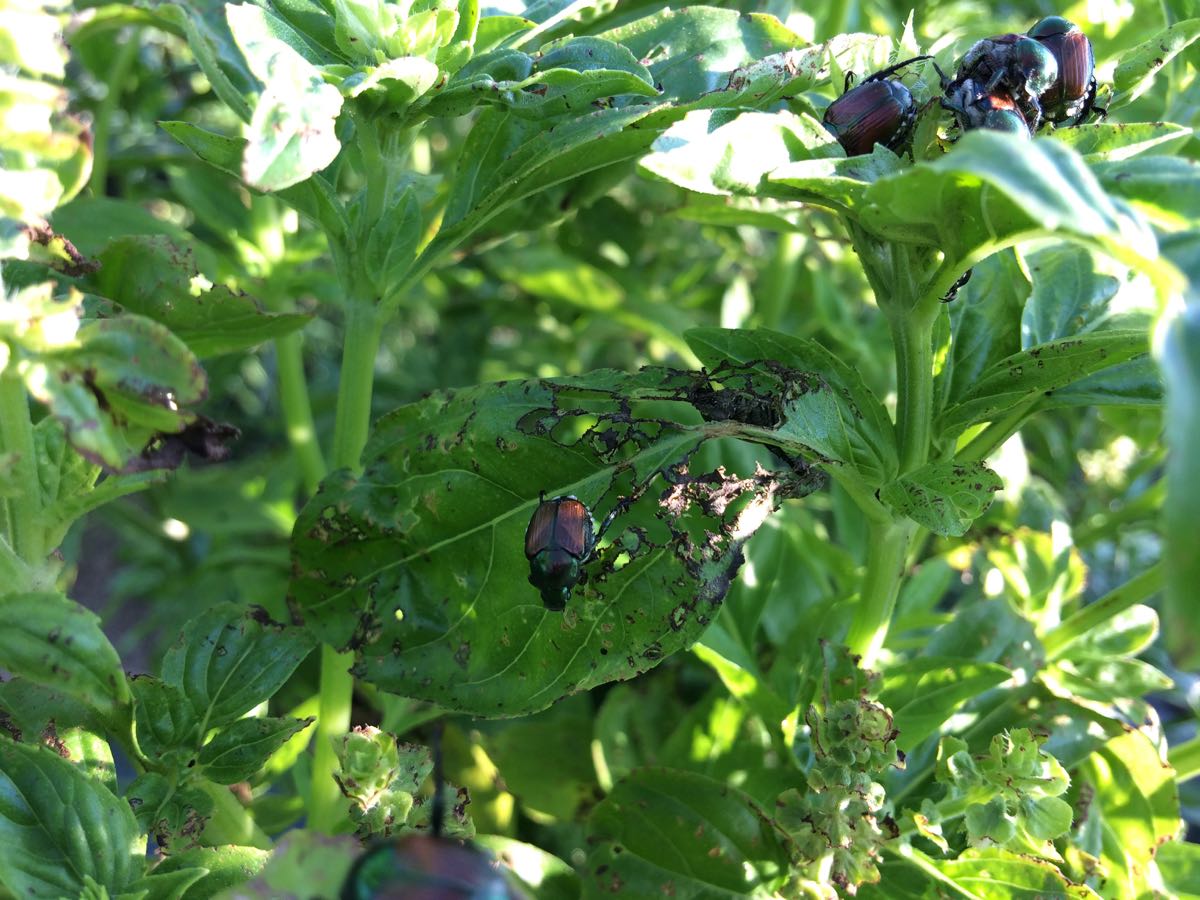
Japanese beetles are pretty but the damage is not.
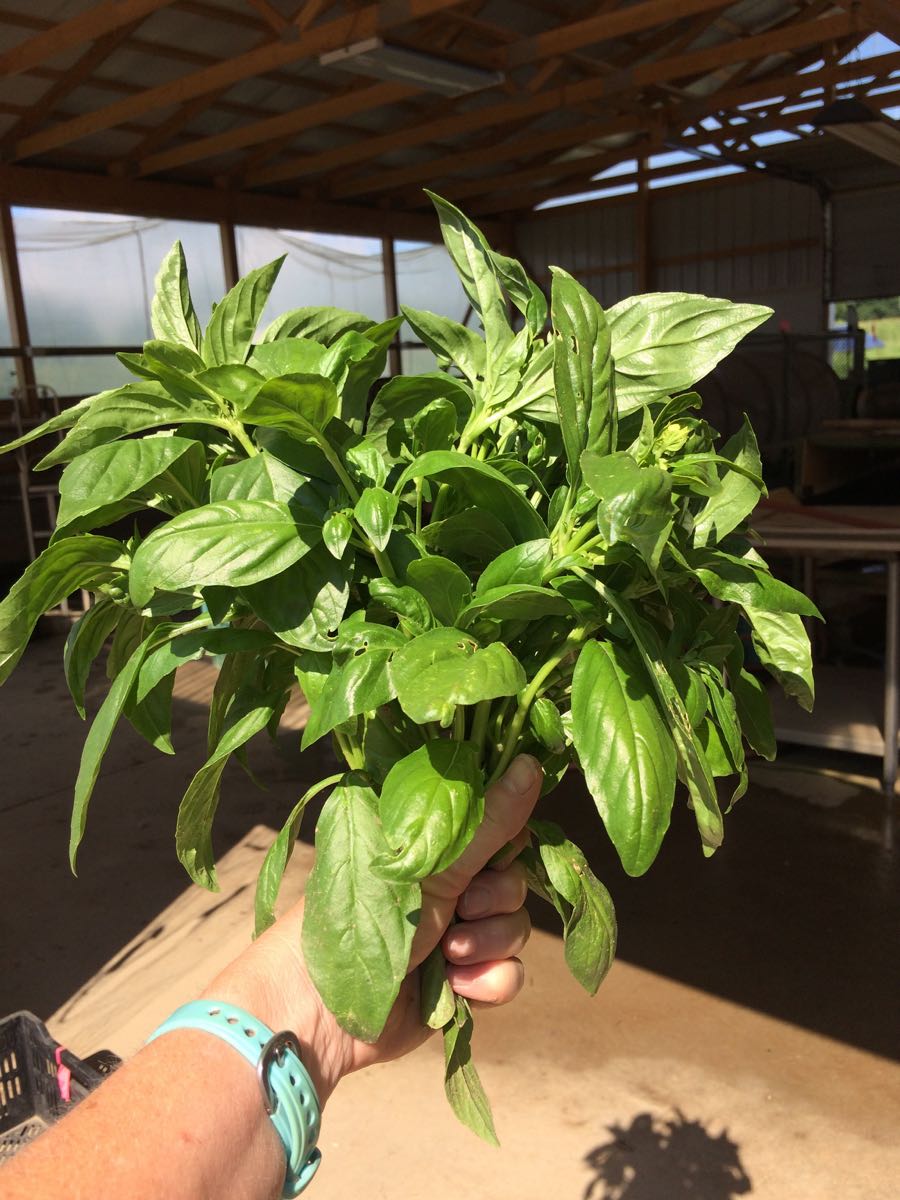
This week’s basil!
Veggie List and Veggie Notes (week #12, Aug. 9/10, 2018)
– weekly shares
– purple EOW
– moon sampler
Plum & slicing tomatoes, ~2.5 lb
Red watermelon
Cucumbers, 3
Silver Slicer cucumbers, ~3
(Pickles, a handful, maybe)
Lettuce
Red frying or bell peppers, 2 – 3
Green beans, 0.7 lb
Walla Walla onion, 1 – 2
Jalapeno chile (HOT), 1
Basil, 2 – 3 husky sprigs
There might be 1 – 2 yellow summer squash.
– One site gets eggplant.
– Sites that didn’t get Sun Jewel melon last week get them this week.
Next week’s box will probably contain tomatoes, peppers, sweet corn, cucumbers, carrots, basil and more.
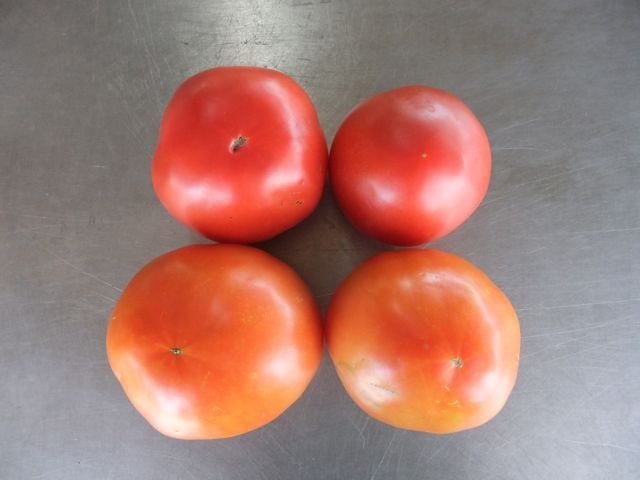
Ripe (top) and less ripe tomatoes (bottom).
Tomatoes – Our large tomato fields are ready. The plants are healthy and the tomato quality is very good. We will pack a mix of ripe and less-ripe tomatoes so you can stretch them through the week. The top tomatoes in the photo are ready to eat. The bottom tomatoes need to ripen at room temperature for a few days. Put on your counter or keep in a brown paper bag.
Storage: Tomatoes retain their best flavor and texture when stored at room temperature, no lower than 55oF. However, you should refrigerate your tomatoes if they are fully ripe and you don’t expect to eat them right away. It is better to sacrifice a little flavor and texture than lose your tomatoes to rot. Also, fully-ripe tomatoes are less sensitive to chilling injury.
Red watermelon – Uncut watermelons can be held at room temperature for one week. Refrigerate after cutting.
Basil – Have fun with this nice bundle of basil. Freeze any that you don’t expect to use soon. Chop by hand (see below) or in a food processor, mix with olive oil and press into a freezer-proof container. It helps if the basil is dry. I choose a container that results in a 1/3 to 1/2 inch layer of basil. I have sets of these containers, and nest an empty one on top of the basil layer, to press it in place while freezing. You can usually break frozen chunks off a sheet of that size as needed.
Sun Jewel melons (for some sites) – We’re sending Sun Jewel melons to the sites that didn’t get them last week. This is a sweet, crisp melon that tastes like a very good honeydew. It’s not a spaghetti squash although it looks just like one! We’ve figured out how to judge ripeness of this new melon.

If the stem end of your melon has detached cleanly, or if the melon has small cracks, then it is ripe and ready to eat. If the stem is intact (rightmost photo) then ripen it on your kitchen counter for 1 to 3 days. When ripe, it will smell faintly sweet, but not as fragrant as a ripe muskmelon. I’m soliciting feedback in our Facebook discussion group to find out if you all like this new melon. That’s how we’ll decide whether to grow it again. Thanks for any feedback!
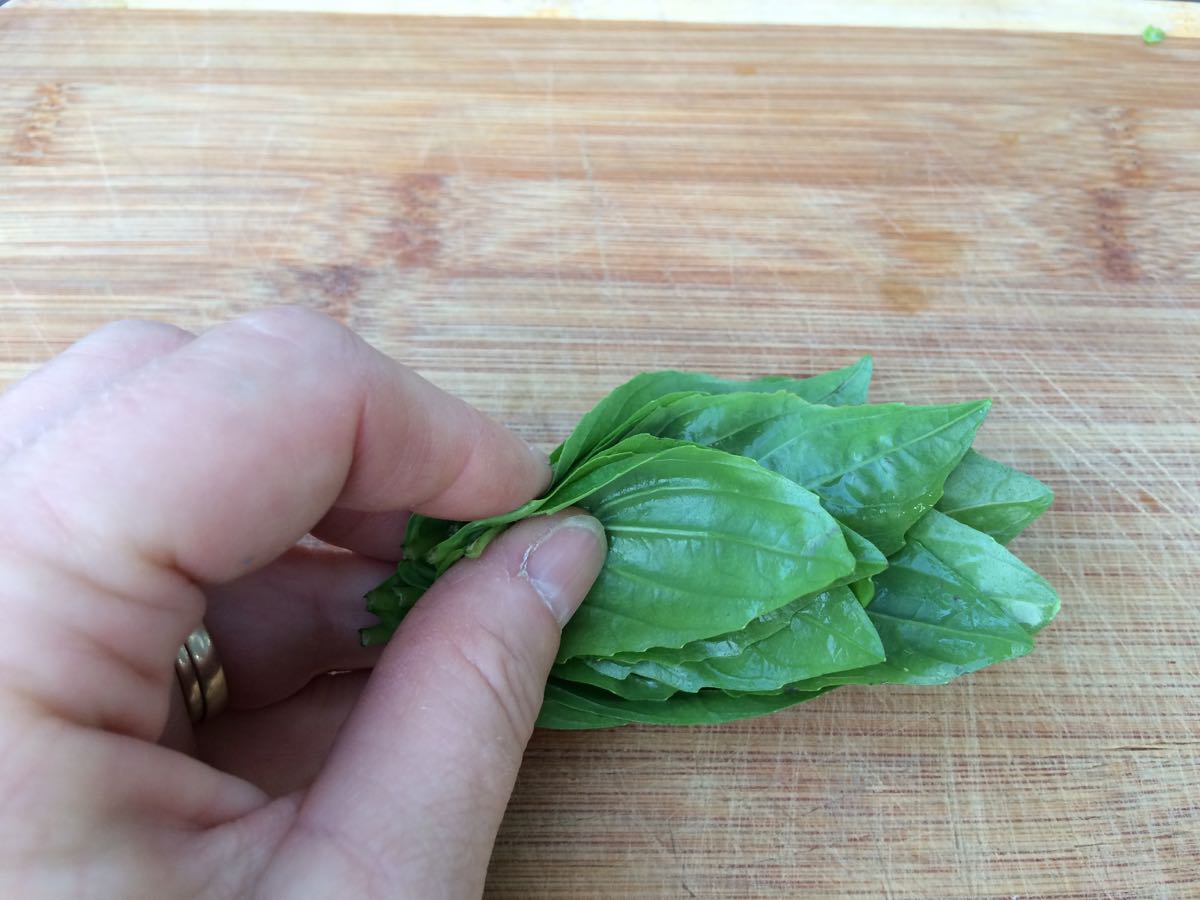
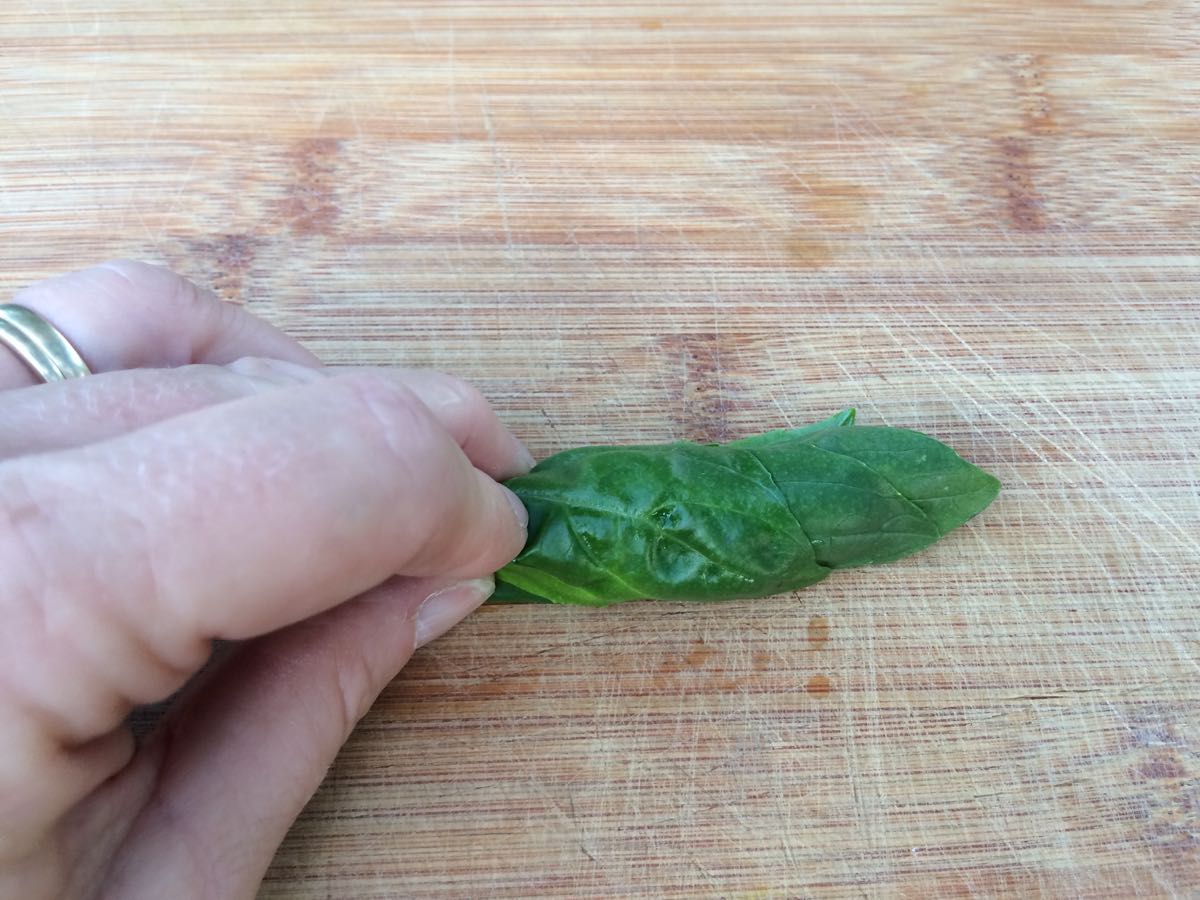
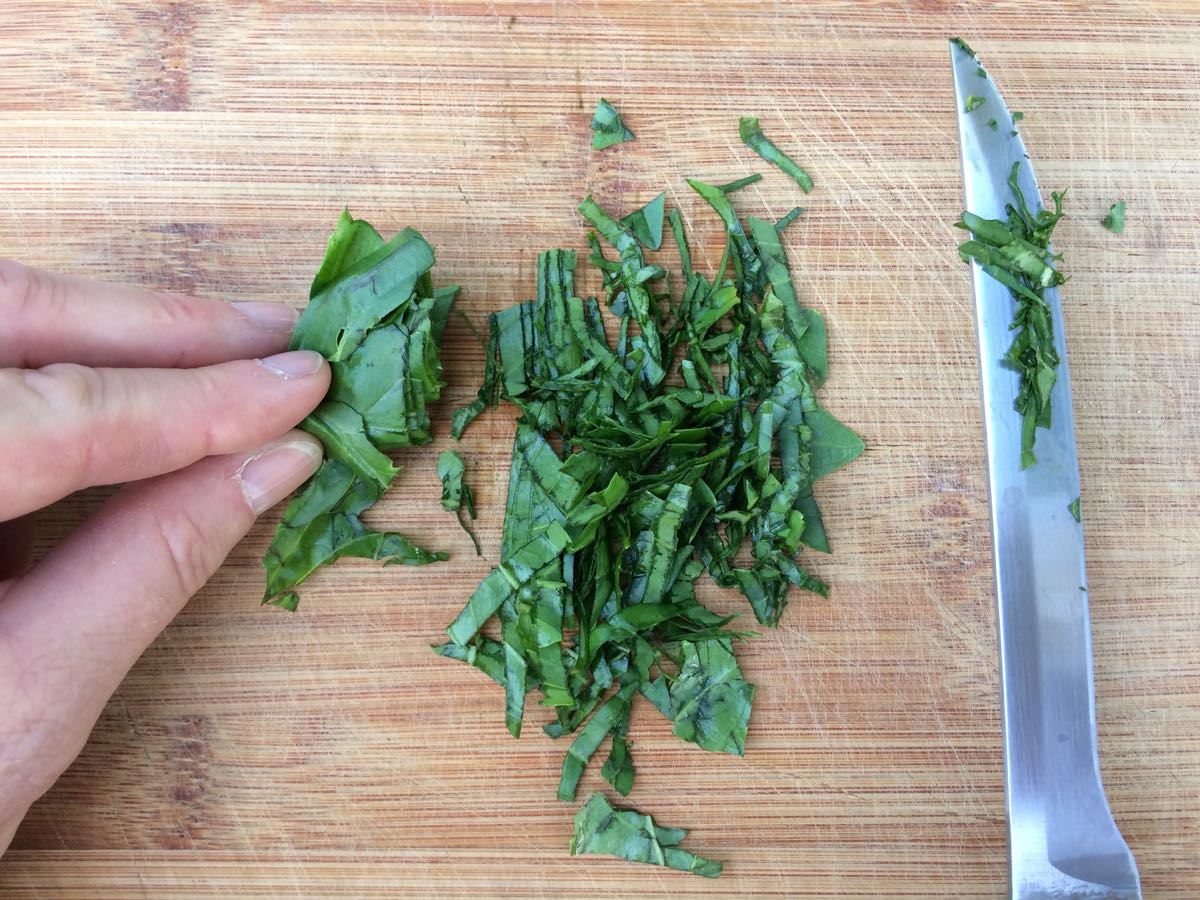
Basil chiffonade
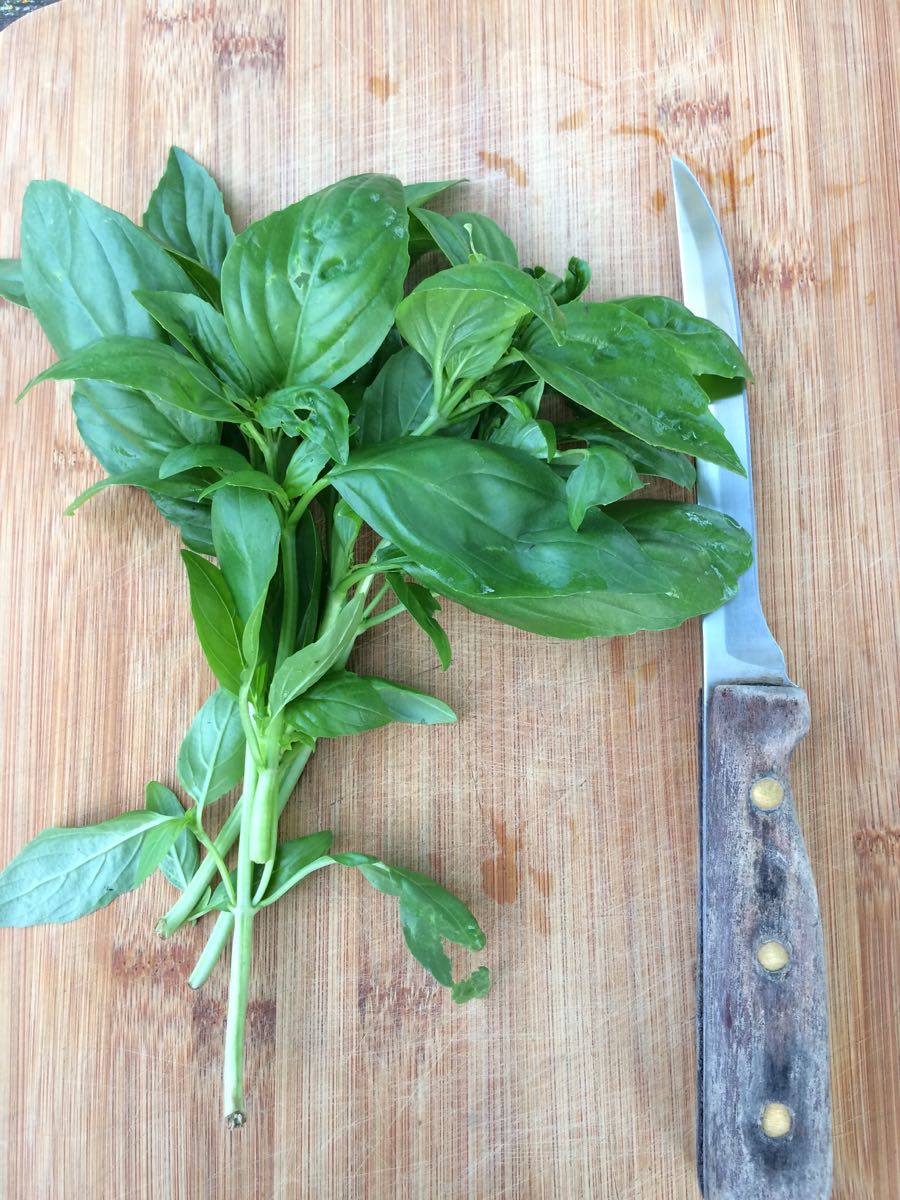
A chiffonade is the best way to cut any flat leaf into ribbons. It works for basil, works for kale. Wash the leaves. Remove the mid vein from kale, collards and chard but not basil. Stack the leaves, then roll the stack like a cigar. Slice across the roll with a sharp knife. If the leaves are large, e.g. kale, cut across the resulting pile for the size ribbons you want. No need to do that with basil! For basil, it helps to start with dry leaves. That doesn’t matter much with the larger kale, chard or collard leaves.
RECIPES
Visit our 2018 Recipe Log or our 2017 Recipe Log or join our Facebook discussion group.
LOCAL THYME/ Comforting Classics
Basil Oil
Gazpacho de Sevilla
Marinated Tomato and Cucumber Pasta Salad
Roasted Pepper Salsa
LOCAL THYME/ Outside the Box Recipes
Basil Salt
Hot Process Spiced Pickle
Rosalie’s Padella
Teriyaki Noodle Stir Fry with Peppers and Green Beans
LOCAL THYME/ Quick and Easy Meal
Bacon, Lettuce and Tomato Sandwiches with Basil Mayo
Recipes from Lauren
WATERMELON, CUCUMBER & AVOCADO SALAD
Adapted every so slightly from Heartbeet Kitchen
If you are anything like me then you get a little tired of melons after the first couple and get wondering if there is anything fun you can do with it. I made a cocktail with all these ingredients first (watermelon, cucumber, jalapeno, and basil alongside tequila, lime juice and honey) and although absolutely incredible tasting, the pink watermelon juice and green cucumber jalapeno juice combined into a color that was truly unappetizing so I changed course completely. This salad, though slightly less fun then a cocktail, is as beautiful as it is delicious so I really hope you enjoy it!
Oh and if you don’t have watermelon, just leave it out. The cucumber, avocado, basil and jalapeno still work wonderfully together though it will obviously be a much smaller salad. Lauren
Takes 15 minutes.
Serves 2-4.
3 cups uniformly cubed watermelon
1 silver slicer cucumber, cut in half, seeded and very thinly sliced
1 ripe avocado, scooped into small balls with a melon baller (or if you don’t have a melon baller, just cut them into a large dice)
1 jalapeno, seeded and minced
1 lime, juiced
3 tablespoons olive oil
2 tablespoons freshly chopped basil
Salt and pepper to taste
Prepare watermelon, cucumber, avocado and jalapeno and place together in a large bowl. Squeeze lime over the top and gently stir. Add olive oil, basil and a small sprinkle of salt and pepper. Stir gently, taste and adjust seasonings to your liking. Serve immediately.
.
GYRO BURGERS
Serves 6-8.
Takes 30 minutes.
3 red peppers (a mix of bell and fryers is fine), cores and seeds removed but left in large, easily grill-able pieces
Olive oil
Salt and pepper
2 pounds ground beef (or lamb)
3 tablespoons dried minced onion
2 teaspoons Kosher salt
1 teaspoon granulated garlic
4 ounces feta, crumbled
Tzatziki Sauce:
2 cucumbers (could be regular or silver slicers)
1 cup full-fat Greek yogurt
1/4 cup olive oil
2 tablespoons white wine vinegar (or lemon juice)
1 teaspoon sugar
1 teaspoon Kosher salt
1 teaspoon granulated garlic
1/2 teaspoon dried dill (unless you happen to have fresh lying around)
For Serving:
6-8 burger buns, buttered and toasted if you’re feeling extra ambitious
6-8 slices Jack cheese
3-4 sliced tomatoes
1/2 large Walla Walla onion, thinly sliced
- Preheat your grill as high as it goes. While it preheats, toss your peppers with a couple drizzles of olive oil and some salt and pepper in a medium bowl. Head out to your grill with a pair of tongs and roast those babies over the hottest part of the grill until they are getting quite a bit of char on them (but take them off before they get completely blackened). Return the roasted peppers to a bowl and cover with a plate for 5 minutes to “steep” them so that the skins become easy to remove. Turn your grill off if you don’t have any other grilling to do, but multi-task here if you feel like it because we will turn the grill back on for the burgers in about 10 minutes.
- Meanwhile, prepare your tzatziki sauce by cutting your cucumbers in half, removing the seeds with a spoon and dicing very small. Combine cucumbers with all other sauce ingredients in a medium bowl and stir until well-combined.
- Now your pepper skins should be nice and softened. Remove the skins as best you can– if some pieces stay on, it’s totally fine. Chop the peppers up real small and add to a large bowl with ground beef, minced dried onion, salt, garlic and crumbled feta. Mix together with your hands and then shape into 6-8 patties.
- Grill burgers over medium heat for 3-5 minutes per side depending on the done-ness you like. During the last minute or so of cooking top with the Jack cheese.
- Serve burgers on a toasted bun with sliced tomato, sliced onion and tzatziki sauce.
.

