
Monthly Archives: September 2017
Week #20, Sept 29 2017
- On: September 27, 2017
 0
0
Register for November shares this week
We offer two shares to extend the CSA season into November, for hungry members who want to continue their local-foods adventure. Both shares focus on fall vegetables, roots, winter squash, etc. Go here to learn more and view sample boxes from previous years.
– Extension Share, $30, November 2/3 (Thurs/Fri sites), one delivery, same size box as the regular CSA deliveries (3/4 bu)
– Storage Share, $108, November 16/17 (Thurs/Fri sites), one delivery, two large 1 & 1/9 bushel boxes
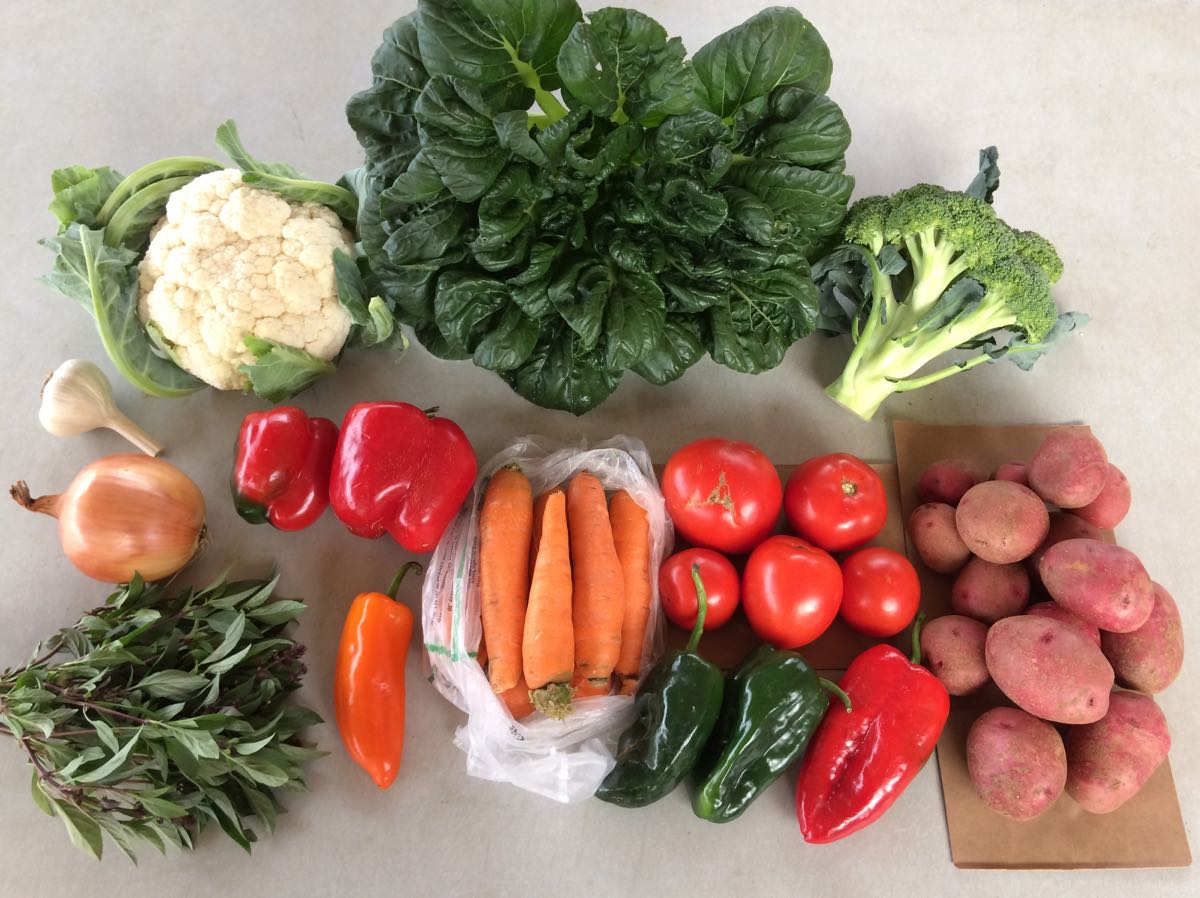
Veggie List and Veggie Notes (Sept 28 2017; week #20, green EOW)
Beth’s box logic: – Wow, look at all the cabbage family vegetables in this box (cauliflower, broccoli, Koji or tatsoi greens). That’s what happens in fall. Stock up on your anti-oxidants this week.
– Roast your three poblano peppers. This is easiest on a grill. Peel the roasted chiles, cut into strips and use to top any dish this week. Great with any version of potatoes, or sprinkled into soup, or over top of casseroles, or cooked into scrambled eggs. We stir strips of roasted poblanos into tomato-pepper soup at the end of cooking.
– See below for a recipe to wilt your raw Koji greens. It’s a great technique to manage large heads of Asian greens.
Cauliflower, 1 large or 2 small
Broccoli, 1 large or 2 small
Koji OR tatsoi greens, 1 head
Red potatoes, 3.5 lb
Slicing tomatoes, 2.2 lb, see note
Carrots, 2 lb
Bell peppers, 2
Oranos peppers (orange, sweet), 1 or 2
Poblano chiles (mild heat), 3
Yellow onion
Thai basil
Garlic
Next week’s box will probably contain sweet potatoes, cauliflower or broccoli, cabbage, peppers, red onion and more.
Cauliflower – Woohoo! The cauliflower is ready and the heads are beautiful.
Koji greens (large head of dark green leaves) – Similar to other Asian greens like tatsoi or Yukina. We did not expect this to be ready until mid-October but it’s ready now. Cool weather in August was ideal for the young plants to get going. The recent hot spell sped them to maturity. These are really, really great. Consider trying my Wilted Choy Salad (below) if you are intimidated by large heads of Asian greens.
Red potatoes – These red potatoes are from our friends at Driftless Organics in western Wisconsin. This is a fresh batch of the red potato variety we got from them a few weeks ago. I found those to be excellent and more broadly useful than red potatoes often are. They were successful in potato salad yet they also roasted beautifully as oven fries.
Slicing tomatoes – These might be the final ripe tomatoes of the year. By this time of year, we recognize that tomatoes do not store well. Use them quickly; don’t try to hold them.
Poblano chiles (triangular, shiny, green or red) – These are mildly hot. Poblanos are the creme de la creme of chiles. They have lots of great flavor in combination with manageable heat. Roast and add to soup or casseroles. For our household, they are emblematic of fall cooking.
Garlic – This garlic is from John Hendrickson of Stone Circle Farm.
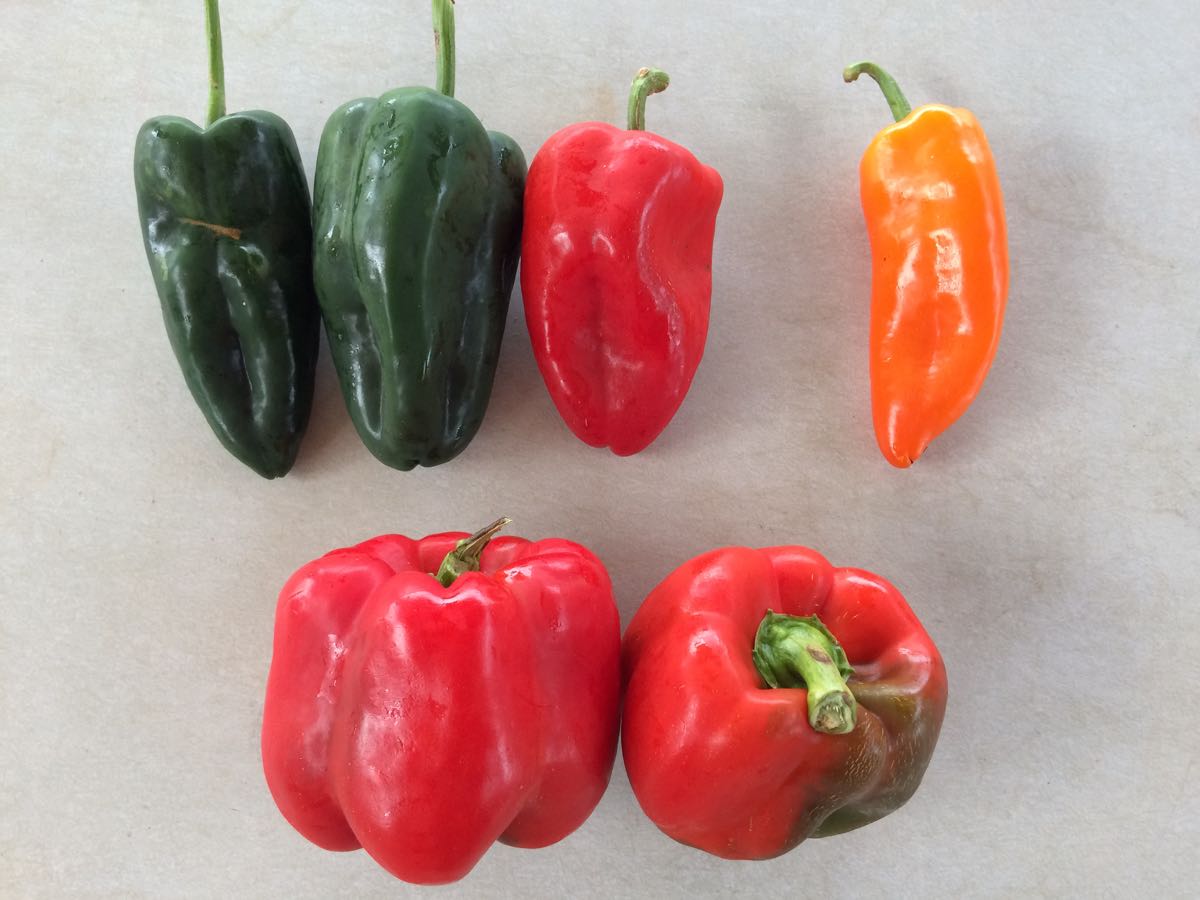
Pepper ID. Top left, poblano chiles (mild heat, triangular in shape, green or red).
Top right, Orano pepper (sweet, orange). Bottom, bell peppers (sweet, red or green).
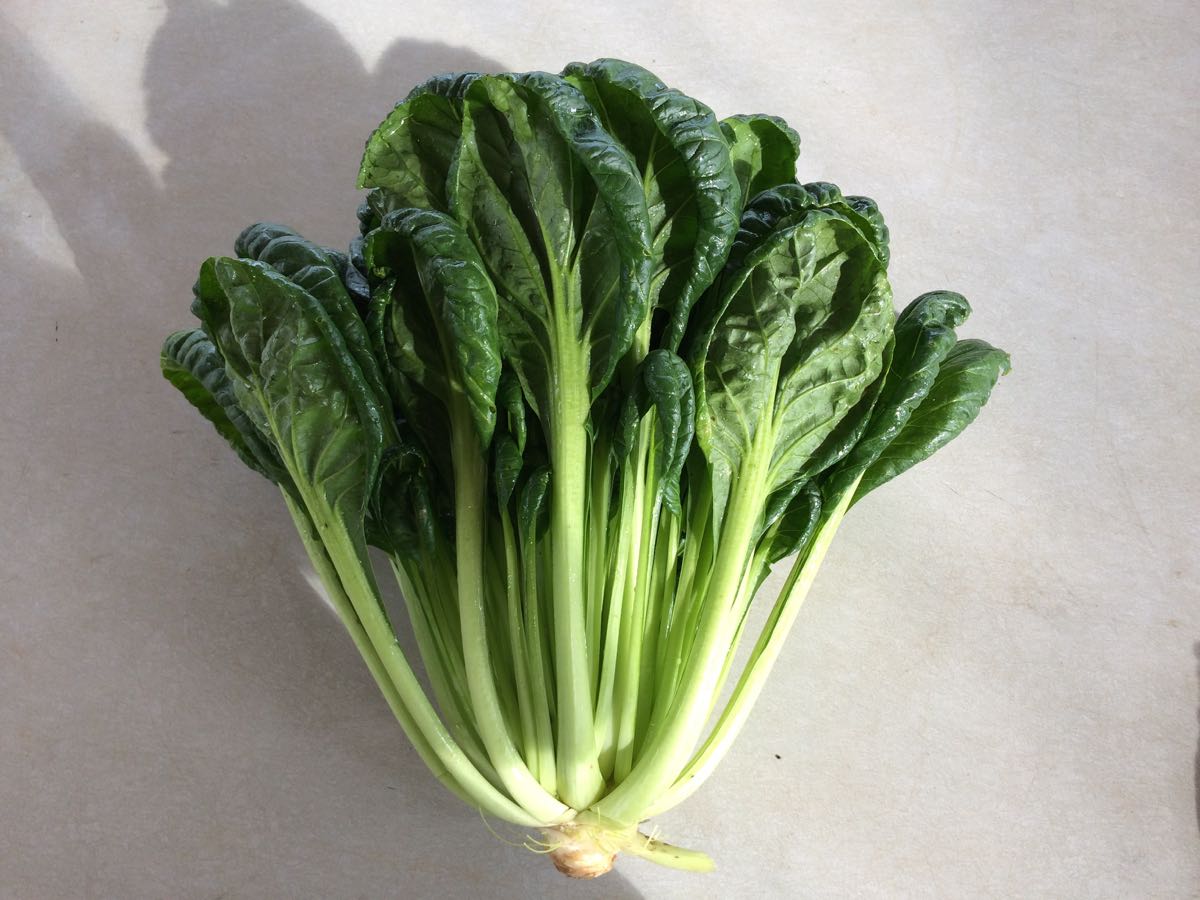
Koji and tatsoi are similar Asian greens. Eat both the leaves and stems.
RECIPES
Visit our Recipe Log, a list of all our 2017 recipes.
Recipe from Beth:
Succulent Wilted Choy Salad (aka “Tame That Choy” Salad)
Large heads of bok choy or Koji greens can be intimidating. This technique shrinks raw greens without cooking, while preserving their peppery flavor. It’s a useful approach with bok or pak choy, Yukina, tatsoi or Koji greens. I’ve provided a dressing suggestion, but you can use any dressing you like, even bottled.
1 head Asian greens (bok choy, Yukina, Koji greens, or tatsoi), about 1.5 lb
salt
1 carrot, grated
1/2 red bell pepper, thinly sliced
2 scallions, sliced (optional)
1. Slice Asian green leaves and stems into 1/2 inch strips. Wash well in a basin of water. Drain in a colander.
2. Set the colander in a bowl or in the sink. Sprinkle 1 1/2 Tbsp salt over the greens and mix with your hands. This large amount of salt will be washed away later.
3. Wait 30 – 45 minutes. The salt will wilt the greens.
4. Rinse greens under running water, then dump into a fresh basin of cold water. Swish and drain, then repeat. Taste the greens. They will be slightly salty.
5. Squeeze most of the liquid from the greens. (Leave more liquid for thin-stemmed greens like Koji or tatsoi. Thick-stemmed bok choy will continue to release moisture after you assemble the salad.) In a large bowl, mix with the carrots and peppers. Dress with your favorite dressing.
Suggested dressing:
1 clove garlic, minced
1/2 tsp sugar
1 tsp soy sauce
2 tsp rice vinegar
1 tsp sesame oil
1/4 tsp paprika
pinch cayenne
toasted sesame seeds
Mix all dressing ingredients except the sesame seeds together in a small bowl. Dollop over the salad and massage together with your hands. Adjust the vinegar and soy sauce to taste. Sprinkle with toasted sesame seeds and serve.
LOCAL THYME RECIPES
Comforting Classics
Grilled Halibut with Yukina Savoy and a Thai Lime Sauce
Dried Apricot and Cauliflower Dal
Broccoli Cheddar Soup
Autumn Chicken or Veggie Pot Pie
Outside the Box Recipes
Tatsoi and Pecorino Salad
Mac, Cauliflower and Greens
Broccoli and Greens Soup
Vegetable Korma
Quick and Easy Meal
Roasted Tomatoes and Garlic Sauce with Ravioli
RECIPES FROM LAUREN
MEATLOAF WITH BROWN BUTTER MASHED POTATOES
This is one of my favorite dinner party meals. It feeds a crowd. It’s simple to make (especially if you have a food processor). It warms up well and incorporates loads of fresh veggies. If I were you, I’d make a pile of roasted broccoli and serve that on the side along with some sliced tomato. Lauren.
Takes 1 hour, 30 minutes
Serves 8-10
Tomato Glaze:
1/4 cup cider vinegar
2 tablespoons olive oil
2 tablespoons maple syrup
4 teaspoons Dijon mustard
4 teaspoons Worcestershire
3 large tomatoes, cored and finely chopped (about 2 cups diced), divided
1/2 teaspoon Kosher salt
Meatloaf:
2 pieces sandwich bread, food process, remove
2 carrots, roughly chopped
1/2 onion, roughly chopped
1 orano pepper, roughly chopped
2 garlic cloves
2 tablespoons olive oil
1-1/2 teaspoons Kosher salt, divided
1/4 teaspoon pepper
2 pounds ground beef
2 eggs
2 tablespoons Worcestershire
1 teaspoon Dijon mustard
1 teaspoon smoked paprika
Roasted broccoli, optional
Sliced tomato, optional
Mashed Potatoes:
3-1/2 pounds red potatoes, quartered
1 stick butter (1/2 cup)
1 cup whole milk
2 teaspoons Kosher salt
- In a small saucepan, combine all tomato glaze ingredients. Whisk together as best you can and then bring to a boil. Reduce to a simmer and let cook while you prepare everything else (about 45 minutes-1 hour), whisking occasionally to prevent it from sticking. You want the sauce to reduce to less than half its original amount and a consistency a little thinner than ketchup.
- In a large saute pan, melt butter for mashed potatoes. Continue cooking over medium heat until it begins to sizzle and then brown. It should smell nutty but not burnt. Use a spatula to remove all the delicious buttery bits from the pan to a small bowl.
- Preheat oven to 400 degrees and find two 9×13 baking pans.
- Next, begin to prepare your meatloaf. Tear bread into pieces and toss in a food processor. Process until it turns into crumbs. Remove to a large bowl. It’s fine if a few crumbs remain. Add carrots, onion, pepper and garlic to the food processor and process until finely chopped.
- In the same saute pan you browned the butter in, heat olive oil for meatloaf over medium heat until hot. Add chopped veggies and sprinkle with 1/2 teaspoon salt and pepper. Cook for 10 minutes until just starting to char in places. Add to bowl with breadcrumbs along with eggs, Worcestershire, Dijon, paprika and remaining 1 teaspoon of salt.
- Let the meatloaf mixture sit while you begin your potatoes. Add potatoes to a large stock pot, cover with water and bring to a boil. Once boiling, reduce to a simmer and cook for 25 minutes.
- Now, shape your meatloaves. You will want 12 small loaves total, six in each baking pan. Place in the oven. Bake for 10 minutes then remove and top with reduced tomato glaze. As much as you can get to stay on. Anything leftover can be served with the meal. Bake loaves an additional 10-15 minutes until brown on the edges and cooked through.
- Drain your potatoes. Return to the pot and mash as best you can. Add browned butter, milk and salt and mash until smooth.
- Serve potatoes with meatloaves on top. Throw some roasted and charred broccoli and/or sliced tomato on the side. Make sure to add any additional leftover tomato glaze to the loaves.
.
CAULIFLOWER RICE BURRITO BOWLS
Takes 45 minutes
Serves 4-6
1 large head cauliflower (or 2 smaller ones), leaves removed
1 yellow onion
2 tablespoons olive oil, divided
3 garlic cloves, minced
1 teaspoon Kosher salt, divided
2 limes, juiced, divided
1-1/2 teaspoons chili powder, divided
1 teaspoon cumin, divided
1/4 teaspoon oregano
2 red peppers, seeded and cut into strips
2 poblanos, seeded and cut into strips
1/4 teaspoon cayenne pepper
15-ounce can black beans
2 tomatoes, cored and diced
Simple guacamole (recipe below)
Sour cream, optional
Hot sauce, optional
- Using the large holes of a cheese grater (what you’d use to shred cheese), shred cauliflower into small pieces that resemble rice. Change the angle of the cauliflower so you get all the florets but not much of the stems. Set “rice” on a towel to remove excess moisture.
- Prepare your onion. Peel and halve it. Thinly slice half of the onion. Cut the remaining half in half again and thinly slice one of these quarters. Finely chop the other quarter and put both onion preparations to the side.
- In a large saute or sauce pan (that has a tight-fitting lid), heat 1 tablespoon olive oil over medium low heat. Add garlic and half of the diced onion. Sprinkle with 1/4 teaspoon salt. Cook gently until veggies become fragrant, about 3 minutes. Add the cauliflower rice and put the lid on. Cook for four minutes then remove to a medium bowl.
- Add half the lime juice, 1/2 teaspoon chili powder, 1/2 teaspoon cumin and 1/4 teaspoon dried oregano to cauliflower rice. Taste and adjust seasonings. Set aside.
- In the same pan you used for the cauliflower, add the remaining tablespoon of olive oil and heat over medium heat. Add the sliced onions, red peppers and poblano peppers and cook for 8-10 minutes until softened and even charred in places. Add 1/2 teaspoon salt, 1/2 teaspoon chili powder and cayenne pepper.
- While this cooks, combine black beans with remaining salt, chili powder and cumin in a small saucepan. Cook over medium low heat until warm.
- Serve in bowls with cauliflower rice on the bottle and all desired toppings. I love the beans and peppers with diced tomatoes, guacamole, sour cream and hot sauce.
.
SIMPLE GUACAMOLE
4 avocados
1 garlic clove, minced
1 poblano, finely diced
1/4 cup diced onion (reserved from above)
1 lime, juiced
1/4 teaspoon Kosher salt
- Place avocados in a medium bowl. Mash with a fork.
- Add remaining ingredients and stir to combine. Taste and adjust seasonings as desired.
.

Week #19, Sept 21 2017
- On: September 20, 2017
- 0
Scenes from the week
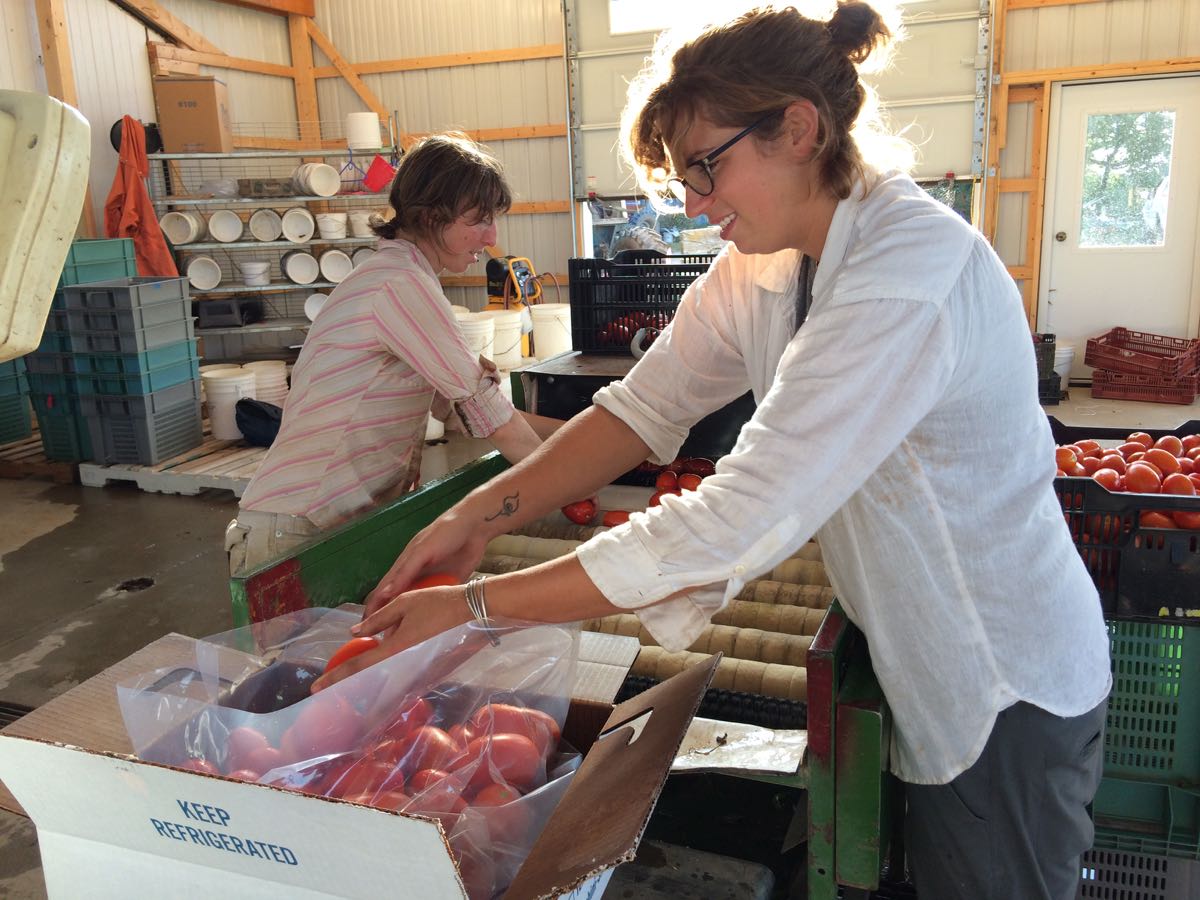
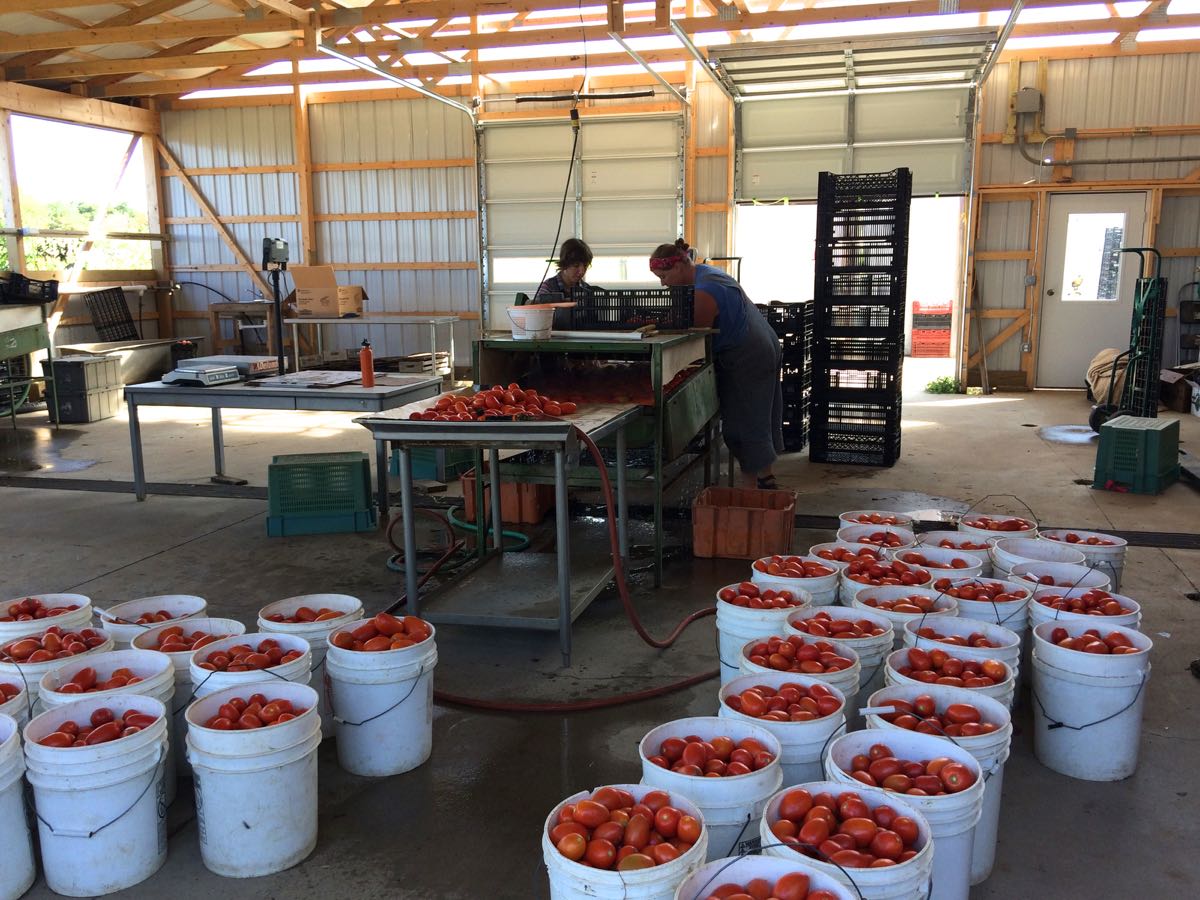
The tomatoes are still going strong. We can thank the dry weather for that. At top, Kerry and Kelsie wash plum tomatoes. The improved light in our new shed is wonderful. We’ve enjoyed it all season.
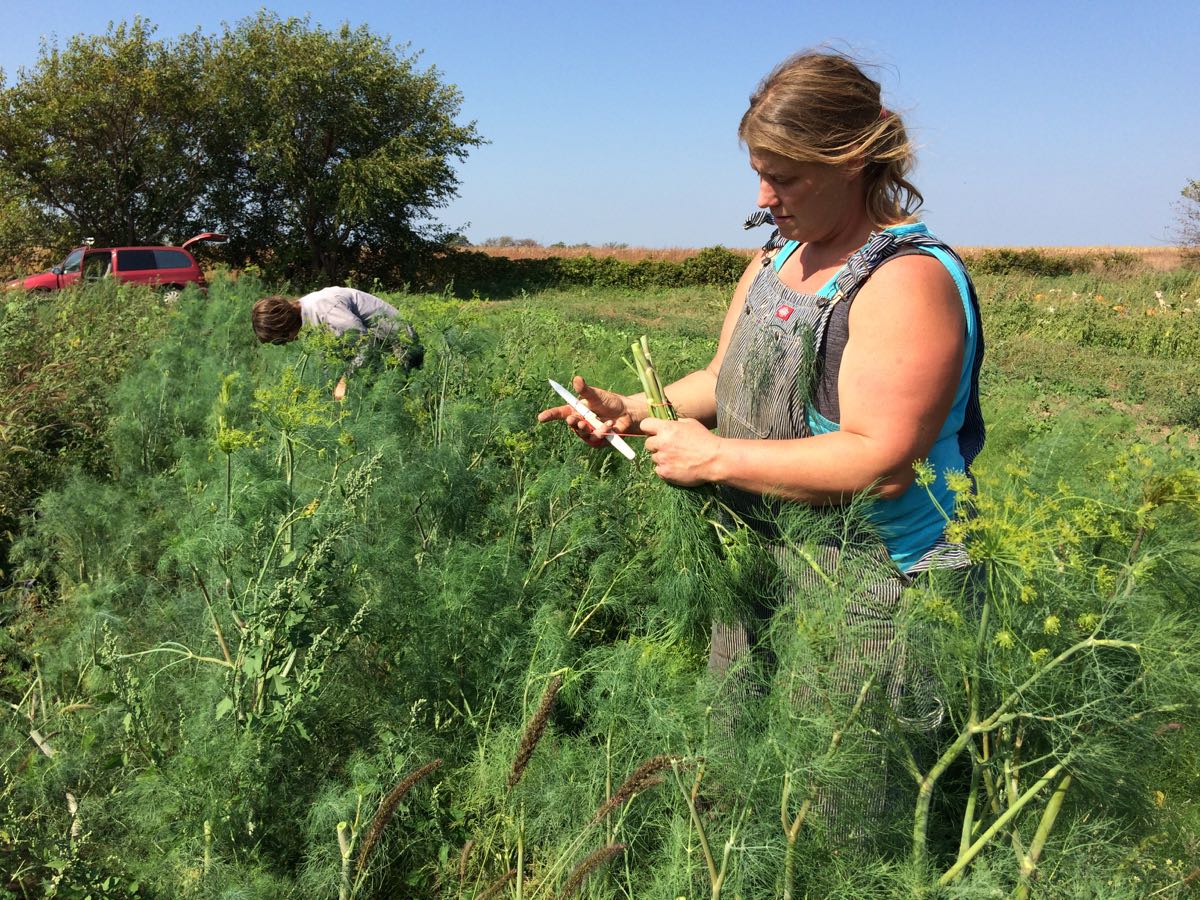
Charlotte and Maggie bundle dill for the CSA boxes.
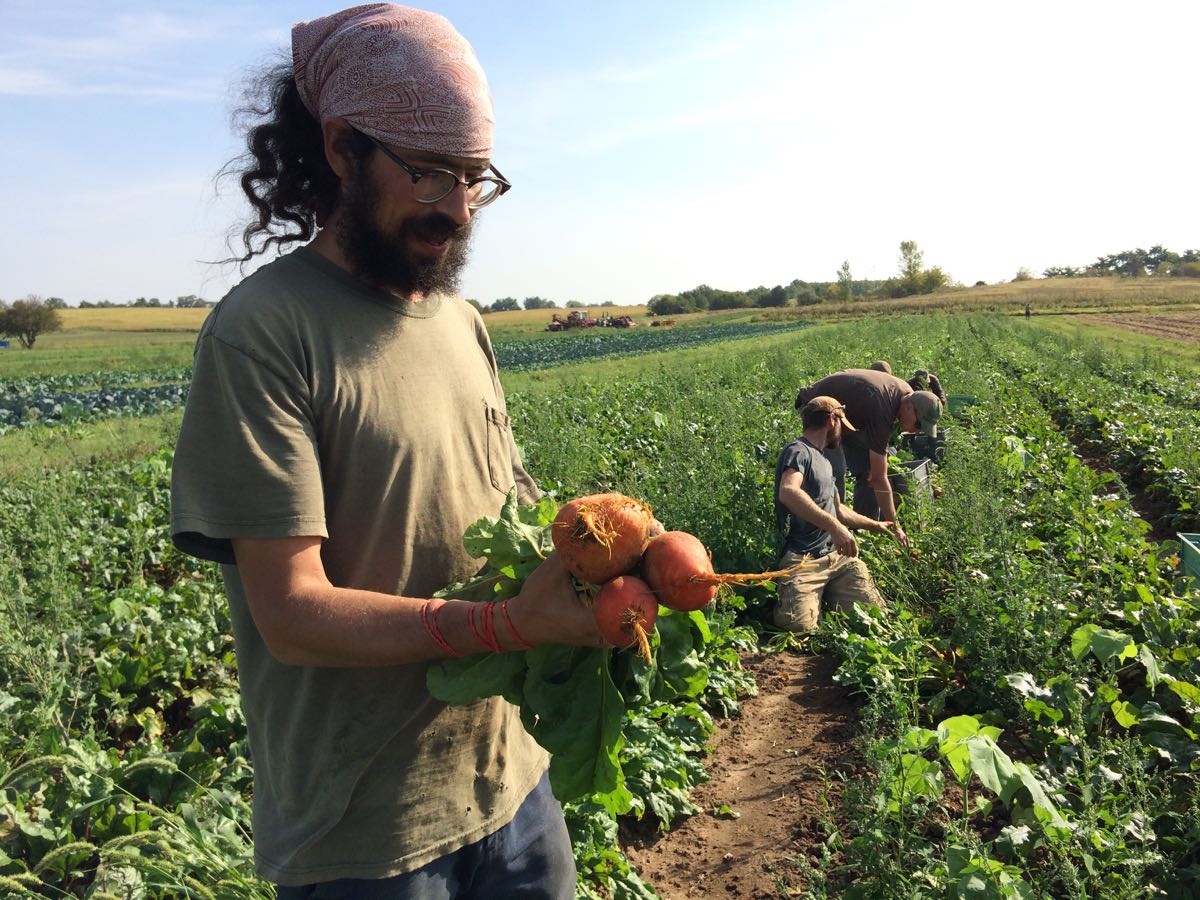
Small scale, big scale. Smitty, Billy, Matt, Jim, Jose, Raul and Kelsie bundle golden beets with the greens attached. We do this task by hand. Really, it’s the only way to do a quality job.
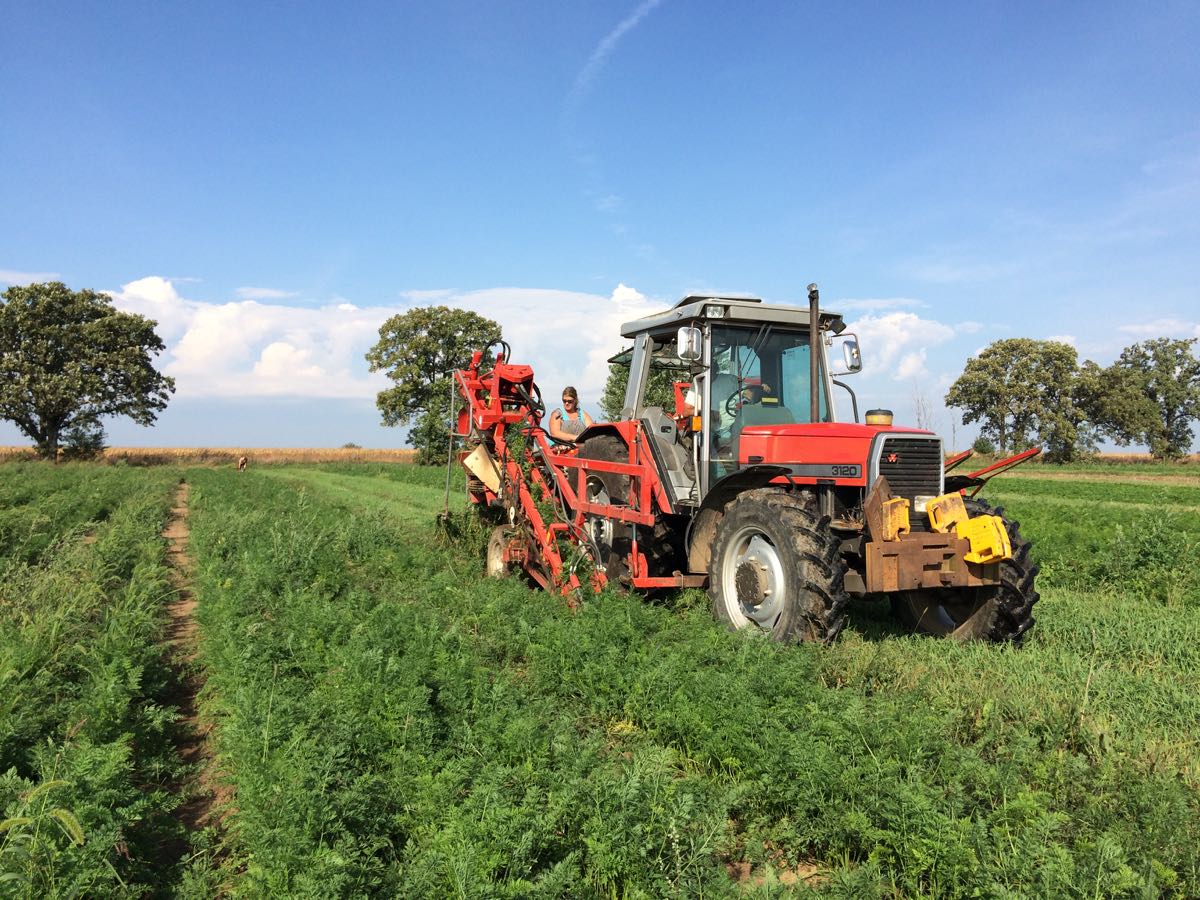
In a nearby field, Steve harvested carrots mechanically. With our root digger, we can harvest 1000 lb carrots in 30 minutes with just three people. Without this sort of tool we couldn’t grow enough carrots to feed you all winter.
WINTER SQUASH
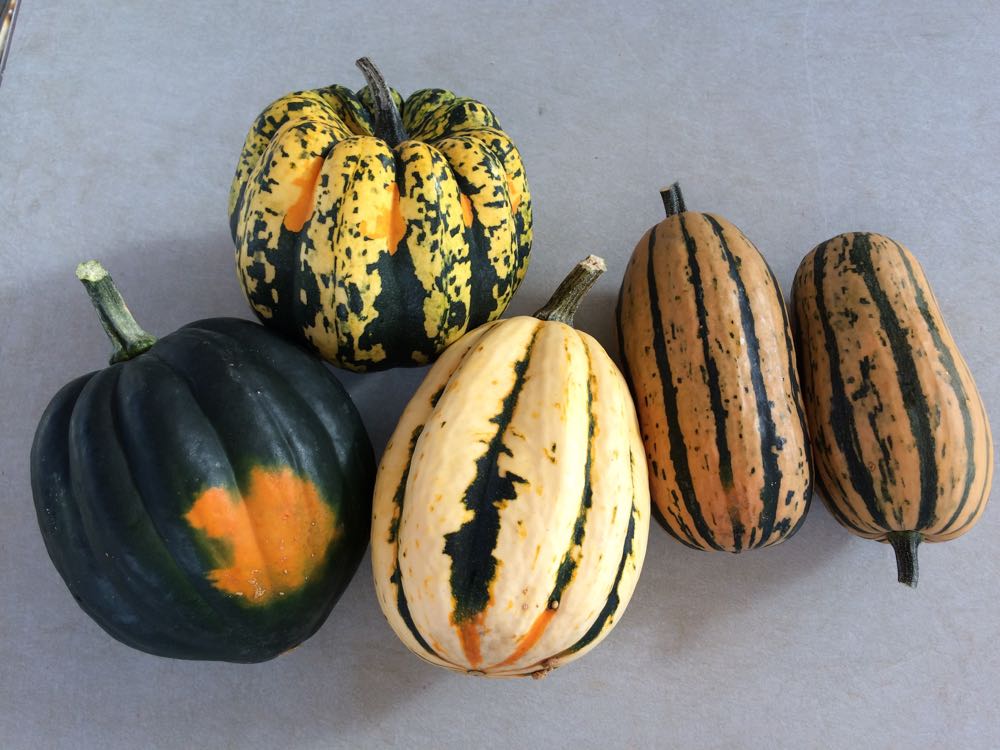
From left, TipTop acorn, Carnival acorn, Jester (an acorn x sweet dumpling hybrid), Honey Boat delicata (2/box).
We harvested a variety of early maturing types for this week’s box. You will receive one of these types. Some are new-ish varieties for us. We trial new varieties for a few years before scaling up and each of these types made the cut. I think these are all winners but I’d like to hear what you think of them. There’s a limit to how many I can sample!
Expected life: These acorn and delicata types do not store for long. Plan to eat within two weeks.
Storage: Store at room temperature, uncovered.
To make squash easier to cut: Microwave on high for 30 to 60 seconds, depending on size of the squash. This will soften the rind and flesh, making it much easier to cut.
Beth’s favorite simple preparation: Winter squash are easily roasted in a 400F oven. Microwave your squash to soften it. Split in half with a sharp knife. Scoop out and discard seeds. Run the squash under running water and shake off the excess water. Place cavity-side-down on an oiled baking sheet. The little bit of moisture helps seal the squash to your roasting pan. The water soon evaporates, allowing the squash to brown and caramelize. The caramelization really boosts the flavor. Roast at 400F until easily pierced with a fork, 20 – 45 minutes depending on size. Flip over while hot. Add a little butter to melt and some seasoned salt. Cut into wedges and eat.
Can you eat the rind? Well, Steve eats the rind for all these types but he’s a little crazy. In my opinion, the rinds are too thick to eat on the acorn types (TipTop, Jester, Carnival). Delicata skin is usually thin enough to eat but this durable Honey Boat variety has a somewhat thicker rind than usual. I don’t eat it; Steve does.
Stuffed squash: Each of this week’s types has a central cavity that can be stuffed. Prepare your favorite fully-cooked stuffing, e.g. a rice or quinoa mixture. Roast your squash as described above. Preheat the stuffing. Fill the cooked squash with stuffing, top with grated cheese and return to the oven until everything is hot.
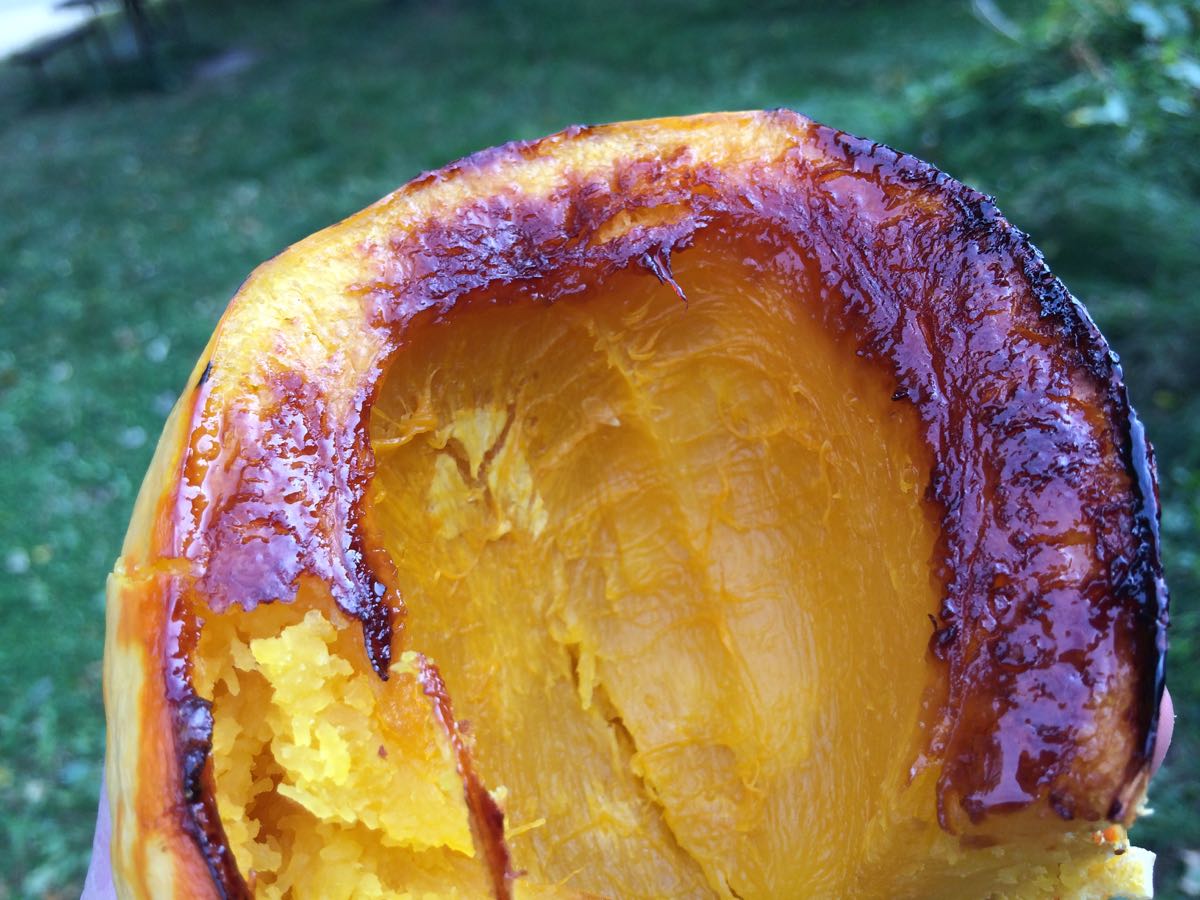
Carmelized Carnival squash.
Veggie List and Veggie Notes
Sept 21/22, 2017, week #19, purple EOW, moon Sampler
Beth’s box logic w.r.t. dill:
– Your dill will be a bundle of both flowers and leaves. Use the flowers to make a dilly-bean salad or some refrigerator dilly-beans, similar to refrigerator pickles.
– Dill leaves combine well with broccoli, so think about an egg-broccoli-dill dish, along the lines of a quiche or frittata.
– Cream of tomato soup with dill is really, really good. Use your favorite tomato-basil soup but substitute dill for the basil, and reduce the amount. Use a light hand with the dill if you’re planning to save soup for leftovers. Dill tends to strengthen over time in tomato soup.
Golden beets with greens, 1 bunch
Broccoli, 1 or 2 nice heads
Winter squash, 1 medium or 2 small, see notes
Tomatoes, slicing, ~2 lb
Tomatoes, plum, ~2 lb
(Both types are in one paper bag.)
Carrots, 2 lb
Green beans, ~0.7 lb
Red bell peppers, 2
Yellow onion
Dill, 1 bunch
Jalapeno chile (HOT), 1
Garlic
A few sites get an heirloom tomato or a cucumber or some extra beans.
Next week’s box will probably contain broccoli, potatoes, tomatoes, peppers, spinach and more.
Golden beets with greens – Beet greens are tasty, similar to Swiss chard in flavor, texture & cooking time. These two crops are very closely related. You can remove the thickest midribs before cooking if you wish, but it is not essential. Storage: Cover and refrigerate. Separate the tops and roots if you don’t plan to eat the greens immediately, to preserve freshness in the roots. Beet greens are perishable and should be eaten soon. The beet roots will last for weeks.
Broccoli – 2017 continues to be a good broccoli year. Broccoli needs a lot of water at its adolescent stage and this planting certainly got it this summer.
Yellow onion – This week’s onion is an intermediate type which will fry successfully yet is not as pungent as a typical yellow storage onion.
Dill – You’ll get a bundle with both flowers and leaves. Ideas: See above.
Winter squash – See above.
RECIPES
Visit our Recipe Log, a list of all our 2017 recipes.
RECIPES FROM LOCAL THYME
Comforting Classics
Golden Beets with Citrus and Greens
A Hungarian Goulash
Asian Stir Fry with Broccoli, Peppers, Beet Greens and Beef
Baked Winter Squash with Tomatoes
Outside the Box Recipes
Farro Salad with Beets, Broccoli, Dill and Walnuts
Orange Scented Pork with Tomatoes and Onions
Black Bean, Broccoli and Cheese Stuffed Bell Peppers
Winter Squash Agrodolce
Quick and Easy Meal
Black Bean, Shredded Carrot and Pepper Burrito
Week #18, Badger on the farm!
- On: September 13, 2017
- 1
While puttering in our sand pit one day in July, I looked up and saw a badger peeking out of its den. This is quite rare; badgers are elusive. I took the video below with my cell phone. You can see that the badger was curious about me too.
This creature has brightened my summer, even though I have not seen it again. It continues living in our sand pit, digging extensive tunnels within the walls of the pit and in the nearby tree line. I find fresh prints and digging every day. Before noticing the badger, I visited the sandpit frequently in spring, planting prairie seedlings along its dry walls. The badger has dug tunnels everywhere except the area I planted. Perhaps it recognizes that as my territory. At first, I worried about disturbing it but then I saw this video of various animals romping outside badger dens in southern Wisconsin.

The sandpit is a special place for our family. The previous owners of our farm sold sand for road construction, leaving an open bowl-shaped pit in a hillside. Over the years, it was a giant sandbox when our children were young, then a sled run, then a sheltered and exotic fire pit. We’ve ceded it to the badger for now. Beth
#2 Grade Red Peppers
I write about pepper grading every year. Returning members can say “yeah, yeah” and skip ahead. New members, please read.
Many of the red bell peppers we send in the CSA boxes will be our #2 grade. We do this to avoid waste and to deliver good value to our CSA members. The #2 grade peppers are excellent eating quality, but are not quite pretty enough to sell to stores. As a result, we place a much lower value on these peppers. This allows us to provide generous amounts of peppers over the course of the season. We feel this is a good exchange, even if it means you occasionally open a pepper and find that it needs trimming. Here are the reasons that peppers are downgraded from #1 grade to #2 grade:
- They may have a minor blemish, or
- They may have minor insect damage, or
- They may be very ripe and beginning to wrinkle. (These are especially sweet and delicious as they are fully ripe. These cannot be sold to stores because their shelf life is short. You will find that the texture is less crisp than a #1 grade pepper, but the flavor more than makes up for it.)
- They might be partially red and partially green.
- Others are just too small.
The eating quality is fine (or excellent) for all these #2 peppers. We throw away all peppers that we suspect have rot inside (although one may occasionally slip through in either #1 or #2 grade.) Today’s peppers are a mix of #1 and #2 grade.
Veggie List and Veggie Notes (week #18, Sept 14/15, green EOW)
Slicing tomatoes, ~4.4 lb
Green beans, 1.2 lb
Celery, 1 head
Red peppers, 3 – 4, mostly red frying peppers
Swiss chard, 1 bunch
Leek, 1 or 2
Yellow onion, 1 medium
Lettuce, red or green leaf
Zucchini/squash, ~1
Cucumber, ~1
A few sites get an heirloom tomato.
Next week’s box will probably contain tomatoes, peppers, onion, green beans, some kind of greens and more.
Celery – Our celery is more strongly flavored and more fibrous than typical grocery store celery. Taste it raw then decide how you want to use it, raw or cooked. This is one of our better batches of celery, which we pack in the CSA boxes just once per year. We’ve pushed the planting date later. We want to avoid summer harvests because the celery is tough if it matures during hot weather. Harvest too late in the fall and insect problems accumulate. Who knew celery is so finicky to grow?
Frying (long) and bell (blocky) peppers – You’ll get 3 or 4 peppers this week, based on size. Everyone gets frying peppers but some get frying peppers plus a bell pepper. Frying peppers have lower moisture, making them ideal for browning in a pan with a little oil. You can also roast them in the oven. I cut into pieces, lightly oil and put close to the broiler until they are a bit charred. It doesn’t take much broiling to develop the roasted flavor.
Yellow onion – This week’s onion is a yellow storage onion, the type you’ll find most often in the grocery store. These are pungent and will fry well.
RECIPES
Visit our Recipe Log, a list of all our 2017 recipes. Check June 29 for other cabbage and Swiss chard recipes.
RECIPES FROM LOCAL THYME
Comforting Classics
Wilted Chard with Almonds
Summer Squash, Green Bean and Tomato Sauté
Braised Sausage, Peppers and Onions
Tuna Noodle Casserole
Outside the Box Recipes
Sausage, Brown Rice and Lentil Stuffed Chard
Pungent Green Beans and Tomatoes with Cumin, Garlic and Ginger
North African Roasted Vegetable Salad
Mozzarella and Celery Salad
Quick and Easy Meal
Red Bean Jambalaya
RECIPES FROM LAUREN
GREEN BEANS with ROMESCO SAUCE
Adapted from Naturally Ella
Though technically a side dish, I absolutely have a meal in mind for you here. Do yourself a favor and pick up some tuna steaks from the grocery store and then serve this simple dish on the side of seared tuna. Tuna and romesco is one of my all time favorite combinations and the addition of crunchy, gently blanched green beans is just heavenly. Lauren.
Takes 1 hour
Serves 4 as a side
2-3 Italian frying peppers
1-1/2 cups unsalted roasted almonds, divided
1/4 cup diced leek (if you made the African peanut stew, just make sure you leave this much on the side)
1 small to medium tomato, cored and seeds removed
2 tablespoons red wine vinegar
1 tablespoon smoked paprika
1/2 teaspoon Kosher salt
1/4 teaspoon freshly ground black pepper
1/4 teaspoon cayenne pepper
1/4 cup olive oil
1+ pounds green beans
- Preheat the broiler of your oven and bring a large pot of salted water to a boil on the stove.
- Place peppers on a baking sheet and let cook under the broiler for 15-25 minutes (it will vary a lot based on how hot your broiler can get), turning occasionally until blackened (and I mean really blackened) on all sides.
- Remove from oven, place in a bowl and cover with a plate. Allow to cool for 30 minutes for easiest peeling.
- While the peppers roast, trim the ends of your green beans and submerge them in boiling water for three minutes. Drain and rinse with cold water until cool to the touch. Leave in colander to drain further until ready to use.
- In a separate small pan, toast remaining almonds over medium heat until lightly browned and fragrant. Set aside.
- Once peppers have rested, remove from bowl and peel the skin away. Remove the seeds and toss the peppers into a food processor. Add 1 cup of almonds, leek, tomato, vinegar, spices and oil to food processor. Process until mostly smooth.
- Toss with cooled beans in a large bowl and sprinkle with remaining almonds.
.
AFRICAN PEANUT STEW
This time of year, the meal I’m always dreaming of is African peanut stew. I’m not sure why but for me it’s the quintessential mid-September dishes. It uses up a few pounds of tomatoes without being too tomato-forward and the spicy flavors warm you through September’s coolest nights. The peanut butter adds heft to a meal that would otherwise almost be too light. It’s a stick to your bones kind of a meal and everything I’m craving this time of year. Lauren.
Serves 4-6
Takes 50 minutes
2 tablespoons butter
1 yellow onion, diced
1 large leek (white and pale green part only), halved and sliced
1 teaspoon Kosher salt plus more to season
1/4 teaspoon freshly ground black pepper
1 bunch chard, divided
2 stalks celery, diced
1 red Italian frying pepper, seeded and diced
1 zucchini, cut into space cubes
1 teaspoon red pepper flakes (if you have a jalapeno or other hot pepper lying around from a previous week just dice that and throw that in instead)
1 teaspoon ground ginger
2 teaspoons ground cumin
1/4 teaspoon cayenne powder
2 pounds tomatoes, cored and diced
4 cups vegetable stock
1/2 cup peanut butter
1/4 cup brown sugar
For serving:
2 cups cooked rice
1/2-1 cup roasted peanuts
1-2 limes, quartered
- In a large stock pot, melt butter over medium heat. Add onion, leek, salt and pepper. Saute for 5 minutes until softened and fragrant.
- While that cooks, remove the chard stems from the leaves. Very thinly slice the stems and throw them into the pot with the onions and leeks. Roughly chop the chard greens and set them aside for later use. Add celery, red pepper and zucchini. Saute 2-3 minutes longer until all the veggies have softened. Add spices and continue to cook for 2-3 minutes. You want the spices to become fragrant and toast ever so slightly but not burn. The second you smell even the faintest burnt flavor, add the tomatoes. Simmer for 15 minutes until significantly reduced.
- Add vegetable stock, peanut butter, and brown sugar. Continue simmering very gently for another 15 minutes. Add chard leaves and cook until just wilted. Taste and adjust seasonings. You may want a little more salt, sugar or spice.
- Serve over cooked rice with peanuts and lime juice.
.
Week #17, Sept 7 2017
- On: September 06, 2017
- 0
Veggie List and Veggie Notes (Sept 7/8, 2017, week #17)
– Weekly members
– Purple EOW
– Sun sampler
Beth’s notes: This box is loaded with solanaceous crops (tomatoes, potatoes, eggplant, peppers, chiles). This is an excellent week to make ratatouille. Remember, Pat gave us a recipe for Ratatouille Provencal earlier this season. Pat and Lauren’s recipes are always appealing but they have come up with an unusually appetizing set this week.
Red potatoes, ~ 3.3 lb
Globe eggplant, 1 or 2
Green or red leaf lettuce
Slicing tomatoes, ~5 lb
Bell or Orano peppers, ~2 (or 3 if small)
Zucchini/squash, maybe 1.5 lb
Cucumber, ~1
Yellow onion
Anaheim chile, 1
Garlic
A few sites get one heirloom tomato per box.
.
Next week’s box will probably contain tomatoes, peppers, leeks, lettuce, beans, some kind of green and more.
.
Bok choy (large rosette with thick white stems and green leaves) – This Asian green is good for stir-frying or sautéing or in soup. You can think of the stems and leaves as two separate vegetables. The stems require longer cooking. The leaves will cook almost as quickly as spinach. Bok choy stores well, so feel free to pull off leaves as you need them, or use the whole head at once. Refrigerate in a plastic bag.
Red potatoes – These Red Norland potatoes are from our friends at Driftless Organics.
Yellow onion – This week’s onion is an intermediate type. They are not very pungent but not as mild as a Walla Walla. They are fairly moist but you can brown them successfully.
Heirloom tomatoes (ONLY AT SOME SITES; a large tomato that’s not in the paper bag with the other tomatoes) – We will rotate heirloom tomatoes among the sites as they ripen. Heirloom tomatoes are full-flavored but delicate. If you receive one this week, please handle it very gently, as these fragile beauties bruise easily. Some are delivered ripe, some need to ripen at room temperature for a day or two. Plan to eat your heirloom as soon as it is ripe. FYI, we did not wash the heirlooms this week, in an effort to minimize handling and bruising. Just give it a gentle wash when you are ready to eat it.
Anaheim chiles (MEDIUM HEAT, long slender peppers, red or green) – Anaheims usually have medium spiciness although it varies from pepper to pepper. As usual, the heat is concentrated in the seeds and midveins. Remove the seeds and midveins is to lessen the chili’s heat. Anaheims are easily mistaken for Italian frying peppers. We never send them in the same box for that reason. Keep this in mind if you have peppers left over from previous weeks.

The only slender green or red peppers in your box this are spicy Anaheims. Slender orange peppers are sweet Oranos. Bell peppers this week are blocky and could be green, red, yellow, orange or purple. Everyone gets two sweet peppers this week (or three if they are small). Everyone also gets one Anaheim.
RECIPE LOG
Visit our Recipe Log, a list of all our 2017 recipes to date.
LOCAL TIME RECIPES
COMFORTING CLASSICS
Fresh Marinara
Korean Style Bok Choy Fried Rice
Zucchini, Tomato and Eggplant Tian
Potato and Sweet Pepper SM-Hash with Smoked Salmon or Trout and Poached Eggs
From earlier this year: Ratatouille Provencal
OUTSIDE THE BOX
Charred 2 Pepper and Tomato Salsa
Bok Choy Kimchi
Rigatoni with Roasted Eggplant, Capers and Anchovies
Summer Squash, Potato and Tomato Tagine
QUICK AND EASY MEAL
Salad with Tuna, Olives, Cucumbers, and Onion Vinaigrette
RECIPES FROM LAUREN
FARM STAND QUINOA BOWL
Adapted from my farming buddy Andrea Bemis. Lauren
Takes 1 hour
Serves 4-6
2 cups cooked quinoa (or grain of your choice)
1 anaheim chili, seeded and diced
1 bell pepper or 2 orano peppers, seeded and diced
2 tablespoons olive oil, divided
1 pound zucchini, halved and cut into 1/4-inch slices
1/2 Expression onion, sliced
Kosher salt and freshly ground black pepper
2 pounds tomatoes, cored and sliced
15-ounce chickpea
1 teaspoon paprika
Tahini Dressing:
1/4 cup tahini
1/4 cup water
1 garlic clove, minced
2 tablespoons lemon juice
2 tablespoons olive oil
2 teaspoons honey
1/2 teaspoon Kosher salt
1/8 teaspoon freshly ground black pepper
Pinch cayenne pepper
- Preheat oven to 450 degrees.
- Cook your quinoa (or grain of your choice). I always follow these directions for perfect results.†Once cooked, add diced peppers and set to the side.
- On a large baking sheet, drizzle with 1 tablespoon olive oil. Add zucchini and onion to pan and sprinkle generously with salt and pepper. Bake for 15 minutes. Move veggies to one side of the pan and add sliced tomatoes to the other. Season with salt and pepper. Roast 25 more minutes. At this point, veggies should begin to look charred. If not, turn on the broiler and cook 5-10 more minutes.
- Meanwhile, while the veggies cook, heat remaining olive oil in a large saute pan over medium high heat. Add chickpeas and 1/2 teaspoon Kosher salt. Cook for 15 minutes until chickpeas are golden brown and crispy. Remove to paper towel to drain grease and then toss with paprika.
- Prepare the dressing by combining all ingredients in a small bowl and whisking until smooth.
- To serve, scoop quinoa into large bowls. Top with roasted veggies and drizzle with dressing. Add crispy chickpeas just before serving.
.
PAN-FRIED EGGPLANT with BUTTERMILK DRESSING
Adapted ever so slightly from Bon Appetit. Lauren
Takes 30 minutes
Serves 2-4
1 eggplant, quartered and cut into 1/4-inch slices
4 tablespoons olive oil, divided
Kosher salt
1 cucumber, seeded, quartered and sliced
1 tablespoon lemon juice
1/2 lemon zest
2 avocados, cup into 1/2-inch slices
Buttermilk Dressing:
1 tablespoon olive oil
1/2 Expession onion, diced
Kosher salt
2 tablespoons yogurt
2 tablespoons white wine vinegar
1/2 tablespoon honey
1/2 tablespoon Dijon mustard
1 garlic clove, minced
2 tablespoons olive oil
- Begin with the dressing. In a large, heavy saucepan (use a cast-iron skillet if you have it!) heat olive oil over medium high heat. Add onion and saute gently for 5-7 minutes for until the onions begin to be charred (and smell almost burnt). Sprinkle generously with Kosher salt and remove from heat.
- In a small bowl, combine yogurt with vinegar, honey, mustard and garlic. Whisk until smooth then add sauteed onion. Stir in olive oil and set aside to marinate.
- In the same large pan you cooked the onions in, heat two tablespoons olive oil over medium high heat. Add half the eggplant in a single layer and sprinkle with salt. Cook for 3-4 minutes without moving until browned. Use tongs to flip and cook 2 minutes longer. Remove to a large bowl. Add remaining olive oil to pan and repeat browning with remaining eggplant.
- Add cucumbers followed by lemon juice and lemon zest. Gently fold in avocado.**
- Transfer to a platter and drizzle with dressing. Enjoy at room temperature (with a grilled pork chop if you’re anything like me).**
**If you aren’t planning to eat all the salad in this one sitting, place as much avocado as you plan to use on a platter and top with proportionate amounts of salad. Drizzle with dressing.
.

