
Highlights of the week
- On: July 27, 2016
 0
0
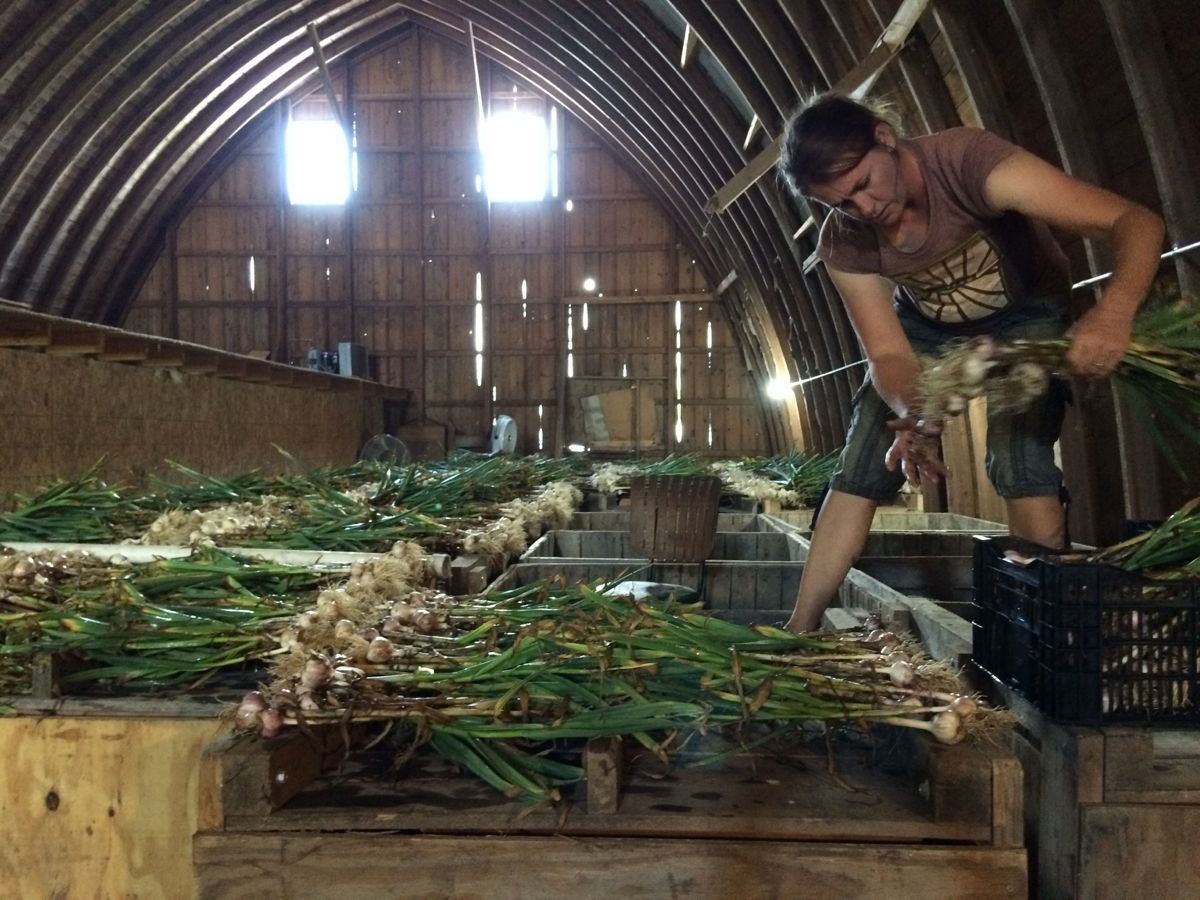
Karen spreads freshly harvested garlic plants.

It’s drying nicely in the barn loft.
Garlic harvest was an adventure this past week. This is a “new” crop for us. We’ve always bought most of the garlic for your CSA boxes from our friend John Hendrickson. We will continue to buy everything he can grow for us, but we want to deliver more garlic in the boxes, per your requests. On our annual survey, members consistently ask for more garlic.
This is our biggest garlic crop yet. We’ve dabbled and experimented and increased our seed stock over the past three years. We dug it on Friday and spread it to dry in our barn loft. Look closely at the photos and you’ll see that we spread it on overturned wooden bins, propped on the raised legs of the bins. It’s an easy way to get the garlic up in the air. The barn is dry and warm and the garlic is drying nicely. We will hold some back to plant for next year’s garlic and green garlic crops. The rest will go in the CSA boxes, maybe as soon as next week. You cannot believe how wonderful the barn smells.
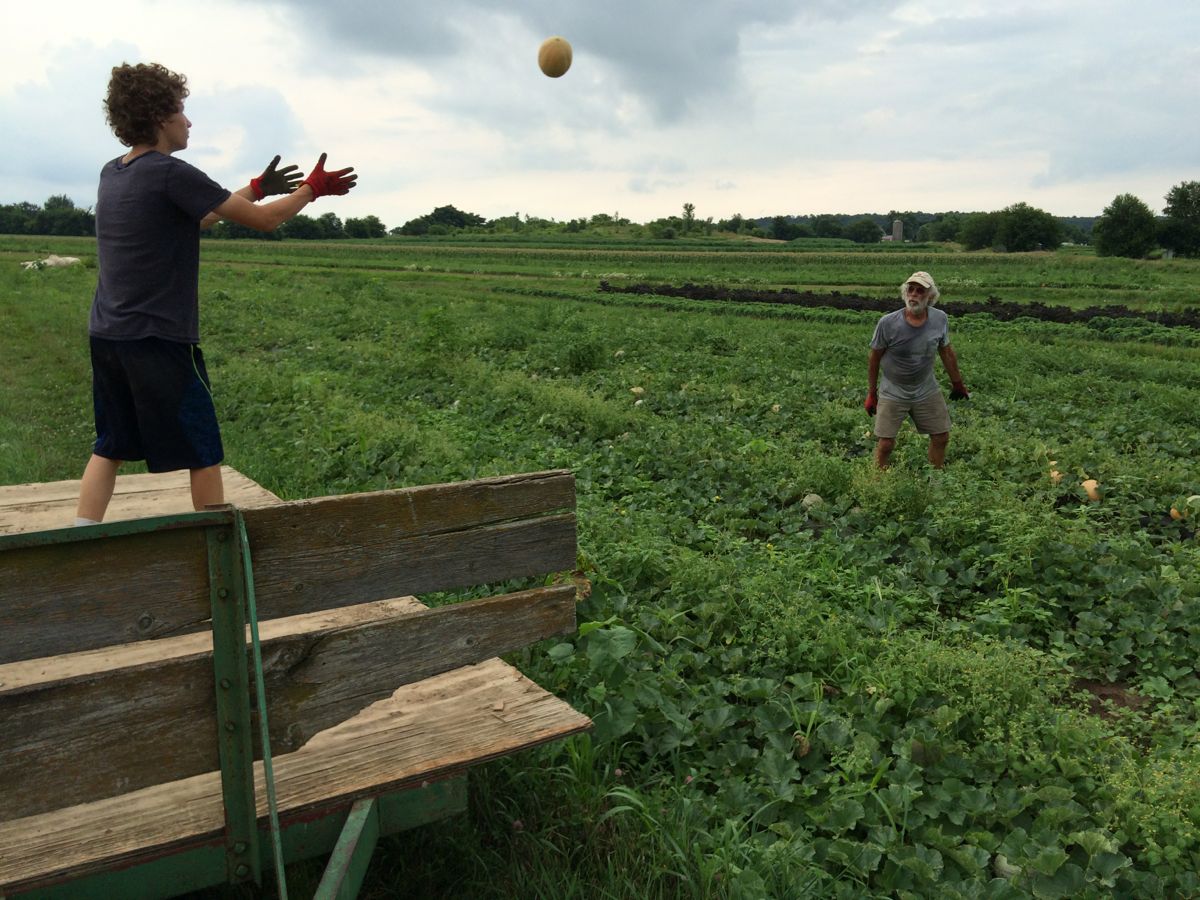
Steve and I harvested the first melons over the weekend with help from our son Ari. He has helped with melon harvests for three years but is bigger and stronger this summer, better able to handle heavy watermelons. Outpost and Willy Street coops will stock our watermelons this weekend. We have ripe muskmelons for you this week, and are planning watermelons for the CSA boxes next week.
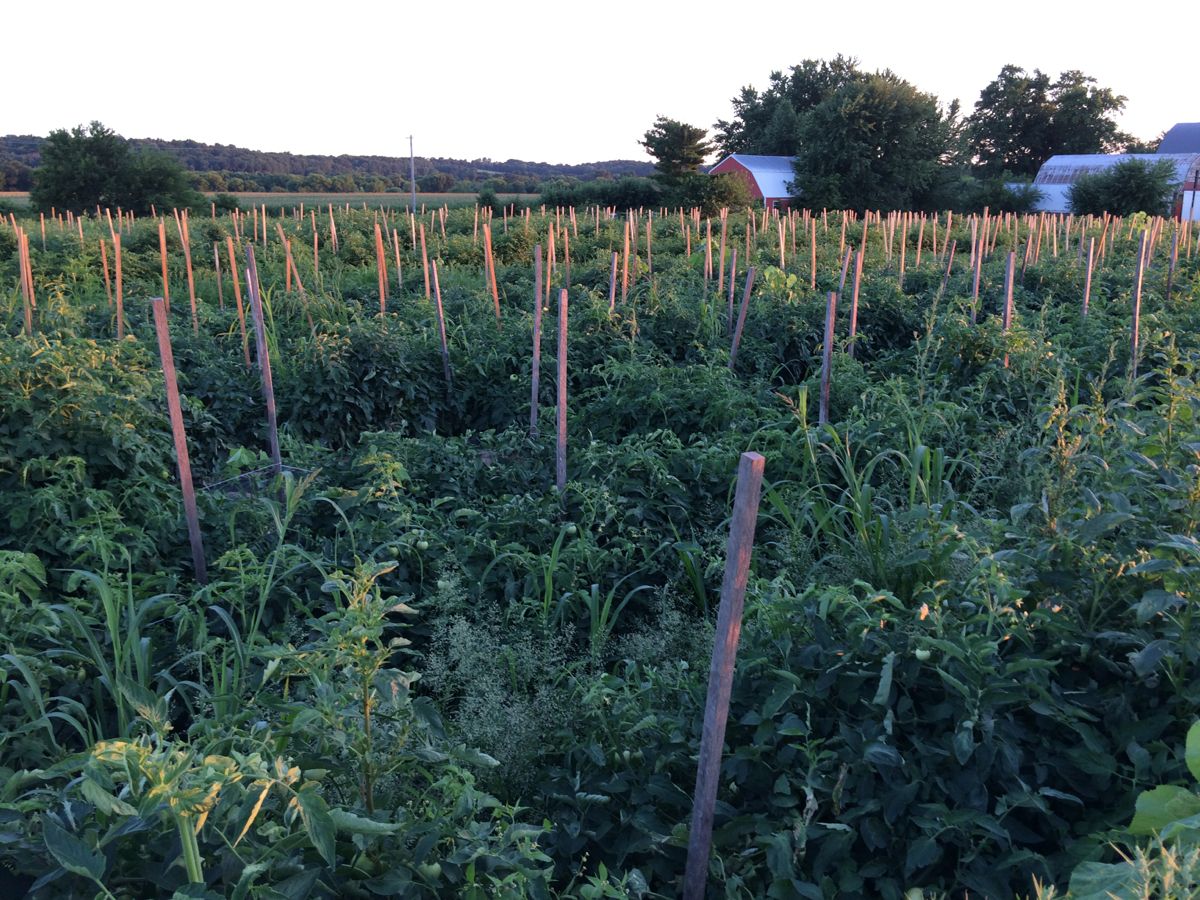
Staked melon field at dusk. It’s a pretty spot on the farm right now. The tomatoes are growing strongly. We’ll have more and more for the CSA boxes in the next few weeks.
Veggie list and veggie notes (July 28/29, 2016, week #11, green EOW)
Sweet corn, about 10 ears
Muskmelon, 1
Snap peas, 0.7 lb
Cherry tomatoes, 1 pint
Tomatoes, 1 or 2
Italian frying peppers, 2 or 3
Cucumbers, about 3
Zucchini & summer squash, 2+ lb
Walla Walla onion, 1 or 2
Dill flowers and ferns, 1 bundle
Each site gets globe eggplant OR Japanese eggplant OR broccoli OR extra cucumber OR an extra corn.
Next week’s box will probably contain melon, tomatoes, peppers, carrots, cucumbers, onions and more.
Sweet corn – Storage. Sweet corn is best when fresh, so we encourage you to eat it asap. Store in the refrigerator, in the husks if you have the room.
Cooking. It is quicker to steam sweet corn than to boil it.
1.) Stand ears of corn upright in a tall pot. Put one inch of water in the pot.
2.) Bring the water to a boil. If the corn is cold when you begin cooking, steam for 5 – 6 minutes. If the corn starts at room temperature, steam for 4 – 5 minutes. The cooking time will vary somewhat depending on how many ears are in the pot. Pay attention to how the corn smells. The scent changes once the corn is ready. Another clue: water will bead on the corn until it is cooked. Don’t overcook it.
Muskmelon – We picked the muskmelons at field-ripe stage. However, Steve says they will be even better if you let them ripen further on your counter for a day or two. Watch for a slight ‘give’ when you press the melon at the blossom end (opposite the stem end). Check for fragrance too. Eat or refrigerate when fully ripe.
Dill flowers and leaves – Your bundle contains both leaves (useful added to many dishes) and flowers (great for pickles). Use whichever part suits you best. A batch of sliced refrigerator pickles would be perfect, seasoned with the dill flowers and buds. Yes, you can pickle sliced ‘normal’ cucumbers. I always choose dill flowers over seed heads when pickling because the flavor is less harsh. Two to four flower umbels per quart of pickles. Pat of Local Thyme has a sweet-sour Refrigerator Dill Pickle recipe with turmeric and mustard. I’ll list our family favorite below.
Refrigerator Pickles
Hang on to this recipe. We should have some pickling cucumbers to share in the CSA boxes, as well as continued slicing cucumbers.
Beth’s notes: We stopped canning pickles years ago because we prefer the flavor and crunch of refrigerator pickles. They will be ready sooner if you slice the cucumbers. You can make refrigerator pickles with ‘normal’ cucumbers (sliced), or with pickling cucumbers (sliced or whole). We often add rings of sweet Walla Walla onions.
Per quart of pickles:
about 1.5 lb pickling cucumbers
optional: sliced red bell pepper strips, without blemishes
1 bay leaf
2 cloves garlic, crushed
2 dill heads (4 if they are small)
1/2 tsp. yellow mustard seed
Brine (enough for 1 quart of pickles)
1 pint water
1.5 Tbsp. pickling salt or table salt
1.5 Tbsp. white vinegar
Mix salt, vinegar and water. Set aside and stir occasionally until the salt dissolves.
Clean the pickles. Place the bay leaf, one garlic clove and one dill head at the bottom of a one-quart jar or container. Pack the jar with pickling cukes (and optional red bell pepper strips), adding the second garlic clove among the pickles. Feel free to slice large pickling cukes into spears to get them to fit compactly. Sprinkle mustard seed over the jar and add the second dill head. Make sure the salt is fully dissolved, then pour brine over the cukes to cover. Pour slowly to allow air bubbles to escape. Cover jar with a lid and refrigerate. Invert the sealed jar every few days to disperse the flavors.
Sliced pickles will be ready in a few days. Whole pickles need at least one week.
RECIPES FROM LAUREN
CHARRED ONION & CUCUMBER SALAD
Adapted from Bon Appetit
Serves 2-4 (but easily doubled!)
Takes 30 minutes
1 green Italian Frying pepper, sliced into circles, seeds removed
4 tablespoons red wine (or sherry) vinegar, divided
1 Walla Walla onion, cut into 1/4-inch slices
3 tablespoons olive oil, divided
Kosher salt and freshly ground black pepper
1 cucumber, cut in half, seeded and sliced
1 teaspoon dried oregano
1. Combine pepper with 2 tablespoons red wine vinegar in a large bowl. Toss several times to coat. Set aside while you prepare the rest of the veggies.
2. Preheat a grill to high. Lay onion slices on a baking sheet and drizzle with 1 tablespoon olive oil as well as a good sprinkling of salt and pepper. Place on grill and cook until charred with grill marks on each side (about 3 minutes each). Remove to baking sheet once charred and drizzle with remaining 2 tablespoons red wine vinegar while still warm. Again, toss to coat incorporate.
3. Pour onions (with all juices) into bowl with pepper. Add cucumber along with remaining olive oil, dried oregano and salt and pepper to taste. Toss well to combine and serve at room temperature.
– – – – – – – –
CHERRY TOMATO, ZUCCHINI, SUMMER SQUASH & CORN PIE
Borrowed and adapted ever so slightly from Smitten Kitchen
I’ve adapted Smitten Kitchen’s recipe ever so slightly because I just love it as it is. Also note that if making pies and pie dough isn’t your thing, these blistered cherry tomatoes with zucchini, summer squash, corn and onion (a.k.a. the filling) would make a lovely salad all on it’s own with just a couple more minutes in the skillet (and maybe a little bacon).
Makes 2 small pies
Serves 6-8
Takes 1 hour, 45 minutes
For the pastry:
2 1/2 cups all-purpose flour
1/2 teaspoon table salt
16 tablespoons cold unsalted butter, cut into pieces and chill again
1/2 cup plain yogurt or sour cream
4 teaspoons fresh lemon juice
1/2 cup ice water
For the filling:
1 tablespoon olive oil
1/4 teaspoon coarse Kosher or sea salt
1 pint cherry tomatoes
Red pepper flakes, optional
3 ears corn, cut from the cob (about 3 cups)
1 small zucchini, diced
1 small summer squash, diced
1 Walla Walla onion, diced
3/4 cup grated parmesan
Glaze:
1 egg yolk beaten with 1 teaspoon water
- Make dough:†Stir the flour and salt in a large bowl. Sprinkle bits of butter over dough and using a pastry blender or your fingertips, work it into the flour until the mixture resembles coarse meal, with the biggest pieces of butter the size of tiny peas. In a small bowl, stir together the sour cream, lemon juice and water and add this to the butter-flour mixture. With your fingertips or a wooden spoon, mix in the liquid until large lumps form. Pat the lumps into a ball. Wrap with plastic and†place in freezer for 20 minutes until chilled (or in fridge for up to 2 days).
- Make filling: Get down the saute pan with the lid. If you donít have one, any large lid will do. Add olive oil, tomatoes, salt and a pinch of red pepper flakes (if thatís your thing) to your saute pan then cover and heat over high heat. Roll the tomatoes around from time to time so that theyíll cook evenly. In a few minutes, youíll hear some putts and pops as the tomatoes burst a little. When most have, remove lid, turn heat down to medium and add zucchini and summer squash chunks along with diced onion. Saute for two minutes, until they soften. Add corn and cook one minute. Adjust seasonings if needed. Transfer mixture to a large plate and spread it out, so that it will cool faster. You want it cooled to at least lukewarm before assembling the pies.
- Assemble pies: Heat oven to 400 degrees. Divide dough in two. Keep half refrigerated while working with other half. On a floured counter, roll the dough out into a 12-inch round (it really doesnít need to be perfectly shaped since we’re going to be free-forming). Transfer to a parchment-lined baking sheet; I like to fold my dough gently, without creasing, in quarters then unfold it onto the baking pan. Sprinkle half tomato-zucchini-corn mixture with half of parmesan and spoon the mixture into the center of the dough, leaving a 2-inch border. If any liquid has puddle in plate, try to leave it there as you spoon. Fold the border over the filling, pleating the edge to make it fit. The center will be open. Repeat with the other portion of dough and other half of filling and cheese (leaving a small amount for the crust). Brush crusts with egg yolk glaze. Sprinkle glaze with last pinches of parmesan.
- Bake the pies: For 30 to 40 minutes, or until puffed and golden brown. Remove from the oven and let stand for 5 minutes, then slide the pies†onto serving plates. Cut into wedges and serve hot, warm or at room temperature.
– – – – – – – –
LOCAL THYME RECIPES
Comforting Classics
Sweet Creamed Corn
Grill Blistered Italian Frying Pepper Salad
Honey Whipped Cottage Cheese with Melon
Pickled Snap Peas
Outside the Box Recipes
Grilled Corn with Garlic and Ginger Soy-Butter
Muhammara
Chilled Tomato Muskmelon Soup
Quinoa Salad with Snap Peas and Zucchini
Quick and Easy Meal


