
Berry podcast + photos
- On: June 22, 2016
 0
0
Did you miss our farm u-pick this past weekend? Here’s a chance to see and to hear what it was like. Friend and Tipi CSA member Julie Garrett has pioneered a podcast series for WORT-FM 89.9 titled “5 Minutes on the Farm.” Each episode features a local Wisconsin farmer talking about what’s currently in season and what’s happening on their farm. The podcasts post on WORT’s website every Wednesday afternoon, and includes a photo gallery, SoundCloud file, and a seasonal recipe. Julie has gotten to know many, many farmers during her four years working for FairShare CSA coalition. This is her newest effort to strengthen connections between consumers and the farms that feed them. Julie visited us this weekend during the strawberry u-pick to interview Steve about berries and farming. Listen here.
Julie is an excellent photographer too (and all-around creative gal!). Here are some of her shots from the u-pick. I’ve created an album with more photos on our Facebook page.
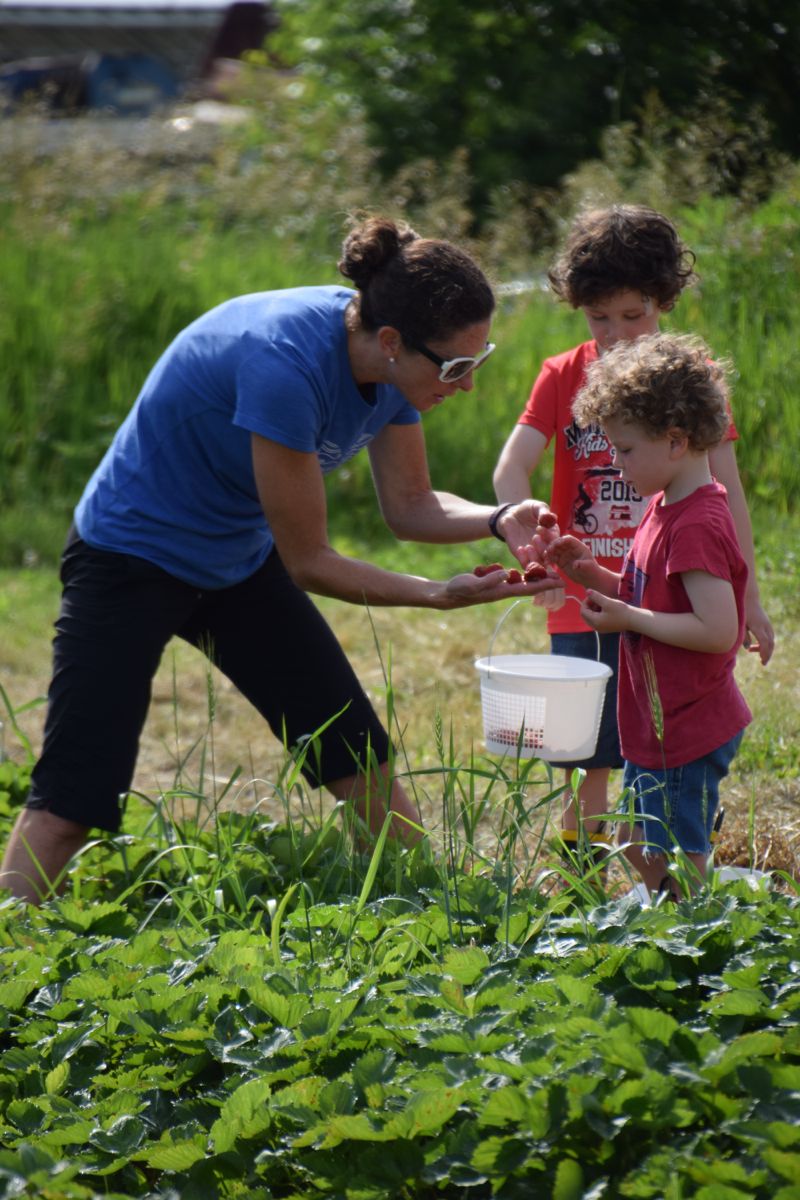

It was a good outing for families.

You gotta test the berries!
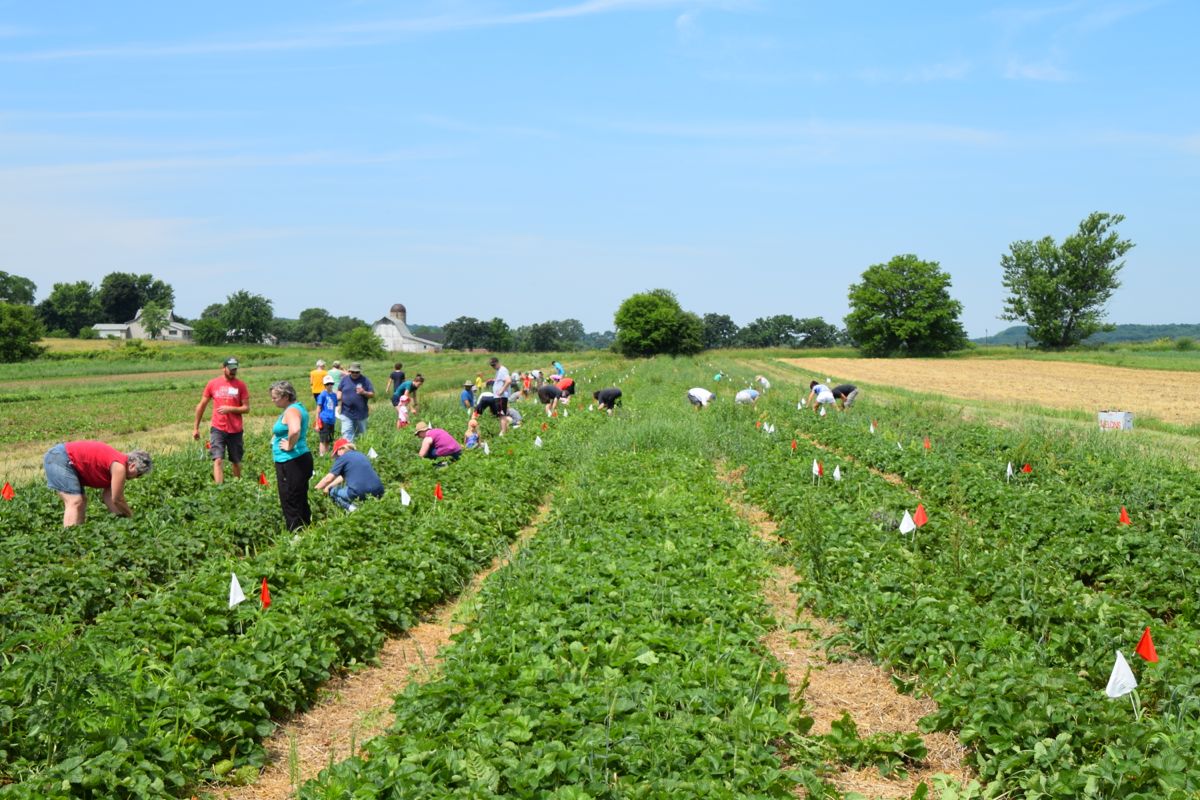
Steve and I think this was our best strawberry u-pick in terms of picking quality. The berries were at their peak, ripe, and incredibly abundant.
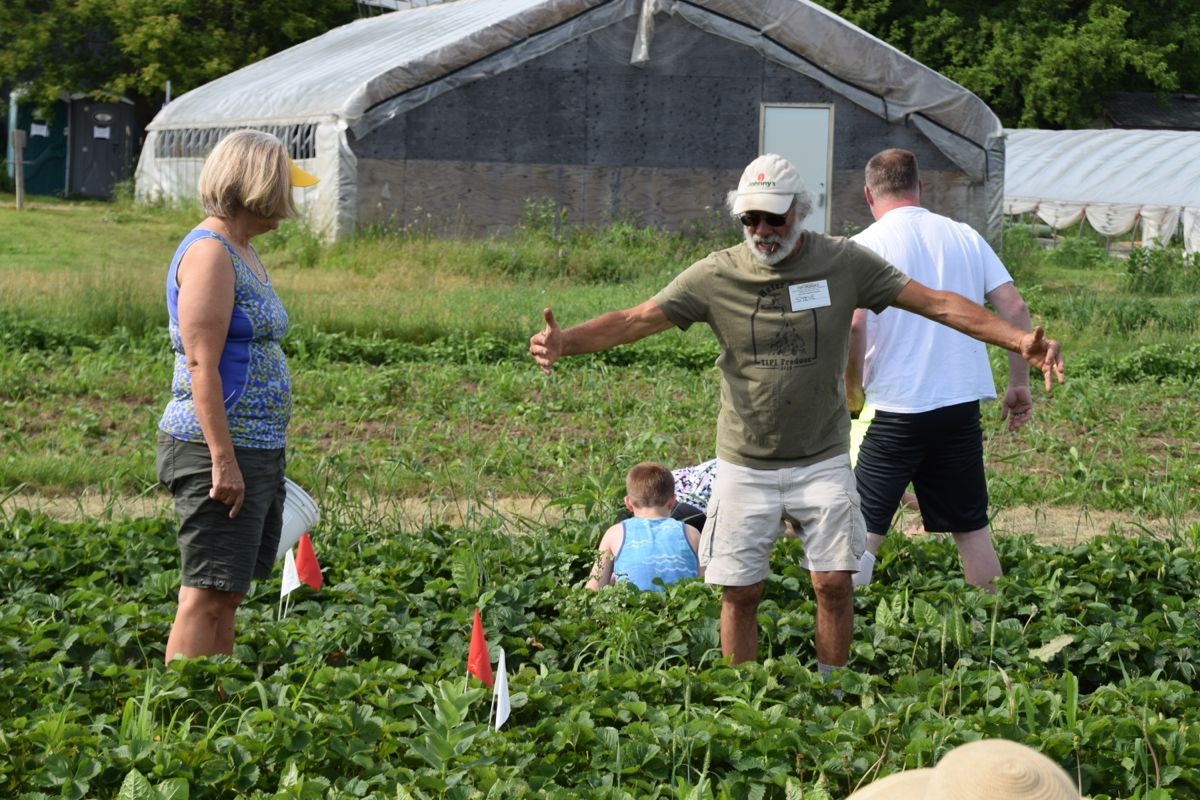
Steve explains how and where to pick.
Head over to our Facebook page to see more photos.
Second strawberry u-pick.
Tipi CSA members, read our emails for info about the upcoming berry u-pick. The season is winding down, so the berries will be smaller and the picking slower.
Veggie list and veggie notes (June 23/24, 2016, week #6, purple EOW)
Strawberries, 1 quart + 1 pint
Snap peas, 3/4 lb
Snow peas, 1/3 lb
(Both types of peas are in one bag.)
Zucchini and summer squash, 3+ lb
Napa cabbage, 1
Collard greens, 1 bunch
Red romaine lettuce, 1
Daikon radish, 1 or 2
Garlic scapes, a handful
Everyone gets some broccoli OR an extra 1 pt strawberries
Next week’s box will probably contain zucchini & summer squash, fennel, kohlrabi, scallions, lettuce, greens, and more.
Strawberries – The berries are ripe. Eat asap. We grew six strawberry varieties this year. Some hold up to the weather better than others. If one of your containers looks riper or more fragile than the other, eat that one first. Don’t be surprised if one container is not quite full. That’s one of our strategies to distribute the berries evenly to all.
Zucchini and summer squash – You will receive yellow summer squash and/or green zucchini.
Napa cabbage (large, pale green cabbage with crinkled leaves) – This is an interesting vegetable, useful for both fresh, raw salads and for cooking. Napa’s most famous use is fermented kimchi. I like to prepare a fresh, unfermented kimchi. Same seasonings, but it’s ready to eat right away. You will be amazed at how much shredded napa cabbage shrinks when prepared this way. See here for an example, but cut the salt in half: Grilled Flank Steak with Kimchi-style Coleslaw.
Storage: Napa stores very well. Cut off wedges as needed and keep the rest covered and refrigerated, and it will keep for several weeks. Peel off the outer layer and it will be ready to use. Here are a few preparation ideas from the ‘Asparagus to Zucchini’ cookbook.
– Chop raw napa into green salads.
– Substitute napa in traditional coleslaw.
– Chinese cabbage cooks quickly. Steam 3-5 minutes, or until leaves are wilted down but remain slightly crisp.
– Substitute napa cabbage for common cabbage in recipes, but reduce the cooking time by 2 minutes.
– Napa cabbage is the main ingredient in egg rolls. Try making an egg roll mixture to eat as a cooked side dish instead of preparing time-consuming egg rolls.
Daikon radish (slender white roots) – These Asian radishes are good cooked or raw. We often make a sliced radish salad, with Asian-style dressing (rice vinegar, mirin, sesame oil, soy sauce, minced garlic). Even a brief marination mellows the radish’s sharpness.
Garlic scapes (curly green things) – Garlic scapes grow at the top of garlic plants. They look like flower buds but are actually clusters of tiny bulblets. We snap off the young scapes to direct the plants’ energy into forming garlic bulbs underground. Use scapes as a substitute for garlic cloves. They can be minced, mixed with olive oil, and added to stir fries or simple pasta dishes. The scapes can be sautéed, but will not brown like garlic cloves. Expect them to retain their crunch even when cooked, and to be milder than garlic cloves, closer in pungency to the green garlic we’ve sent. Most of this week’s scapes are from John Hendrickson of Stone Circle Farm who grows organic garlic for our CSA, but some are from our garlic field.
Snap peas and snow peas. These will be together in one bag.
– Snap peas (plump pea pods) – These peas should be eaten pod and all. They are delicious raw, or very lightly cooked or stir-fried. They might need a quick rinse to remove faded gray blossoms. Store in the refrigerator. Here’s how to remove the strings from the snap peas. Snap off the stem end and pull the string down the concave side of the pod (the inward-curing side). Throw away the string and eat the pod.
– Snow peas (flat pea pods) – These are excellent stir fried or in raw salads. The thicker pea pods will usually have two strings along the edges. Remove them when you snap the stem off.
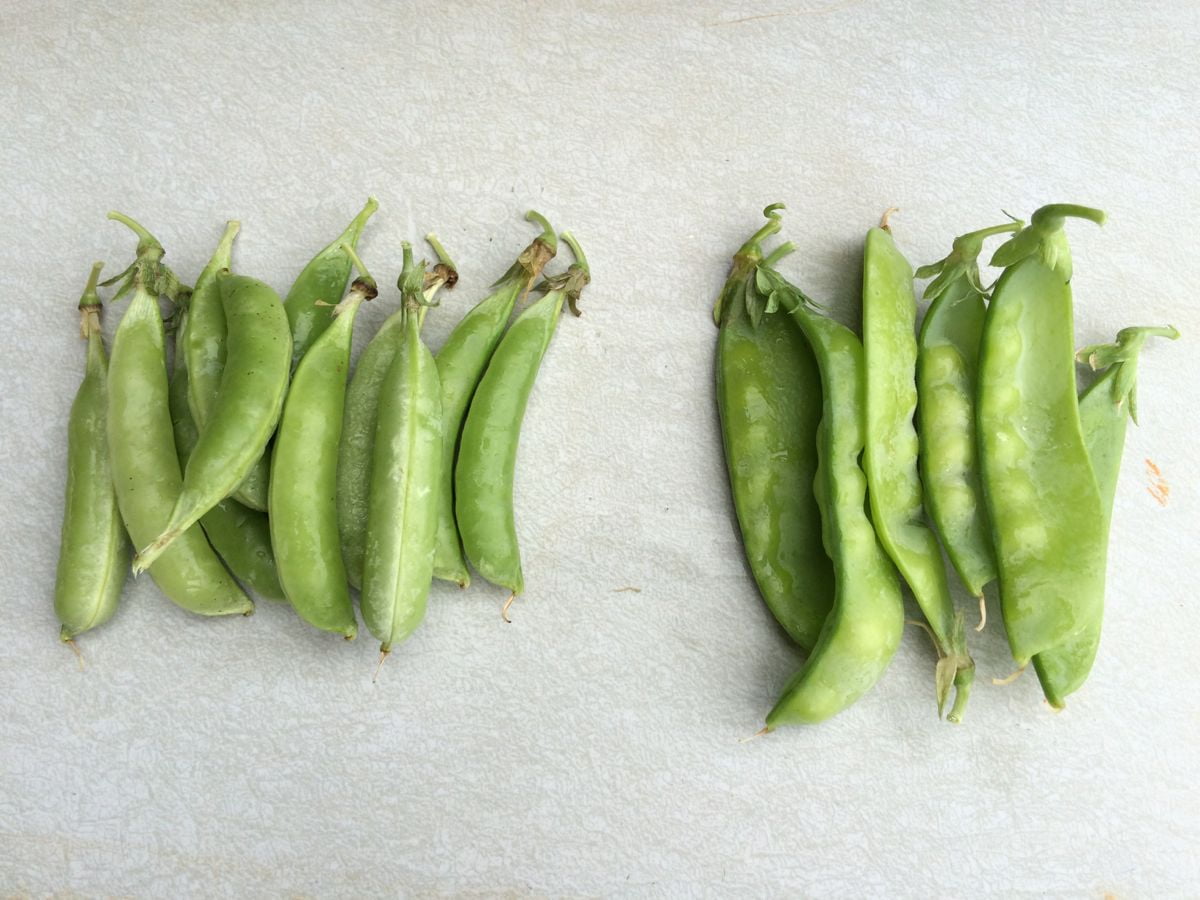
Snap peas on left, snow peas on right. The snap peas are plumper.
RECIPES FROM LAUREN
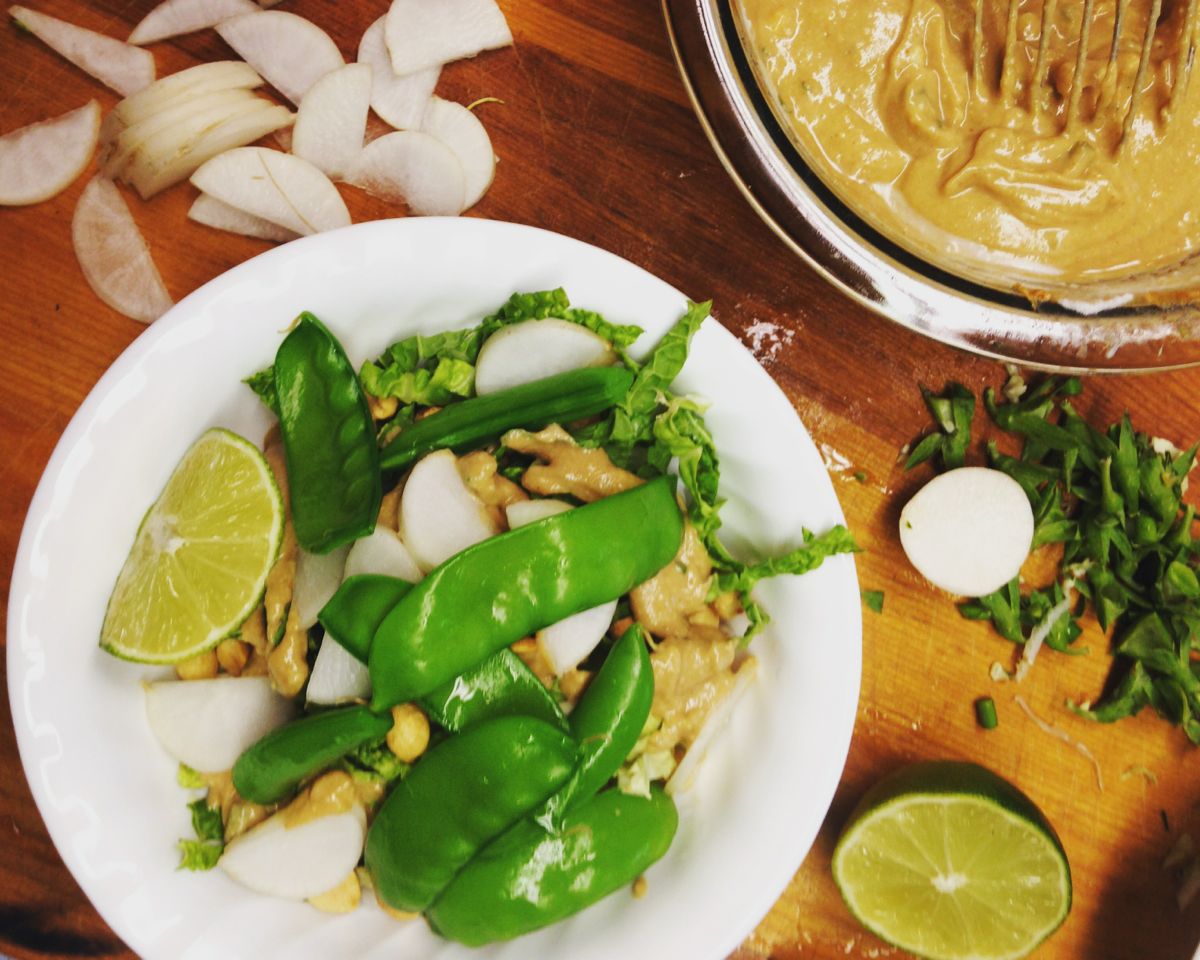
Napa Cabbage Bowl with Coconut Peanut Dressing
Adapted from 101 Cookbooks
In true Lauren fashion, this recipe is super duper versatile. In my opinion, the rice noodles, the peanuts and the dressing are essential, but everything else can be substituted or increased (or decreased) or left off. Use this recipe as guideline and deviate widely (or not) as you desire. I choose to use napa cabbage as the leafy green for the base of this bowl because I love it, but lettuce or kale could also be used. The snow and snap peas are a bright fresh addition, but you could use really any blanched raw veggie instead (broccoli, beans, asparagus, etc). The daikon adds a delicious crunch but is also optional or substitutable.
Takes 30 minutes
Serves 4-6
6 cups thinly sliced napa cabbage (green leafy portion and white core)
1/2 pound snow peas, ends trimmed
1/3 pound snap peas, ends trimmed
8 ounces rice noodles
1 cup thinly sliced daikon radish
1-1/2 cups roasted peanuts
1-2 limes, quartered
Coconut Peanut Dressing:
1/2 cup peanut butter
1-1/2 cups coconut milk
2-3 garlic scapes, minced (about 2 tablespoons)
3 tablespoons brown sugar
2 tablespoons fresh lime juice (about 1 lime)
1 tablespoon soy sauce
1/2 teaspoon cayenne pepper
- Bring large pot of well-salted water to a boil on the stove.
- Prepare your sauce by combining all ingredients in a medium bowl. Whisk well until combined and smooth. Taste and adjust seasonings as needed. More soy sauce will make it saltier. More lime juice will make it brighter. More brown sugar will make it sweeter. You get the picture. Set aside until ready to use. Add a tablespoon or two of hot water if you find the mixture too thick.
- Once water comes to a boil, add snow and snap peas (or any other raw veggies you plan to use). Blanch for just under a minute and then remove with a slotted spoon to a colander. Rinse with cold water to stop the cooking.
- Bring the water back up to a boil and then add the rice noodles. Cook according to package directions. (Mine took 4 minutes). Strain and rinse with cold water to stop the cooking.
- Now you have two options for serving. If you plan to eat it all at once, toss the noodles, cabbage, peanuts and dressing together in an extra-large bowl. Top with blanched veggies and daikon. Serve with lime wedge. If you don’t plan to eat it all at once, get everything all in one place so people can “build their own” bowl starting with the noodles, followed by the cabbage, and then the coconut peanut dressing. Folks can add peanuts, blanched veggies and daikon to their liking. It will store much better in its component parts than once tossed all together. The dressing will keep in your fridge for a week.
◊ ◊ ◊ ◊ ◊ ◊ ◊

Early Summer Vegetarian Cobbler with Basil Parmesan Biscuits
Adapted from My Name is Yeh
This dish is the perfect buttery, robust comfort food you need to celebrate the true beginning of summer. Zucchini and squash have arrived and they are on full display in this creamy dish. Don’t feel guilty if you don’t feel like making the biscuits from scratch. Pillsbury biscuits are a completely acceptable substitution, or you could also leave the biscuits off entirely and make a quick side dish instead of a cobbler.
Makes enough for 4-6
Takes 1 hour
6 tablespoons butter
1 large†zucchini, quartered and sliced
1 large summer squash, quartered and sliced
3-4 garlic scapes, chopped
Pinch Kosher salt
1/2 cup flour
2 cups chicken stock
1 cup water
2-3†cups roughly chopped packed collard greens, stems removed
1-1/2 cup whole milk
1 cup finely shredded Parmesan
Freshly ground black pepper
Basil Parmesan Biscuits:
9 tablespoons butter
2-1/2 cup all-purpose flour
2 teaspoons sugar
1 tablespoon baking powder
3/4 teaspoon Kosher salt
3/4 teaspoon baking soda
1/4 cup finely shredded Parmesan
2-3 tablespoons basil, leaves cut in a chiffonade
3/4 cup buttermilk
1 egg, beaten
- Preheat oven to 425 degrees.
- If you plan to make the biscuits, cut your butter into small cubes and place in a small bowl or measuring cup. Place in the freezer (or fridge) until ready to use.
- Melt butter in a large oven-proof skillet. If you plan to double the sauce, make sure the pan is at least a couple inches deep (a Dutch oven would work nicely if doubling). Add zucchini, summer squash, scallions (or onion) and a pinch of salt. Saute over medium low heat for 10 minutes until well softened. Add garlic and cook until fragrant (about one minute). Add flour and stir until well combined and it evenly coats the veggies (about 2 minutes). Add chicken stock and stir. The mixture should bubble gently and thicken slightly (if it doesn’t turn up the heat a bit). Add the water and again stir to combine. Let simmer for a couple minutes and then add the collard greens, milk, Parmesan and a good helping of pepper. Let simmer gently until it reaches the desired consistency then remove from heat. This will only take a couple minutes. Feel free to add more milk if you feel it’s gotten too thick. Taste and adjust salt and pepper as desired.
- Prepare your biscuits by combining flour, sugar, baking powder, salt and baking soda together in a large bowl. Stir to combine. Incorporate butter using two forks or a pastry cutter. The butter should be incorporated with the flour mixture in rough, pea-sized pieces. Feel free to use your fingers if that works better for you. Once well incorporated, add the Parmesan and basil. Stir to combine and then add buttermilk. Stir until loose dough forms, then turn out onto unfloured counter and knead until all dough comes together. Cut out 6-7 biscuits, brush with egg wash and place on top of liquid mixture.
- Bake for 20 minutes until biscuits are golden brown. Let rest for 5-10 minutes before eating as it will be very, very hot. Then devour immediately.
LOCAL THYME RECIPES
Comforting Classics
Napa Cabbage Slaw with Oranges
Ponzu Chicken, Napa Cabbage and Snap Pea Salad
Parmesan Zucchini Coins
Curried Daikon
Outside the Box Recipes
Roasted Chinese Cabbage
Pasta Carbonara with Snap Peas
Greek Stewed Zucchini
Korean Daikon Rice Cake Soup
Quick and Easy Meal Idea
Collard Greens Pesto Bruschetta


