
Insightful visitors
- On: September 14, 2016
 0
0
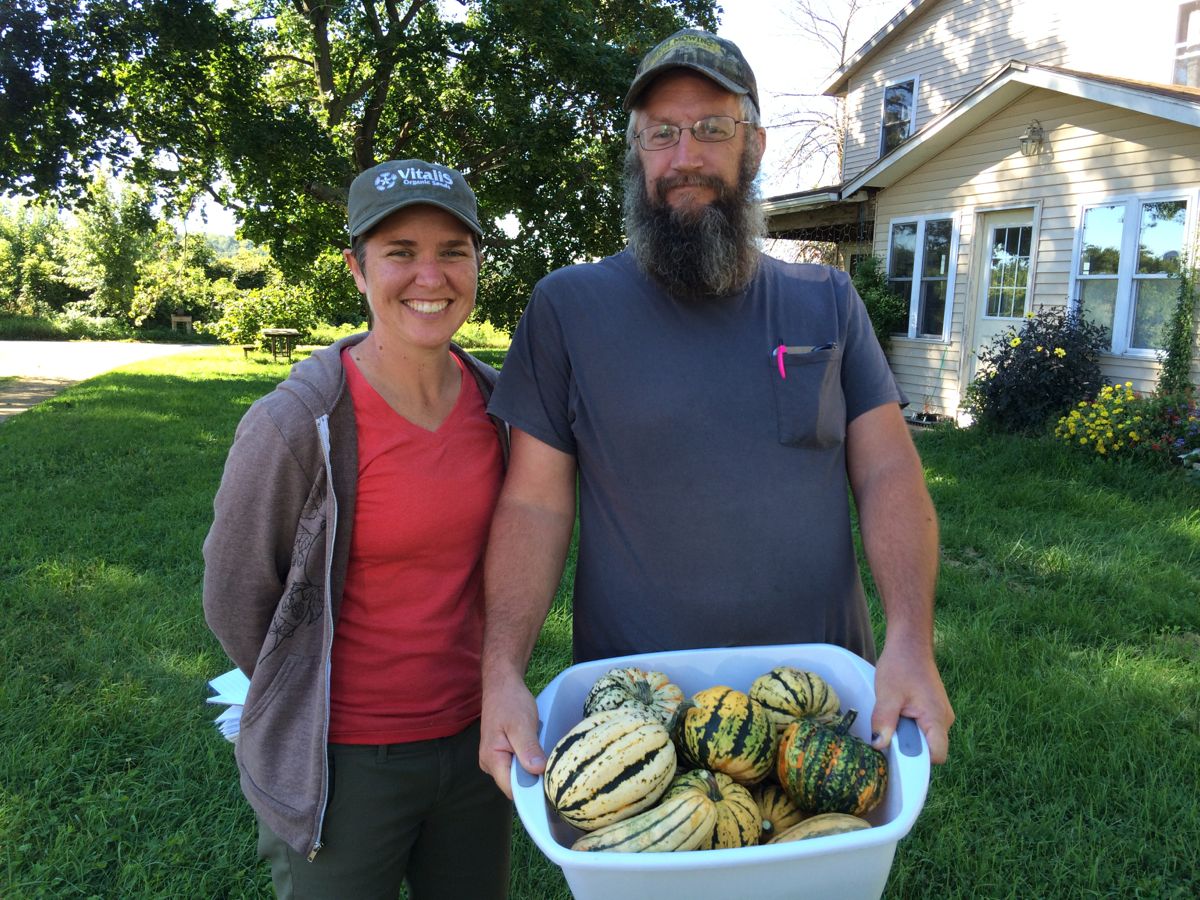
Adrienne Shelton and Paul Betz with a tub of winter squash samples I gathered to discuss with Paul.
We snagged a morning farm visit with two interesting people from seed companies. Adrienne Shelton is a plant breeder for Vitalis Seeds and Paul Betz works for High Mowing Seeds of Vermont. We buy from both companies, as well as from other companies specializing in organic seeds. Adrienne and Paul were in Wisconsin to attend the Organic Vegetable Research Showcase hosted by UW-Madison. Adrienne came to our farm to visit the trials we planted with her basil breeding lines. She is selecting for resistance to basil downy mildew, our most difficult basil disease. We’re glad to evaluate her lines under our conditions. She has some lines with good resistance. The more difficult issue is developing basil varieties that are both disease resistance and taste good.
Paul has run his own farm in Vermont for many years and is a fountain of knowledge about winter squash, my favorite crop. I was glad to swap notes with Paul about varieties and growing practices. (I think Steve is a little sick of talking with me about winter squash.) Paul and I found that we like many of the same varieties, despite our different growing environments. He had a few interesting suggestions that we will try next year. I was glad to walk our fields with Paul to get his insight about harvesting a few of the varieties we buy from High Mowing.
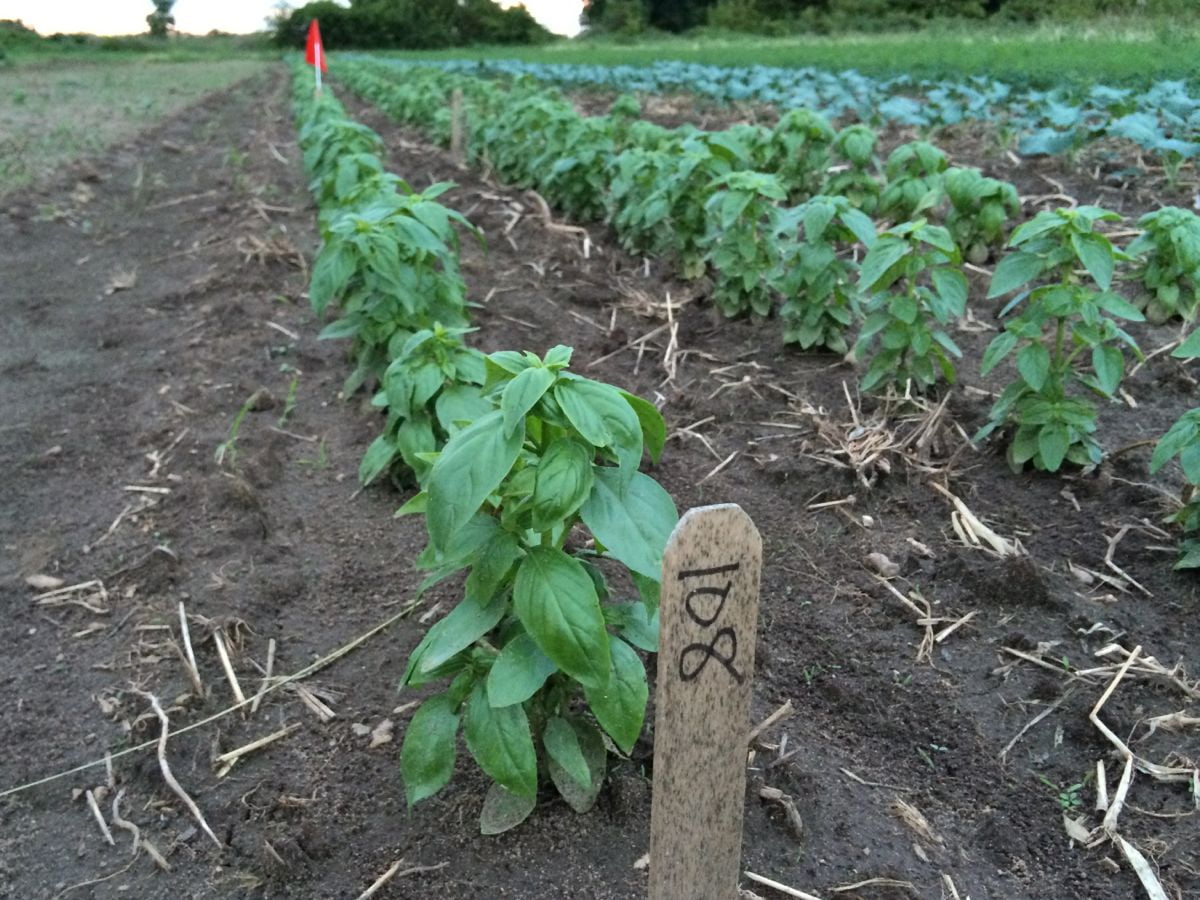
We planted Adrienne’s lines in the midst of our third and fourth basil plantings. Her company developed the disease-tolerant variety that we rely on in summer, called ‘Eleonora’. Some of her lines show improvement over Eleonora but there’s still work to be done with regard to flavor.
Farm News
Summer crops are giving way to fall crops. This delivery contains the last melons and cucumbers. This is the last burst of tomatoes. By next week, we’ll pack just a few in each box. Other summer crops will continue (beans, peppers) but now we are looking ahead to our fall crops. Steve began sampling from the sweet potato fields. If the weather forecast holds, we’ll get the first roots out within a week so they can start curing.
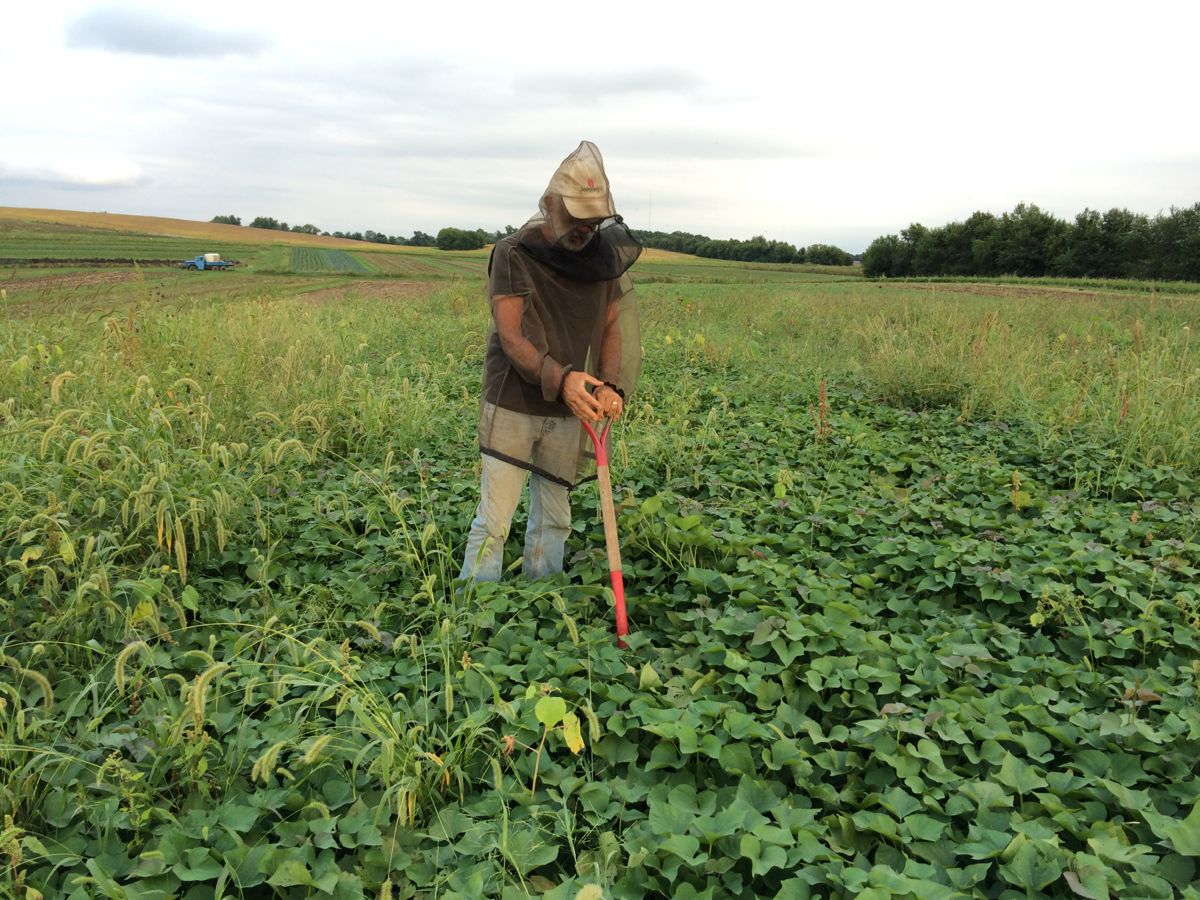
Steve digs a few sweet potato plants from our mysterious field. The vines look terrific but that doesn’t tell us much about what is happening underground.
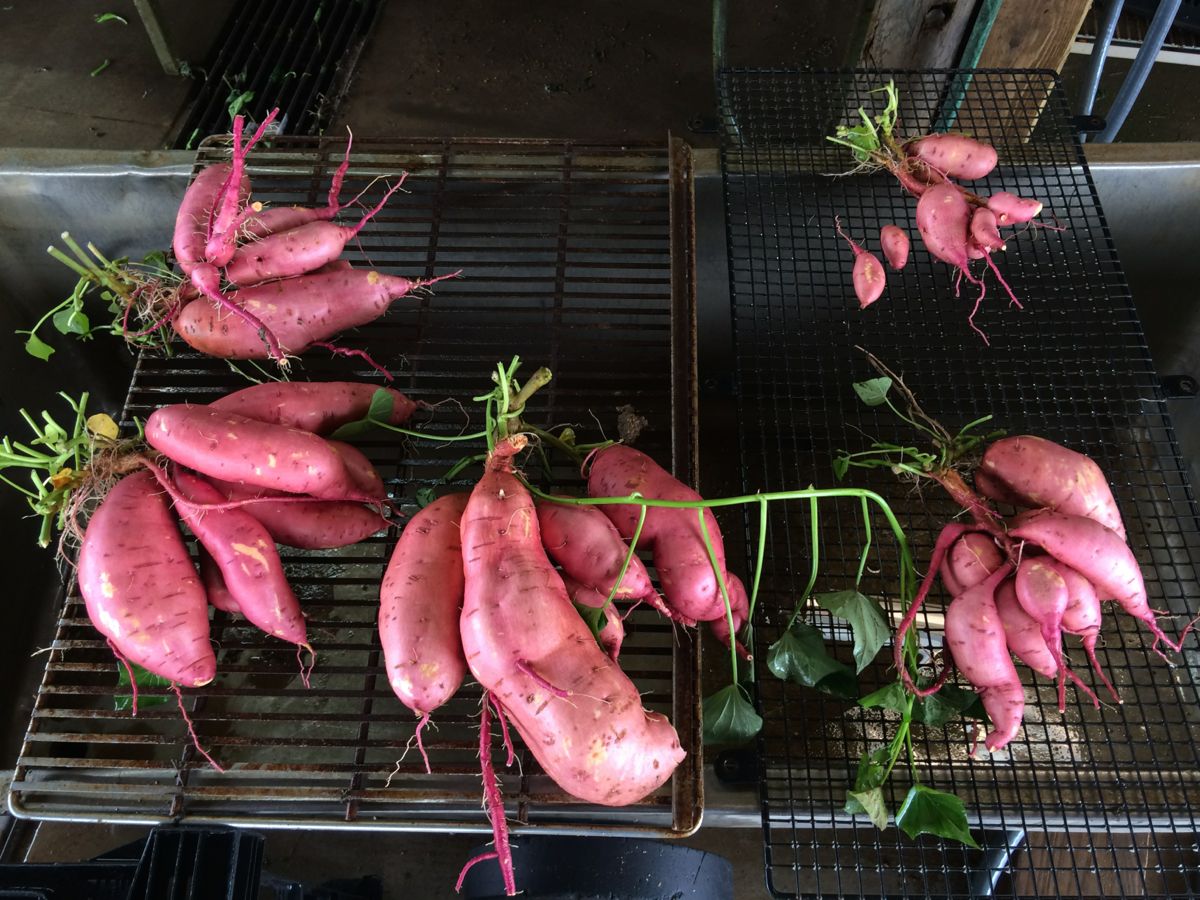
Here are the tubers from five plants. The three in the middle and on the left look unusually good for this time of year. The two on the right? Well, they could use a little more growing time.

Steve chooses the bok choy for this week. We are still loving our mosquito shirts. We wear them all the time, and don’t have to use bug spray. The shirts are hot on sunny days but the relief from mosquitos is worth it.
#2 Grade Red Bell Peppers
I write about pepper grading every year. Returning members can say “yeah, yeah” and skip ahead. New members, please read. So far this year, you have received a mix and #1 and #2 grade peppers from us.
Many of the red, orange and yellow bell peppers we send in the CSA boxes will be our #2 grade. We do this to avoid waste and to deliver good value to our CSA members. The #2 grade peppers are excellent eating quality, but are not quite pretty enough to sell to stores. As a result, we place a much lower value on these peppers. This allows us to provide generous amounts of colored bell peppers over the course of the season, about three times the amount we could provide if we only gave #1 grade. We feel this is a good exchange, even if it means you occasionally open a pepper and find that it needs trimming. Here are the reasons that peppers are downgraded from #1 grade to #2 grade:
1. They may have a minor blemish, or
2. They may have minor insect damage, or
3. They may be very ripe and beginning to wrinkle. (These are especially sweet and delicious as they are fully ripe. These cannot be sold to stores because their shelf life is short. The texture is less crisp than a #1 grade pepper, but the flavor more than makes up for it.)
4. They might be partially red (or orange or yellow) and partially green.
5. Others are just too small.
The eating quality is fine (or excellent) for all these #2 peppers. We throw away all peppers that we suspect have rot inside (although one may occasionally slip through in either #1 or #2 grade.) Today’s peppers are a mix of #1 and #2 grades.
Veggie list and veggie notes (Sept. 15/16, 2016, week #18, purple EOW)
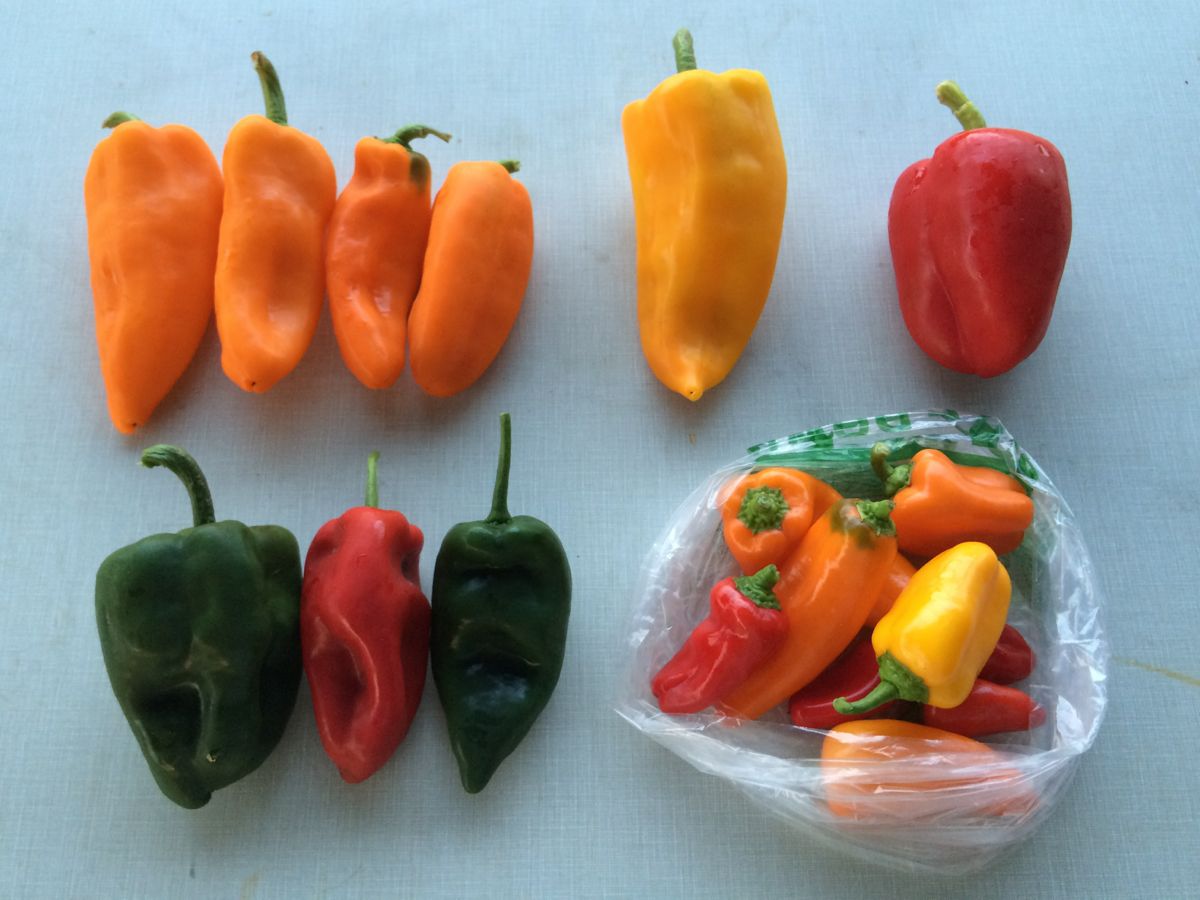
You will receive SOME of these peppers in your box. The poblano chiles are medium heat. All others are sweet peppers. Clockwise from top left; Oranos (sweet, orange), frying pepper (sweet, long, pointed, yellow or red), colored bell pepper (blocky, red or orange or yellow), Lunchbox peppers (sweet, multicolored, packed in a bag), poblano chiles (hot, triangular shape with pointed tip, can be green or red)
Bok choy
Plum tomatoes, 3 lb
(with 1 slicing tomato included)
Romano beans, 3/4 lb
Poblano peppers, 3
Yellow frying or colored bell pepper, 1
Oranos or Lunchbox peppers
Daikon radish, 1.25+ lb
Yellow onion(s)
Fresh fennel seeds & flowers
Garlic
By site, members get Sugar Cube muskmelon (plus broccoli) OR red watermelon
By site, members get Japanese eggplant OR a cucumber OR an extra bell pepper
Bok choy (large rosette with thick white stems and green leaves) – This Asian green is good for stir-frying or sautéing or in soup. You can think of the stems and leaves as two separate vegetables. The stems require longer cooking. The leaves will cook almost as quickly as spinach. Bok choy stores well, so feel free to pull off leaves as you need them, or use the whole head at once. Refrigerate in a plastic bag.
Plum tomatoes – We are nearing the end of our tomato harvests. This week’s tomatoes are still flavorful but will not store as long as usual. Plan to use them quickly.
Poblano chiles (triangular, shiny, green or red) – These are mildly hot. Poblanos are the creme de la creme of chiles. They have lots of great flavor in combination with manageable heat. Roast and add to soup or casseroles. For our household, they are emblematic of fall cooking.
Daikon radish (slender white roots) – These Asian radishes are good cooked or raw. We often make a sliced radish salad, with Asian-style dressing (rice vinegar, mirin, sesame oil, soy sauce, minced garlic). Even a brief marination mellows the radish’s sharpness.
Fresh fennel seeds & flowers (round clusters) – This anise-flavored herb can be used to season tomato sauce and other dishes. Both the yellow flowers and the tender green seeds are quite flavorful. Strip the seeds from their cluster, then crush with the flat of a knife to release their flavor. I think you could add intact seed clusters to your cooking sauce, then remove the cluster when you wish. You will still want to crush the seeds with the flat of a knife. The seeds can be added early in cooking, the flowers are better added at the end. If you shake a flower over your hand, it will release a yellow dust. This is fennel pollen, and it gives the flowers their intense flavor.
Garlic – This week’s garlic is from John Hendrickson of Stone Circle Farm.
Next week’s box will probably contain cabbage, peppers, carrots, onions, an herb and more.
Recipes from Lauren
TOMATO, ONION & FENNEL SALAD
Simple, fresh and delicious, this light tomato salad is the perfect way to say goodbye to tomato season. I’m tempted to make these gluten-free roasted poblano waffles and top them with some sour cream and this tomato salad, but you see my other recipe. I didn’t want to throw much at you this week 😉
Takes 15 minutes
Serves 4-6
8-10 plum tomatoes, cored, halved and thinly sliced
1 sweet onion, thinly sliced
All the fennel flowers you’ve got, flowers removed from stalks and roughly chopped
1/4 cup olive oil
2 tablespoons lemon juice
1 teaspoon Kosher salt
1/4 teaspoon freshly ground black pepper
Toss all ingredients together in a large bowl and stir to combine. Enjoy!
————

CRISPY KOREAN RICE BOWL
Now this recipe is similar to last week’s chickpea and tomato flatbreads due to the fact that it also has a lot of components (and obviously a very long list of ingredients), but I promise it really is not so difficult. Just follow along and allow enough time. Take a weekend day or evening and have a bunch of fun with your family in the kitchen making your own kimchi, crispy rice and toppings.
And if that doesn’t sound enjoyable, you could also simplify things considerably. †The kimchi can be made ahead of time and stored in your fridge for weeks. The rice doesn’t need to be crispy. It could just be ordinary rice. You technically could leave out the mushrooms (but I wouldn’t!).
As for that kimchi. All the ingredients should be regular things you can find in your kitchen with the exception of the gochujang and possibly the rice wine vinegar. You could use white wine or cider vinegar instead of the rice wine vinegar in a pinch, but the gochujung is an essential ingredient. It will be available in the ethnic food aisle of most grocery stores near the Thai or other Asian ingredients. It may also be called Korean red pepper paste.
Takes 2 hours
Serves 4-6
1-1/2 cups white rice
3 cups water, divided
1-1/2 teaspoon Kosher salt, divided
3-5 tablespoons olive oil (use peanut oil if you’ve got it, don’t worry if you don’t), divided
4 garlic cloves, minced
1 head bok choy, leaves and stems separated; leaves roughly chopped, stems thinnly sliced
13.66-ounce can coconut milk
2 tablespoons butter (use olive oil or peanut oil if vegan)
1 pound cremini mushrooms, sliced
1/2 cup soy sauce
2 tablespoons brown sugar
Daikon & Romano Bean Quick Kimchi (below), for serving
- Put rice in a fine-mesh strainer and rinse until water runs clear.
- Add rice to large sauce pan along with 2-1/2 cups water and 1/2 teaspoon Kosher salt. Bring to a boil over high heat. Once boiling, reduce to low and cover. Cook for 12 minutes then remove from heat but keep the lid on for 15 minutes.
- Heat 1 tablespoon olive oil in a large saute pan over medium low heat. Add garlic and 1/2 teaspoon Kosher salt and cook for 5 minutes. Add thinly sliced bok choy stems and additional 1/2 teaspoon Kosher salt. Bring heat up to medium. Cook 5 minutes and then add coconut milk. Bring coconut milk to a boil over high heat and then add bok choy leaves. Reduce to a simmer and cook 10 minutes until bok choy leaves are wilted.
- In a separate large saute pan, melt butter over medium heat. Add mushrooms and cook for 5 minutes just until starting to soften. Add soy sauce, 1/2 cup water and brown sugar. Let simmer gently for 15 minutes until sauce has reduced to a thick syrup.
- Keep bok choy and mushrooms on low while you crisp up the rice. Get a cast-iron skillet really hot over medium high heat. Add 1 tablespoon oil followed by rice. Press it all down and let it sit in the pan for 5 minutes until it begins to brown. Stir up the rice every 5 minutes or so, adding more oil as needed and pressing it flat after you stir it. It should take about 20 minutes total to get crispy rice. I used about 4 tablespoons of oil to get there.
- Scoop crispy rice into the bottom of a large bowl. Use a ladle to add bok choy (with sauce), followed by mushrooms with any remaining sauce and a few spoonfuls of kimchi.
.
Daikon & Romano Bean Quick Kimchi:
1 large daikon, peeled and cut into cubes
3/4 pound romano beans, ends trimmed and cut into bite-size pieces
2 tablespoons Kosher salt
2 tablespoons sugar
1/4 cup rice wine vinegar
3 tablespoons gochujang (also known as Korean red pepper paste)
1 tablespoons minced garlic
1/2 teaspoon ground ginger
1/2 teaspoon cayenne pepper, divided
1/4 teaspoon red pepper flakes
1/2 onion, very thinly sliced
- Add daikon and romano beans to a large bowl. Add salt and sugar and stir to coat evenly. Let sit for an hour at room temperature.(This is a perfect time to start the other components of your meal if making it all at once).
- Meanwhile, prepare the sauce. Combine rice wine vinegar, gochujang, garlic, ginger, 1/4 teaspoon cayenne pepper, and red pepper flakes. Whisk until smooth.
- After an hour has passed, rinse daikon and romano beans with cold water. Let drain for 5 minutes then return to bowl and toss with raw onion and additional 1/4 teaspoon cayenne pepper. (This will help you get that beautiful red color associated with kimchi).
- Add sauce and stir to combine. Use immediately or place into a sealed container (mason jars work great) and leave on the counter for 24 hours. After 24 hours, pace in your†fridge and store up to a month.
.
This makes A LOT of kimchi. About five cups. You will likely only use 1/6 of it during this meal but keep it around, it’s good on EVERYTHING!
————
Local Thyme Recipes
Comforting Classics
Roasted Garlic Hummus with Peppers
Insalata de Riso
Bibimbap with Radish, Bok Choy, Peppers and Ground Pork (vegetarian notes in recipe)
Pasta Puttanesca
Outside the Box Recipes
Bagna Cauda
Coconut Braised Romano Beans
Wakame and Daikon Tsukemono
Couscous with Tomato and Onion
Quick and Easy Meal
Scrambled Eggs with Poblano Tomato Sauce


