
Week #13; Garlic harvest!
- On: August 14, 2019
 0
0
We have a beautiful crop of garlic this year. The bulbs need to dry for a few weeks, then we’ll start packing them in the CSA boxes.

Above, Steve loosens the garlic with our imported undercutter, the new tool I wrote about last month. I rolled my eyes when he suggested it for this job but it worked amazingly well. In the photo above, he has already undercut the bed of garlic. The undercutter lifted the plants up enough to loosen them, then dropped them back in place, still standing upright. We pull the garlic by hand when the ground is moist but (at that moment) it was too dry. This was an excellent moment to use the undercutter instead of digging the garlic up with shovels.
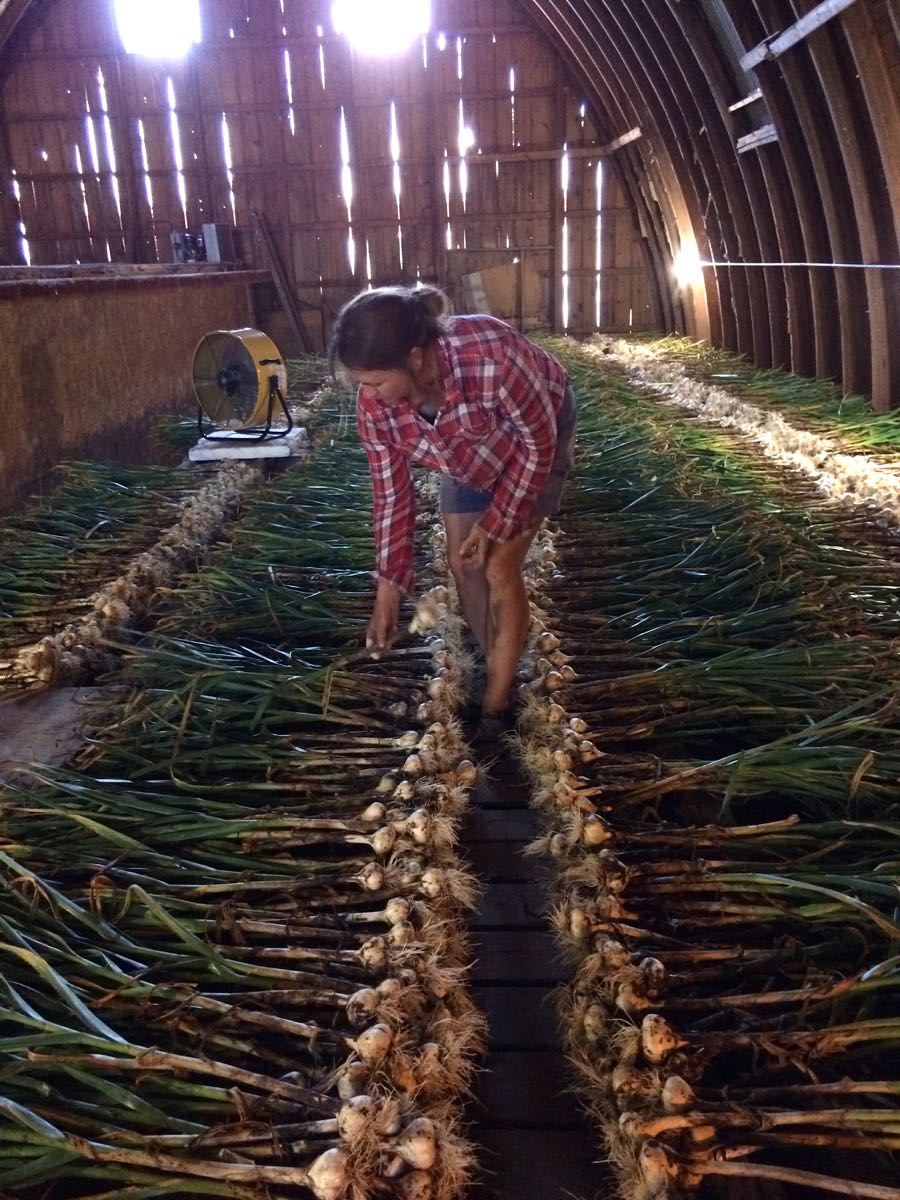
Above, Karen lays harvested garlic in shallow piles. Our barn loft stays very dry, a good place to cure the garlic.
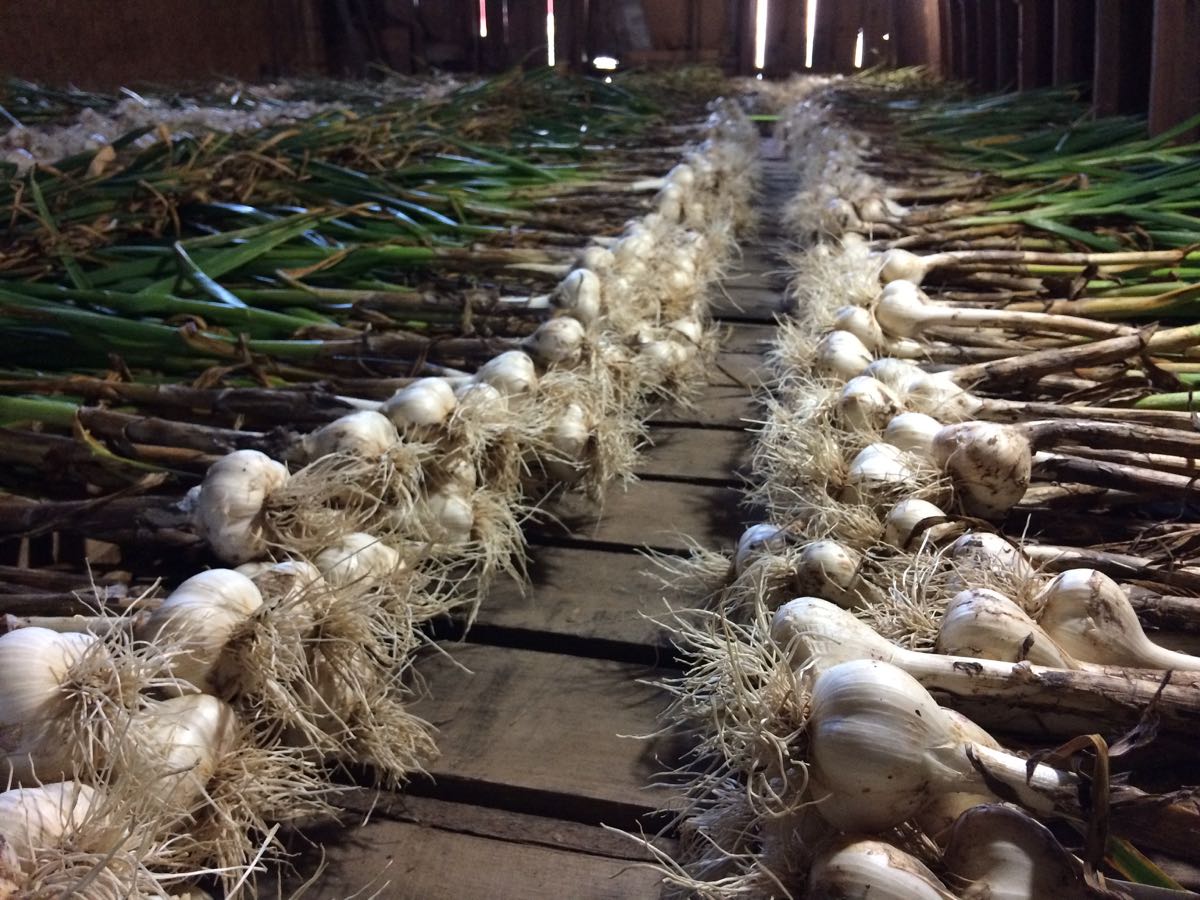
It looks like we standing on the floor but we’re actually five feet in the air, standing on overturned wooden bins. We store carrots and other roots in these bins in winter. They are empty right now, a great surface to spread the garlic. The bins have slatted sides, so air circulates through them.
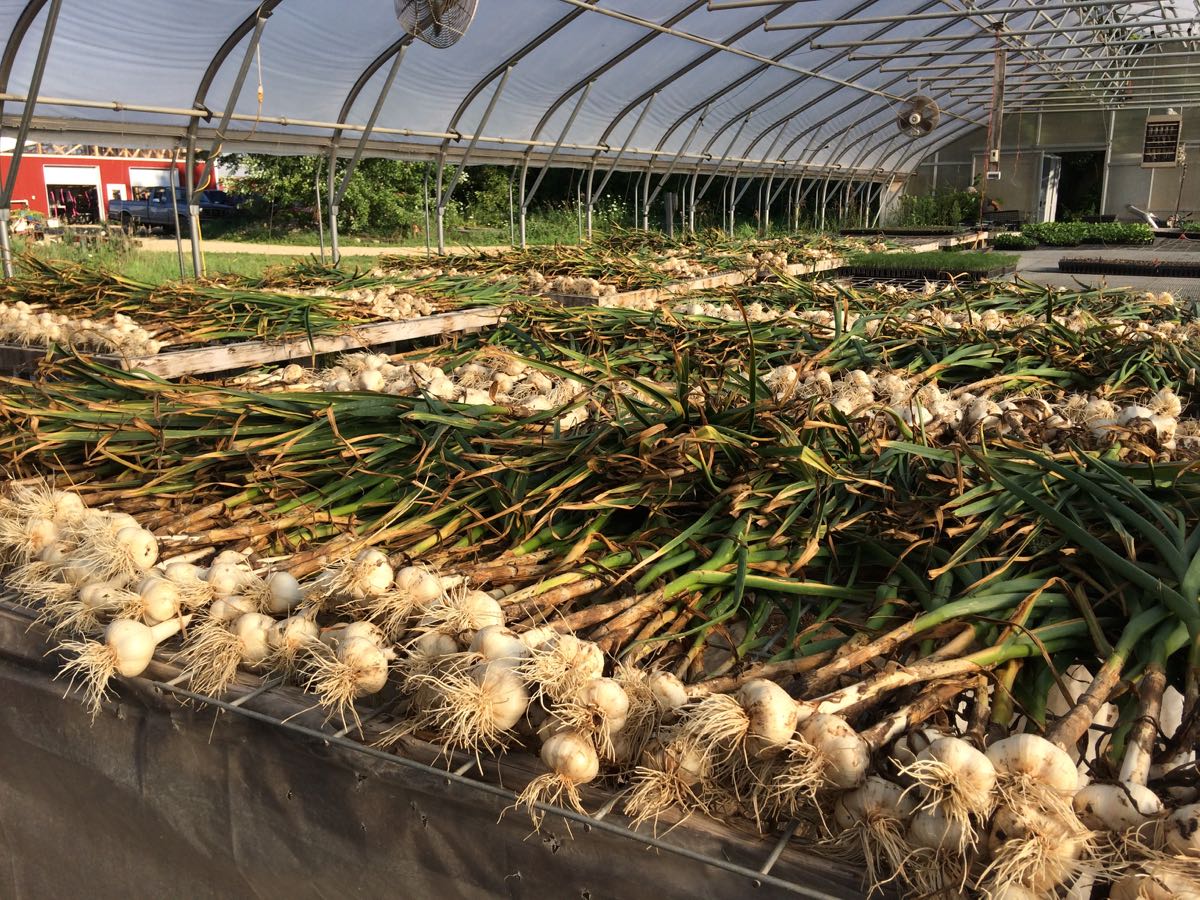
We ran out of room in the barn and filled some empty benches in the greenhouse. The friend who grew half our garlic in past years has retired from farming, so we planted much more than usual this year.
Veggie List and Veggie Notes
Week #13, August 15/16, 2019
– Weekly shares
– EOW/ purple
– Sampler/ moon
Sweet corn, 9 or 10 ears
Muskmelon, green or orange
Yellow or green beans, 1/3 lb
Tomatoes, mixed slicing & plum, ~ 2.5 lb total
Pepper, 2 red or green, bell or fryers
Cucumbers, ~2
Walla Walla onion
Red onion
Parsley, 1 bunch
Basil, 1 small sprig
Jalapeno chile (HOT), 1
Some sites get a Silver Slicer cuke OR orange snack pepper (Oranos)
Next week’s box will probably contain sweet corn, melon, tomatoes, peppers, cucumbers, onion and more.
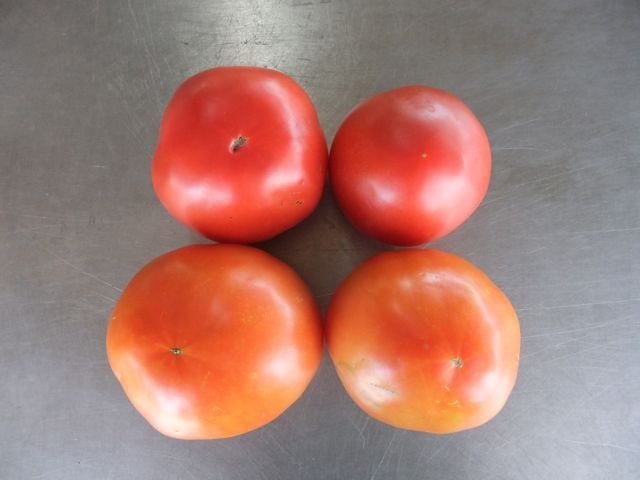
Ripe (top) and less ripe tomatoes (bottom).
Tomatoes – As usual, we pack a mix of ripe and less-ripe tomatoes so you can stretch them through the week. The top tomatoes in the photo are ready to eat. The bottom tomatoes can ripen at room temperature for a few days. Put on your counter or keep in a brown paper bag.
Storage: Tomatoes retain their best flavor and texture when stored at room temperature, no lower than 55 F. However, you should refrigerate your tomatoes if they are fully ripe and you don’t expect to eat them right away. It is better to sacrifice a little flavor and texture than lose your tomatoes to rot. Also, fully ripe tomatoes are less sensitive to chilling injury.
Sweet corn – There are not many caterpillars at the tips this week. Nonetheless, if you are squeamish about bugs, I suggest that you cut off (and discard) the tips of the ears before you husk them. That way, you can avoid seeing the bugs.
Muskmelon – Everyone gets either a green or an orange muskmelon. The green variety is new and unusual but tastes like a typical orange melon. Both types have the typical netted exterior. Storage: Some are ripe and ready to eat. Some need to ripen a day or two on your kitchen counter. Keep at room temperature but refrigerate if not eaten within 2 – 3 days.
Jalapeno chiles – These are hot.
Cucumbers – We now have both normal and Silver Slicer cucumbers to share. We’ll scatter the Silver Slicers among the boxes as they are ready. They are medium-sized white cucumbers with thin skins. They can be used interchangeably with slicing cucumbers in recipes, or mixed together. However, their best use is as a snack. Hand these to the kids on the ride home from picking up your CSA box. There’s no need to peel them. As usual, store all types of cucumbers in the warmest part of your fridge.
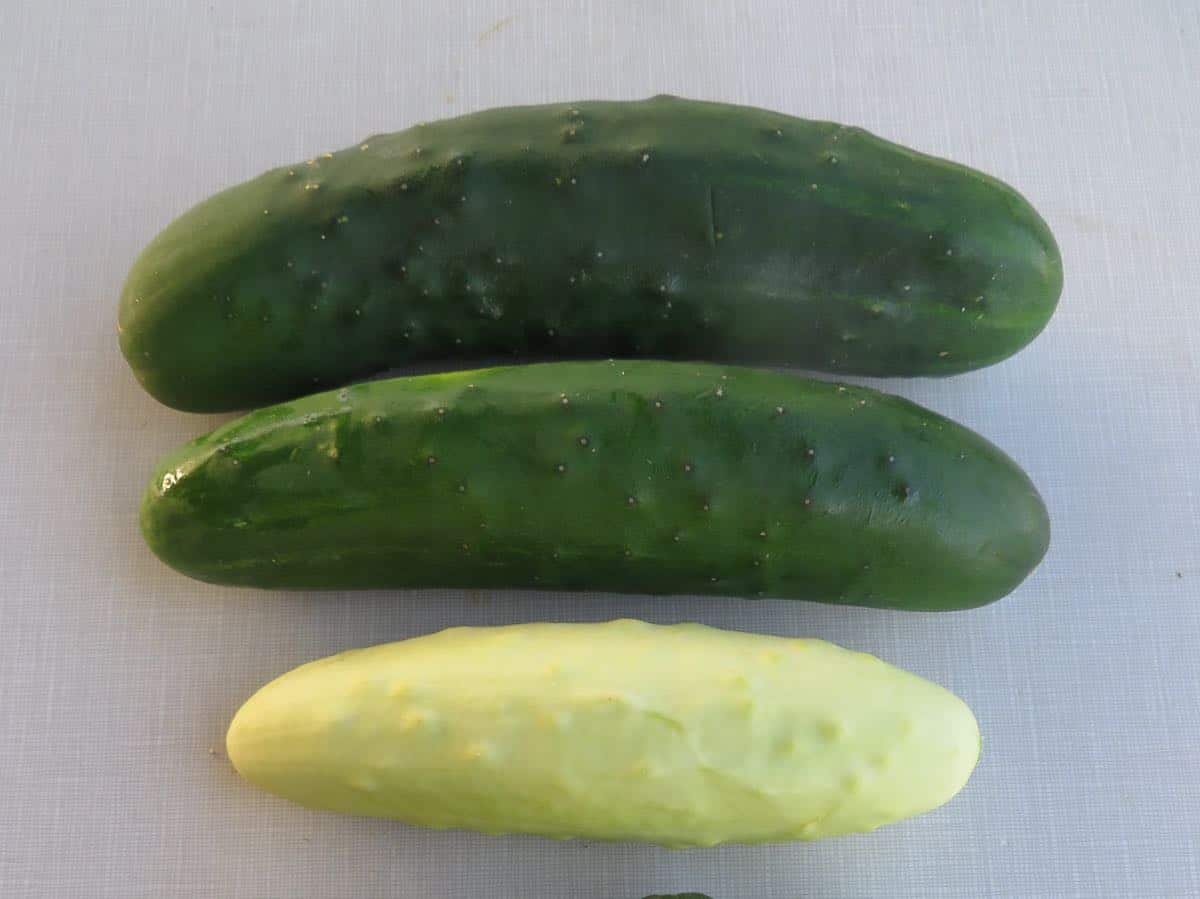
Some sites get slicing cucumbers (top). Some sites get a mix of slicing cucumbers and ‘Silver Slicer’ cukes (bottom).
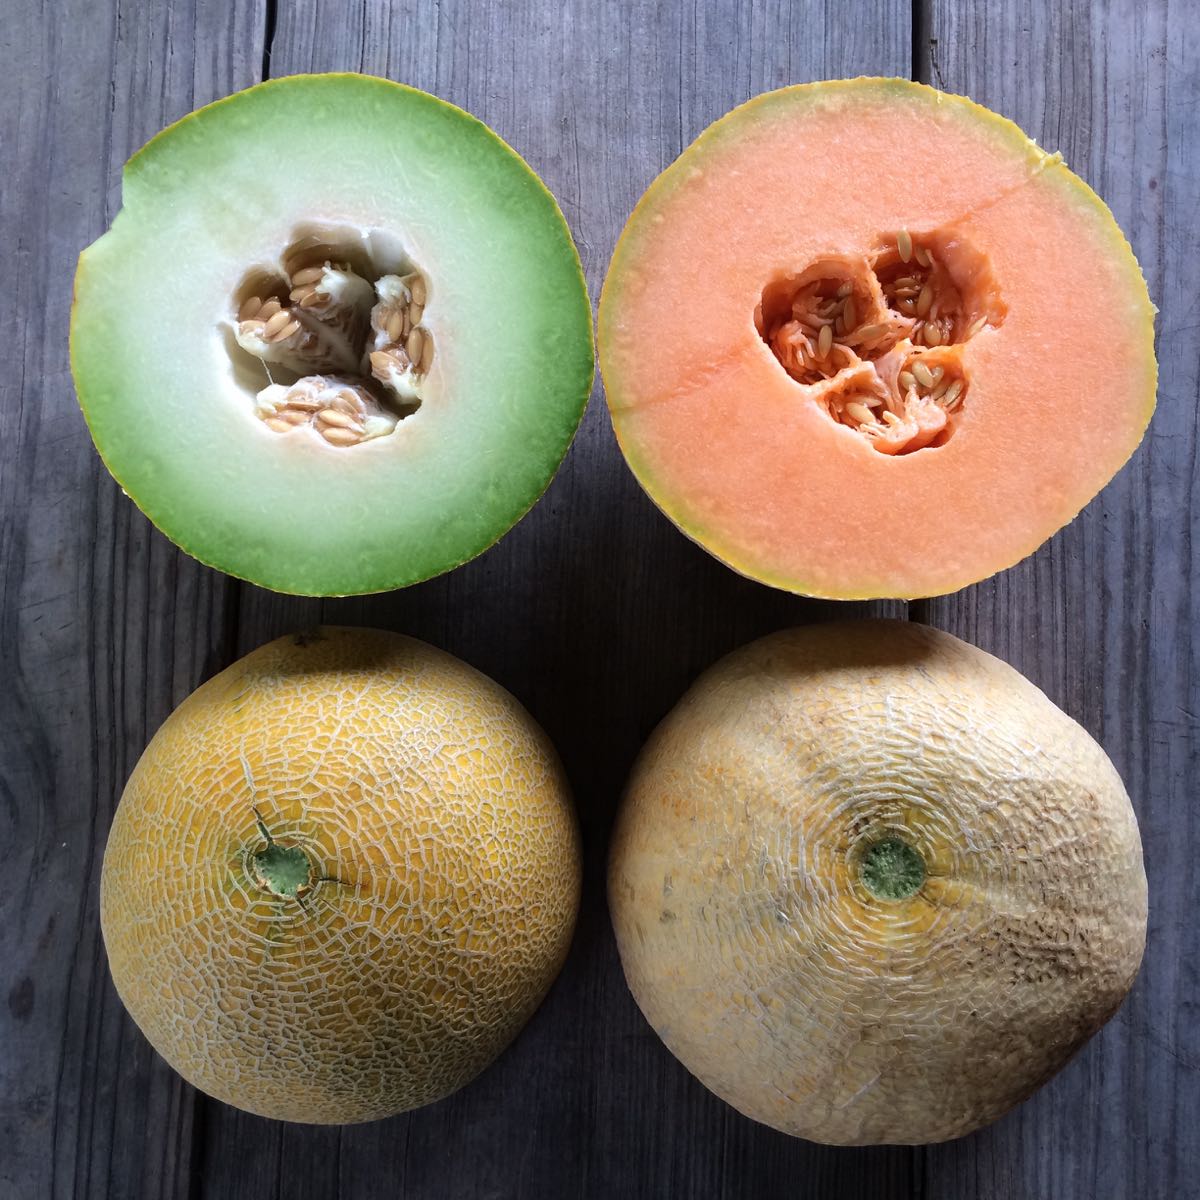
Everyone gets a green or orange muskmelon.
RECIPES
Visit our 2019 Recipe Log or our 2018 Recipe Log or join our Facebook discussion group.
LOCAL THYME/ Comforting Classics
Tomato Gazpacho with a Kick and Polenta Croutons
Grill Blistered Italian Frying Pepper Salad
Tuscan Rigatoni with Tomatoes and Pancetta
Velvet Chicken and Corn Soup
LOCAL THYME/ Outside the Box Recipes
Quinoa Tabbouleh with Corn
Mediterranean Stuffed Peppers
Spicy Chicken Paella
Mustardy Grilled Corn and Sausage Kebabs
LOCAL THYME/ Quick & Easy Meal
Spiced Shrimp with Corn Cakes
????????????
RECIPES FROM LAUREN
SWEET CORN FRITTERS
Adapted from Bon Appetit
Takes 30 minutes.
Serves 2-4.
1 green frying or bell pepper, seeded and cut into quarters
1 jalapeno, seeded, cut in half
1/2 Walla Walla, roughly chopped
1/2 cup flour
2 eggs
1/2 cup parmesan
1 teaspoon Kosher salt
1/4 teaspoon freshly ground black pepper
2 cups sweet corn kernals (not cooked!)
1/4 cup vegetable oil, divided
Basil Yogurt Sauce (recipe below)
Hot sauce, optional
Diced tomatoes, optional
1/4 cup vegetable oil, divided
- In a food processor combine peppers and onion. Process until finely chopped. Add flour, eggs, parmesan, salt and pepper. Process until eggs are fully incorporated. Add corn and pulse 3-4 times until uniformly mixed throughout.
- Heat a large heavy skillet over medium heat. Warm a tablespoon of oil for about 5 minutes. When the pan is quite hot and the oil is glistening, add a scant 1/4 cup of batter to the pan. You should have room for 3-4 fritters at a time. Fry for 4 minutes per side and until nicely browned. Set on paper towels so that most of the oil drains off. Continue cooking until you get through all your batter, adding more oil when the pan gets dry and adjusting the temperature as needed.
- Meanwhile, prepare your sauce.
- Serve 4-5 fritters on a plate with a heafty dollop of sauce, some hot sauce and diced tomatoes.
.
Basil Yogurt Sauce
1/4 cup mayonnaise
1/4 cup plain yogurt
1 teaspoon Dijon mustard
1 small spring basil, finely chopped
1/4 teaspoon Kosher salt
Few grinds fresh black pepper
In a small bowl, combine all ingredients and stir to combine.
????????????
HEAPED HUMMUS
Adapted from the amazing Smitten Kitchen
Below you will find links to my favorite simple hummus and pita recipes. You absolutely can make them from scratch. I have. It can be very fun if you have the time, but it’s also really fun to get a vat of incredible hummus and pile of pita from a great Mediterranean restaurant (like Banzo in Madison), whip up this quick salad, and pour it on top of the hummus for a very simple, very affordable, very fresh dinner. Do not feel like you need to avoid making life easy.
Also, if you still have any eggplant left in your box from last week, feel free to chop that into large chunks and toss it with 2-3 tablespoons of olive oil and roast it for 30 minutes at 400 degrees. Serve on the side of your heaped hummus plate. It will pair beautifully.
Serves 8-12 (as a snack) or 4-6 (as a meal).
Takes 20 minutes (if just making the salad) or 2 hours if making hummus and pita from scratch.
3-4 cups diced tomatoes
2 cucumbers, seeded and chopped
1 red onion, diced
1 red fryer, diced
1/2 cup diced parsley
2 tablespoons olive oil, plus more for drilling
1/2 lemon, juiced
1 teaspoon Kosher salt
1/4 teaspoon freshly ground black pepper
1 batch ethereally smooth hummus, preferably at room temperature
1 batch whole wheat pita, cut into triangles
- In a large bowl, combine all veggies with parsley, olive oil, lemon, salt and pepper. Stir well, taste and adjust seasonings as desired.
- Prepare you hummus and then spread it out (or maybe 1/3 of it out if not serving all 8-12 people at once) on a large platter. Using a slotted spoon, heap hummus with veggies placing them on top and in the center (so some hummus is still visible on all sides). Drizzle with olive oil and enjoy with pita triangles!
.


