Yearly Archives: 2016
Berry podcast + photos
- On: June 22, 2016
 0
0
Did you miss our farm u-pick this past weekend? Here’s a chance to see and to hear what it was like. Friend and Tipi CSA member Julie Garrett has pioneered a podcast series for WORT-FM 89.9 titled “5 Minutes on the Farm.” Each episode features a local Wisconsin farmer talking about what’s currently in season and what’s happening on their farm. The podcasts post on WORT’s website every Wednesday afternoon, and includes a photo gallery, SoundCloud file, and a seasonal recipe. Julie has gotten to know many, many farmers during her four years working for FairShare CSA coalition. This is her newest effort to strengthen connections between consumers and the farms that feed them. Julie visited us this weekend during the strawberry u-pick to interview Steve about berries and farming. Listen here.
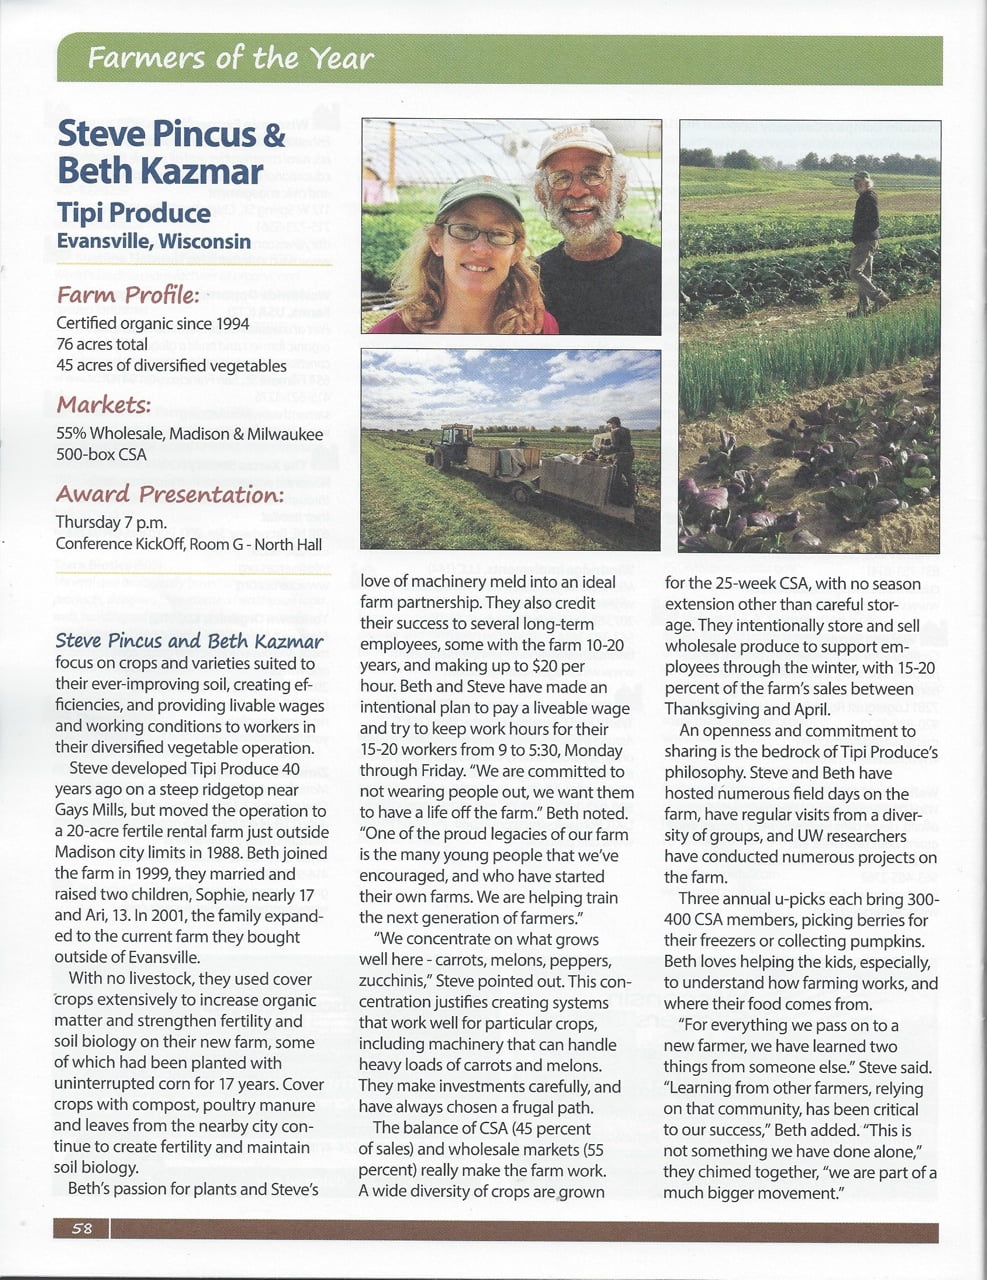
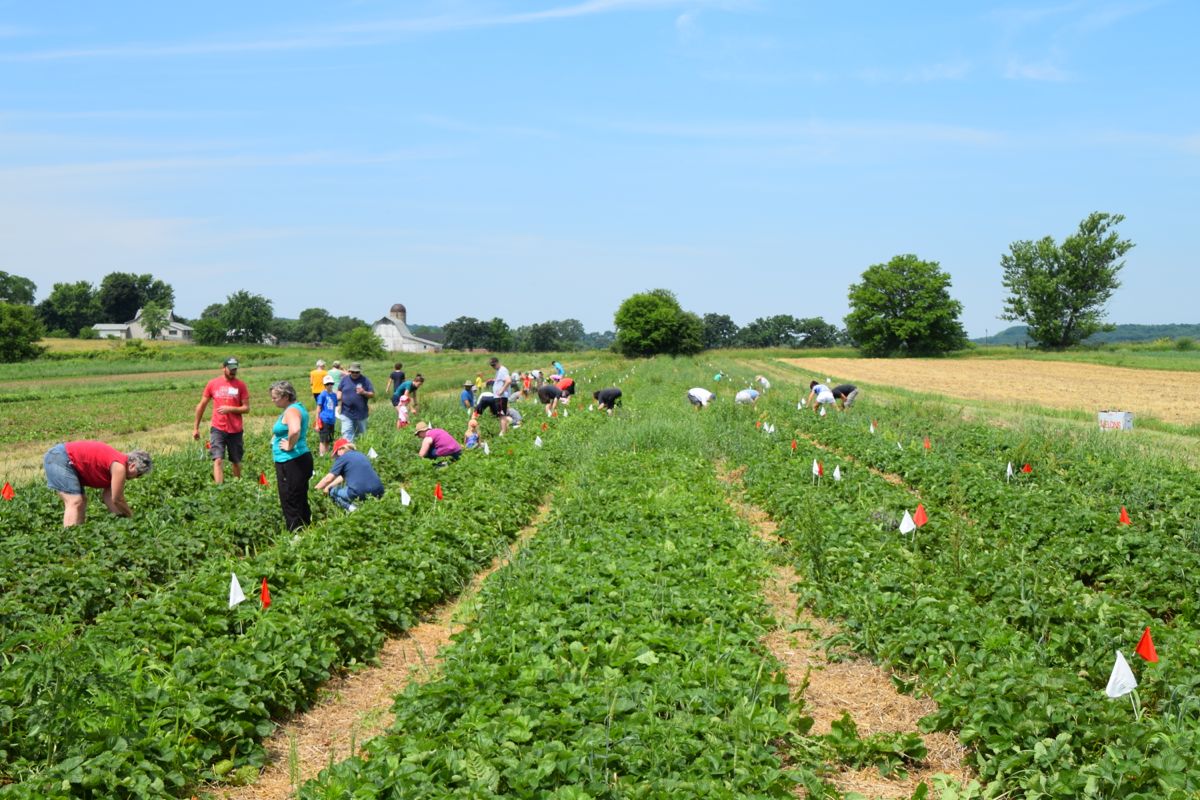
Julie is an excellent photographer too (and all-around creative gal!). Here are some of her shots from the u-pick. I’ve created an album with more photos on our Facebook page.
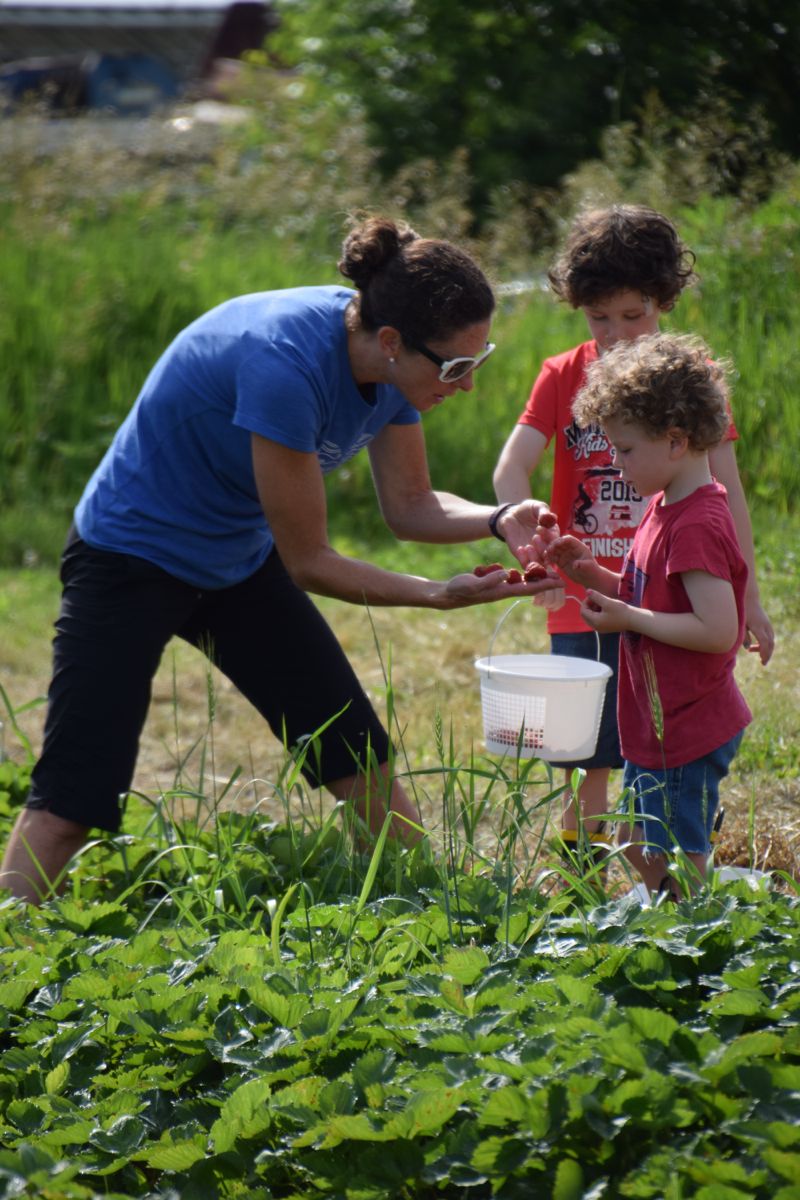

It was a good outing for families.

You gotta test the berries!
Steve and I think this was our best strawberry u-pick in terms of picking quality. The berries were at their peak, ripe, and incredibly abundant.
Steve explains how and where to pick.
Head over to our Facebook page to see more photos.
Second strawberry u-pick.
Tipi CSA members, read our emails for info about the upcoming berry u-pick. The season is winding down, so the berries will be smaller and the picking slower.
Veggie list and veggie notes (June 23/24, 2016, week #6, purple EOW)
Strawberries, 1 quart + 1 pint
Snap peas, 3/4 lb
Snow peas, 1/3 lb
(Both types of peas are in one bag.)
Zucchini and summer squash, 3+ lb
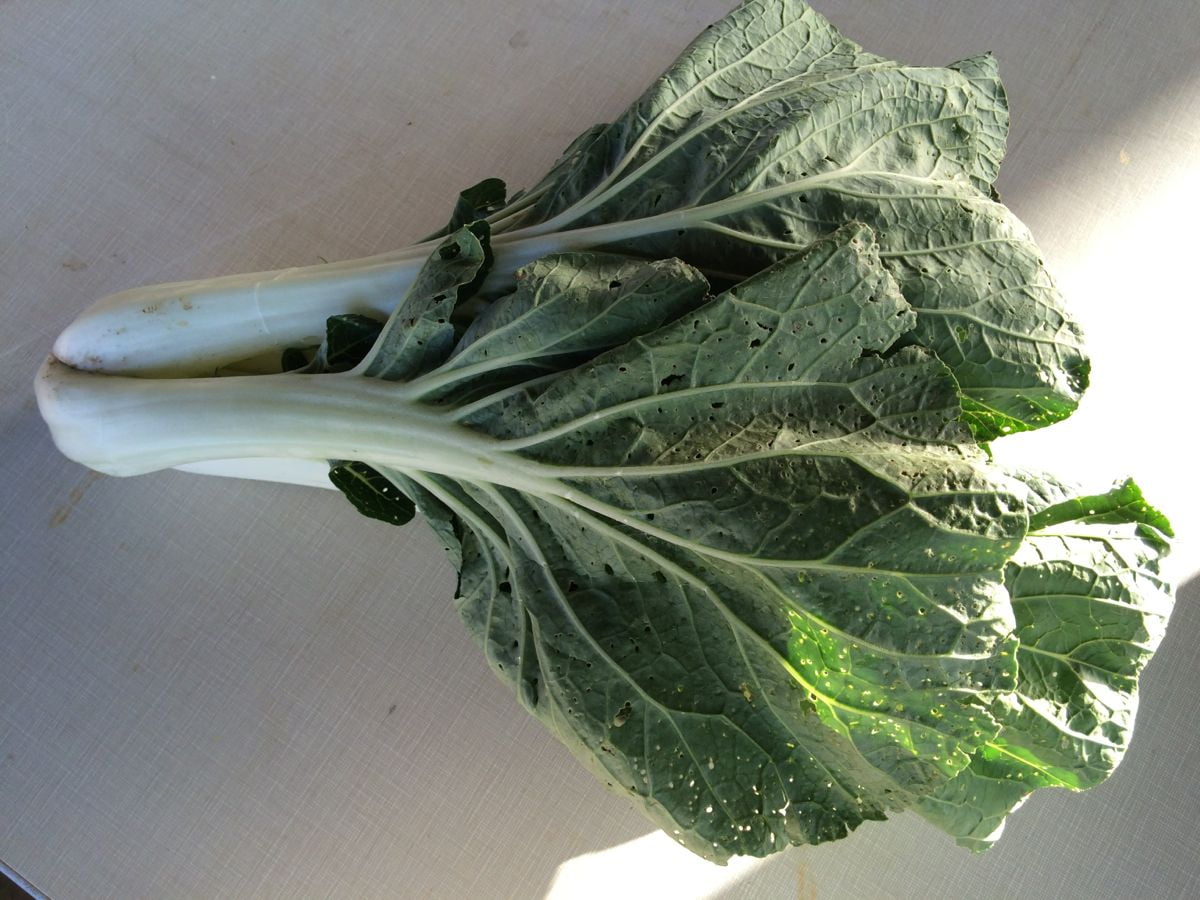
Napa cabbage, 1
Collard greens, 1 bunch
Red romaine lettuce, 1
Daikon radish, 1 or 2
Garlic scapes, a handful
Everyone gets some broccoli OR an extra 1 pt strawberries
Next week’s box will probably contain zucchini & summer squash, fennel, kohlrabi, scallions, lettuce, greens, and more.
Strawberries – The berries are ripe. Eat asap. We grew six strawberry varieties this year. Some hold up to the weather better than others. If one of your containers looks riper or more fragile than the other, eat that one first. Don’t be surprised if one container is not quite full. That’s one of our strategies to distribute the berries evenly to all.
Zucchini and summer squash – You will receive yellow summer squash and/or green zucchini.
Napa cabbage (large, pale green cabbage with crinkled leaves) – This is an interesting vegetable, useful for both fresh, raw salads and for cooking. Napa’s most famous use is fermented kimchi. I like to prepare a fresh, unfermented kimchi. Same seasonings, but it’s ready to eat right away. You will be amazed at how much shredded napa cabbage shrinks when prepared this way. See here for an example, but cut the salt in half: Grilled Flank Steak with Kimchi-style Coleslaw.
Storage: Napa stores very well. Cut off wedges as needed and keep the rest covered and refrigerated, and it will keep for several weeks. Peel off the outer layer and it will be ready to use. Here are a few preparation ideas from the ‘Asparagus to Zucchini’ cookbook.
– Chop raw napa into green salads.
– Substitute napa in traditional coleslaw.
– Chinese cabbage cooks quickly. Steam 3-5 minutes, or until leaves are wilted down but remain slightly crisp.
– Substitute napa cabbage for common cabbage in recipes, but reduce the cooking time by 2 minutes.
– Napa cabbage is the main ingredient in egg rolls. Try making an egg roll mixture to eat as a cooked side dish instead of preparing time-consuming egg rolls.
Daikon radish (slender white roots) – These Asian radishes are good cooked or raw. We often make a sliced radish salad, with Asian-style dressing (rice vinegar, mirin, sesame oil, soy sauce, minced garlic). Even a brief marination mellows the radish’s sharpness.
Garlic scapes (curly green things) – Garlic scapes grow at the top of garlic plants. They look like flower buds but are actually clusters of tiny bulblets. We snap off the young scapes to direct the plants’ energy into forming garlic bulbs underground. Use scapes as a substitute for garlic cloves. They can be minced, mixed with olive oil, and added to stir fries or simple pasta dishes. The scapes can be sautéed, but will not brown like garlic cloves. Expect them to retain their crunch even when cooked, and to be milder than garlic cloves, closer in pungency to the green garlic we’ve sent. Most of this week’s scapes are from John Hendrickson of Stone Circle Farm who grows organic garlic for our CSA, but some are from our garlic field.
Snap peas and snow peas. These will be together in one bag.
– Snap peas (plump pea pods) – These peas should be eaten pod and all. They are delicious raw, or very lightly cooked or stir-fried. They might need a quick rinse to remove faded gray blossoms. Store in the refrigerator. Here’s how to remove the strings from the snap peas. Snap off the stem end and pull the string down the concave side of the pod (the inward-curing side). Throw away the string and eat the pod.
– Snow peas (flat pea pods) – These are excellent stir fried or in raw salads. The thicker pea pods will usually have two strings along the edges. Remove them when you snap the stem off.
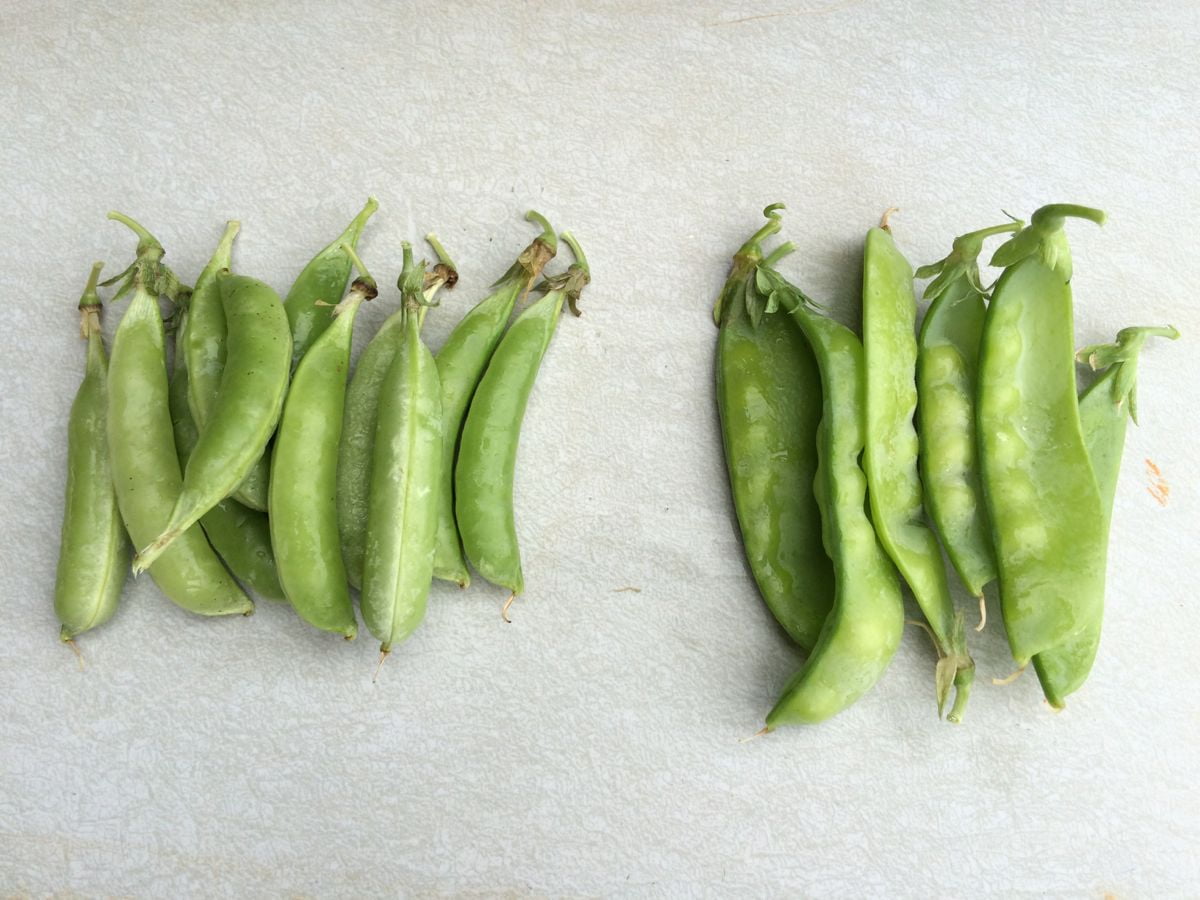
Snap peas on left, snow peas on right. The snap peas are plumper.
RECIPES FROM LAUREN
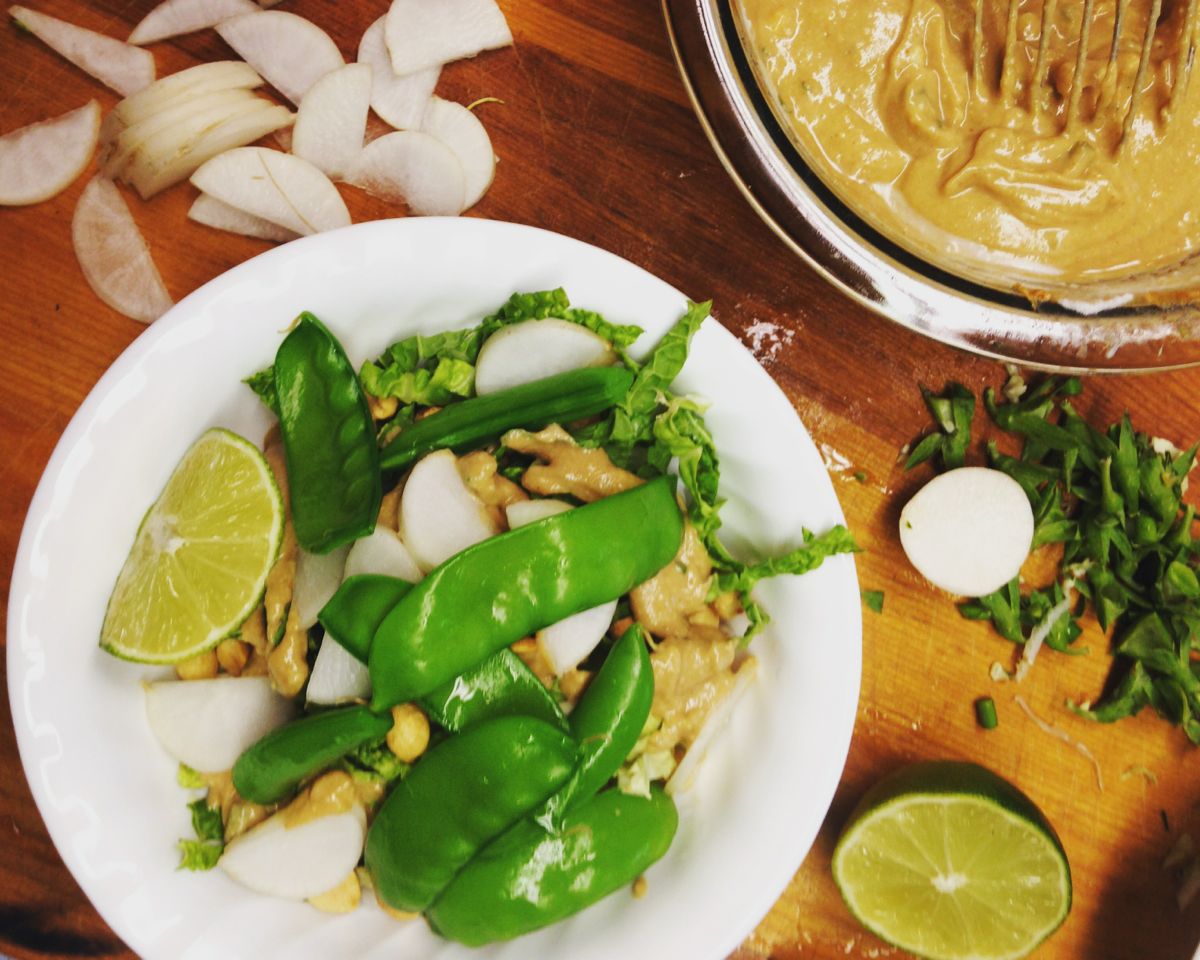
Napa Cabbage Bowl with Coconut Peanut Dressing
Adapted from 101 Cookbooks
In true Lauren fashion, this recipe is super duper versatile. In my opinion, the rice noodles, the peanuts and the dressing are essential, but everything else can be substituted or increased (or decreased) or left off. Use this recipe as guideline and deviate widely (or not) as you desire. I choose to use napa cabbage as the leafy green for the base of this bowl because I love it, but lettuce or kale could also be used. The snow and snap peas are a bright fresh addition, but you could use really any blanched raw veggie instead (broccoli, beans, asparagus, etc). The daikon adds a delicious crunch but is also optional or substitutable.
Takes 30 minutes
Serves 4-6
6 cups thinly sliced napa cabbage (green leafy portion and white core)
1/2 pound snow peas, ends trimmed
1/3 pound snap peas, ends trimmed
8 ounces rice noodles
1 cup thinly sliced daikon radish
1-1/2 cups roasted peanuts
1-2 limes, quartered
Coconut Peanut Dressing:
1/2 cup peanut butter
1-1/2 cups coconut milk
2-3 garlic scapes, minced (about 2 tablespoons)
3 tablespoons brown sugar
2 tablespoons fresh lime juice (about 1 lime)
1 tablespoon soy sauce
1/2 teaspoon cayenne pepper
- Bring large pot of well-salted water to a boil on the stove.
- Prepare your sauce by combining all ingredients in a medium bowl. Whisk well until combined and smooth. Taste and adjust seasonings as needed. More soy sauce will make it saltier. More lime juice will make it brighter. More brown sugar will make it sweeter. You get the picture. Set aside until ready to use. Add a tablespoon or two of hot water if you find the mixture too thick.
- Once water comes to a boil, add snow and snap peas (or any other raw veggies you plan to use). Blanch for just under a minute and then remove with a slotted spoon to a colander. Rinse with cold water to stop the cooking.
- Bring the water back up to a boil and then add the rice noodles. Cook according to package directions. (Mine took 4 minutes). Strain and rinse with cold water to stop the cooking.
- Now you have two options for serving. If you plan to eat it all at once, toss the noodles, cabbage, peanuts and dressing together in an extra-large bowl. Top with blanched veggies and daikon. Serve with lime wedge. If you don’t plan to eat it all at once, get everything all in one place so people can “build their own” bowl starting with the noodles, followed by the cabbage, and then the coconut peanut dressing. Folks can add peanuts, blanched veggies and daikon to their liking. It will store much better in its component parts than once tossed all together. The dressing will keep in your fridge for a week.
◊ ◊ ◊ ◊ ◊ ◊ ◊

Early Summer Vegetarian Cobbler with Basil Parmesan Biscuits
Adapted from My Name is Yeh
This dish is the perfect buttery, robust comfort food you need to celebrate the true beginning of summer. Zucchini and squash have arrived and they are on full display in this creamy dish. Don’t feel guilty if you don’t feel like making the biscuits from scratch. Pillsbury biscuits are a completely acceptable substitution, or you could also leave the biscuits off entirely and make a quick side dish instead of a cobbler.
Makes enough for 4-6
Takes 1 hour
6 tablespoons butter
1 large†zucchini, quartered and sliced
1 large summer squash, quartered and sliced
3-4 garlic scapes, chopped
Pinch Kosher salt
1/2 cup flour
2 cups chicken stock
1 cup water
2-3†cups roughly chopped packed collard greens, stems removed
1-1/2 cup whole milk
1 cup finely shredded Parmesan
Freshly ground black pepper
Basil Parmesan Biscuits:
9 tablespoons butter
2-1/2 cup all-purpose flour
2 teaspoons sugar
1 tablespoon baking powder
3/4 teaspoon Kosher salt
3/4 teaspoon baking soda
1/4 cup finely shredded Parmesan
2-3 tablespoons basil, leaves cut in a chiffonade
3/4 cup buttermilk
1 egg, beaten
- Preheat oven to 425 degrees.
- If you plan to make the biscuits, cut your butter into small cubes and place in a small bowl or measuring cup. Place in the freezer (or fridge) until ready to use.
- Melt butter in a large oven-proof skillet. If you plan to double the sauce, make sure the pan is at least a couple inches deep (a Dutch oven would work nicely if doubling). Add zucchini, summer squash, scallions (or onion) and a pinch of salt. Saute over medium low heat for 10 minutes until well softened. Add garlic and cook until fragrant (about one minute). Add flour and stir until well combined and it evenly coats the veggies (about 2 minutes). Add chicken stock and stir. The mixture should bubble gently and thicken slightly (if it doesn’t turn up the heat a bit). Add the water and again stir to combine. Let simmer for a couple minutes and then add the collard greens, milk, Parmesan and a good helping of pepper. Let simmer gently until it reaches the desired consistency then remove from heat. This will only take a couple minutes. Feel free to add more milk if you feel it’s gotten too thick. Taste and adjust salt and pepper as desired.
- Prepare your biscuits by combining flour, sugar, baking powder, salt and baking soda together in a large bowl. Stir to combine. Incorporate butter using two forks or a pastry cutter. The butter should be incorporated with the flour mixture in rough, pea-sized pieces. Feel free to use your fingers if that works better for you. Once well incorporated, add the Parmesan and basil. Stir to combine and then add buttermilk. Stir until loose dough forms, then turn out onto unfloured counter and knead until all dough comes together. Cut out 6-7 biscuits, brush with egg wash and place on top of liquid mixture.
- Bake for 20 minutes until biscuits are golden brown. Let rest for 5-10 minutes before eating as it will be very, very hot. Then devour immediately.
LOCAL THYME RECIPES
Comforting Classics
Napa Cabbage Slaw with Oranges
Ponzu Chicken, Napa Cabbage and Snap Pea Salad
Parmesan Zucchini Coins
Curried Daikon
Outside the Box Recipes
Roasted Chinese Cabbage
Pasta Carbonara with Snap Peas
Greek Stewed Zucchini
Korean Daikon Rice Cake Soup
Quick and Easy Meal Idea
Collard Greens Pesto Bruschetta

Seeing red
- On: June 15, 2016
- 0
Berry U-Picks.
Read our Tuesday email for everything you need to know.
Veggie list and veggie notes (June 16/17, 2016, week #5, green EOW)
It was hot this week, so there are a gazillion strawberries.
It was hot this week, so the radishes are spicy even though they are still small.
It was hot this week, so the arugula is spicy too.
It was hot this week, so the broccoli is exotic-looking. You get the idea.
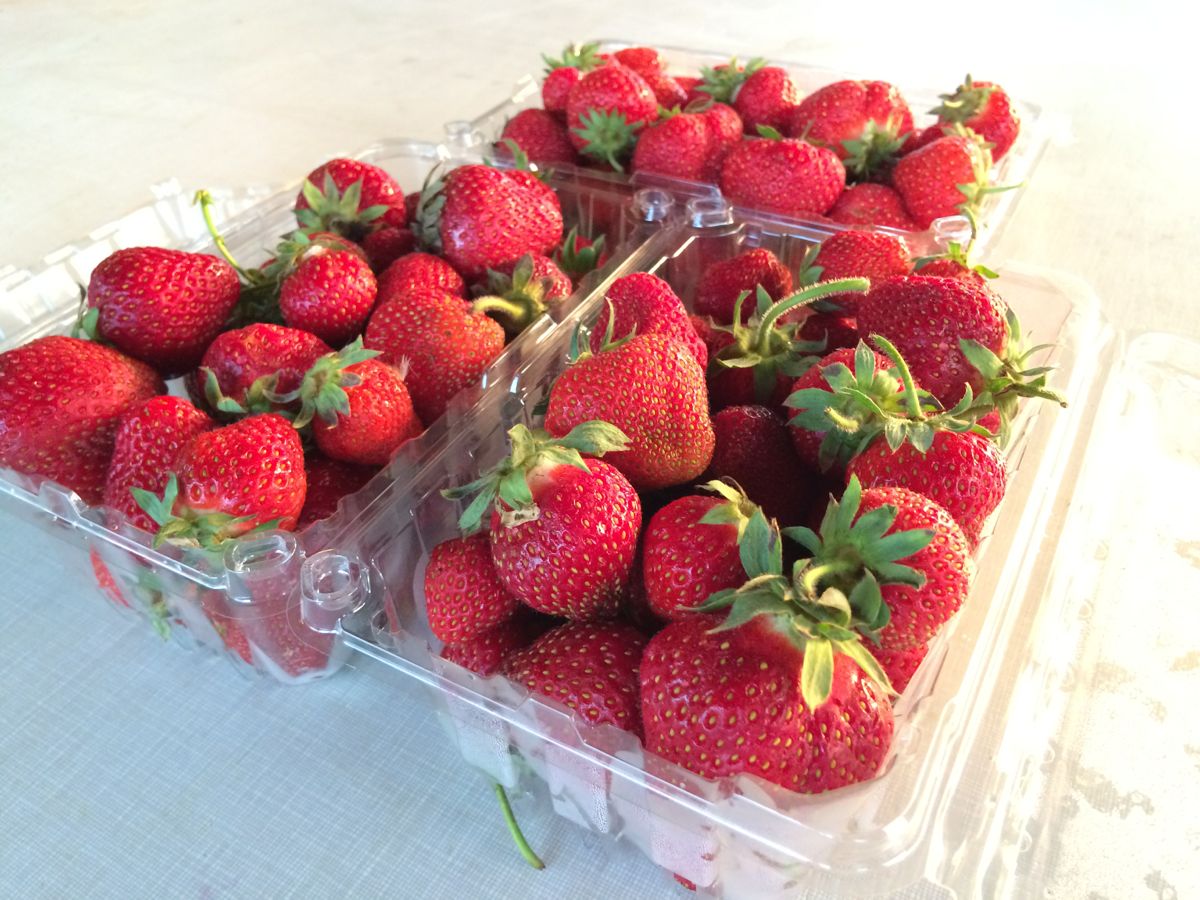
Strawberries, 3 quarts!
Asparagus, about 1 lb
Spinach, 1 bunch
Kale, 1 bunch
Iceberg lettuce
Salad radishes, 1 spicy bunch
Arugula, 1 spicy bunch
Garlic scapes, a handful
A few sites will get a small bag of snap peas.
A few sites will get small broccoli heads.
Next week’s box will probably contain strawberries, peas, daikon, zucchini, spinach, lettuce, garlic scapes and more.
Strawberries! – We’ve been waiting for these.
♦ Ripe strawberries are perishable. Ripe berries should be eaten immediately, or stored in the refrigerator. Most berries are quite clean. If you want to clean your berries, rinse gently. Don’t soak them, just rinse.
♦ You will receive three containers of strawberries. Compare the containers, judge which berries are softer and more ripe, and eat those first.
♦ Please recycle your strawberry containers. We no longer collect them for re-use. Please don’t return them to your pick-up site.
Asparagus – This is the final delivery. We’ve sent you almost 6 lb this season, including this week. Now it’s time to let the plants grow and replenish their enormous underground storage roots, accumulating energy to fuel next spring’s harvests.
Green kale (bundle of dark green, frilly leaves) – Super nutritious, this first picking of the year is great cooked or used in raw salads like the one from Local Thyme this week.
Iceberg lettuce – We grew iceberg lettuce for the first time last year, at Maggie’s urging. She’s the boss of the lettuce patch, so we generally go along with whatever she wants. At least with lettuce. Last year’s experiment worked out very well, so we grew another batch of iceberg this year. Make a wedge salad and enjoy.
Salad radishes – As mentioned, the radishes are spicy because the weather has been hot. Here are ways to temper radishes:
♦ Cook the radishes
♦ Marinate them.
♦ Slice and place in an ice-water bath. Even a few minutes of soaking tames their heat.
Arugula – This is also spicy this week. If you want to eat the arugula raw, chop a bit more finely than usual and mix with other greens like spinach. You still get the arugula’s aroma and taste but diluted by the other greens. Cooking also mellows the arugula.
Garlic scapes (curly green things) – Garlic scapes grow at the top of garlic plants. They look like flower buds but are actually clusters of tiny bulblets. We snap off the young scapes to direct the plants’ energy into forming garlic bulbs underground. Use scapes as a substitute for garlic cloves. They can be minced, mixed with olive oil, and added to stir fries or simple pasta dishes. The scapes can be sautéed, but will not brown like garlic cloves. Expect them to retain their crunch even when cooked, and to be milder than garlic cloves, closer in pungency to the green garlic we’ve sent. Some of this week’s scapes are from our garlic field and some are from our friend John Hendrickson of Stone Circle Farm who grows organic garlic bulbs for our CSA.
RECIPES FROM LAUREN
Lauren Rudersdorf of The Leek & The Carrot blog plans to keep writing recipes for us. This is a coup for Tipi members! Lauren cannot promise recipes every week so let’s enjoy her ideas when available. Lauren and husband Kyle live down the road from us and grow a similar mix of crops. That means we tend to eat in synch.

ASPARAGUS & MOZZARELLA PIZZA WITH ARUGULA PESTO
Adapted from Wisconsin from Scratch
This arugula pesto with garlic scapes is super versatile. You can use it on pasta or sandwiches, in your morning scrambled eggs or even as a spread for baked potatoes. The possibilities are endless when using pesto. This recipe will make twice as much as you need for the pizza so store the rest in your fridge for a couple weeks.
Takes 2 hours if you make the dough from scratch, 45 min if you use prepackaged pizza dough
Serves 2-4.
1 batch Simple Pizza Dough (or prepackaged pizza dough; available at the Willy Street Co-op and most grocery stores)
8 ounces fresh mozzarella (or regular shredded mozzarella if you can’t find fresh)
1/2 pound asparagus, tough ends trimmed and cut into 1-inch pieces
1/2 cup finely shredded Parmesan
1/4 teaspoon red pepper flakes, optional
Arugula Pesto:
2 cups packed arugula leaves
2 tablespoons finely chopped garlic scapes (about 2-4 depending on size)
1/2 cup finely shredded Parmesan
1/2 cup toasted chopped walnuts
1 teaspoon Kosher salt
Freshly ground black pepper
1/4 cup olive oil
1 tablespoon lemon juice
1. Prepare pizza dough according to directions below if making from scratch. Let rise while preparing pesto.
2. Preheat oven to 450 degrees.
3. Slice mozzarella and place in a colander to allow the extra moisture to drain off. This will keep liquid from pooling on your pizza. If you use regular store-bought shredded mozzarella you can skip this step.
3. Prepare arugula pesto. Combine arugula, garlic scapes, Parmesan, walnuts, salt, and pepper in the bowl of a food processor. Pulse until finely chopped and uniform. Slowly pour in olive oil and lemon juice while the food processor runs until mixture is smooth. Taste and adjust salt, pepper or lemon as desired.
4. Once pizza dough is risen, roll out on a floured counter into a 12-inch circle. Place dough on a pizza pan.
5. Using a spatula, spread half of the pesto onto the pizza (leaving a one-inch border around the edges). Scatter asparagus evenly over pizza. Tear mozzarella slices into pizza and place atop pizza. Sprinkle with Parmesan and red pepper flakes (if using). Bake for 18 minutes until the crust is golden brown and cheese is just beginning to brown. Serve warm!
Simple Pizza Dough:
3/4 cup warm water
1 tablespoon honey
1 teaspoon yeast
2 cups bread flour
1 teaspoon Kosher salt
1. Combine warm water, honey and yeast in a small bowl or measuring cup. Let sit for five minutes.
2. Combine flour and salt in a medium bowl. Create a well in the center and pour in yeast mixture. Stir until dough begins to form, then knead until all flour is incorporated. Cover with a thin towel or plastic wrap and let sit in a warm place for 20 minutes.
3. Turn out dough onto a floured counter and knead until smooth. Drizzle bowl with olive oil and return dough to it. Cover with thin towel or plastic wrap and leave in a warm place until doubled in size (about an hour).
– – – – – –
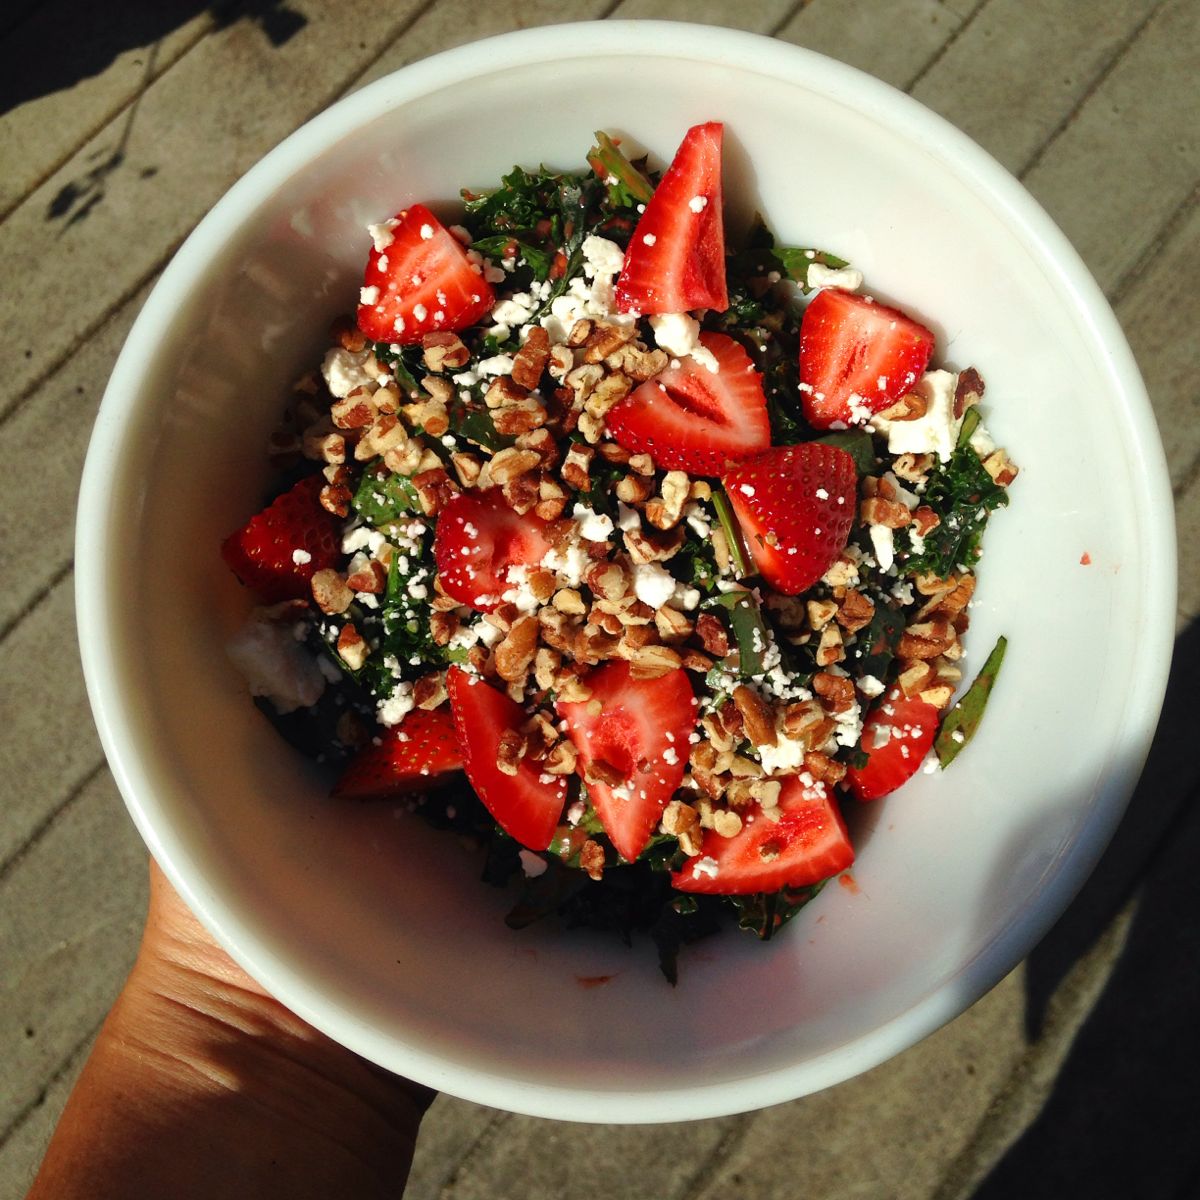
SPRING SALAD WITH ROASTED STRAWBERRY VINAIGRETTE
A lot of people think that kale is too tough or too bitter for using in a salads. I would have to disagree. Kale, when used properly, is one of the best salad greens there is. Often I cut kale really small to use it in salads, but another great method is to massage it (directions below) and/or combine it with another lighter green like I did here. Enjoy the bright strawberries and flavors of summer!
Takes 40 minutes
Makes 6-8 servings depending on if it’s a side or meal (and how much salad you can eat in one sitting)
1 bunch kale, ribs removed
1 tablespoon olive oil
1 teaspoon Kosher salt
4 cups chopped spinach (about 1/2 pound)
1 quart strawberries, halved or quartered based on size
1/2 cup crumbled feta
1/2 cup toasted chopped pecans
Roasted Strawberry Vinaigrette:
1 quart strawberries, halved or quartered based on size
3 tablespoons olive oil, divided
3 tablespoons balsamic vinegar, divided
1/4 teaspoon Kosher salt
Freshly ground black pepper
1 tablespoon water
2 teaspoons sugar
1/2 teaspoon whole-grain mustard
1. Preheat oven to 350 degrees.
2. Line a baking sheet with aluminum foil (or you will have a real mess on your hands) and drizzle with 1 tablespoon of olive oil. Add 1 quart of halved and quartered strawberries. Drizzle with 1 tablespoon balsamic vinegar, sprinkle with 1/4 teaspoon of Kosher salt and a good amount of freshly ground black pepper. Roast for 25 minutes.
3. While the strawberries are roasting, prepare the kale. Remove the kale from the ribs (I just tear it right off) and place leaves in a large bowl. Pour 1 tablespoon olive oil and 1 teaspoon Kosher salt over kale. Using your hands, massage the kale leaves while working the olive oil and salt into the leaves. Tear the leaves as you massage the kale so they are in bite-size pieces. Continue to massage for about 5 minutes until kale is a vibrant green and has broken down.
4. Remove strawberries from oven and add to a food processor (or small bowl). Add 2 tablespoons olive oil, 2 tablespoons balsamic vinegar, water, sugar and mustard. Pulse until smooth and emulsified. Emulsified just means that the dressing has turned creamy and the vinegar should not be too pungent but instead well-incorporated.
5. Toss as much dressing as you desire with greens until evenly incorporated. Add second quart of strawberries, feta and pecans. Enjoy immediately!
Storage tip: If you don’t think you’ll eat all this salad at one time, keep the greens in your fridge with toppings. Store dressing separately and combine just before serving.
– – – – – –
LOCAL THYME RECIPES
Comforting Classics
Strawberry Frozen Custard
Chickpea and Kale Salad
Butter Braised Radishes
Shaved Asparagus Salad with Radish and Parmesan Dressing
Outside the Box Recipes
Strawberry Radish Arugula Salad
Angel Hair Pasta with Kale, Lemon and Pecans
Pickled Radishes
Iceberg Remoulade
Quick and Easy Meal
Scrambled Eggs with Three Greens, Radish and Feta
Wisconsin, hotbed of organic ag
- On: June 08, 2016
- 0
As organic agriculture developed in the USA, Wisconsin has been a leader in the movement. I planned to write a newsletter piece about this but The Milwaukee Journal Sentinel ran an article yesterday on this exact topic, titled “Wisconsin farmers leaders in organic food.” It’s nicely written. Disclaimer – Steve and I are quoted heavily in the article.
Wisconsin is a good fit for organic farming. The state has a history of modest-sized farms, lots of dairy farms, a strong cooperative history and strong conservation ethics. The terrain here grows grass very very well, making dairy a logical option. Wisconsin-based cooperative Organic Valley surpassed $1 billion in sales this past year. That’s incredible but their real accomplishment has been providing a path for small farms to stay in business. Here is my favorite quote from the MJS article:
“Eisenbeis [of Organic Valley] characterized Wisconsin as the “last holdout” for small, prudent family farms that barely survived the farm crisis of the 1980s. “Then organics launched, and suddenly these small family farms had an option that would help them not only survive but thrive,” he said. “Organic Valley was literally founded on the idea that a farmer should be able to make a living.”
We love farming in a hotbed of organic agriculture. Realisticly, what does that mean?
– It means we have friends to turn to for ideas and advice when we need it.
– It means we can run over to a friend’s farm to see a piece of equipment before we make a big purchase.
– It means our annual Organic Farming Conference buzzes with excitement and ideas.
– It means there are lots of viable farmer coops and cooperative ventures, groups like FairShare CSA coalition.
– It means a lot of people we know eat our food, or food grown by our friends.
– It means a robust supply of organic farm supplies, e.g. composts, untreated wooden tomato stakes, etc.
– It encourages local farmers to consider organics. There are two farms within five miles of us in new transition to organic production.
– It means we are not isolated, oddball farmers. On a local level, the real result of Organic Valley’s prominence in WI is that organic farming is taken seriously here.
Thanks for being part of this with us!
Strawberry season
We began picking strawberries today and will continue tomorrow morning. Please read our emails about upcoming u-picks here at the farm.
Veggie list and veggie notes (June 9/10, 2016, week #4, purple EOW)
Strawberries, 1 or 2 pints
Asparagus, about 1 lb
Portobello mushrooms, 2 or 3
Spinach, 1 big bunch
Bok choy, 1 head
Red leaf lettuce
White salad turnips, 1 bunch
Kohlrabi, 1 or 2
Scallions, 1 bunch
Members at a few sites will receive small broccoli heads.
Next week’s box will probably contain strawberries, asparagus, spinach, lettuce, radishes, some type of greens and more.
Portobello mushrooms – These big beauties are from Mary at Hidden Valley Mushrooms in the Wisconsin Dells. We will pack them in brown paper bags. Mary says to store them in your fridge in the paper bag. Eat soon; they are fresh, lovely and perishable.
Spinach – Great quality this week. Can be used for salads or for cooking but will (as usual) shrink a lot when cooked.
Kohlrabi (pale green, round vegetable with thick skin) – Crunchy and sweet, kohlrabi is a great addition to salads.
Storage: Kohlrabi bulbs will store for a month in the refrigerator.
Uses: Kohlrabi are good peeled and eaten out of hand, or added to sandwiches. It is good mixed into salads, or prepared as a salad on it’s own. You can grate it, slice it, or cut it into matchsticks. It’s also good cooked. If you have it, the Asparagus to Zucchini cookbook has a long list of kohlrabi suggestions.
Broccoli – The broccoli heads are small (tiny?). That happens in spring when the temperatures fluctuate wildly.
Bok choy (large rosette with thick white stems and green leaves) – This Asian green is good for stir-frying or sautéing or in soup. You can think of the stems and leaves as two separate vegetables. The stems require longer cooking. The leaves will cook almost as quickly as spinach. Bok choy stores well, so feel free to pull off leaves as you need them, or use the whole head at once. Refrigerate in a plastic bag.
The bok choy has a little more insect damage than usual but is fine to eat. Flavor is not affected. The flea beetles were voracious this spring.
TWO RECIPES FROM LAUREN
We have a guest recipe contributor this week! Friend and farmer-neighbor Lauren Rudersdorf provided the two recipes below. Lauren is a fabulous cook and a skilled food writer. You can read her food blog here; The Leek and The Carrot. Lauren and husband Kyle run their own farm down the road from us, Raleigh’s Hillside Farm. I think Lauren’s recipes will complement Pat’s recipes. It’s great to have two cooking perspectives to choose from.
Boy Choy & Portobello Eggrolls
If you aren’t much of a fan of frying, these eggrolls can easily be baked in the oven (20-25 minutes at 400 degrees until nice and golden brown). Of if you want to shy away from eggroll wrappers altogether, the filling makes a fantastic salad for 4-6 people all on its own!
Takes 1 hour
Makes 10 eggrolls
1 tablespoon toasted sesame oil (peanut or olive oil will work fine if you don’t have sesame)
1 tablespoon olive oil
1 tablespoon minced garlic (about 3 cloves)
2-3 portobello mushrooms, roughly chopped (about 2-1/2 cups)
4 scallions, finely chopped (about 3/4 cup)
1/2 large head bok choy, leaves and stems finely (about 3 cups)
2 cups roughly chopped spinach
1 tablespoon soy sauce
1 tablespoon rice wine vinegar
1 tablespoon sugar
1/2 teaspoon Kosher salt
1/2 teaspoon red pepper flakes, optional
10 eggroll wrappers
Water
Vegetable oil
- Heat oils in a medium skillet over medium-low heat. Add the garlic and mushrooms and cook until mushrooms are just softened (about 10 minutes). Add mushroom mixture to a large bowl and wipe out pan with a paper towel. (You will use this same pan for frying eggrolls).
- In the large bowl, along with the mushroom mixture, add scallions, bok choy, spinach, soy sauce, rice wine vinegar, sugar, salt and red pepper flakes. Toss to combine. Taste and adjust seasonings as desired.
- Now you can stop here and enjoy a delicious crunchy, salty, sweet salad or you can use this as a filling for eggrolls!
- To fill eggrolls, lay out one eggroll wrapper. Dip your index finger in water and moisten the entire edge of the eggroll wrapper. Scoop about 1/3 cup of the filling into the middle of the wrapper. Lay the wrapper in front of you so that it looks like a diamond and one point is directly in front of you. Fold that point into the middle. Fold in each side and the roll to seal. Repeat until all 10 eggrolls are made.
- Pour vegetable oil into your medium skillet so it just coats the bottom. Turn heat to medium high and wait 5 minutes until hot but not smoking. Reduce heat to medium and add 3-4 eggrolls (as many as you can without crowding). Fry for about 5-7 minutes per batch until all sides are brown and crispy. Drain on a paper towel. Serve warm!
.
Spring Asparagus Hash
Adapted from Smitten Kitchen
My husband and I absolutely love breakfast (or breakfast for dinner) and we love hashes for their ability to pile loads of healthy vegetables into the start of our day. Our current obsession is making a vegetable heavy hash, throwing a duck egg on top and then topping the whole dish with a bit of hollandaise sauce. It’s a pretty rich (yet well-balanced) meal, but I know hollandaise can be intimidating for most. If you want to give it a whirl, here’s our go to hollandaise recipe.
Takes 45 minutes
Serves 4
1/4 pound bacon, cut into 1/4-inch dice
1 bunch white salad turnips, greens removed and cut into a 1/2-inch dice
4 scallions,
1/2 pound asparagus, tough ends trimmed and cut into 1-inch segments
Salt and pepper to taste
Fried eggs
- Heat a 12-inch cast iron skillet or other large frying pan over medium heat. Fry the bacon, turning it frequently so it browns and crisps evenly. This should take about 10 minutes. Remove it with a slotted spoon and drain on paper towels. Leave the heat on and the bacon grease in the pan.
- Add the turnips and don’t move them for a couple minutes. Use this time to season them well with salt and pepper. Once they’ve gotten a little brown underneath, begin flipping and turning them, then letting them cook again for a few minutes. The idea is not to fight them off the frying pan, once they’ve gotten a little color, it’s easier to flip them and you’ve gotten closer to your goal of getting them evenly browned.
- When the turnips are as crisped and brown as you’d like them — this takes about 20 minutes — add the scallions and asparagus. Stir to combine and then add a lid. (It doesn’t have to fit perfectly). Cook for an addition 5-10 minutes (thin spears of asparagus will take closer to 5 minutes, thick spears will take a bit longer) until asparagus is softened. Remove the lid, return the bacon to the pan for another minute, to reheat. Taste for seasoning and adjust if needed. Serve immediately with a fried egg on top and maybe that hollandaise if you’re feeling daring.
.
LOCAL THYME RECIPES
Comforting Classics
Asparagus Portobello Sauté
German Creamed Kohlrabi
Veggie Sauté with Bok Choy, Salad Turnip and Asparagus
Ricotta and Spinach Stuffed Shells
Outside the Box Recipes
Mark Bittman’s Asparagus Pesto
Curried Kohlrabi Cakes
Congee with Bok Choy
Wilted Spinach with Almonds
Quick and Easy Meal
Sesame Braised Bok Choy and Salad Turnips with Tofu or Chicken
June 1 check reminder
- On: June 01, 2016
- 0
Many of you paid us with checks dated June 1, 2016. FYI, I plan to deposit the checks on Friday June 3 or Saturday June 4.
Veggie list and veggie notes (June 2/3, 2016, week #3, green EOW)
We got lots of rain this week (yeah!) so there might be more grit than last week in the asparagus and lettuce. The crew spent extra time washing the produce but we never get it all.
Asparagus, 1.25 lb
Button mushrooms, 12 oz.
Escarole, 1 large head
Romaine lettuce
Spinach, 1 big bunch
Salad radishes, 1 bunch
Scallions, 1 bunch
Cilantro, 1 bunch
Next week’s box will probably contain asparagus, portobello mushrooms, spinach, lettuce, daikon, scallions, greens, and more. Check back next week for the final list.
Button mushrooms – These organic mushrooms are from Hidden Valley Mushrooms from Wisconsin Dells. We buy mushrooms from Mary every year; they are a great addition to spring salads and quiches. Here are Mary’s suggestions for storing the mushrooms. Store separate from leafy greens, which hasten mushroom aging. If storing for more than a few days, remove from the box and store in a paper bag with holes punched in the side. Keep dry. Don’t wash to clean, just wipe with a damp cloth.
Escarole (large head of wavy green leaves) – This member of the chicory family can be eaten raw or cooked. Its slightly bitter flavor is a good addition to mixed salads. It is excellent cooked alone or mixed with other greens. It cooks quickly, but not as quickly as spinach. Cover and refrigerate.
Romaine lettuce (tall head of lettuce with crisp leaves) – More sturdy and less fragile than our other spring lettuces. Great for salads
Scallions (bundle of green onions) – These are useful raw or cooked. Thinly-sliced raw scallions can be folded into biscuit dough or sprinkled on top of soups or salads. Terrific garnish for pasta dishes in combination with cilantro. Think pad thai.
Cilantro (bundle of aromatic leaves) – This herb is good in salsa, chutneys and salad dressings, or added to stir-fries. Used in Mexican, Asian and Indian cooking.
Local Thyme Recipes
Comforting Classics
Parisian Salad with Lardons (there is a vegetarian version included in it)
Italian Marinated Mushrooms
Korean Romaine Salad
Baked Ziti with Spinach and Mushrooms
Outside the Box Recipes
Risotto with Escarole
Chorizo Stuffed Mushrooms
Teriyaki Asparagus and Romaine Stir Fry
Spinach Kugel
Quick and Easy Meal
Sesame Noodles with Asparagus, Radish and Scallion


Behind the scenes in the lettuce patch
- On: May 25, 2016
- 0
We can tell you about the lettuce we grow for you, or we can show you. Here is a 51-second video biography of your CSA lettuce. At the same time, it’s a great overview of our spring work as the season begins. Enjoy the video. It was fun to assemble!
Hot, cold, hot, cold
We protected our strawberry field from frost last Wednesday, yet it’s 83 F today. That’s an exhilarating switch for people but shocking for plants. We harvested a few crops younger than usual, just to hedge our bets. Spring crops like spinach, arugula and radishes tend to bolt (flower prematurely) after any stress. Looks like we can add salad turnips to that list. We rarely see turnips bolt but buds are forming in the crowns so we harvested them this week instead of next week. The turnips are a little smaller and a little spicier than usual. They were sweet and mild on Sunday but changed their minds during the last warm days.
Picking selectively from the early plantings is fairly normal. Steve plants multiple rows of all the early crops, just in case. We’ve got four spinach plantings in the ground, four lettuce plantings in the field and three more growing in the greenhouse, multiple radish and turnip plantings, etc.
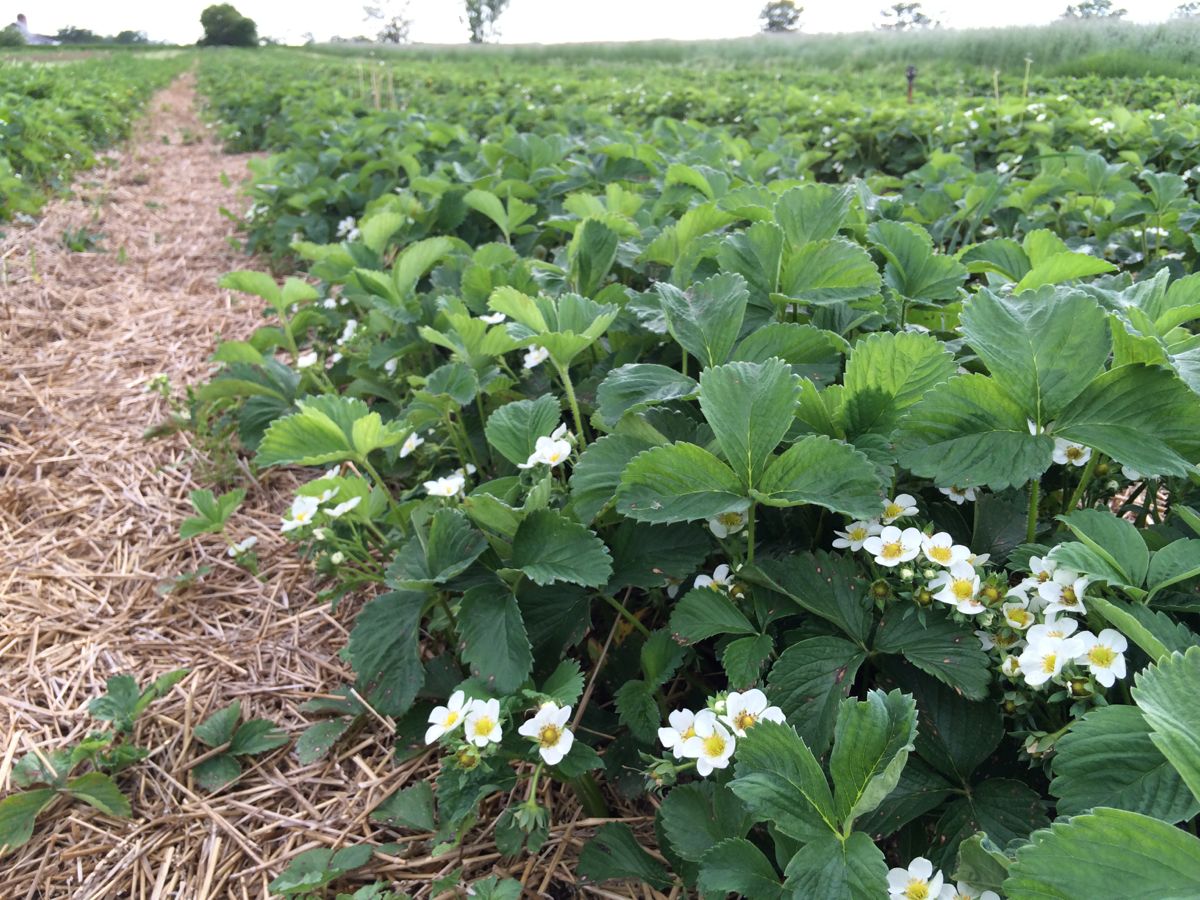
Look at the beautiful strawberry field in full bloom. You can see why we are motivated to protect this field from frost. We have irrigated two cold nights so far. Sprinkling water on the plants protects the blossoms by keeping the temperature from dropping below 32 F.
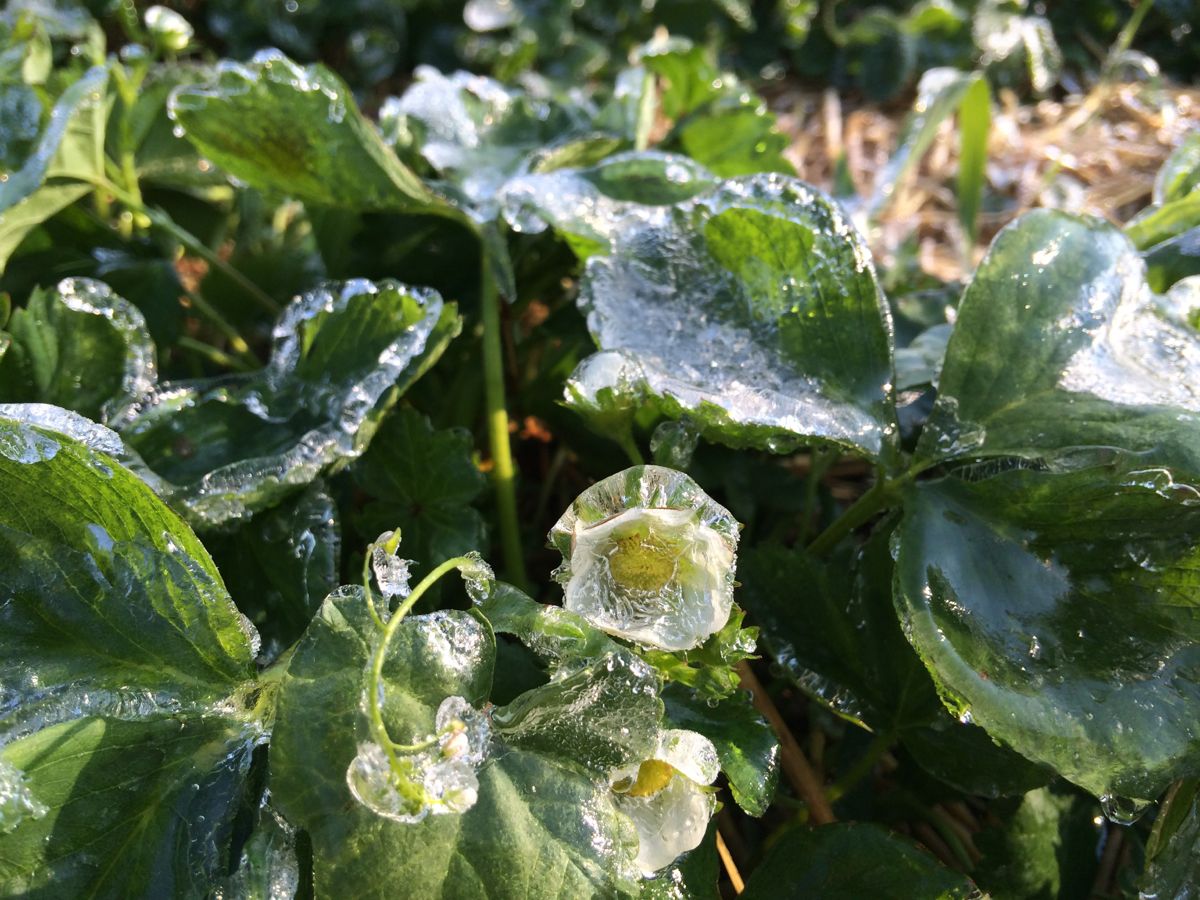
Ice on strawberry blossoms the morning after we irrigated to protect from frost. It worked – the flowers were not damaged.
Veggie List and Veggie Notes (May 26/27, 2016, week #2, purple EOW)
Asparagus, 1.1 lb
Oneida Gold potatoes, 4 lb
Spinach, 1 big bunch
Arugula, 1 small, tender bunch
Red bibb lettuce
Salad radishes, 1 bunch
White salad turnips, 1 bunch
Green garlic, 1 bunch
Rhubarb, 1.5 lb
Next week’s box will probably contain asparagus, button mushrooms, lettuce, radishes, escarole, scallions and more. Watch next week’s newsletter for the final list.
Asparagus, lettuce, spinach, green garlic and rhubarb – Check last week’s newsletter for prep and storage information. Remember, I provide a crop overview the first time we deliver each season. Then, I’ll provide weekly updates when needed.
Oneida Gold potatoes – Please refrigerate these potatoes. They are in great shape now but will sprout within days if stored at room temperature. They’ve been stored all winter and want to grow. Store in a paper bag to protect from light, even in the fridge. We grow everything we send in our CSA boxes except potatoes, some of the garlic, and mushrooms, all of which we buy from organic growers that we trust. We purchased these potatoes from Jesse Perkins at Vermont Valley Farm. This is a new variety for all of us. Jesse says “It is a very good all-purpose potato. They are very good eating.” He also says the potatoes have a higher sugar content because of starch to sugar conversion during cold storage. The potatoes taste a bit sweet, and will blacken slightly when fried. It’s a harmless color change due to the sugar conversion.
Arugula – (small bunch of green leaves with pungent scent) – Arugula is good mixed with lettuce or spinach in salads, or added to cooked dishes such as lasagne or quiche. I love it on sandwiches. This arugula is thin-leaved and tender and will not store for long. Eat soon. Cover and refrigerate.
White salad turnips (bunched white roots with green tops) – I know that returning members look forward to these sweet and delicious turnips, which taste nothing like the turnips that are harvested in fall.
– Storage: Cover and refrigerate.
– Uses: Both the turnip roots and tops are edible. Slice the sweet roots and add to salads. They can be cooked and are especially good when lightly sauteed in butter. Stir as little as possible so they brown on at least one side. The turnips greens are excellent cooked. Treat them like mustard greens.
– Our favorite use: Slice the roots very thinly and combine with a mixture of rice vinegar, mirin, soy sauce, sesame oil. Eat immediately or marinate.
Local Thyme Recipes
I asked Pat to give us support with salads this week; many of the box ingredients are suited to salads. Take the ideas here and run with them, swapping different greens. The arugula bunch is small, so you will want to supplement the arugula salad with spinach or lettuce.
Comforting Classics
Spinach Breakfast Burritos
Pureed Potato and Asparagus Soup with Spinach
Rhubarb Crumb Cake
Arugula Salad with Shaved Parmesan and Balsamic Vinaigrette
Outside the Box Recipes
Curried Brown Rice, Lentils, Potatoes and Spinach
Spinach Salad with Mango Chutney Dressing
Rhubarb Butter
Turnip Greens in Honeyed Caesar Salad
Quick and Easy Meal
Welcome!
- On: May 18, 2016
- 6
Welcome to our CSA! Deliveries begin this week for weekly members and for green every-other-week (EOW) members. Purple EOW, your first delivery is next week, May 26/27 (Thursday/Friday sites).
Things you need to know.
♦ On Thursday, we deliver CSA boxes to Evansville, Fitchburg, Madison, McFarland, Middleton and Oregon.
♦ On Friday, we deliver CSA boxes to Brookfield, Janesville, Mequon, Milwaukee and Wauwatosa.
♦ We post this newsletter/blog each Wednesday night, with the list of veggies for the week, quantities, information about storage and preparation, news of the farm, recipe list, and a forecast for the next week’s box. We alert you by email on Wednesday night once the newsletter is posted and ready to read.
♦ Want earlier notice of what will be in the box? Check the sidebar on our website homepage around 7 p.m. on Wednesday night. I’ll post the list under “Box Contents.” I also provide a tentative list for the following week in the Veggie List section of this newsletter. The list is rarely complete but the items listed are ones we feel confident about.
♦ EOW and weekly members, we assume you read all the newsletters, even on your “off” weeks. This newsletter (and our emails to you) are our means to communicate with you.
♦ The first few boxes of the season are often the lightest. EOW members, do not worry that you have signed up for the wrong share. Our deliveries get heavier and more abundant as the season progresses.
♦ We will sometimes write “OR” in the produce list, e.g. green leaf OR red bibb lettuce. You will receive one of these crops. We will pack the same crops for all the members at your site. Therefore, all the boxes at your site are identical. Please don’t open other members’ boxes.
Which of this week’s veggies were planted this spring?
Asparagus? Nope, we planted our asparagus fields in 2004 and 2008.
Rhubarb? No, this is another long-established perennial. In fact, we’ve been growing and dividing these rhubarb crowns since 1988. We inherited the plants from another farmer’s 1970s-era planting. If you’ve ever divided rhubarb, then you know it forms thick underground crowns. Our tool of choice for dividing crowns is a sharpened shovel. It’s not a delicate job. Rhubarb is tough.
Green garlic was planted in the fall, rooted quietly under its winter mulch, then grew shoots this spring.
Carrots and parsnips are both from last year. See below.
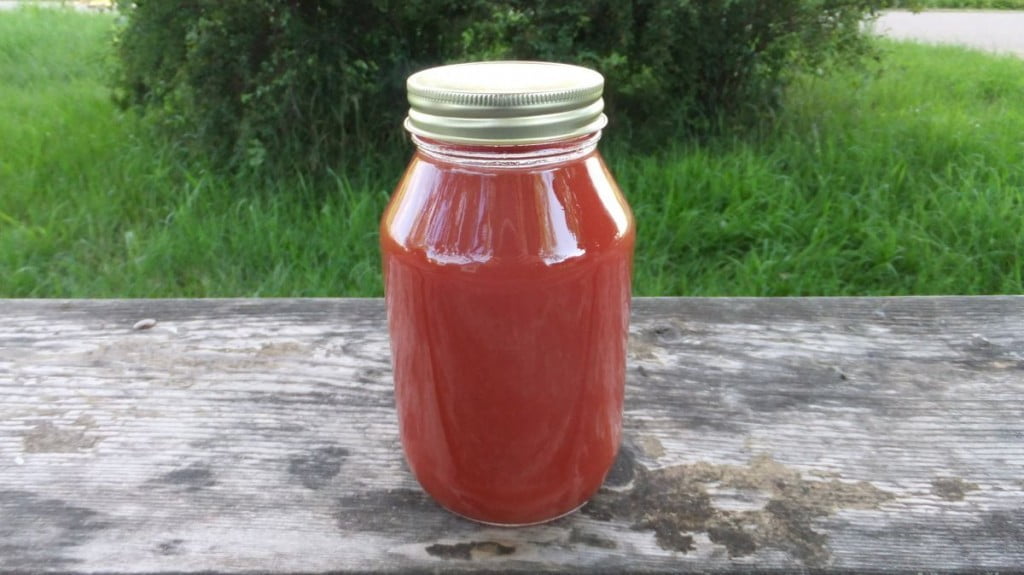
Tomato juice was bottled with our tomatoes last summer when they were at their peak.
Lettuce, spinach, Asian mustard and radishes? Yes, these were all planted this year.
Now you understand our strategy to fill the early CSA boxes!
Parsnips
The parsnips spent the winter in the ground. They were planted last spring and tended all summer. We harvested most of the parsnips last fall, but left these for spring harvest. Parsnips sweeten over the winter and are fabulous once spring arrives.
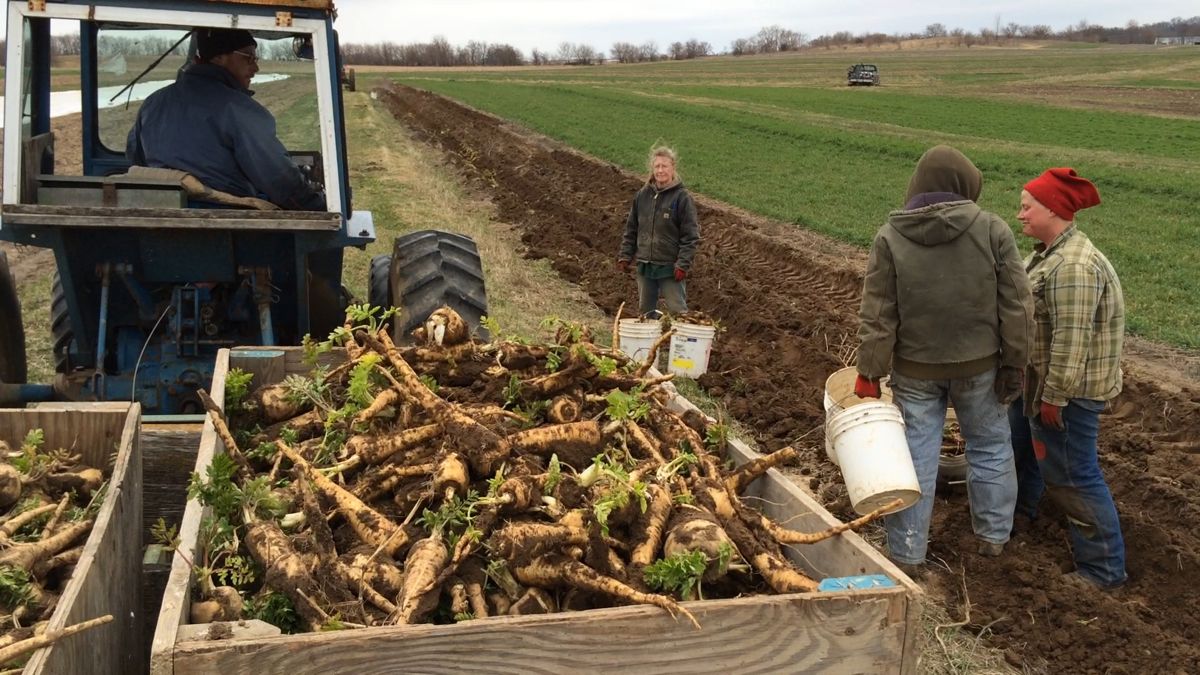
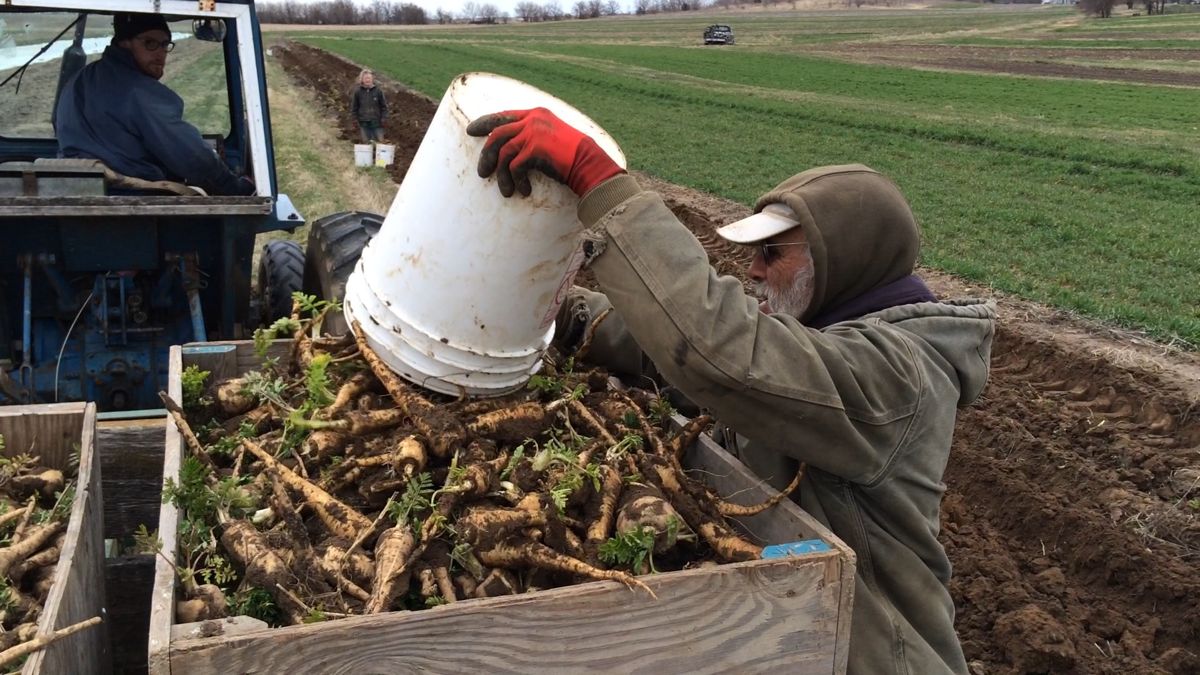
Parsnip harvest in April. We harvested these by hand instead of using our root harvester. The harvester needs tops to grab, and the parsnips lose their leaves over the winter.
Carrots
We fought off hordes to save these carrots for you. Our harvest last fall was so massive that we supplied carrots to our store customers into late April. That’s our longest carrot sales season yet. The quality was very good so demand stayed high. This was a mixed blessing. It was great to have that many carrots to sell but the work overlapped with our start to the season. We found ourselves juggling greenhouse work with washing stored crops. We were ready to move on to this year’s plantings.
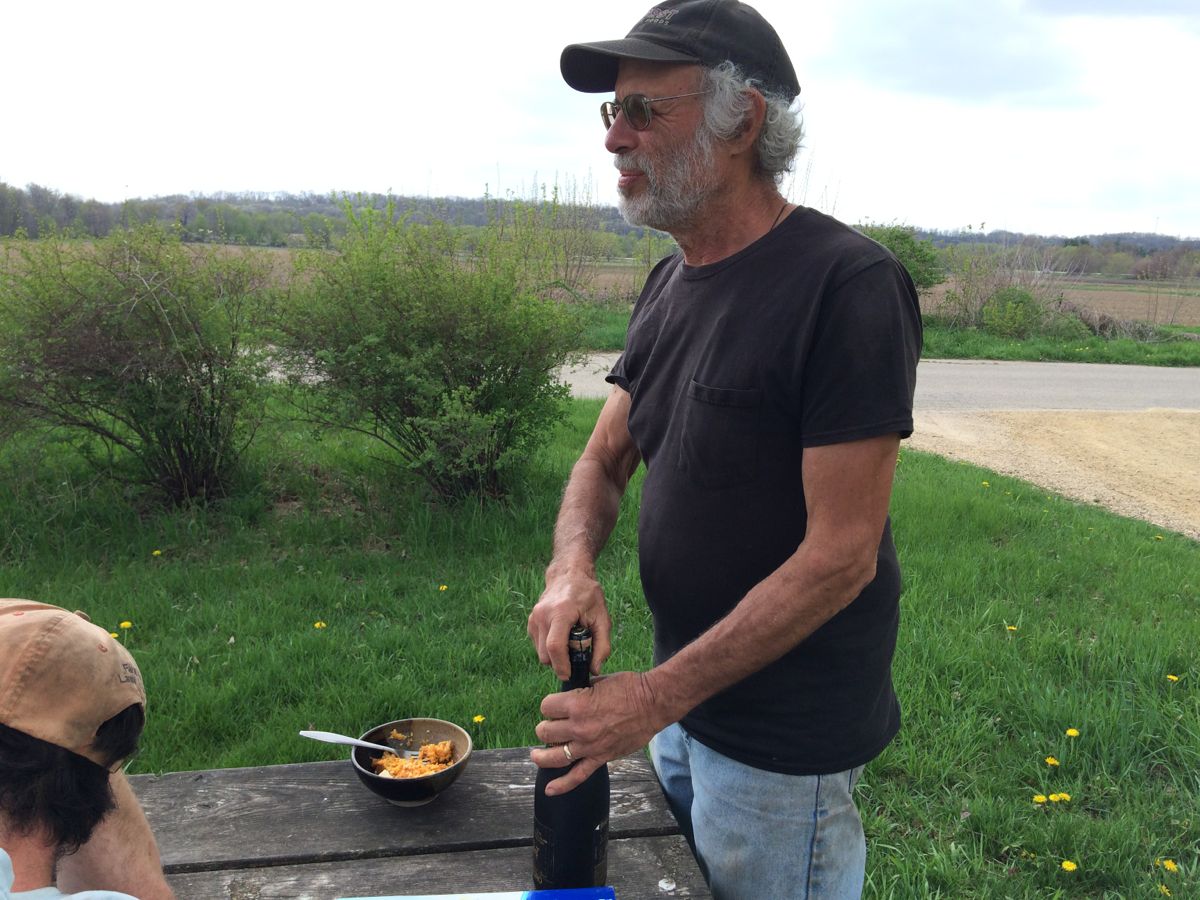
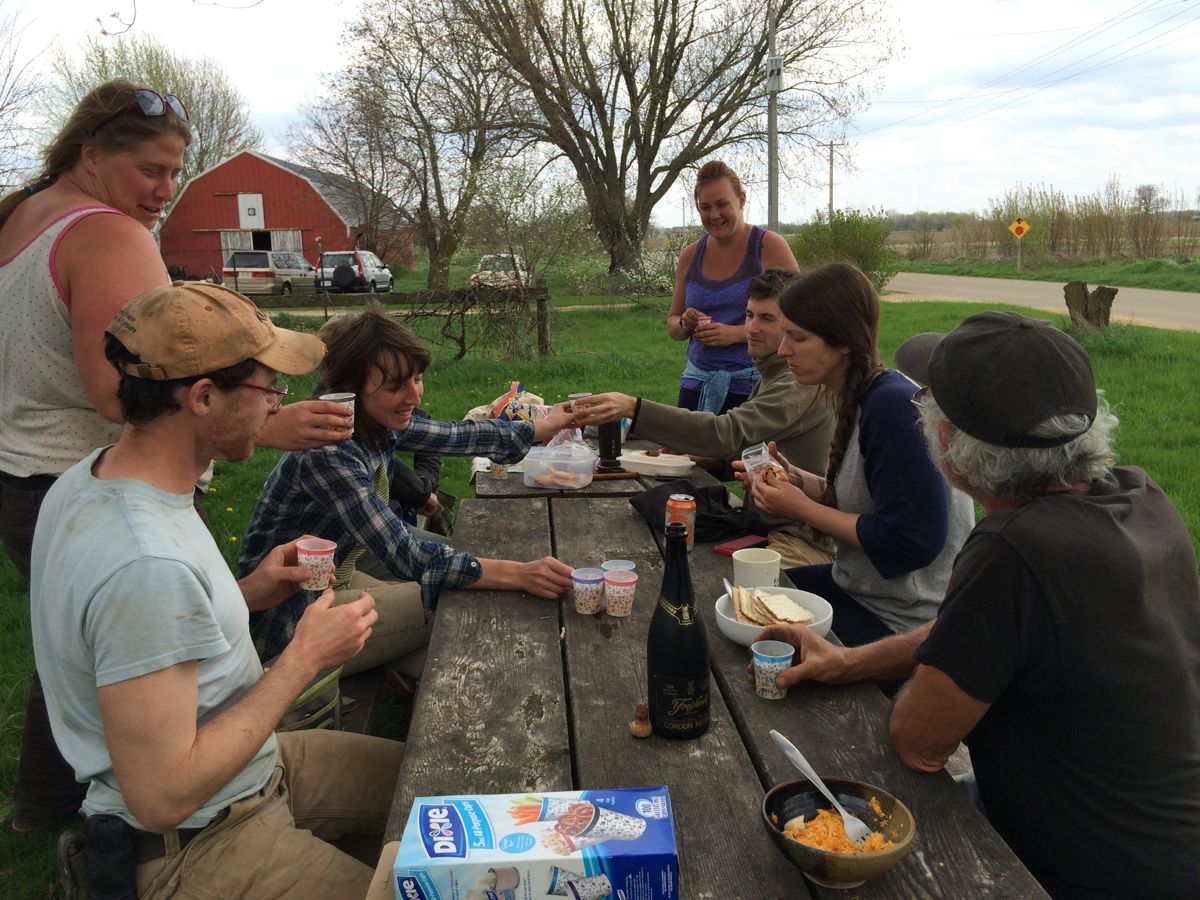
We celebrated the last carrot washing with a bottle of champagne. It’s an annual tradition. No fancy stemware for us. Look at the green grass! That tells you how late in spring we finally finished our storage crops. We usually wrap up a month earlier.
Veggie List and Veggie Notes (May 19/20, 2016, week #1, green EOW)
Read this section each week for specific information about the produce. For example, see our notes below about how to extend the storage life of your lettuce and spinach. I provide detailed notes on each crop only the first week we pack it. This is another reason to read our newsletter weekly.
Asparagus, about 1.5 lb
Red leaf lettuce
Green leaf OR red bibb lettuce
Spinach, 1 small bunch
Asian mustard greens, 1 medium bunch
Salad radishes, 1 bunch
Carrots, 2 lb
Parsnips, 1 or 2
(in the same bag as the carrots)
Green garlic, 1 bunch
Rhubarb, 2 lb
Tipi tomato juice, 1 quart
Next week’s box will probably contain asparagus, rhubarb, potatoes, lettuce, spinach, radishes, green garlic and some kind of spring green. Watch next week’s newsletter for the final list.
Asparagus – Enjoy this spring treat! Your asparagus will be green or purple. The purple variety turns dark green when cooked. Its flavor is almost identical to normal green asparagus. Wash your asparagus thoroughly to remove hidden grit. Submerge in water, soak briefly, then swish vigorously and pull out of the water with the tips pointing down. The draining action helps pull the grit out of the asparagus tips. Repeat several times.
Storage: Asparagus is perishable, so eat it as soon as possible. Store it in the paper bag we packed it in, and wrap loosely in a plastic bag. The paper bag protects the asparagus tips from direct contact with the plastic bag. The plastic bag keeps the asparagus from wilting.
Preparation: We snap our asparagus at harvest, rather than cutting. Therefore, there is no need to snap the stalks to remove fibrous ends. For the same reason, it is not necessary to peel the asparagus stalks. It’s OK to trim the end a bit.
Cooking: If your asparagus stalks vary greatly in size, you will want to cook the thicker ones longer. Put the asparagus in a steamer pot over water. Alternatively, you can lay spears flat in the bottom of a broad pan, with ½ inch of water. Cover and steam over medium heat until just tender. Use two forks or a spatula to turn the asparagus during cooking, rotating the bottom spears to the top. Drain and serve. Also excellent broiled or grilled. Good dressed with vinaigrette, or simply with lime juice, salt and pepper.
Lettuce and spinach – Wash your greens to remove grit splashed into the heads by rain. Cut to the size you like, submerge in water, swish gently, then pull from the water and drain in a colander. Some weeks, you will need to repeat in fresh water.
Storage hint – To extend the storage life of your tender greens, wash them, dry in a salad spinner, then store in a dry container or bag. Lettuce and spinach last much longer when handled this way.
Asian mustard greens (bundle of green leaves. Color is lighter green than the spinach) – These are young and tender and you can eat the whole plant; buds, stems and leaves. They are a great addition to salads because they are so mild. At this young age, they wilt substantially if cooked, so keep the cooking to a minimum. Add at the last minute to soup or sautés. We’re planning mustard green and asparagus quiche for this weekend.
Carrots – These are in great shape, considering we stored them all winter. Refrigerate and eat soon.
Parsnips (looks like a big white carrot) – Spring-dug parsnips are exceptionally sweet, a legacy of exposure to cold over the winter. When cooked, parsnips are sweet and starchy. Brown them so the sugars caramelize, to give the best flavor. We have only a small amount to share so be creative. Ideas:
– Oven-roast the carrots and parsnips together.
– Use in soup.
Green garlic (looks like scallions, tastes like garlic) – Last fall, we planted garlic cloves that grew into the stalks we harvested this week. If left to grow until mid-summer, the slim white bulb on this week’s garlic would divide and form the usual cluster of cloves in a garlic bulb. Green garlic is more pungent than scallions, so slice thinly and use sparingly when raw. It mellows when cooked. Chop and add to any cooked dish that would benefit from garlic. Use the white bulbs and pale green stems. Avoid the dark green stems and leaves, as these are fibrous.
Rhubarb – Refrigerate in a plastic bag. FYI, 2 lb of rhubarb yields 6 – 6.5 cups when chopped.
Stewed rhubarb: This is the simplest way to prepare rhubarb. Chop rhubarb into one inch chunks. Stir over medium heat with a small amount of water in the bottom of the pan. The rhubarb will release moisture as it cooks. Stew until it softens and falls apart. Sweeten to taste with honey or sugar. Eat warm on its own, over vanilla ice cream, on pancakes, etc.
Tipi tomato juice – We had this juice bottled from our tomatoes last summer. It’s a great way to capture ripe tomatoes at peak season, at a moment when we are swimming in tomatoes. Drink it or try making an easy soup with the tomato juice, carrots, and parsnips. Add minced green garlic and spinach or mustard greens at the very end.
Storage: Store the juice out of sunlight at room temperature when unopened. Refrigerate after opening. The juice is already seasoned so don’t add salt if you cook with it.
Ingredients: organic tomatoes from Tipi Produce, salt, organic garlic, organic onion, organic black pepper. I’ve posted the nutritional information here.
Recipes from chef Pat Mulvey at Local Thyme
Comforting Classics
Asparagus and Radish Greens Frittata with Gruyere
Cinnamon Crisp Rhubarb Muffins
Roasted Parsnip, Carrot and Tomato Soup
Shredded Radish and Carrot Salad with Carrot Ginger Dressing
Outside the Box Recipes
Asparagus with Tapenade Vinaigrette
Rhubarb Spritzer
Mustard Greens Salad with Frizzled Parsnips and Rhubarb Vinaigrette
Hearty Grain and Egg Salad with Green Garlic Dressing
Quick and Easy Meal
CousCous Salad with Spinach, Radish and Feta
Organic Farmers of the Year!
- On: March 03, 2016
- 0
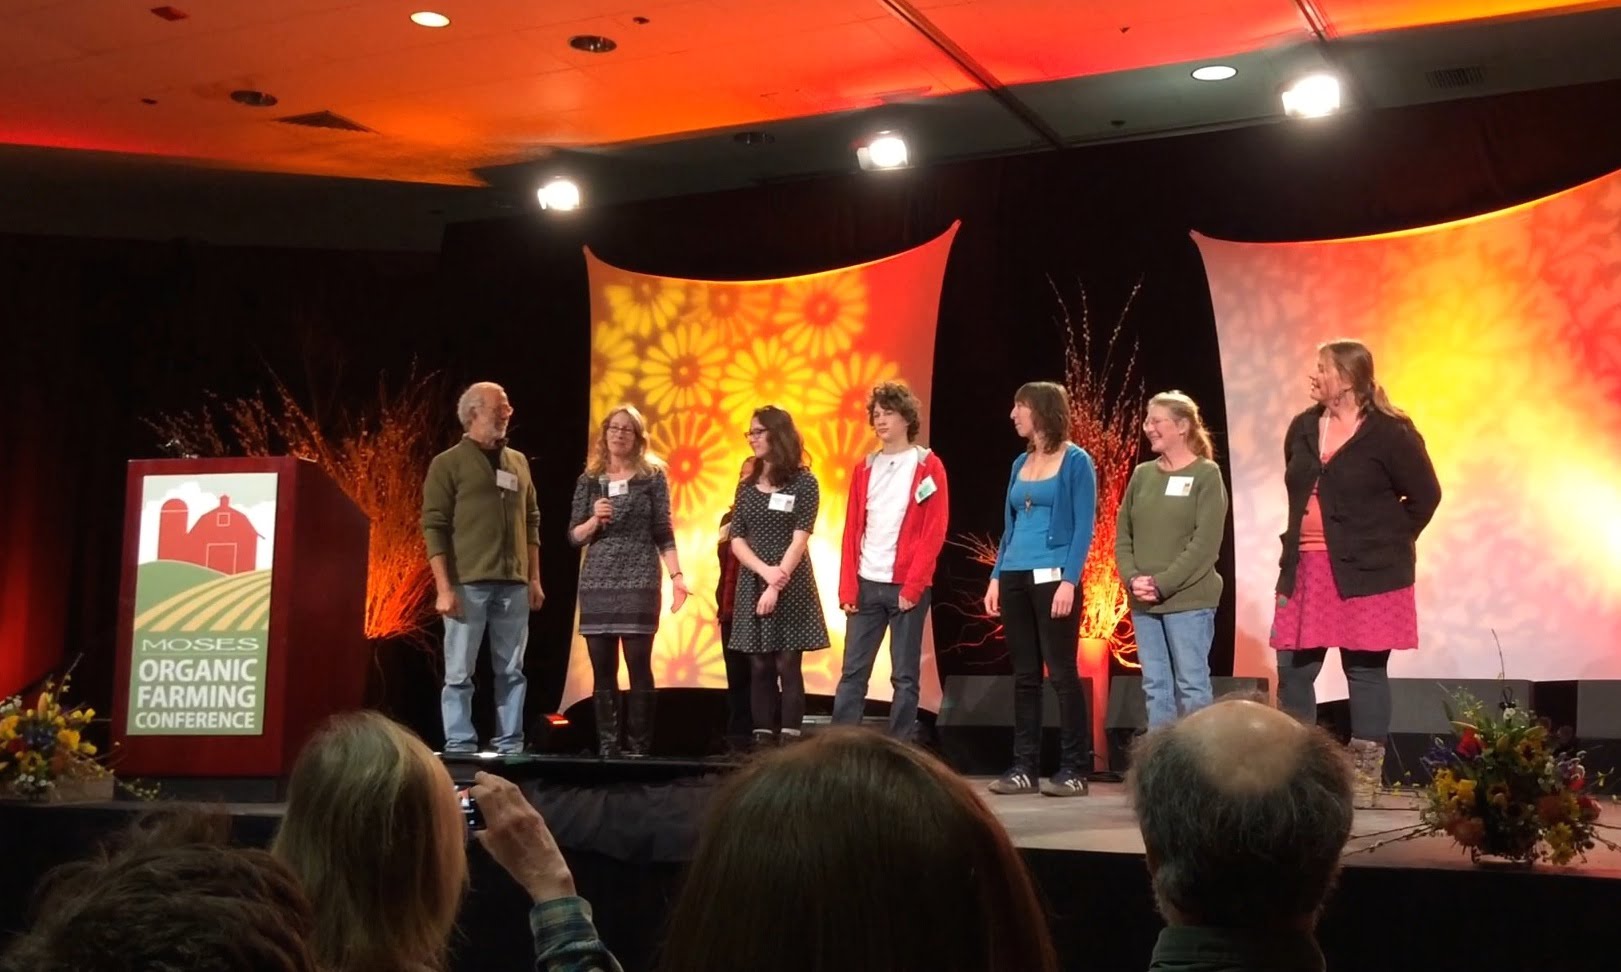
Steve and I accept the Organic Farmers of the Year award, with our children Sophie and Ari and longtime employees Kerry Devlin, Simone O’Donahue, and Maggie Schley.
Steve and I have some news to share. We have been named the 2016 Organic Farmers of the Year for the midwest, and received the award at the MOSES organic farming conference last weekend. In our community of organic farmers, this is the highest possible honor. We are thrilled and excited and still buzzing from all the love that came our way at the conference. It was one of the best weekends of our lives. Tipi CSA members, this award belongs to you too. We could not farm without your loyal support!
We invited longtime employees Kerry, Simone and Maggie to the conference with us, and introduced them during the award ceremony. They got a big round of applause when we explained that they’ve worked for us for 10, 16 and 20 years respectively. They (and all our employees) are a key part of why our farm has reached its current stability and productivity. We could not farm it without them.
Here’s the full award text from the conference booklet.