
Week #10; A Good Week
- On: July 22, 2020
 0
0

This was a good week, following difficult times after a lightning strike two weeks ago. We’ve gotten almost everything repaired, including the expensive controller for our irrigation well. We held our breath on that one. Once the controller was fixed, we could test the pump and fortunately it was not damaged. We still need to get electronics for our solar array fixed but have not yet been able to line up someone to do the repairs. (photo credit Ari P-K)
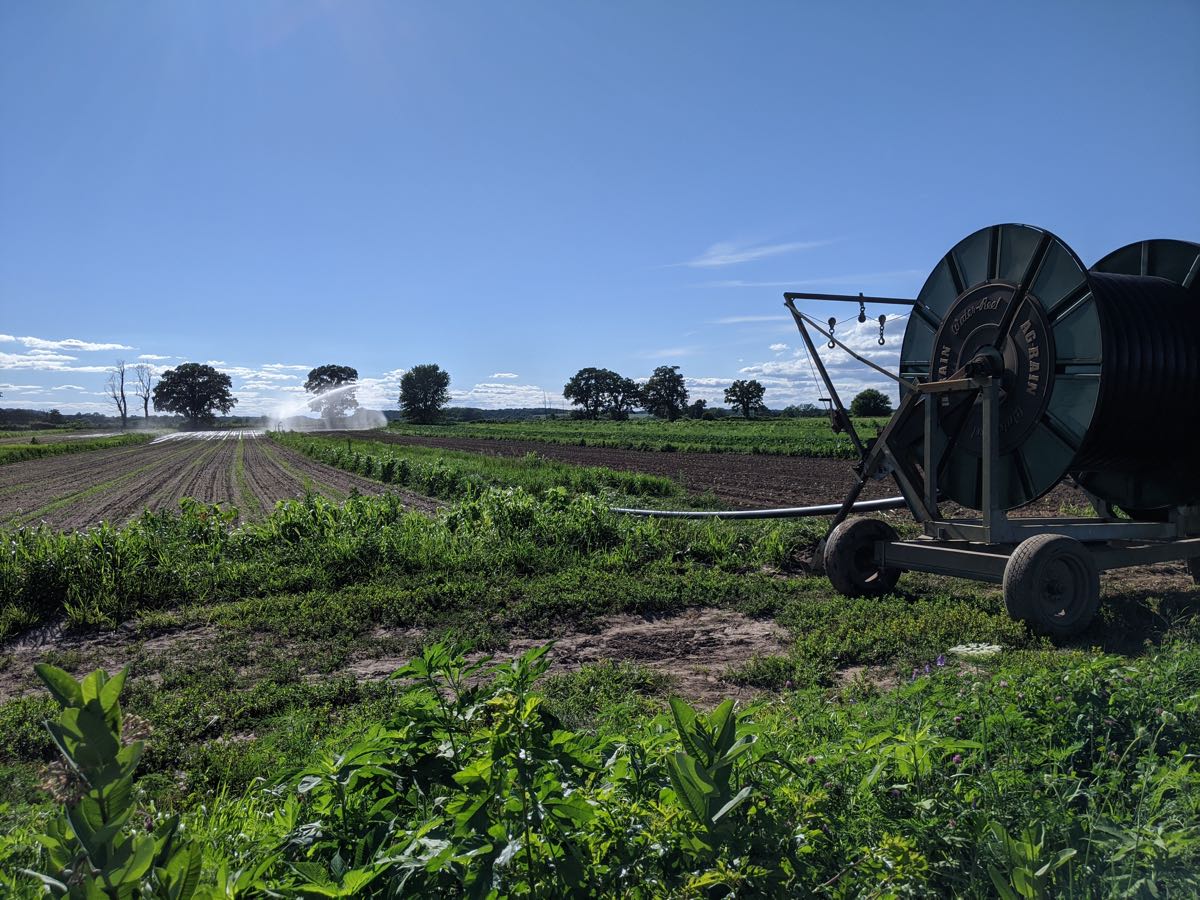
There’s been plenty of rain for most crops, except our young carrot plantings. We seeded a sequence of carrot fields right before the lightning strike. The carrots need steady moisture to emerge. Usually we irrigate lightly for 12 days. This year we had to rely on rain as it took over a week to get the irrigation well running again. So far the fields look fine because there was enough rain to keep the tiny seeds moist as they germinated. (photo credit Ari P-K)
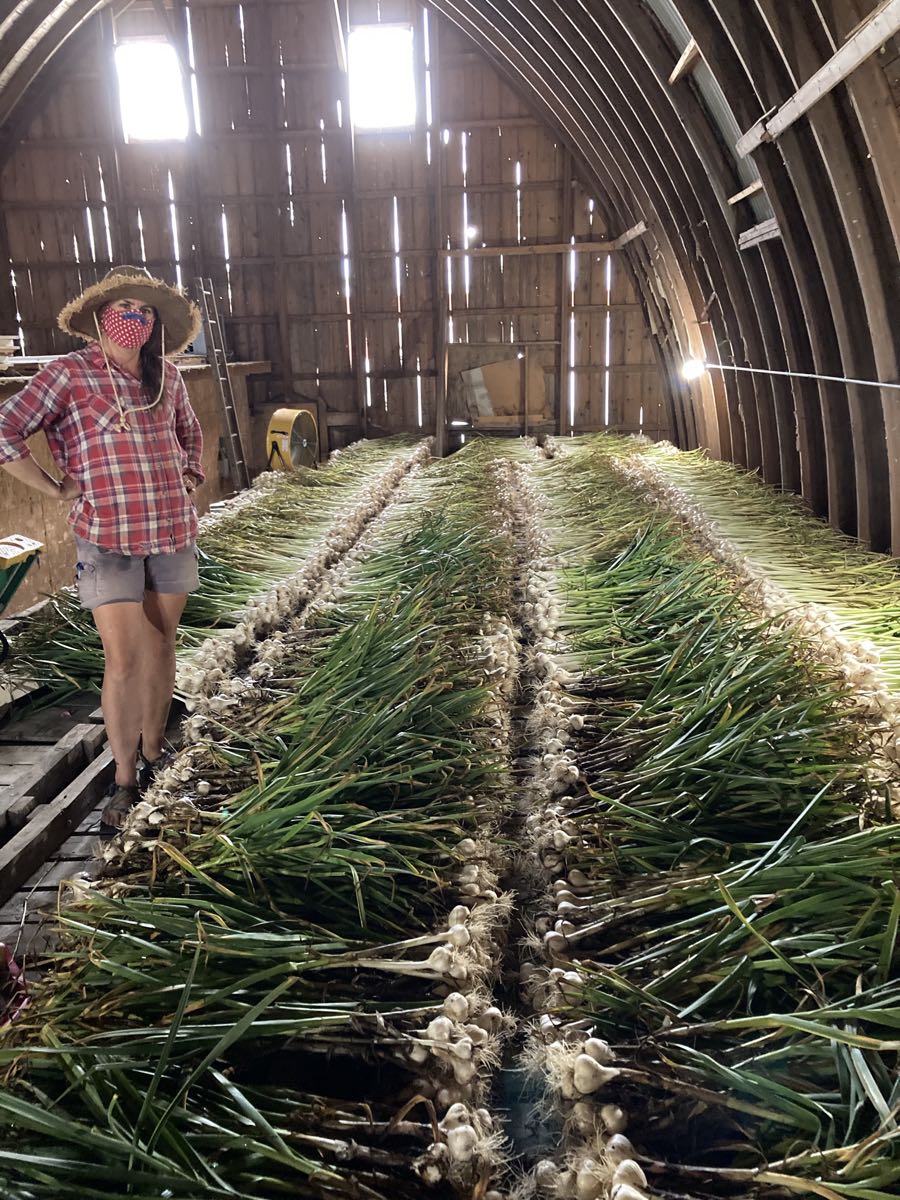
We harvested almost our entire garlic crop over the past week. There’s still a few hundred bulbs to pull. We dry the garlic upstairs in our well-ventilated barn, laying the stalks on overturned wooden bins. The masked bandoleer is neighbor/employee/friend Karen who helps with garlic every year. She grows seed garlic on her farm, so I rely on her expertise as we harvest our garlic crop.

We have to say goodbye to employee David (left, harvesting your basil with Ben). David returned to work for us during the pandemic, but now is leaving for a job in his field (wine making). We were glad to have him back – he’s worked for us several times over the past ten years, when he’s been available between other adventures.

The basil is growing extraordinarily well this year so we’re sending another nice bunch. We usually overplant in anticipation of losing some to to disease. Instead, it is unexpectedly lush. We’ll continue to send it frequently. If it’s too much, freeze some for winter. You’ll be glad you did.
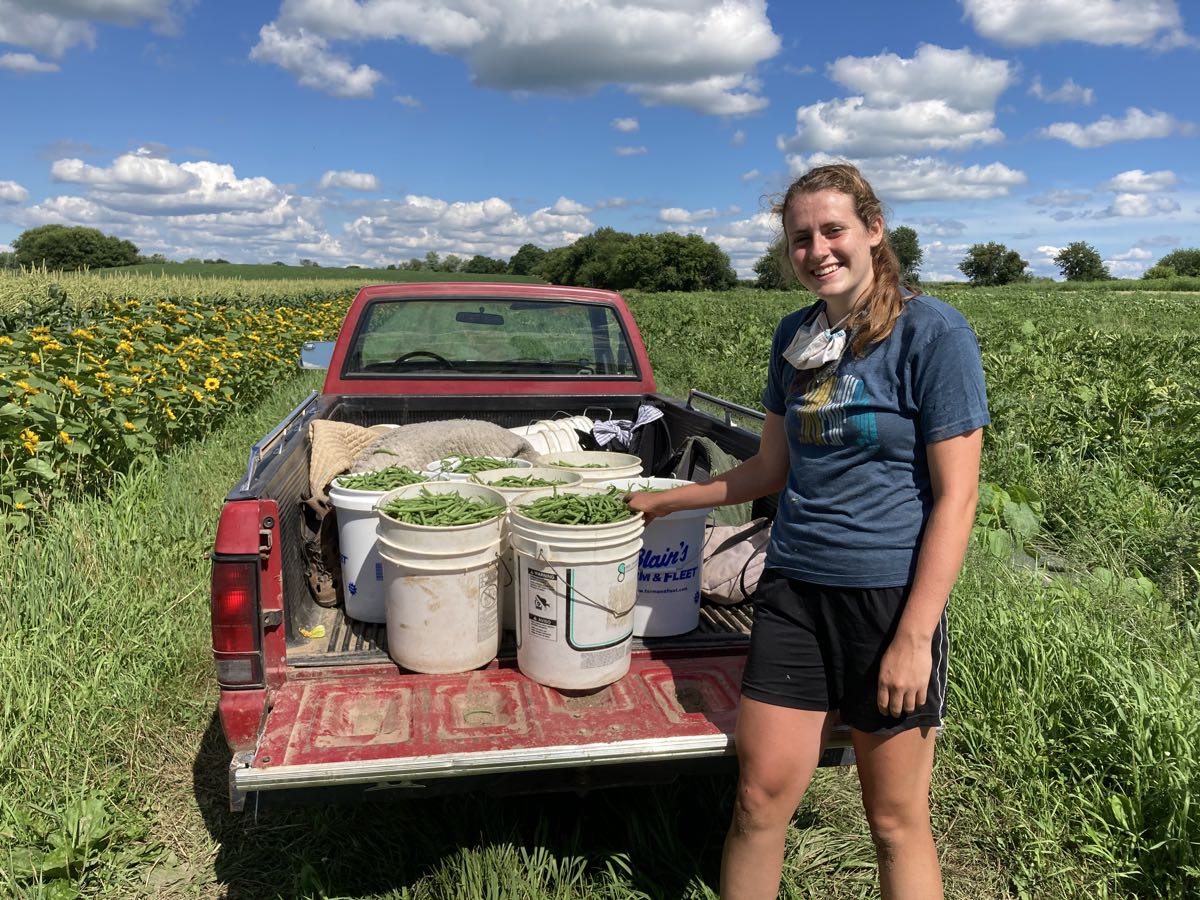
All our farm work is so much easier in the cooler weather! Zoe brings in the bean harvest.
Veggie List & Veggie Notes
Week #10, July 23/24, 2020
– Weekly shares
– EOW/ purple
– Sampler/ sun
Sweet corn, ~8 ears
‘Caraflex’ cabbage
Green beans, 3/4 lb
Cherry tomatoes, 1 pint
Tomatoes, a few slicing or plum tomatoes
Cucumbers, 3
Green bell pepper, 1 small
Walla Walla onion, 1 large
Basil, 1 bunch
Each site gets globe eggplant OR broccoli OR zucchini OR extra corn.
Next week’s box will probably contain sweet corn, green beans, tomatoes and other summer crops!
Sweet corn – Now it’s summer! Some ears have bugs at the tip. I suggest cutting off the tips before shucking the corn.
Storage. Sweet corn is best when fresh, so we encourage you to eat it asap. Store in the refrigerator, in the husks if you have the room, or husked in a plastic bag.
Cooking. It is quicker to steam sweet corn than to boil it.
1.) Stand ears of corn upright in a tall pot. Put one inch of water in the pot.
2.) Bring the water to a boil. If the corn is cold when you begin cooking, steam for 5 – 6 minutes. If the corn starts at room temperature, steam for 4 – 5 minutes. The cooking time will vary somewhat depending on how many ears are in the pot. Pay attention to how the corn smells. The scent changes once the corn is ready. Another clue: water will bead on the corn until it is cooked. Don’t overcook it.
‘Caraflex’ cabbage – This is the same type of cabbage we sent three weeks ago. This ‘salad’ type is great for slaws and raw salads but handles light cooking too.
Green beans – Store in the warmer part of your fridge.
Tomatoes (plum or slicing) – Store your tomatoes at room temperature to preserve flavor and texture.
RECIPES
Visit our 2020 Recipe Log or our 2019 Recipe Log or join our Facebook discussion group.
LOCAL THYME/ Cooking 101
Corn Pudding
Roasted Chicken and Cabbage Dinner
Green Bean Salad with Basil and Pine Nuts
LOCAL THYME/ Cooking 202
Caramelized Corn with Basil
Roasted Caraflex Cabbage with Gruyere
Pesto Pasta Salad with Green Beans and Corn
LOCAL THYME/ Quick & Easy Meal
Composed Chicken Salad with Buttermilk Dressing
RECIPES FROM LAUREN
RUNZA
What the heck is runza you ask? Well, officially, it is the state dish of Nebraska. But closer to home, it is a dish I grew up with when my mom had extra cabbage in her garden. It’s essentially a German-style calzone packed full of ground meat (traditionally beef, but here I used pork because it’s what I had on hand), cabbage, and onions. I know making your own dough can seem intimidating but give it a try. It’s easier than you think.
Makes 8 runzas
Takes 2 hours
Dough:
3/4 cup lukewarm water
2-1/4 teaspoons active yeast
Pinch sugar + 3 tablespoons sugar, divided
4 eggs; 3 for dough, 1 for egg wash
4 cups all-purpose flour, divided + more for dusting counter
12 tablespoons butter, softened
2 teaspoons Kosher salt
Filling:
1 tablespoon olive oil
1 pound ground pork
1 teaspoon Kosher salt, divided
1/2 teaspoon black pepper
1/2 Walla Walla, diced
1 green pepper, seeded and diced
2 tablespoons butter
1 head cabbage, shredded
1 teaspoon dried thyme
1/2 teaspoon dried sage
- In a large bowl, combine water (it should be warm but not hot), yeast and sugar. Whisk gently to combine. Let sit for 10 minutes until it bubbles, rises and smells yeasty. Add 3 eggs and whisk to combine. Add half the flour and beat with a spoon until totally incorporated. Add butter, remaining flour, sugar and salt. Stir until just combined and then let rest for 15 minutes.
- Once rested, dust counter with flour and knead dough for 5 minutes until tight and smooth. Transfer the dough to a clean, greased bowl. Cover with plastic wrap and let rise in a warm space for an hour (until doubled in size).
- When the dough is about 20 minutes from finished, preheat the oven to 375 degrees and start on the filling. In a large heavy skillet (or Dutch oven), heat olive oil over medium heat. Add ground pork, 1/2 teaspoon salt and the pepper. Break up meat with two forks, cooking for 5 minutes until browned. Add onion and pepper. Cook 5 minutes more. Add butter and remaining salt to skillet. Get it a stir so the butter coats all the meat and veggies. Add cabbage along with dried herbs and let wilt gently over medium low heat for 15 minutes.
- At this point, your dough should be risen. Grease two baking sheets. Divide into 8 pieces.
- Re-dust counter with flour and roll out dough into a rough 8×4-inch rectangle. Scoop 3/4 cup of cabbage mixture into the center. Fold in the two long sides of dough so they touch then pull the other edges into the center until you form a sealed dough pocket with the meat in the middle. Place, seal side down, on the greased baking sheet. Repeat with remaining dough and cabbage mixture.
- Beat last egg in a small bowl until smooth and brush runzas with egg mixture.
- Bake for 15 minutes. Rotate pans and bake 15 minutes longer until golden brown. They may crack, but you shouldn’t worry too much if they do. It just means you over-kneaded the dough and they will still taste amazing.
- Serve with ketchup or some variation of a spicy special sauce.
**Pro tip: My mom often cuts a slit in the side of the fully baked runzas when she is reheating them and adds a slice or two of cheese.
.
????
.
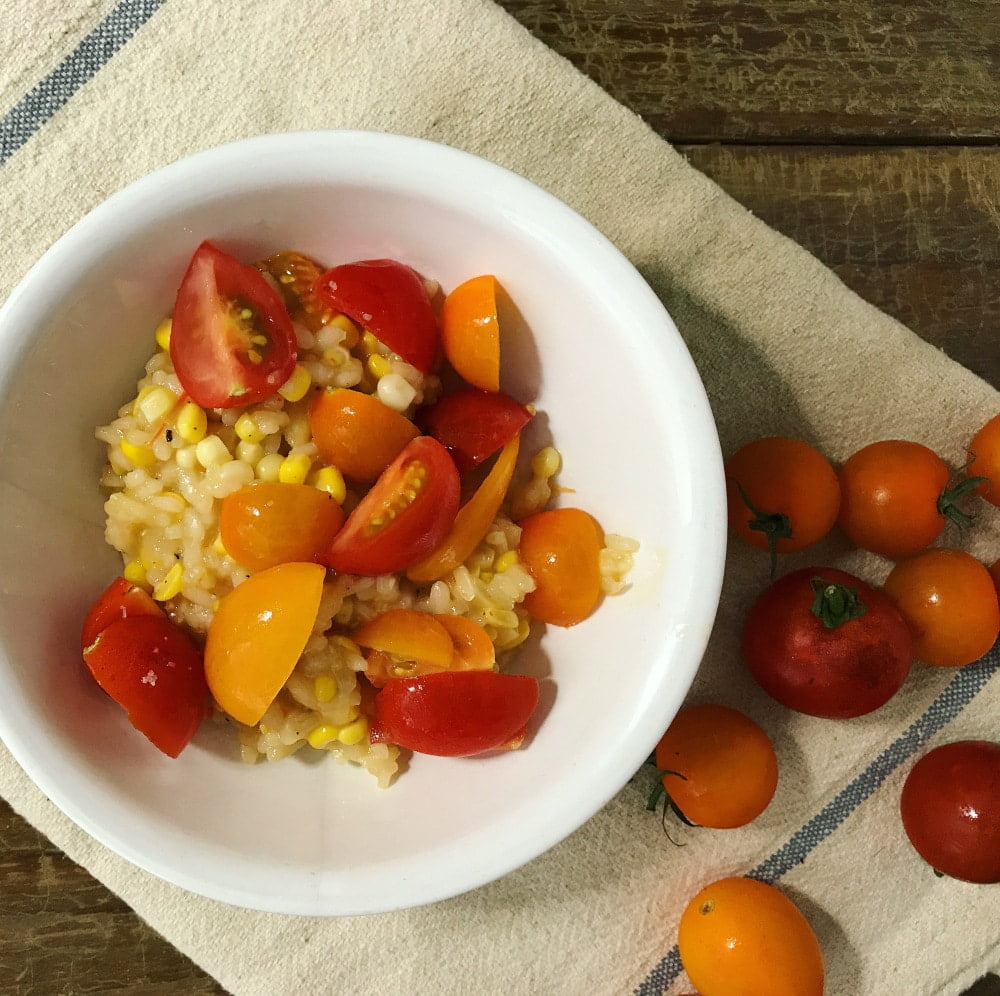
SWEET CORN RISOTTO WITH CORN COB BROTH & CHERRY TOMATOES
Adapted barely from a genius recipe from Susige at Food52
Oh my, oh my this dish! This is hands down one of the most tasty things I’ve ever consumed (and I live a pretty decadent and delicious life). I love really any combination of corn, peppers, onion and garlic but something about this risotto just sings on another level. I think the corn cob broth is the real game changer. Don’t skip this step if you can help it. It adds a little time (but also can be left alone while you get things done around the house). Also don’t omit the quartered cherry tomatoes on top. It’s a simple thing but it adds the acidity and brightness that the rich creamy risotto needs.
Takes 90 minutes (1 hour active cooking time)
Serves 4-6
5-6 ears sweet corn
6 cups water
1 tablespoon Kosher salt, divided plus more for seasoning
5-6 garlic, divided
1/4 cup butter, divided
1 tablespoon olive oil
1/4 teaspoon freshly ground black pepper
1 cup arborio rice
1/2 cup dry white wine
1/2 cup parmesan
1/4 cup minced basil leaves
1 pint cherry tomatoes (or diced tomatoes), quartered
- Husk ears of corn. With a knife, remove kernels from corn and set aside in a small bowl (hopefully there is 1-2 cups). In a large stock pot or Dutch oven, combine water and corn cobs (sans kernels) and 2 teaspoons Kosher salt. Smash 3-4 garlic cloves with the blade of your knife and remove the skin. Toss into pot.
- Bring corn cob broth to a boil and then immediately reduce to a gentle simmer. Simmer slowly for an hour. Then keep warm on very low heat to add into the risotto.
- After the corn cob broth has been simmering for about 30 minutes, begin your risotto. Melt 1 tablespoon butter with olive oil in a large saute pan (with tall sides) over medium heat. Mince remaining 2 garlic cloves and add to pot along with black pepper and remaining teaspoon Kosher salt. Cook until garlic is very fragrant and just beginning to brown, about 10 minutes. Reduce heat to low. Cook over very low heat for 15 minutes, stirring occasionally.
- Turn heat up to medium low. Add rice and cook for 2-3 minutes until it has absorbed any fat from the pan. It should look slightly puffed.
- Add the wine to deglaze the pan. Cook, stirring occasionally until the rice has absorbed all the wine.
- By now your broth should be nicely reduced to 4 cups of liquid. Remove the corn cobs with tongs. If you feel ambitious, run the back of a knife against the corn cob to get every yummy morsel of corn off the cob and into the broth. Toss the garlic gloves into the pan with the rice.
- Add three ladles of broth to the rice and stir. Let simmer gently, stirring occasionally until broth is absorbed by rice. Then add a couple more ladles of broth. Continue this process of adding broth, stirring occasionally and letting the rice absorb the broth until you’ve used all the broth and the rice is tender but not mushy. It should take about 20 minutes. (If you use up the broth before the rice is cooked enough to your likely just add a little more warm water).
- Remove pan from heat. Add reserved kernels, remaining three tablespoons butter, Parmesan cheese and basil. Stir to combine then cover and let sit for five minutes.
- Serve warm with quartered cherry tomatoes and a sprinkle of salt.
.
????
.

CREAMY CUCUMBERS
Serves 2-4 as a side (though I am known to eat the whole bowl for dinner)
Takes 15 minutes (but gets better the longer you let it sit)
3 cucumbers, cut into 1/8-inch slices
1/2 Walla Walla onion, halved and sliced
1/4 cup Greek yogurt
1/4 cup mayonnaise
2 tablespoons sugar
2 tablespoon white vinegar
Salt and pepper to taste
Dill, optional
- In a large bowl, combine cucumbers and onions.
- In a small bowl, whisk together yogurt, mayo, sugar, vinegar, salt and pepper until smooth. Pour over cucumbers and onions and toss gently to combine. Garnish or season with dill (if you like).
- Serve immediately or chill for an hour to let the flavors really meld together.
.


