
Yearly Archives: 2018
Week #6, June 28/29, 2018
- On: June 27, 2018
 0
0
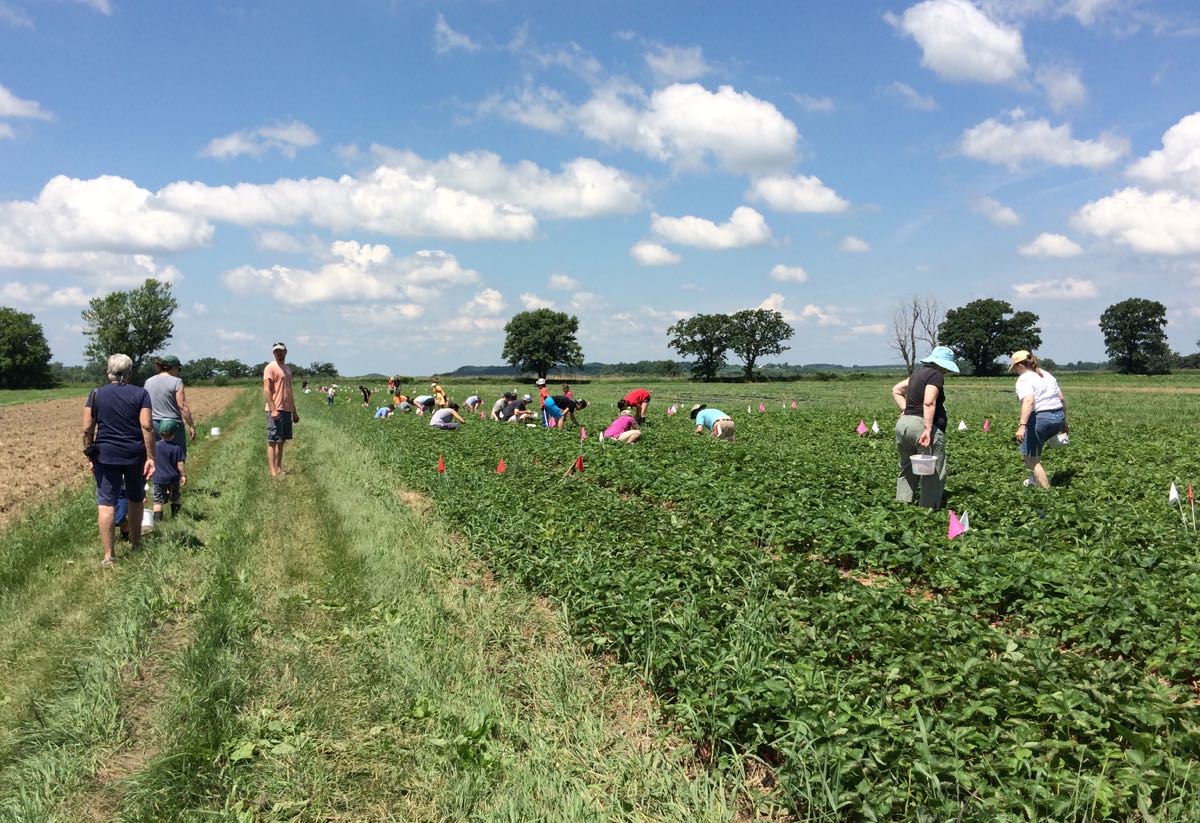
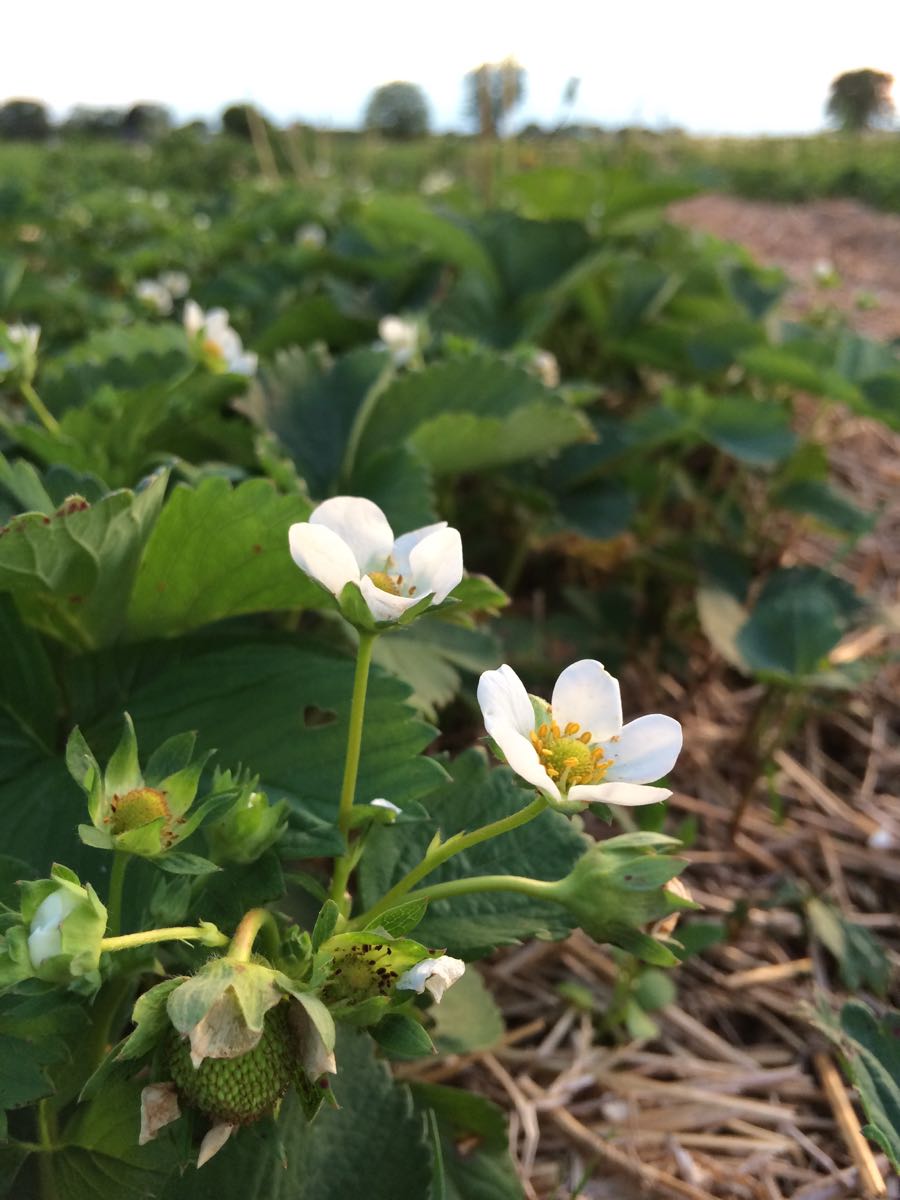
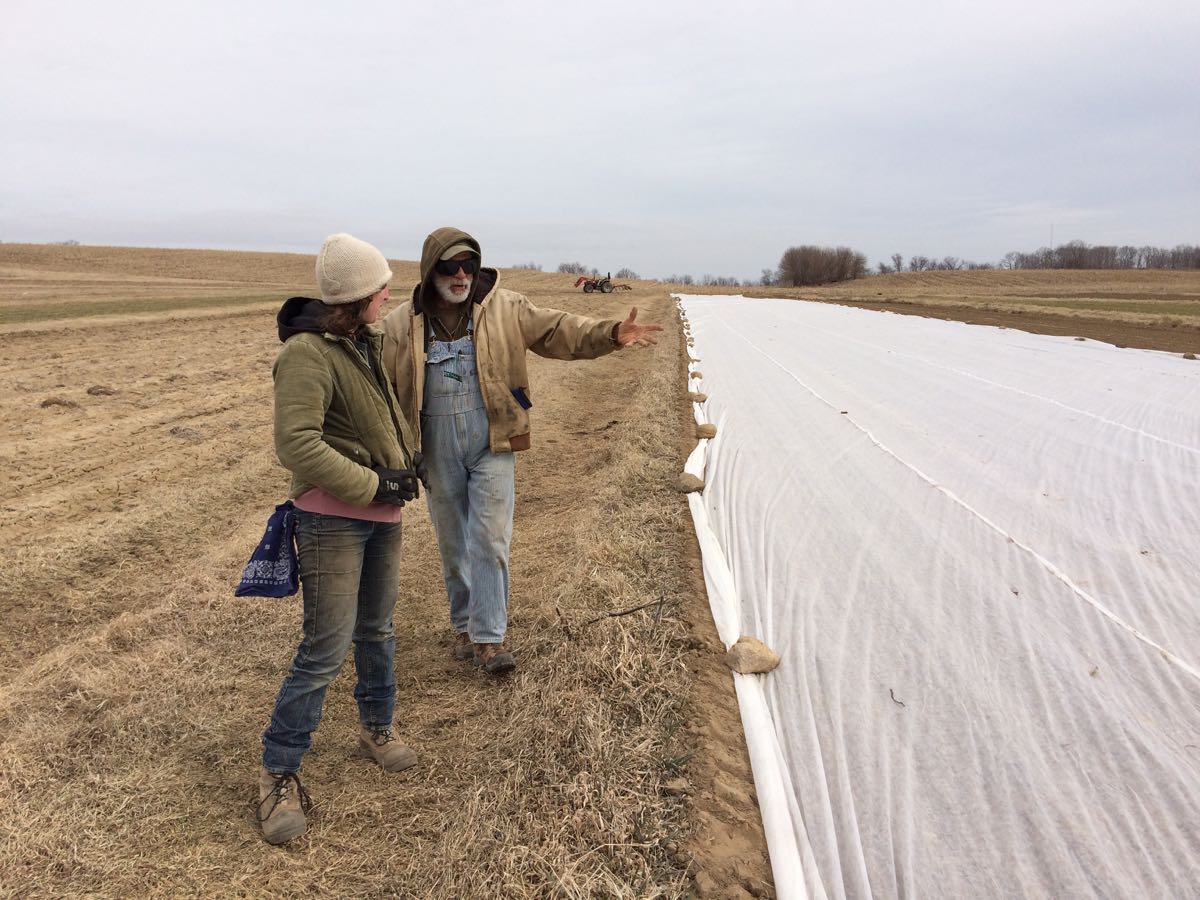
It was a beautiful day for the strawberry upick. Considering the weather the rest of the week, we were very lucky. Billy (in orange shirt) greets members and shows them where to pick.
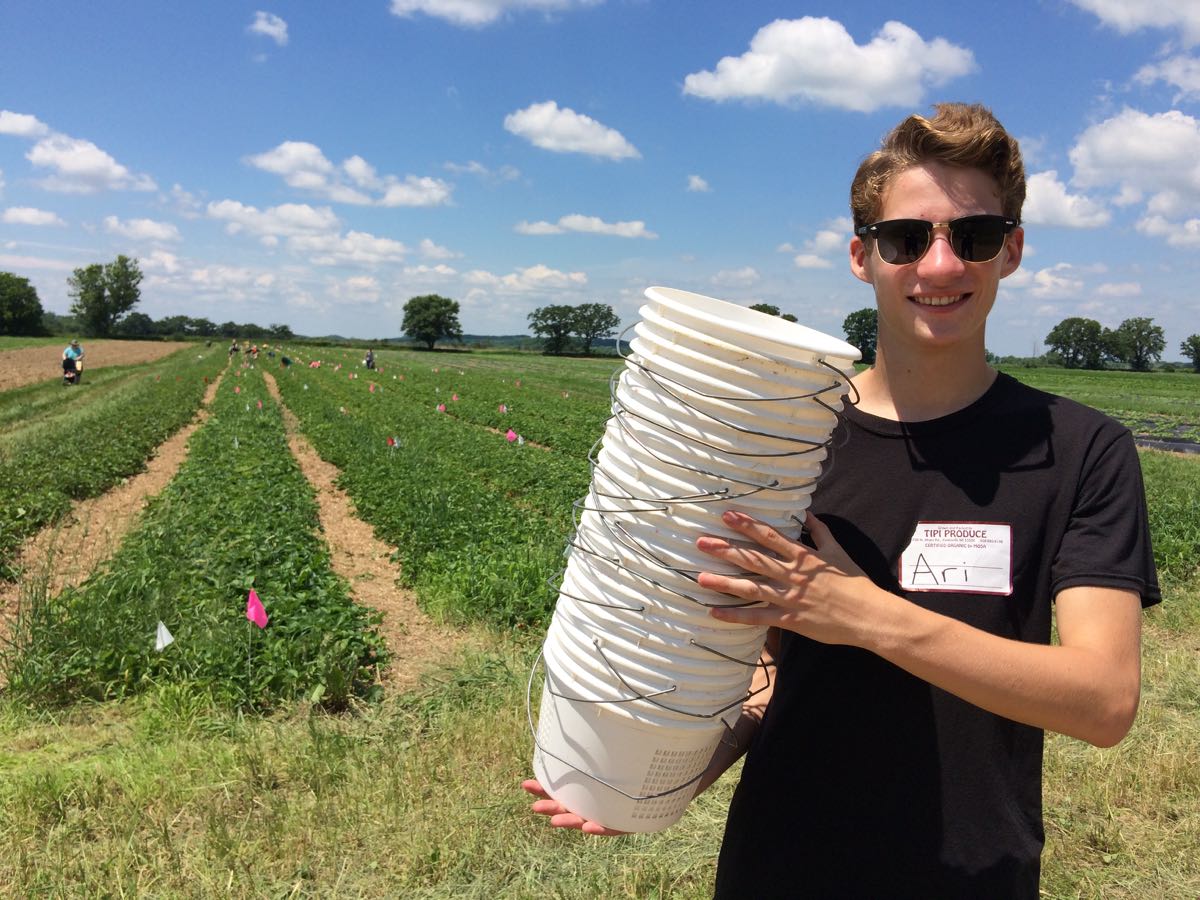
Ari was ready to share both pails and lifetime’s experience picking strawberries.
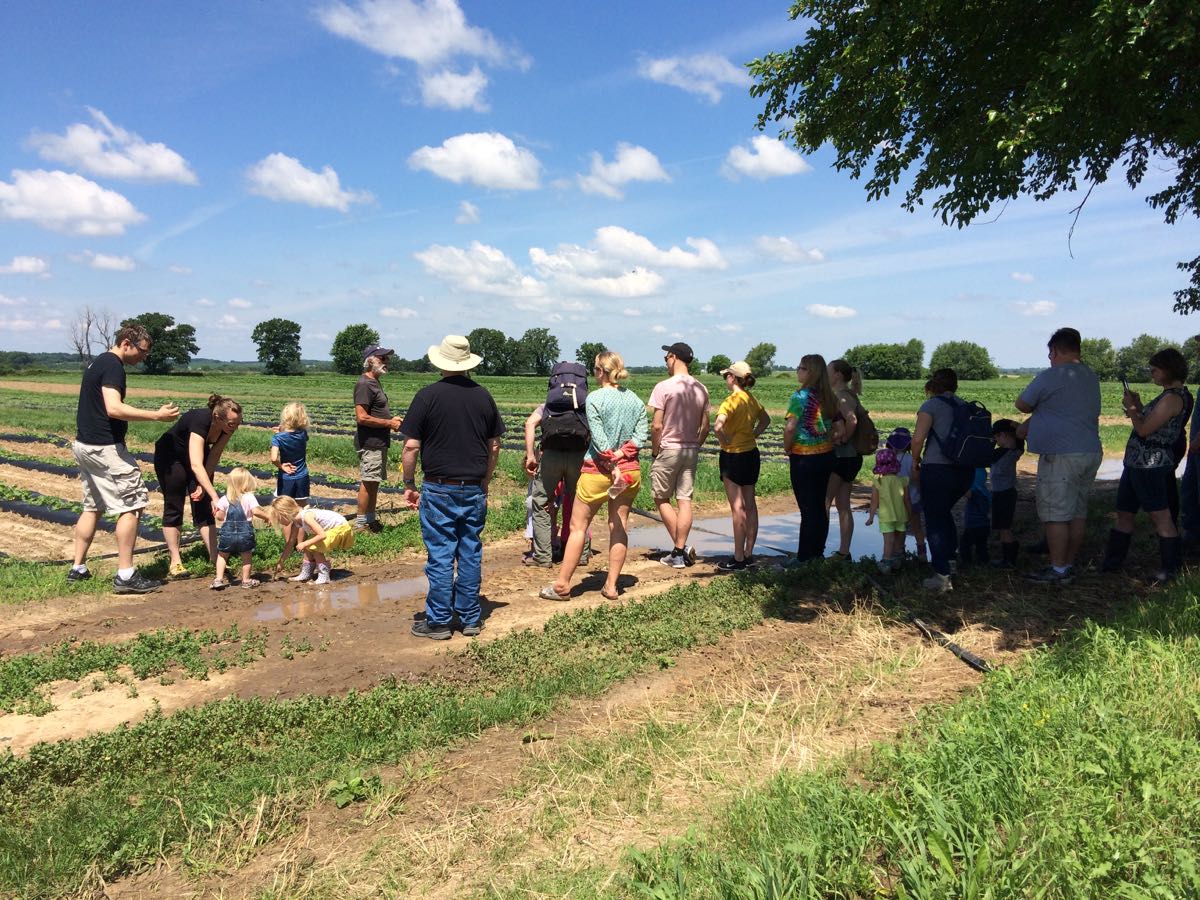
Steve (with beard, 6th from left) led a tour of the farm. He agreed to make this year’s tour a little shorter. He loves showing everyone the farm but sometimes we find members quietly backing away mid-tour because they want to pick more berries.

Well, we got more rain this week, just like all of you.
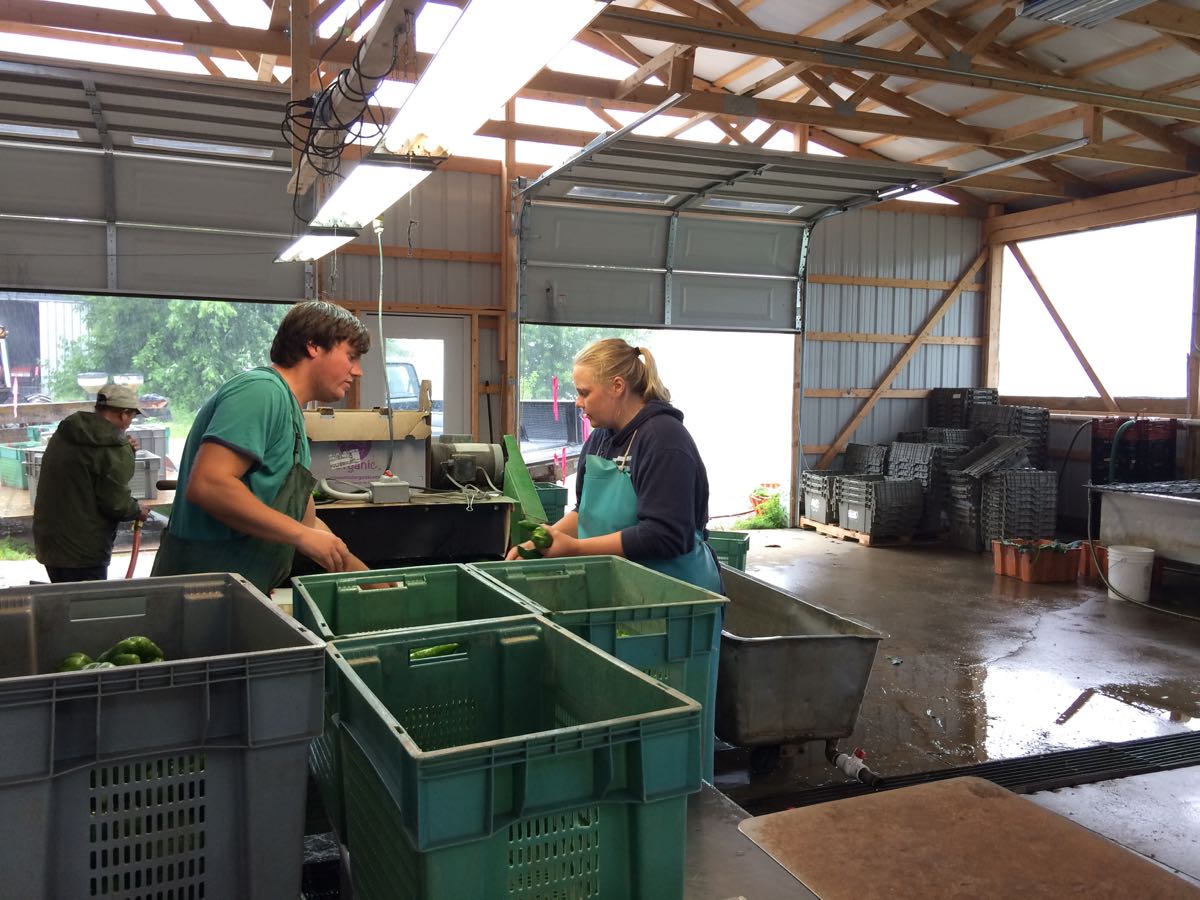
We were strategic with our time, harvesting between storms and saving indoor jobs for during downpours. Above, Raul, Jory and Sena wash your peppers.
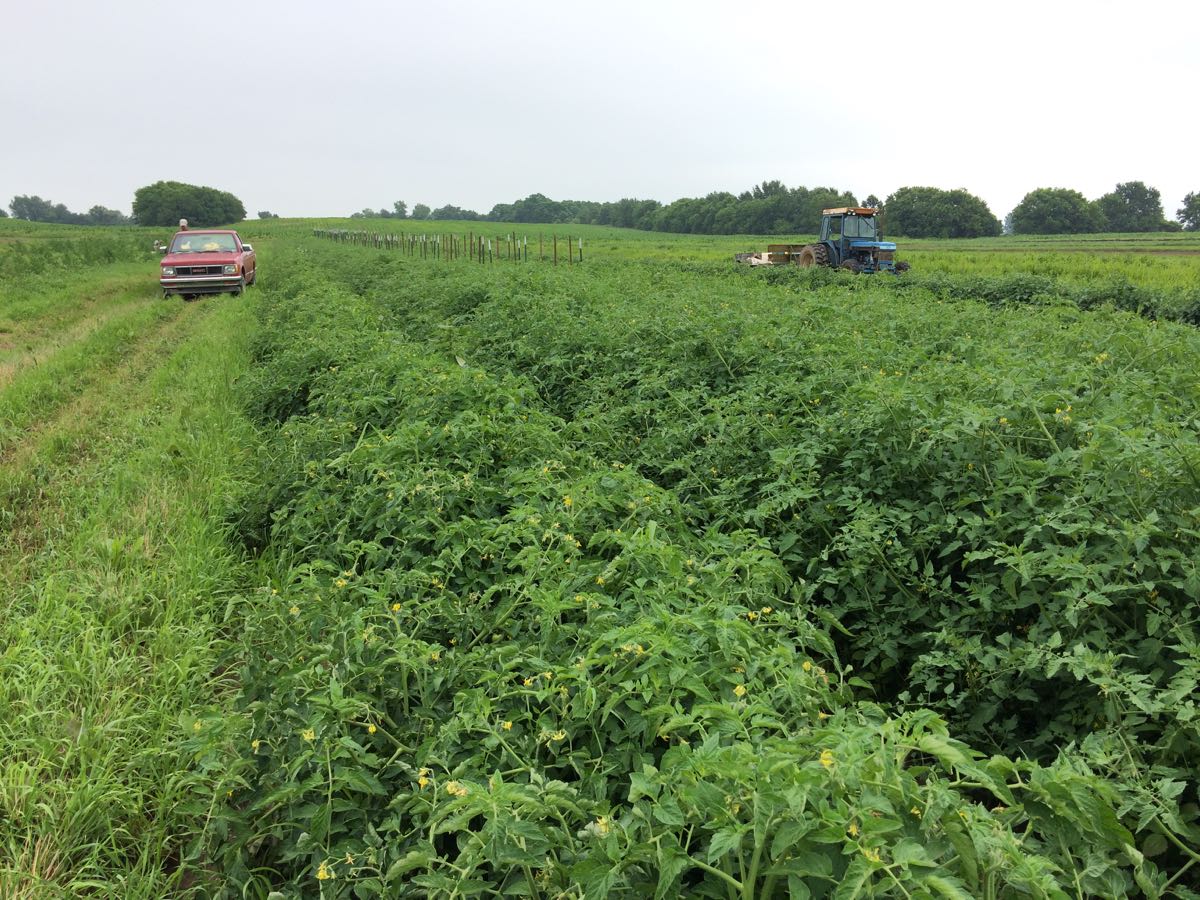
I have to say that our crops are loving the moisture + heat. Look at the lush tomato plants.
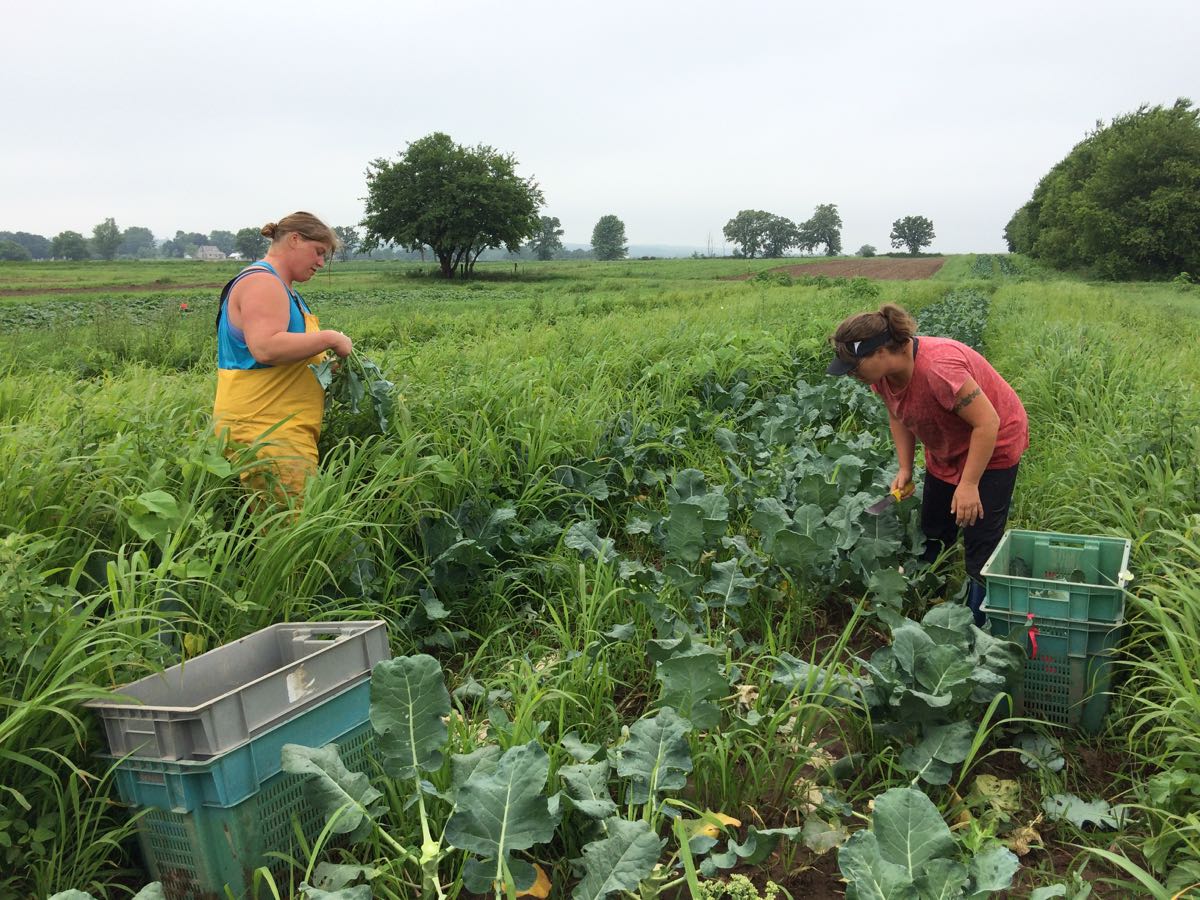
However, we are getting behind on weeding. Maggie and Kristen harvest broccoli. These weeds are very big because we’re almost done with this field. We’re using our dry spells to cultivate and weed as much as possible, trying to keep ahead of the weeds that are thriving after the rain.
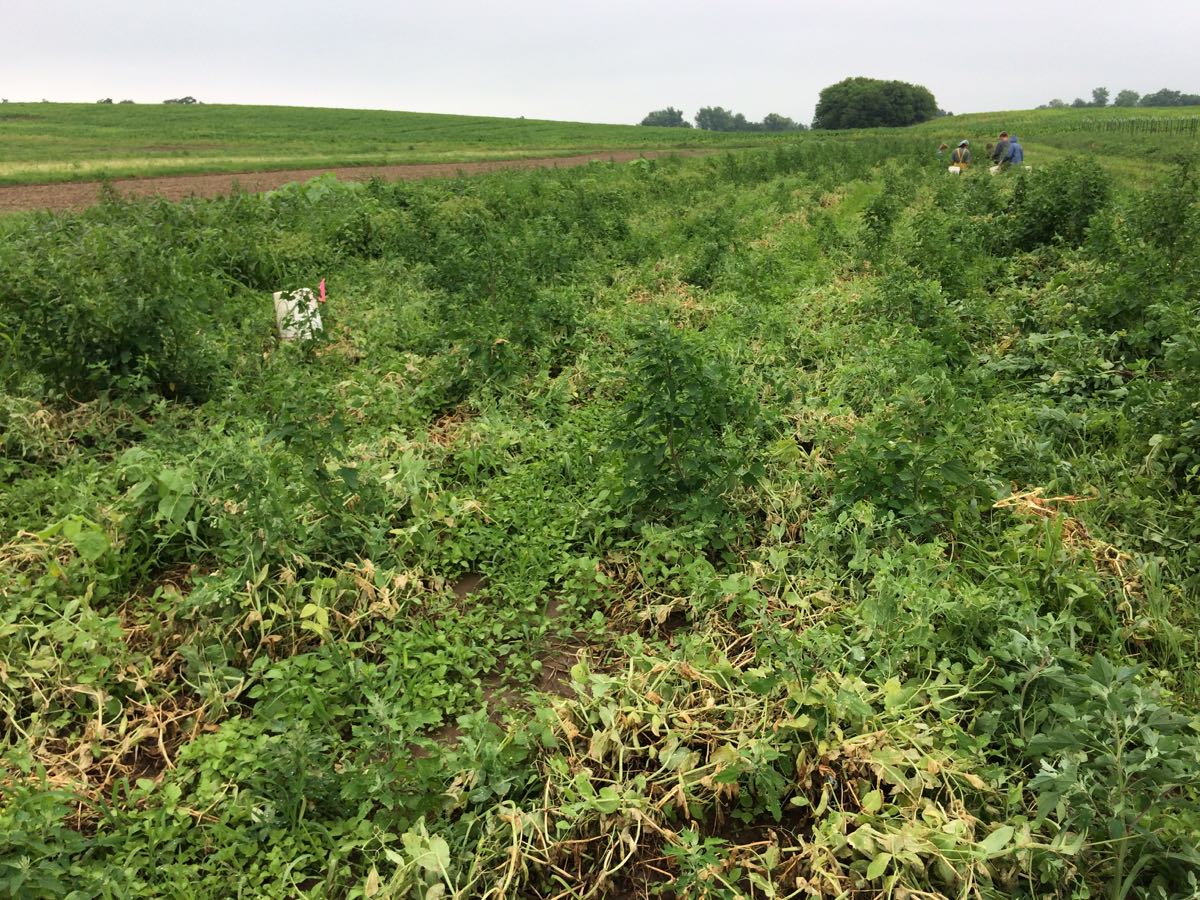
No snap peas this week. We usually get two (or more) harvests from each pea field. Last week’s harvest in the mud wrecked the plants. Now we wait for the next pea field to be ready.
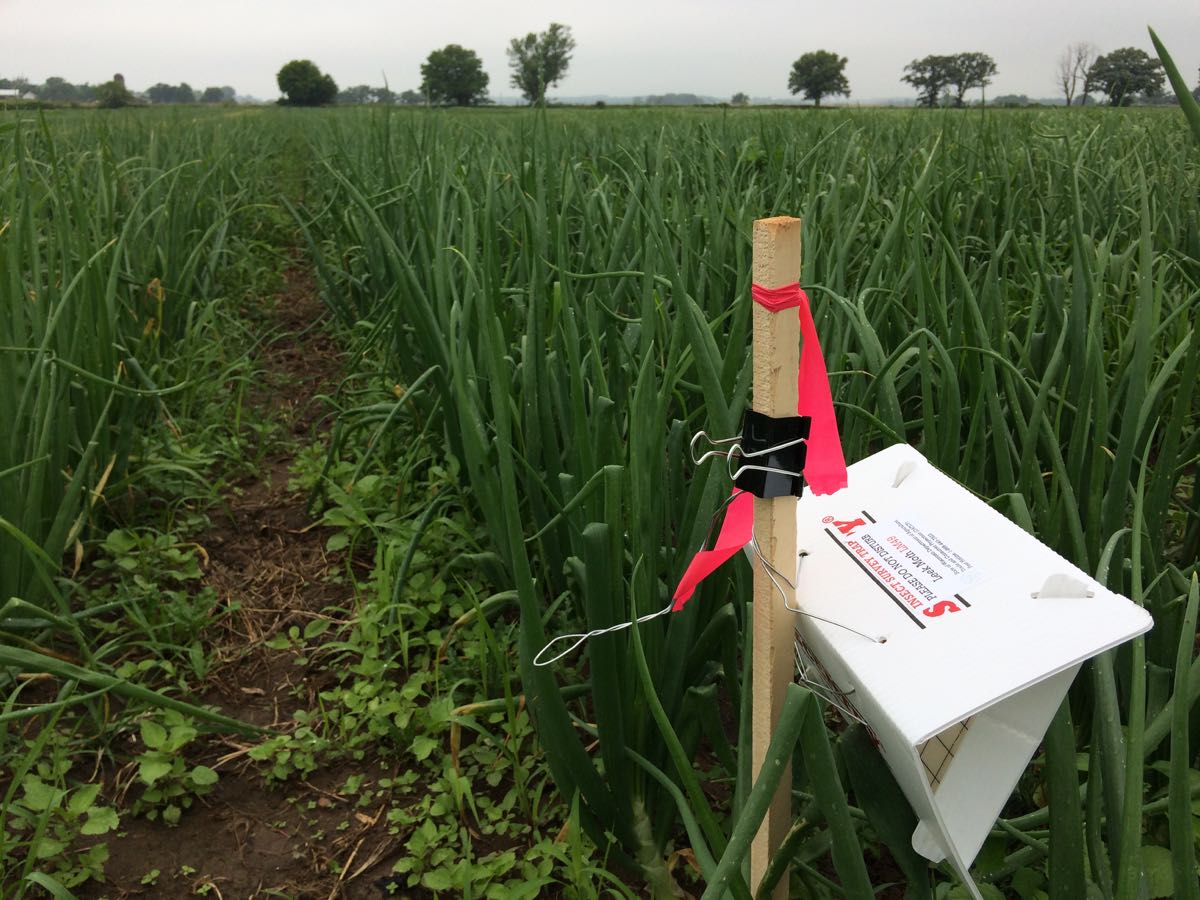
A visiting entomologist from DATCP installed insect traps. She is monitoring for several vegetable pests that are found in neighboring states but haven’t made it to Wisconsin yet. Advance monitoring like this is extremely valuable, so we volunteered to host the traps. Hopefully we won’t find anything.
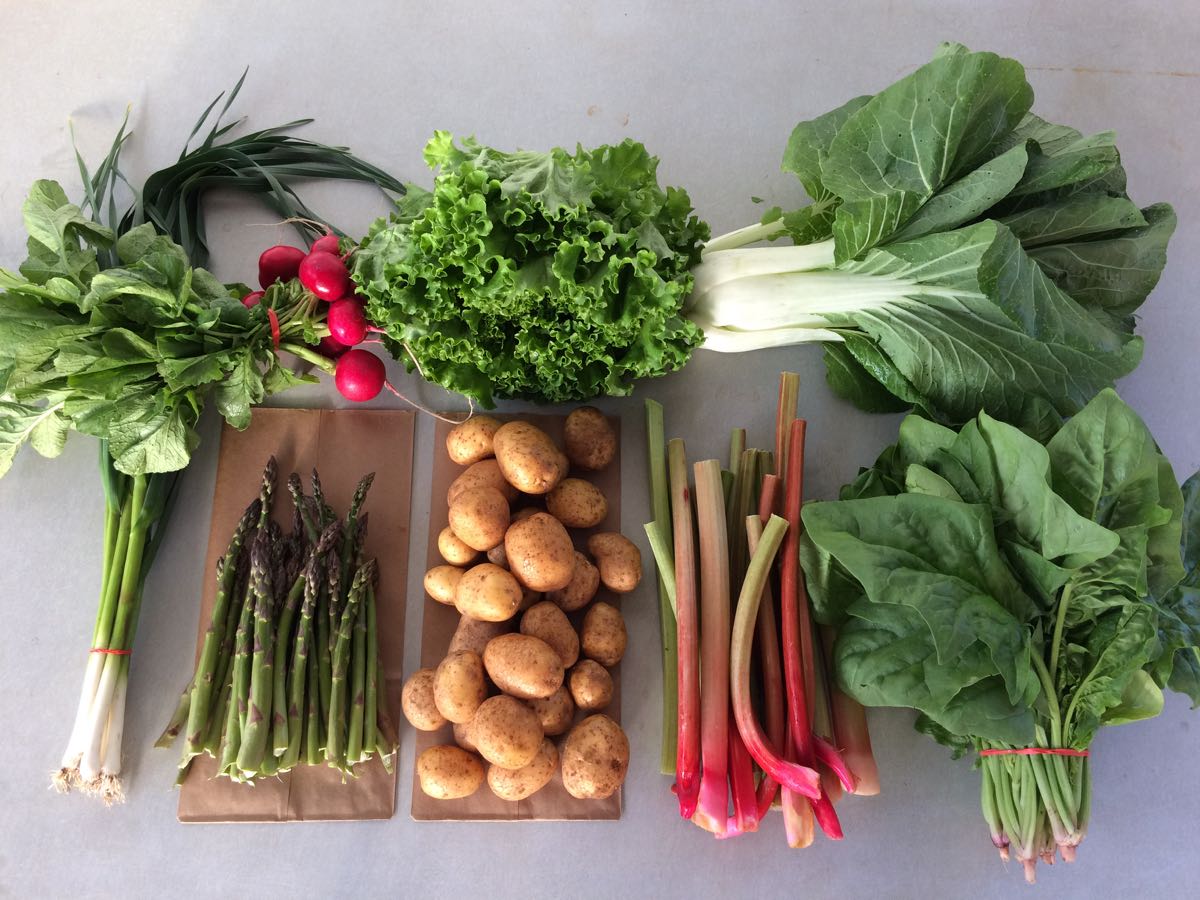
Veggie List and Veggie Notes
Strawberries, 1 quart
Napa cabbage
Zucchini and summer squash, 3.5 – 4 lb
Broccoli, ~2 modest heads
Green bell or green frying pepper, 1 – 2
Kohlrabi, 1
Scallions, 1 bunch
Basil, 1 large branch
Garlic scapes, 1 small handful
– Some sites get 1/4 lb snow peas.
– Some sites get a second pepper.
Next week’s box will probably contain Caraflex cabbage, Walla Walla onion, zucchini/summer squash, basil and more.
Strawberries – Refrigerate and eat soon! These berries are in better shape than last week’s but are still perishable after all the rain.
Napa cabbage (large, pale green cabbage with crinkled leaves) – This week’s napa average 2.75 lb in size. This is an interesting vegetable, useful for both fresh, raw salads and for cooking. Napa’s most famous use is fermented kimchi. I like to prepare a fresh, unfermented kimchi. Same seasonings, but it’s ready to eat right away. You will be amazed at how much shredded napa cabbage shrinks when prepared this way. See here for an example, but cut the salt in half: Grilled Flank Steak with Kimchi-style Coleslaw.
Storage: Napa stores very well. Cut off wedges as needed and keep the rest covered and refrigerated, and it will keep for several weeks. Peel off the outer layer and it will be ready to use. Here are a few preparation ideas from the ‘Asparagus to Zucchini’ cookbook.
– Chop raw napa into green salads.
– Substitute napa in traditional coleslaw.
– Chinese cabbage cooks quickly. Steam 3-5 minutes, or until leaves are wilted down but remain slightly crisp.
– Substitute napa cabbage for common cabbage in recipes, but reduce the cooking time by 2 minutes.
– Napa cabbage is the main ingredient in egg rolls. Try making an egg roll mixture to eat as a cooked side dish instead of preparing time-consuming egg rolls.
Broccoli – Refrigerate in a plastic bag or a container. Make sure there’s no free water puddled in the bag or container, to avoid rot. It’s a bad idea to store broccoli uncovered in the fridge; it will wilt.
Green bell or frying pepper – You’ll get a green bell pepper (blocky) and/or a green frying pepper (long, slender). Both types are sweet. Frying peppers have lower moisture which makes them particularly suited to frying. Other than frying, the two types can be used interchangeably in recipes. It will be a few weeks before we have more peppers. Our plants set one early pepper, then there’s a lag while the next set develops.
Kohlrabi (pale green, round vegetable with thick skin) – Crunchy and sweet, kohlrabi is a great addition to salads.
Storage: Kohlrabi bulbs will store for a month in the refrigerator.
Uses: Kohlrabi are good peeled and eaten out of hand, or added to sandwiches, or added to salads. It makes a nice salad on it’s own. You can grate it, slice it, or cut it into matchsticks. It’s also good cooked. If you have it, the Asparagus to Zucchini cookbook has a long list of kohlrabi suggestions.
Basil (either curly or flat-leaved) – Some people will get flat-leaved basil. Others will receive the ‘Napoletano’ variety with frilly leaves. Storage: Basil will blacken if stored in the refrigerator. It is best stored at room temperature with the cut ends in water, for example in a jar or vase. Treat it like a flower. Give the stem a fresh trim and change the water every day or two.
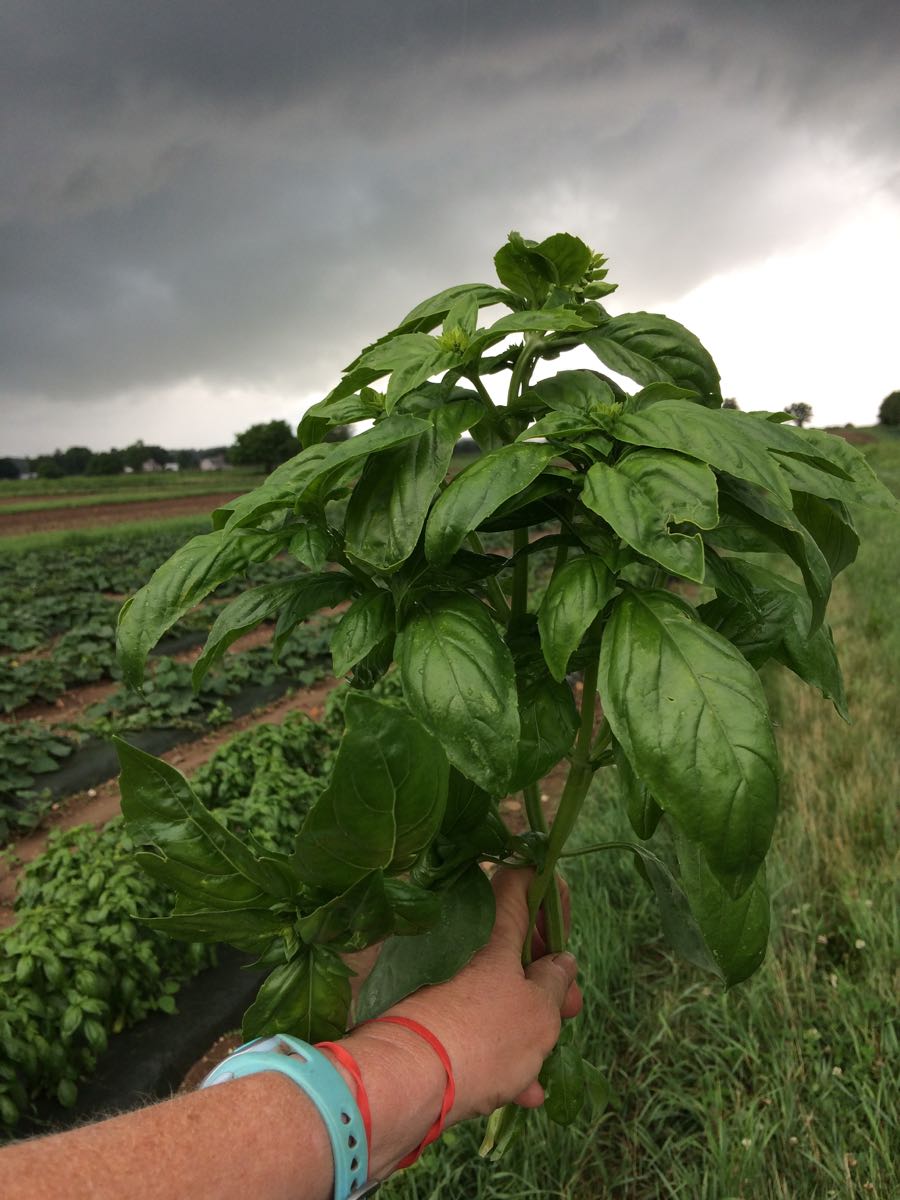
Everyone gets one sturdy basil sprig this week. It looks tree-sized when held up to the horizon! It will look more compact after we’ve washed and packed it.
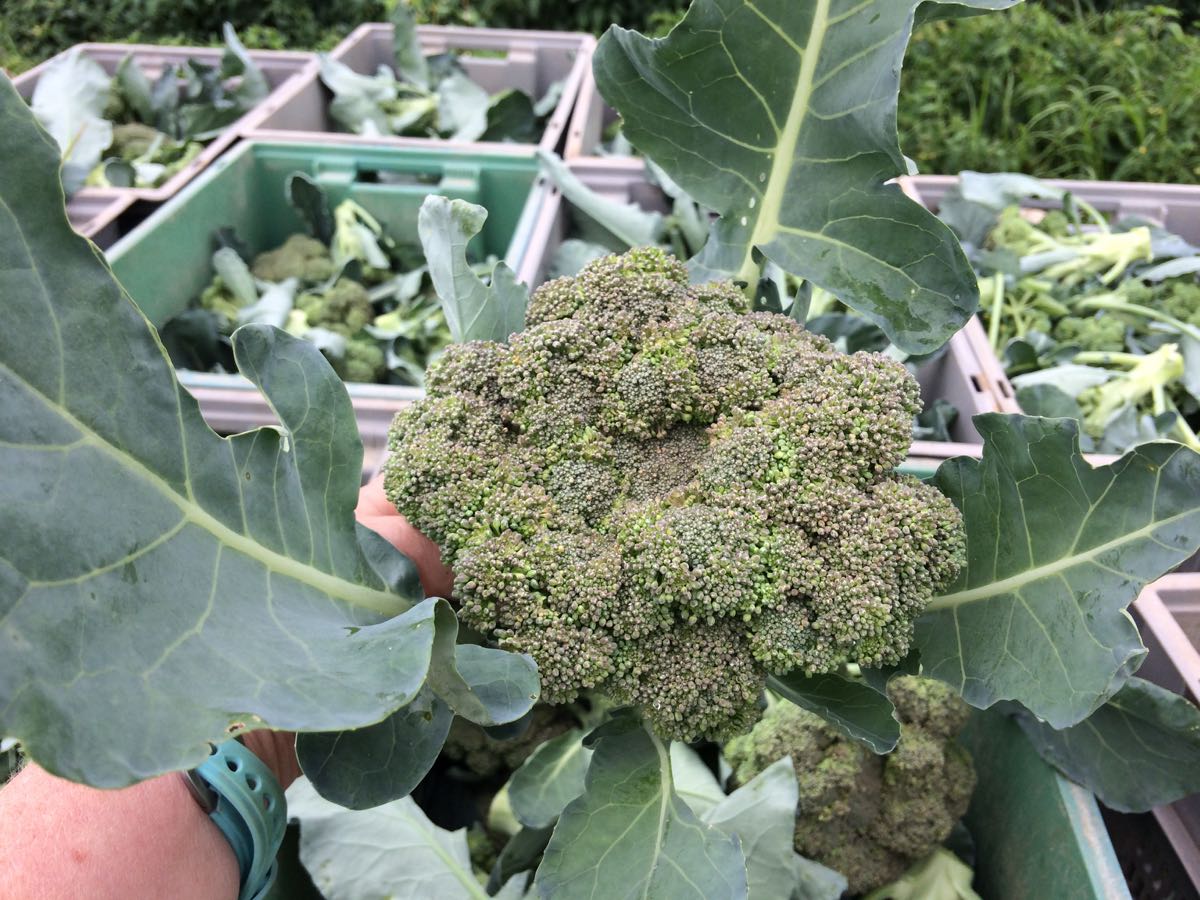
The broccoli heads are uneven this week. This is typical after hot weather.
RECIPES
Visit our 2018 Recipe Log.
Visit our 2017 Recipe Log.
Join our Facebook discussion group.
LOCAL THYME/ Comforting Classics
Thai Tofu Fried Rice with Broccoli and Napa Cabbage
Chipotle Slaw
Broccoli and Kohlrabi Salad
Pasta Salad with Summer Squash, Crushed Almonds and Parmesan
LOCAL THYME/ Outside the Box Recipes
Lake Trout en Papillote with Napa Cabbage Salade
Napa Kimchi
Kohlrabi Fries
Stuffed Zucchini and Summer Squash with Basil
LOCAL THYME/ Quick and Easy Meal
Curried Kohlrabi Cakes
Recipes from Lauren
NAPA CABBAGE NOODLE SALAD
Adapted from Bon Appetit
For this recipe the steak will need to marinate for 10-15 minutes, but you can still prepare this meal in 30 minutes if you get that started right away! While the meat is marinating you will have plenty of time to cut up your cabbage, kohlrabi, scallions, basil and peanuts!
Serves 4
Takes 30 minutes
3 tablespoons toasted sesame oil, divided
1 green bell pepper, seeded and diced
1 garlic scape, sliced
1/4 teaspoon red pepper flakes
Kosher salt
6 tablespoons fresh squeeze lime juice
3 tablespoons fish sauce
3 tablespoons honey
1 pound sirloin steak, bone removed and thinly sliced
6 ounces wide rice noodles
1/2 head Napa cabbage, stems removed and shredded
1 kohlrabi, peeled, quartered and thinly sliced
4-5 scallion greens (dark green portions only), sliced
1/2 cup basil, cut in a chiffonade
1 cup roasted peanuts, roughly chopped
- In a large skillet (preferably cast iron if you’ve got one), heat one tablespoon toasted sesame oil over medium heat. Add the bell pepper, garlic scape, red pepper flakes and a pinch of salt. Saute for 2-3 minutes. Pour into a large bowl followed by lime juice, fish sauce, honey, one tablespoon toasted sesame oil and 1/2 teaspoon Kosher salt. Whisk to combine until smooth.
- Remove 1/4 cup of sauce from large bowl and place in small bowl. Add steak and use a spoon to coat. Let marinade for 10-15 minutes while you cook your noodles and chop remaining ingredients. Stir every once and while to ensure all steak pieces are marinating.
- Bring a large pot of salted water to a boil. Cook rice noodles according to package directions and drain once finished.
- Make sure the cabbage, kohlrabi, and scallion greens are well drained and then add to the large bowl with the majority of the dressing left in it. Add another couple pinches of salt and toss to combine.
- Now get your steak cooking. Pour the last tablespoon of sesame oil into your skillet (the same one you used before; you don’t need to wash it out) and get it nice and hot over medium high heat. Use a fork to transfer the steak (but not the marinade) into the skillet. Cook for 2-3 minutes until cooked through and then let rest for 5 minutes. Add steak and noodles to large bowl of cabbage mixture. Toss to combine and then add basil and peanuts and toss once more. Serve warm.
.
SQUASH TUNA MELT CASSEROLE
Adapted from Six Seasons
Not a fan of canned tuna? Feel free to substitute 10 ounces of shredded chicken breast or some other mild, neutral meat.
Serves 2-4
Takes 1 hour, 10 minutes, most of it inactive
2 pounds zucchini or summer squash
1 tablespoon + 1/2 teaspoon Kosher salt, divided
1/4 cup olive oil, divided
4-5 scallions, white, pale green and 1/2-inch from green tops, sliced
3-4 garlic scapes, sliced
1 teaspoon dried thyme leaves
1/2 teaspoon red pepper flakes
1/4 teaspoon freshly ground black pepper
Two 5-ounce cans oil-packed tuna
1-1/2 cups shredded, good-quality sharp cheddar cheese
1/2 cup breadcrumbs
- Trim off the ends of the squash and halve lengthwise if small or medium in size (under 6 inches long). If larger, quarter them lengthwise. Sprinkle with 1 tablespoon Kosher salt and let sit cut-side up for 30 minutes. This will drain out some of the moisture inherent in squash.
- When the squash has about 10 minutes to go, preheat the oven to 450 degrees.
- Spread the squash cut-side down in a single layer on a baking sheet so that it is not crowded. Roast for 15 minutes until the squash is tender but not mushy.
- Meanwhile, heat one tablespoon olive oil to a medium or large skillet over medium heat. Add the scallions, garlic, remaining 1/2 teaspoon Kosher salt, thyme, red pepper flakes, and pepper. Cook for 4-5 minutes until fragrant and softened but not browned.
- Arrange the roasted squash pieces in a baking dish so that they all fit together snugly together, this side cut-side up. Distribute the scallions and green garlic over the top followed by the tuna. Flake and crumble it evenly atop the squash. Drizzle with a tablespoon of olive oil. Top with cheese, then breadcrumbs and another couple tablespoons of olive oil.
- Return to the oven and bake until the cheese is nicely melted and beginning to bubble and brown, 10-15 minutes. Let cool for 5 minutes before serving.
.

Week #5, June 21/22, 2018
- On: June 20, 2018
- 0

I guess we won’t be weeding this week.
That was a lot of rain.
Honestly, this has been a stressful spring, with such changeable weather. It was over 95 degrees last weekend (again) followed by too much rain. That was very hard on your strawberries, lettuce and peas. We should have twice as many berries for you this week but we lost many to the heavy rain on Monday and Tuesday. It is very frustrating to nurture a strawberry field for a full year then lose berries to bad weather just as they ripen. We’ll see how the younger berries develop. There are a gazillion due to ripen this weekend and next week. Generally it’s only the ripe berries that are sensitive to too much moisture, and the younger berries look OK as yet. Keep your fingers crossed. See Veggie Notes below for lettuce info.
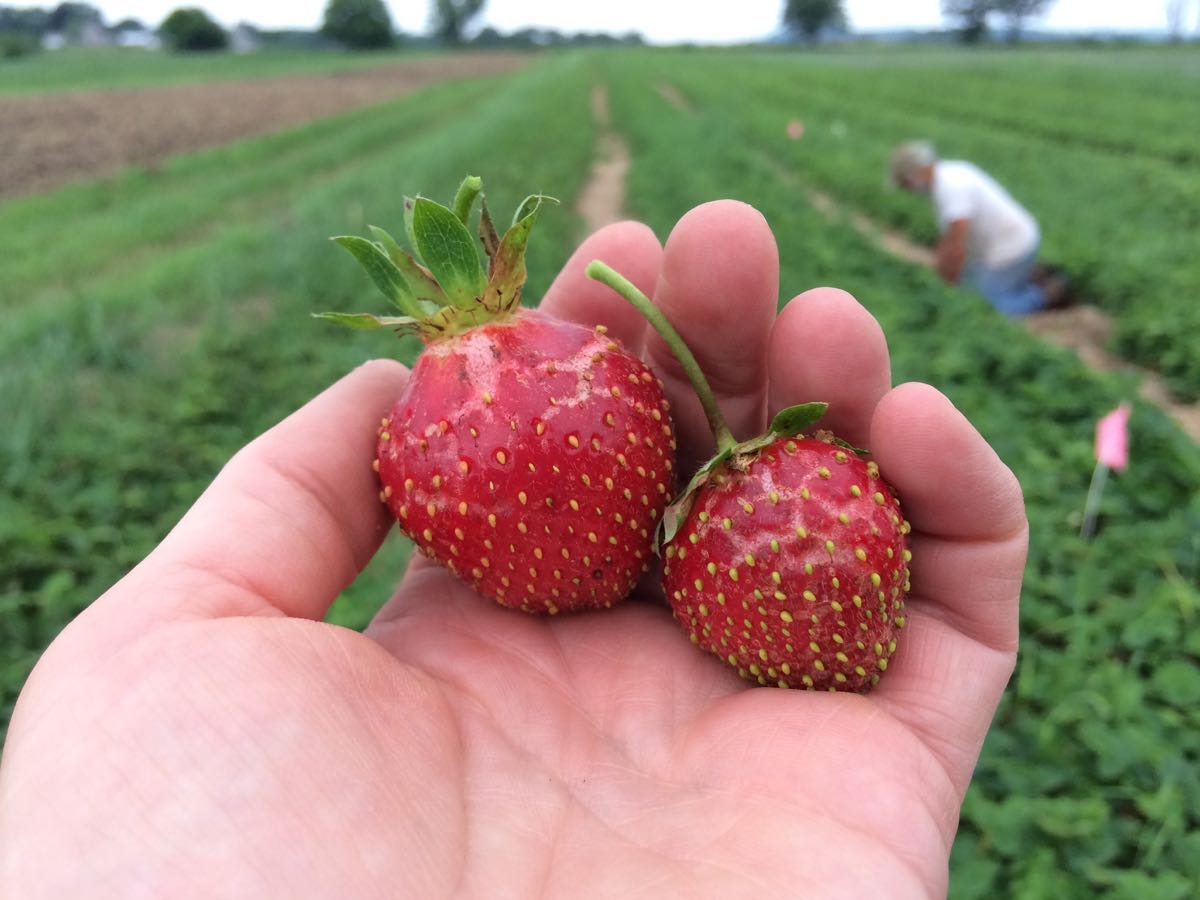
Eat your berries soon. Most have expansion cracks because they swelled after the rain. They are delicious now but will not last.
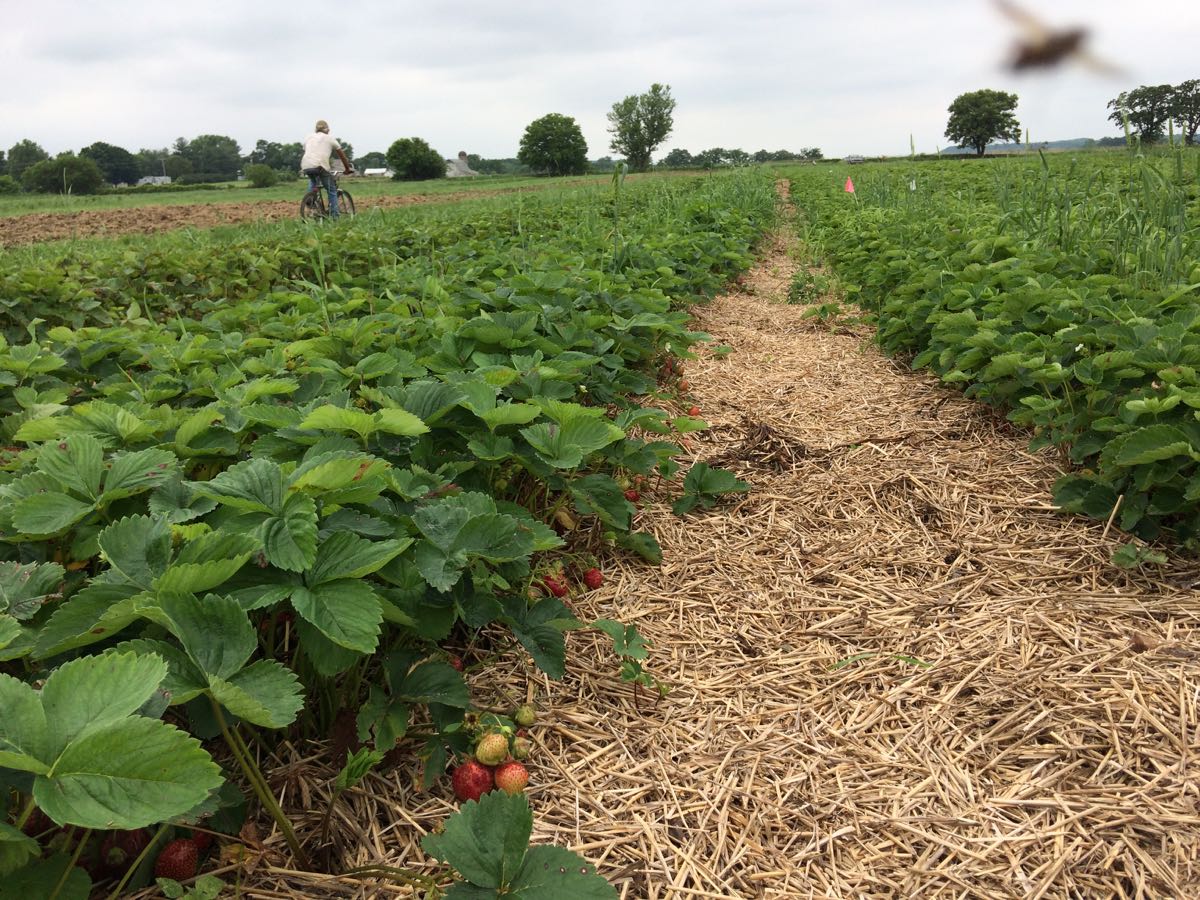
Fortunately, Steve did a beautiful job mulching the strawberry field. Without it, soil would splash all over the berries. Instead, they are quite clean. We’ve enjoyed working in this well-mulched field. I like this photo because you can see Steve racing off on his bike plus a bug that flew into view in the top right corner. It could be a damselfly.
Cooking Ideas from Beth and from members
My friend Victoria wrote in our Tipi CSA Facebook group that she’s newly returned to full-time work and struggling to find time for food prep. She sparked a discussion. I think we all struggle with juggling busy lives and getting meals on the table. Here’s a very cogent response from member Jane Applegate, followed by ideas from our household. Jane and everyone else, thank you for sharing your ideas in the group. Keep discussing in the Facebook group, and I’ll bring some ideas here to the newsletter (with permission!) for those who don’t use Facebook.
BETH’S IDEAS
I love Jane’s proficiency with pizza. It’s wonderful to have pizza dough ready in the fridge. I use this pizza dough recipe most often (using half whole wheat flour), but am still experimenting.
Here is some advice from our household.
– Get everyone in the family involved. Stay-at-home parents, ask for help if you transition back to work. Sure, everyone is used to you doing all the cooking but that cannot continue. I switched from PT to FT on the farm when our kids were 1 and 4 years old. I often worked at night (a persistent habit!). After wrangling an uncooperative database until 3 am one night, I asked Steve to take over breakfast and packing lunches. He did, growing proud of his skill as a short-order breakfast cook.
– Kids can help. They can peel garlic, shuck corn, wash salad greens, learn to make simple dishes, and take on more responsibility as they get older. I haven’t made smoothies, cooked tofu, or washed spinach in years. Those are Sophie and Ari’s jobs, among others. Cooking with your kids is a nice thing to do together.
– Cook on the weekend. This is a well-known strategy but essential for us. We have Sunday dinner every week and I make sure there are leftovers for Monday dinner plus a few lunches.
– Prep on the weekend. By the end of Sunday, choose a few dishes for the week and do whatever advance prep you can. Sometimes decision-making is the hardest part. It’s tough to walk in the door and pull together a meal if you don’t have a plan.
– Prep your salad greens in advance. We cut, wash, and spin-dry our lettuce so we’re ready to make salads with whatever else is on hand. We also cut, wash and spin-dry our spinach and Swiss chard, even without a plan for using them. If nothing else, we just wilt them into noodles near the end of cooking (chard) or just after the noodles are drained (spinach). I don’t prep kale or collards in advance. Those are inherently cleaner because they grow further from the ground.
– Be strategic with leftovers. I’ve started making frittatas with handfuls of leftover cooked vegetables, using this base recipe. This is the recipe I offered in the newsletter two weeks ago. I’ll post a photo below. It’s very quick, sort of my version of Jane’s egg bake.
– Make and freeze your favorite pasta salad sauce(s). Most spring and summer CSA boxes have ingredients to anchor a pasta salad. We start with asparagus, spinach, scallions, radishes, turnips, snap peas, etc. Almost all spring vegetables will work. Maybe not the rhubarb. In summer, we switch to cucumbers, sweet onions and grilled vegetables. Grilled zucchini is another thing I prep first, then find a way to use later. We never waste it!
– In spring, we have lemon vinaigrette in the fridge. It’s good with asparagus, or as pasta salad sauce, or for fresh salads. In fall, we switch to mustard vinaigrette, good for Brussels sprouts or potatoes.
– Cooking and cleaning the kitchen are separate jobs. I cook most dinners. Steve and the kids wash the dishes.
Thanks for reading! If you have your own strategies to share, post them on our Facebook page for others to see. Beth

Frittatas are adaptable. This one from a few weeks ago had sautéed mushrooms and green garlic plus spinach, asparagus and feta cheese.
Veggie List and Veggie Notes
June 21/22, 2018, week #5
Weekly & green EOW shares
Strawberries, 1 quart
Snap peas, 0.9 lb
Snow peas, 0.45 lb
Fennel, 1 large or 2 small bulbs with fronds
Kale, 1 bunch, red russian or lacinato
Zucchini and summer squash, 2 – 2.2 lb
Scallions, 1 bunch
Garlic scapes, a small handful
Oregano, 1 bunch
– Some sites get a small lettuce. See below for types.
– Some sites get 1 medium broccoli head.
Next week’s box will probably contain strawberries, peas, zucchini, napa cabbage, scallions and more.
Strawberries – Eat these soon!
Snap peas and snow peas. These will be together in one bag. Both types have strings to remove. Snap off the stem end and pull the string down the concave side of the pod (the inward-curing side). Throw away the string and eat the pod. The thicker pea pods will usually have a string along both edges. Remove them when you snap off the stem.
– Snap peas (plump pea pods) – These peas should be eaten pod and all. They are delicious raw, or very lightly cooked or stir-fried. Preparation: They will need a quick rinse to remove faded gray blossoms. Storage: Refrigerate.
– Snow peas (flat pea pods) – These are excellent stir fried or in raw salads.
Kale – Each site gets either Red Russian kale (green leaves, pink midveins) or lacinato kale (dark green, pebbled texture). They can be used interchangeably. Super nutritious, this first picking of the year is great cooked or used in raw salads. Storage: Cover and refrigerate.
Fennel (large vegetable with a fat bulb and lacy fronds) – Fennel is a ‘swing vegetable’; it can be used raw or cooked. Clean well and slice as thinly as possible for use in raw salads. It is good simply prepared with olive oil, lime or lemon juice, salt and shaved parmesan cheese. Cooking softens and sweetens fennel, and mellows its anise flavor. Both the bulb and leaves are edible. Here are ideas from Alice Water of Chez Panisse about how to use fennel: ‘It’s strong anise characteristic seems to suit fish particularly well. … We use fennel all the time. We add the feathery leaves to marinades for fish and to numerous salads, sauces and soups and we use them as a garnish, too. … The bulbs are sliced and served raw in salads in various combinations with other vegetables, parboiled for pastas; caramelized and served as a side dish; braised whole; or cooked in vegetable broths & fish stocks.”
Garlic scapes (curly green things) – Garlic scapes grow at the top of garlic plants. They look like flower buds but are actually clusters of tiny bulblets. We snap off the young scapes to direct the plants’ energy into forming garlic bulbs underground. Use scapes as a substitute for garlic cloves. They can be minced, mixed with olive oil, and added to stir fries or simple pasta dishes. The scapes can be sautéed, but will not brown like garlic cloves. Expect them to retain their crunch even when cooked, and to be milder than garlic cloves, closer in pungency to the green garlic we’ve sent.
Greek oregano – We timed the oregano to go with zucchini and garlic scapes. Seems like a good combination! To store your oregano, you can …
– Wrap in a cloth or paper towel, place in a plastic bag and refrigerate. OR
– Alternatively, you can wash it well then hang it up to dry in a place with good air movement.
Broccoli (for some sites) – Cover and refrigerate.
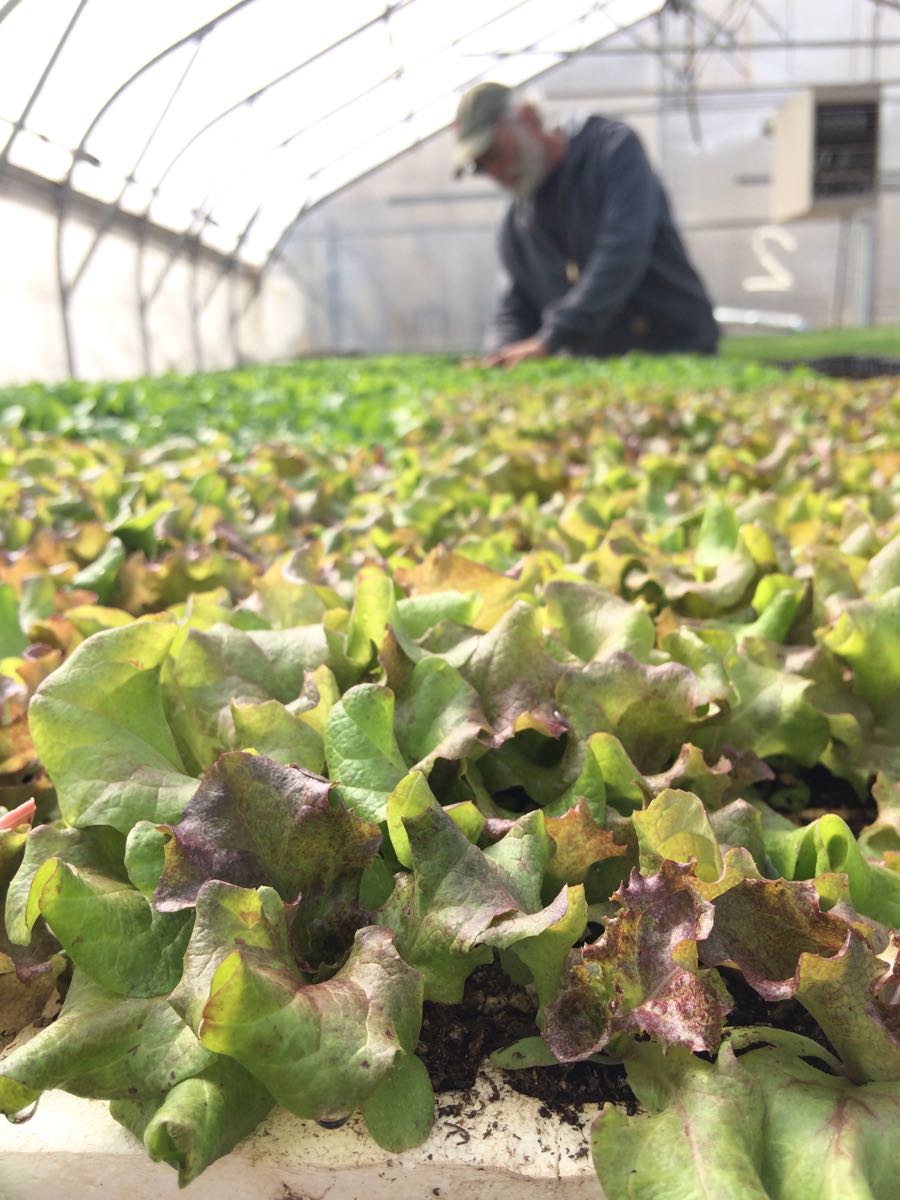
Lettuce (for some sites) – If you receive lettuce, you will get either red bibb lettuce or red Salanova or green Salanova. Red bibb is a very round, crunchy head with buttery leaves. The Salanova types are in middling shape after the rain. There is a fair amount of ‘rust’ discoloration at the base of the stems. You can prepare as I show below (with photos from last year!) but you will need to cut high enough to remove the rust. It will work.
Salanova is a new innovation in lettuce breeding that lets you prepare salad mix easily. Cut the head across the base and it will fall apart into individual leaves. Dunk and swish in a tub of water. Drain and spin dry to store.
Cut the lettuce head at the base and it falls apart into salad mix.
RECIPES
Visit our 2018 Recipe Log.
Visit our 2017 Recipe Log.
Join our Facebook discussion group.
LOCAL THYME/ Comforting Classics
Fennel, Kale or Mustard Greens and Pastina Soup
Quinoa Salad with Zucchini and Snap Peas
Fennel Slaw with Olive Vinaigrette
Greek Kale Fritters
LOCAL THYME/ Outside the Box Recipes

Bibimbap with Kale, Summer Squash, and Ground Pork or Tofu
Grilled Salmon with Summer Squash and Snap Pea Relish
Kale Pesto Pizza
Fennel Risotto
LOCAL THYME/ Quick and Easy Meal
Pan Fried Tofu on Chopped Snap Pea Salad
RECIPES FROM LAUREN
SPRING PEA, FENNEL & PICKLED STRAWBERRY SALAD
Fennel gets such a bad rap and it’s really not fair. Fennel is a beautiful, delicate vegetable that you can learn to love if you can just find ways to mellow it’s strong flavor. I love it sauteed, roasted or grilled (all things that make the flavor much milder) but I also really love the texture when it’s sliced super thin and eaten raw— especially in bright salads like this one. The technique outlined below where you soak both scallions and fennel in ice cold water really helps make the flavors of fennel more palatable.
Serves 4-6 easily
Takes 30 minutes (including time to pickle strawberries though you can absolutely do that in advance)
1 cup hulled and halved strawberries
1/2 cup balsamic vinegar
1/4 cup champagne vinegar (just use 3/4 cup balsamic if you don’t have champagne vinegar on hand)
1/3 cup water
2 tablespoons sugar
1 tablespoon + 1/2 teaspoon Kosher salt, divided
1 large fennel bulb (or two small), halved, cored, and very thinly sliced (it should almost look like coleslaw)
3-5 scallion, white, pale green and dark green portions, sliced thin
1/2- 3/4 pound mixture of snow and snap peas (or as many as you can stand to spare), ends trimmed and cut in half
1/2-1 teaspoon red pepper flakes
1/4 teaspoon freshly ground black pepper
1/4 cup olive oil
1/2 cup pistachios
8 ounces burrata, optinoal
- You will start by pickling your strawberries! Place the strawberries in a mason jar. Then in a small sauce pan combine vinegars, water, sugar and 1 tablespoon Kosher salt. Bring to a boil over high heat and as soon as it starts boiling pour over strawberries. Seal jar and flip upside down. Allow to cool while you cut up your vegetables for the salad.
- Start first by cutting up your fennel and scallions. Place in a medium bowl, fill it with cold water and a few ice cubes. Let sit in the bowl of ice water for 20 minutes then drain well and pat dry with a towel if the veggies still look super wet. This will dull the sharpness and intensity of the raw scallions and fennel.
- In a large bowl, combine the fennel, scallions, and pickled strawberries with peas, 1/4 cup pickling liquid, remaining 1 teaspoon salt, red pepper flakes, and freshly ground black pepper. Drizzle with olive oil. Taste and adjust flavors as desired. You may want a bit more of the pickling liquid for more brightness or red pepper flakes for more heat. Once you get the flavors right, top with the pistachios.
- You can absolutely be done right here and serve the salad immediately with no more frills. It’s perfect. I promise. But, if you can find burratta (available at the Willy Street Co-op) you should absolutely buy 8 ounces and serve this salad with a ball of beautiful burrata in the middle.
.
VEGETABLE LASAGNA WITH WHITE SAUCE
Recipe by my darling mother: a woman who is unparalleled in her ability to make simple recipes with abundant veggies from the garden. This recipe does use a lot of dishes (which I hate to do to you all) but it’s okay because it also makes a LOT of food! Lauren.
Makes 1 large lasagna
Serves 6-8
Takes 1 hour, 15 minutes
4 tablespoons butter, divided
1 tablespoon olive oil
3-4 medium zucchini or summer squash, halved lengthwise and thinly sliced
8 ounces carton of fresh mushrooms, sliced
3 or 4 sliced scallions , white and light green portions only, sliced
3 or 4 garlic scapes, sliced
1-1/2 teaspoon Kosher salt, divided
1/2 teaspoon freshly ground black pepper
1 kale bunch, center stems removed and thinly sliced
2 tablespoons minced fresh oregano
16 ounce container of cottage cheese (lowfat is fine)
2 eggs
12-16 lasagna noodles
1/4 cup flour
2-1/2 cup warm or room temperature milk
1/4 cup grated Parmesan cheese
8 ounces sliced or shredded mozzarella
- Preheat oven to 350 degrees and bring a large pot of salted water to a boil.
- In a large skillet, melt 1 tablespoon butter with 1 tablespoon olive oil. Saute first zucchini, mushrooms, scallions and garlic scapes until tender, season with 1 teaspoon salt and pepper. Add kale and oregano, and stir until wilted. Remove from heat, set aside.
- Once water is boiling, cook lasagna noodles according to package directions. Drain, set aside.
- In a medium sauce pan, melt remaining 3 tablespoons butter, stir in flour and cook for one minute until smooth. Whisk in milk and stir until mixture is smooth. Cook over medium heat until thickened, about 10 minutes. Remove from heat, stir in remaining 1/2 teaspoon salt and parmesan cheese.
- In a medium bowl, stir together cottage cheese and eggs, set aside.
- Assemble lasagna: In a 9 X 13 baking dish, spoon 1/2 cup sauce over the bottom of the pan. Then layer 1/3 of noodles, 1/3 cottage cheese mixture, 1/3 veggie mixture and 1/3 shredded or sliced cheese. Top with 1/3 of sauce. Repeat 2 more times. For final layer, put cheese last after sauce.
- Bake 40 to 45 minutes or until hot and bubbly. Let stand 10 minutes before cutting.
.
Week #4, June 14/15, 2018
- On: June 13, 2018
- 0
Farm News
I watched Steve slowly relax on Saturday night as the rain began. He loves gentle rain on Friday or Saturday night, perfect timing so it doesn’t get in the way of field work. It’s great when it falls from the sky without any irrigation effort from us. Free water!
We accomplished a lot this week. Sweet potatoes and winter squash are both in the ground. It will be a long time until those are ready to harvest but this is the first step.
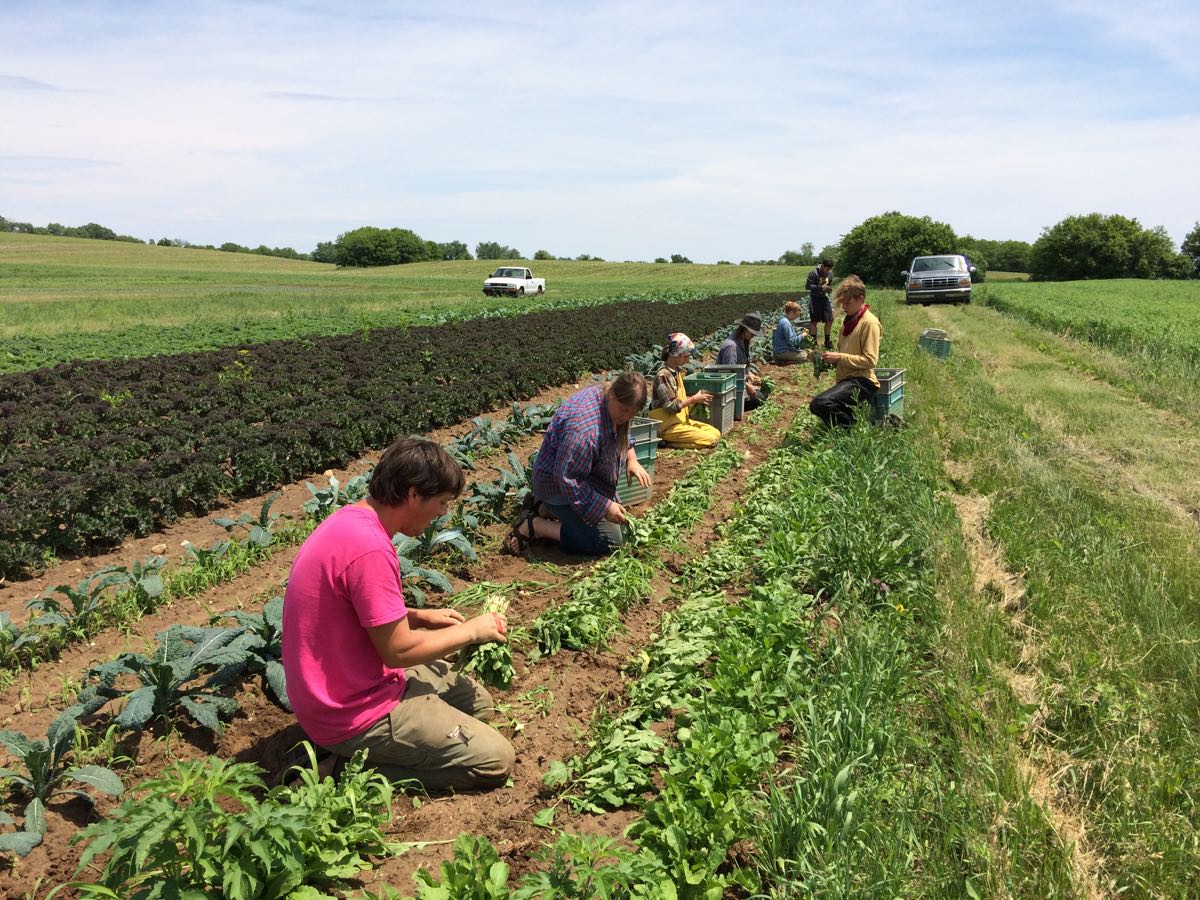
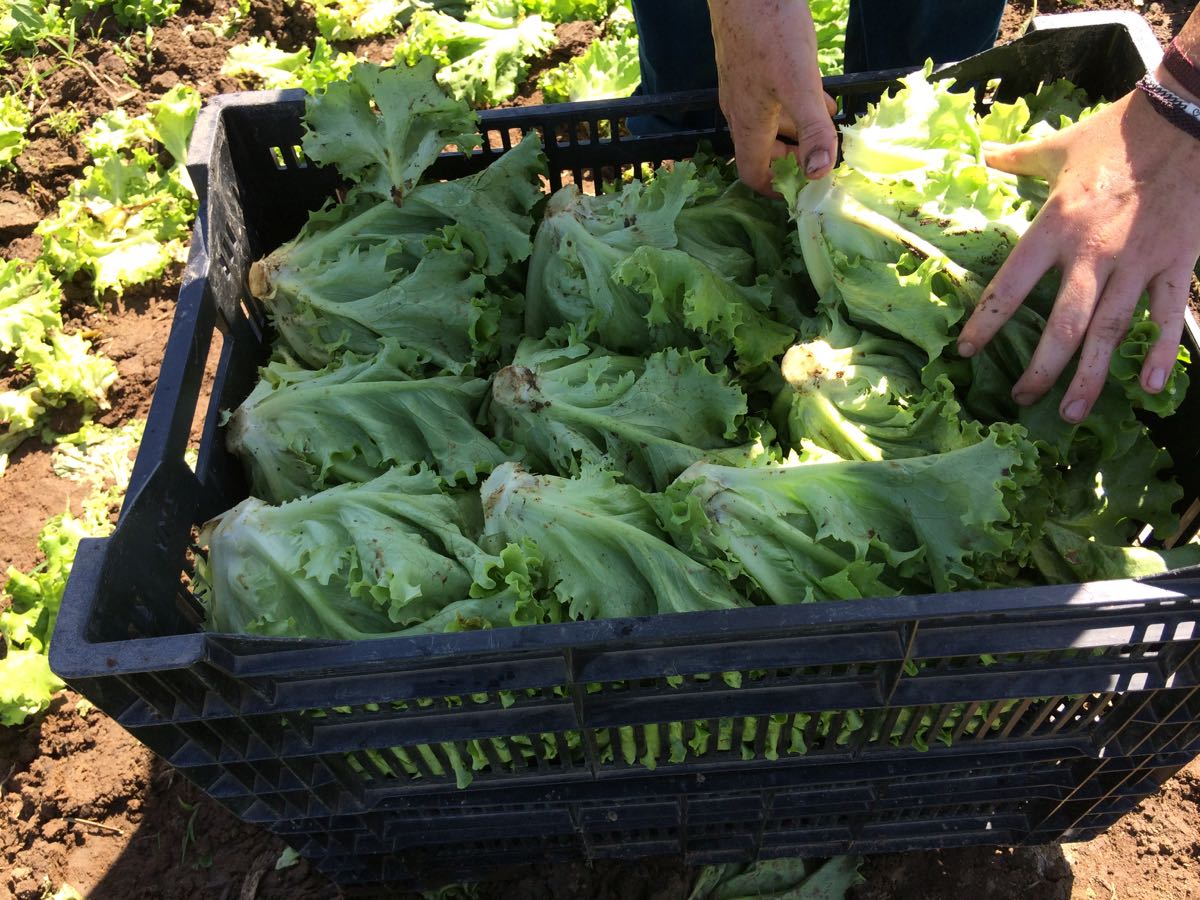
We have a pretty strawberry field this year. It’s weed-free and the rows are clear and nicely mulched with straw. Steve weeded the field last summer with our new finger weeder cultivator. It really worked. We planted the field a year ago, took care of it all summer, and will harvest berries this year and next. Then the field is finished. Strawberries are big time investment but are worth the effort. From left, Charlotte, Billy, Kristen and Maggie pick this week’s berries.
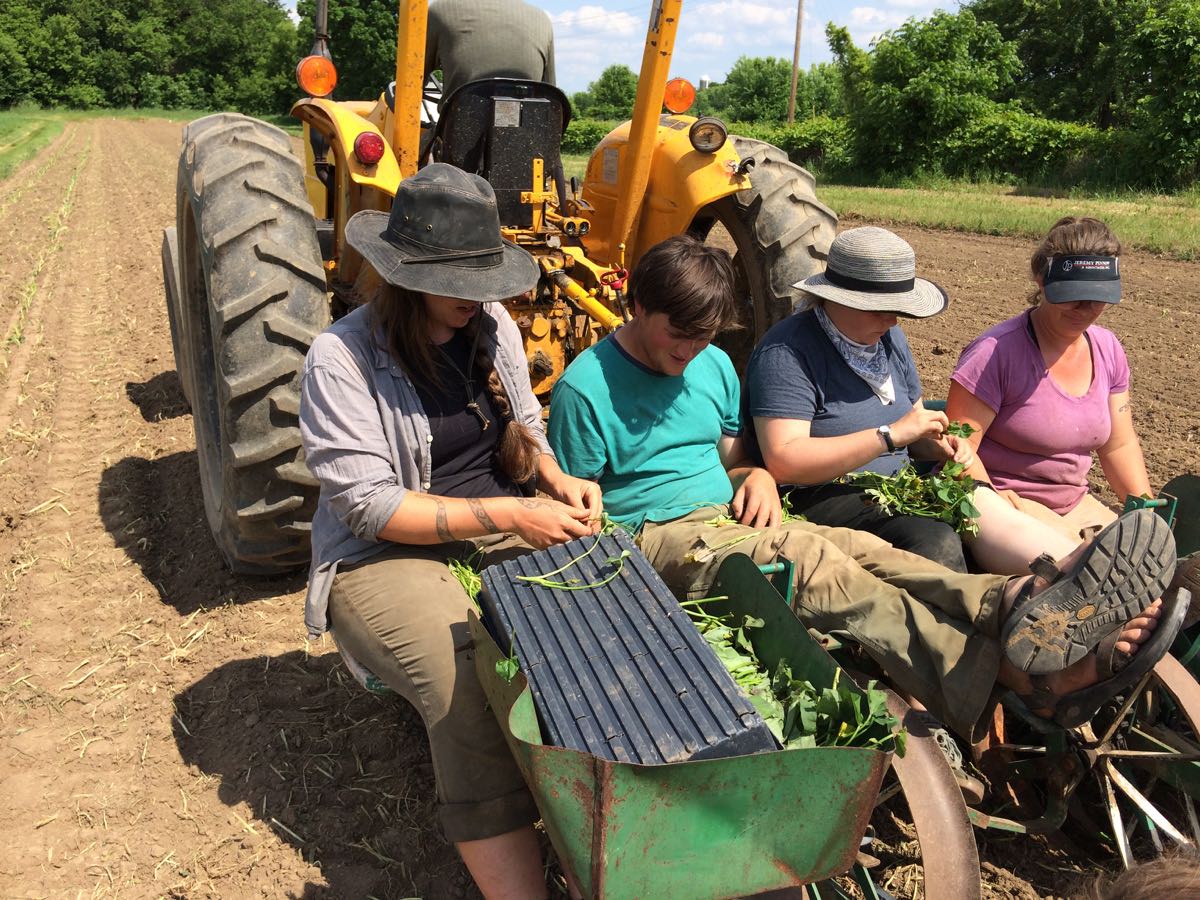
Planting sweet potato slips with an old strawberry transplanter. It’s practically an antique (look at the wheels) but still functions. This is an easy job but you have to like the people you work with; it’s a snug fit with four people. From left, Charlotte, Jory, Sena and Kristen. Raul drives the tractor.
Late prairie burn
We burned our experimental prairie last week. This is a bizarre time to burn prairie but it’s thought to suppress introduced cool season grasses in favor of native species. This is an experimental approach. Our goal is to convert this neglected field to prairie to provide habitat for beneficial insects. In the process, it’s developed into an engrossing hobby for me. Steve reviewed this newsletter for me and said “Hmm, there are many more photos of your prairie than of the rest of the farm.” Yeah, that’s how it is. Beth
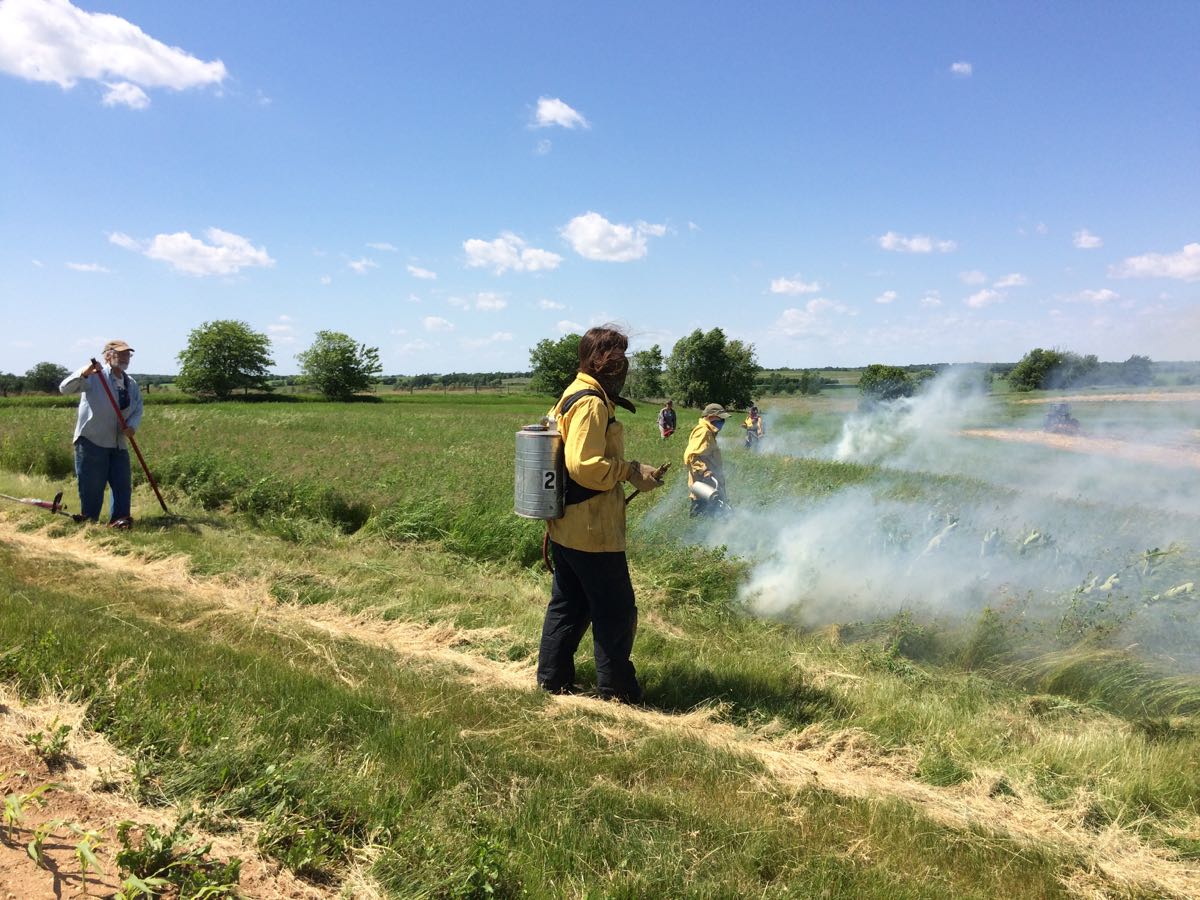
It’s hard to believe that a field this green would burn but it does. The fire stays close to the ground, burning flammable duff at the soil surface. The grass leaves remain green but fall over as the fire passes.
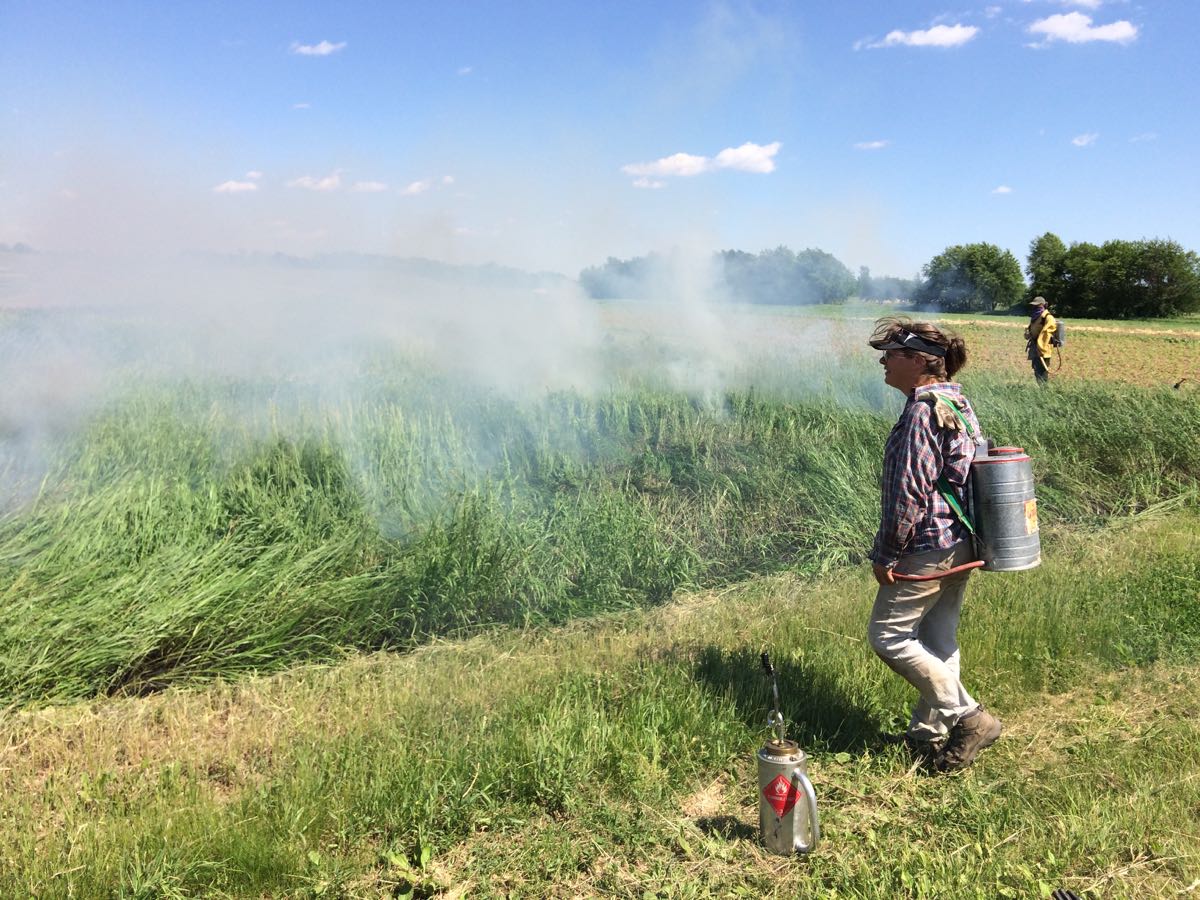
Burn boss Kristen. She has years of experience with prairie management and burns. She works for us now, and it’s been great having her here as a resource with this project.
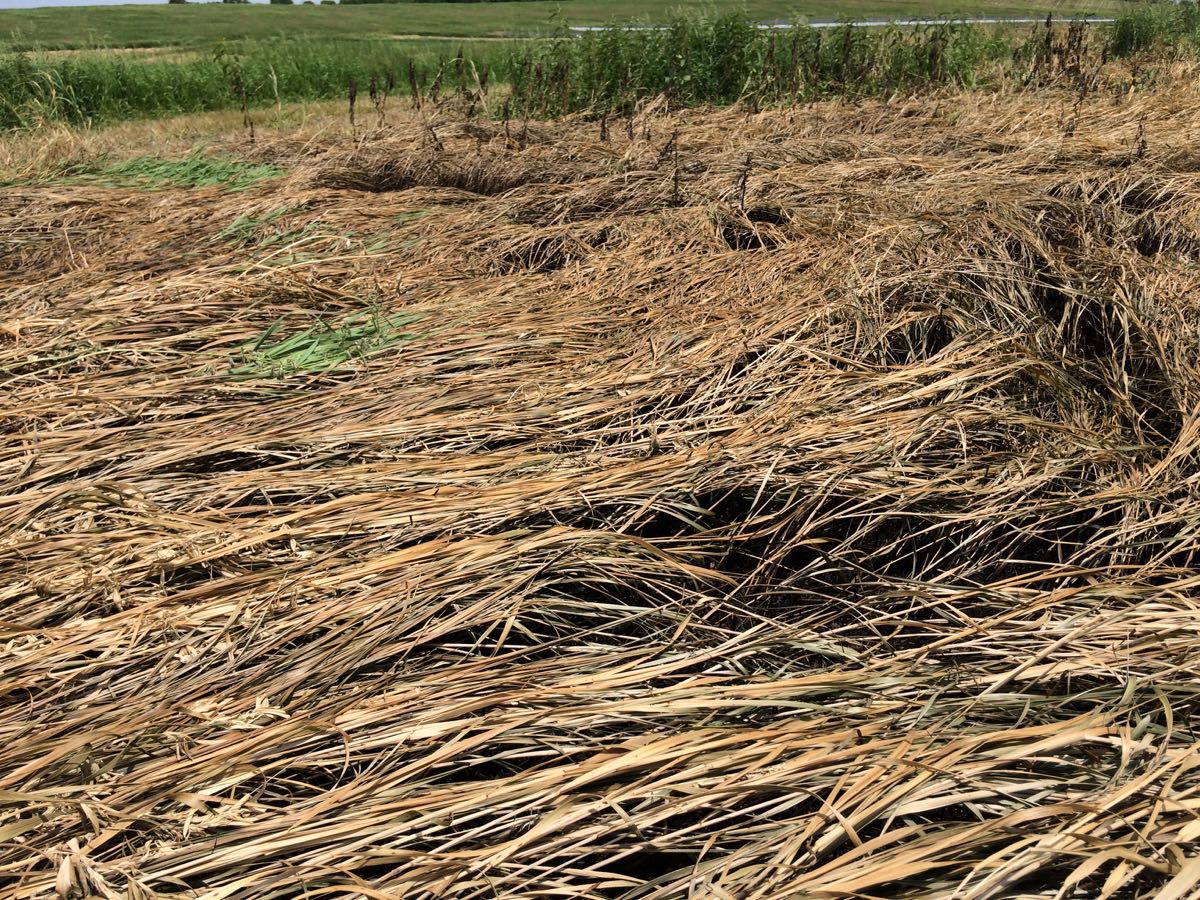
By two days later, the grass leaves had withered.
![]()
Then we chopped the dry residue and planted seedlings that I grew in the greenhouse this spring. Most of the seed is from local prairies. Over the past year, I volunteered with the local Prairie Bluff chapter of The Prairie Enthusiasts (TPE). We collect seed to expand TPE plantings and I get to keep some for my own use.
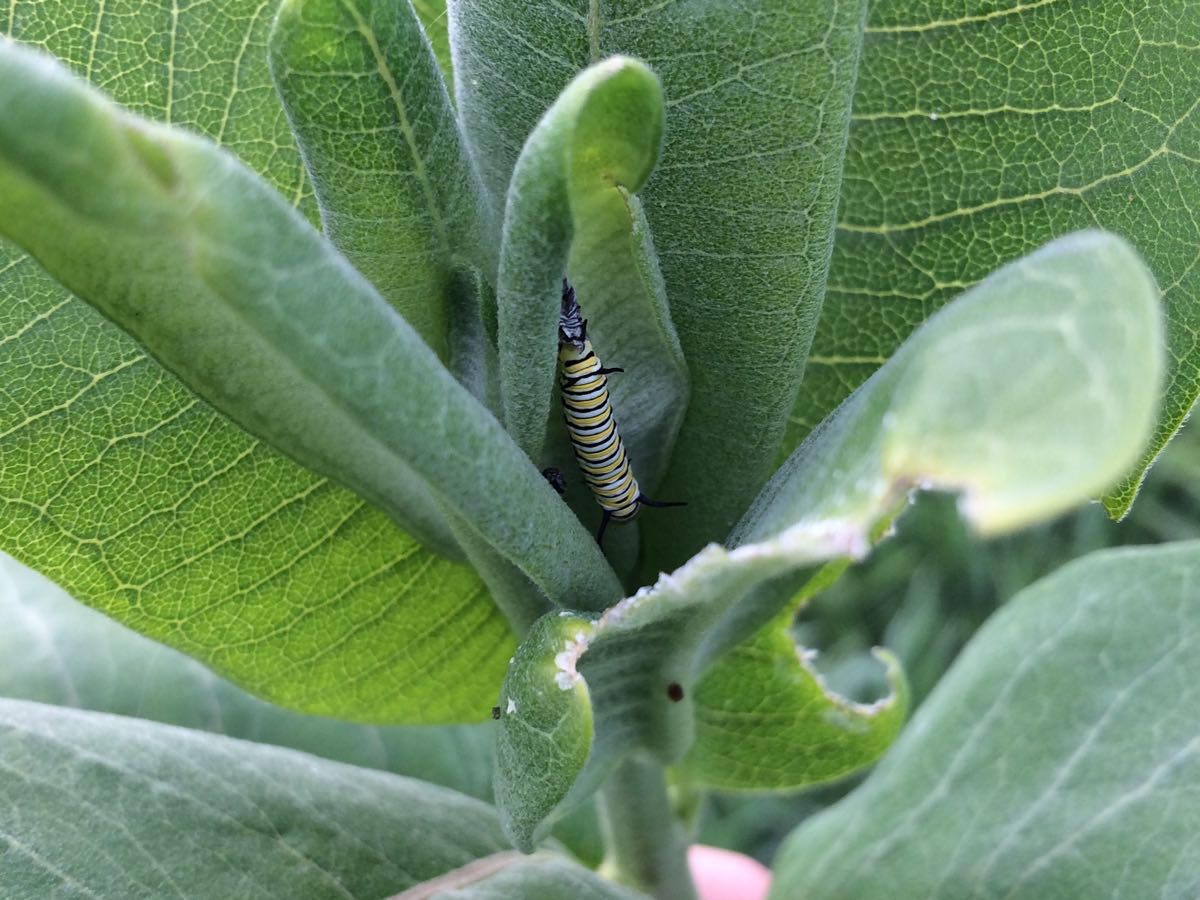
Before the burn, I collected monarch butterfly caterpillars and moved them to safety. There are many this year.
Veggie List and Veggie Notes
Strawberries, 1 scant pint
Sugar snap peas, 0.4 lb
Bok choy, 1
Zucchini & summer squash, ~3 lb
Swiss chard, 1 bunch
Scallions, red or white, 1 bunch
Italian parsley, 1 bunch
Red Romaine lettuce
Rhubarb, ~1.75 lb
Next week’s box will probably contain strawberries, snap & snow peas, zucchini, lettuce, scallions, garlic scapes, and more.
Strawberries! – We’ve been waiting for these. This first picking is small but more are ripening for next week.
♦ Ripe strawberries are perishable. Eat them immediately, or store in the refrigerator. Most berries are quite clean. If you want to clean your berries, rinse gently. Don’t soak them, just rinse.
♦ Please recycle your strawberry containers. We no longer collect them for re-use. Please don’t return them to your pick-up site.
Sugar snap peas (plump pea pods) – These peas should be eaten pod and all. They are delicious raw, or very lightly cooked or stir-fried.
Preparation: They will need a quick rinse to remove faded gray blossoms.
Remove the strings before eating: snap off the stem end and pull the string down the concave side of the pod (the inward-curving side). Throw away the string and eat the pod.
Storage: Refrigerate.
Zucchini & summer squash – It was a very productive squash week, so we’re sending lots. Zucchini and summer squash need refrigeration but do not do well at very cold temperatures, as they will soften and form pits in their surface. Refrigerate these squash but in the warmest part of your fridge.
Swiss chard (pretty bundle of green leaves) – Our crew did a nice job mixing colors for pretty bunches. Swiss chard is a close relative of spinach, but requires a bit more cooking. Use as a substitute in any recipe that calls for spinach, just cook the chard a little longer. Both stems and leaves are delicious. The stems requite longer cooking, so cut them free from the leaves when preparing. That allows you to cook the stems longer.
Scallions – You will get either red or white scallions. They can be used interchangeably. We started growing the red ones because they are so darn pretty.
Parsley – We have harvested flat-leaved Italian parsley for you this week. It looks a bit different than curly parsley but they are used interchangeably.
RECIPES
Visit our 2018 Recipe Log.
Visit our 2017 Recipe Log.
Join our Facebook discussion group.
Beth’s box logic.
– We’re sending rhubarb this week because we have the time to harvest it. Next week will be too busy with time-consuming pea and strawberry harvests, plus the other veggies. If you want to use your rhubarb in combination with the upcoming strawberries, just freeze it. Wash, dry, and chop it, then freeze in a plastic bag or any container. You can use the frozen rhubarb in most baked recipes without thawing. Of course, it’s ready to use fresh as well.
– I like to pack parsley and scallions together because they combine well in grain salads like tabouleh. This week, I plan to make a farro salad with snap peas, grilled zucchini, scallions and parsley. We’ll add lots of lemon-olive oil dressing, then eat it over lettuce.
LOCAL THYME/ Comforting Classics
Flourless Rhubarb-Almond Upside Down Cake
Soba and Bok Choy Stir Fry
Black Eyed Pea and Chard Soup
Wilted Chard with Almonds
LOCAL THYME/ Outside the Box Recipes
Chicken with Lemon Rhubarb Sauce
Grilled Bok Choy
Moroccan Chard and Couscous Stuffed Zucchini
Raw Chard and Rice Noodle Salad
LOCAL THYME/ Quick and Easy Meal
Herbed Ricotta Pesto with Linguine and Summer Squash
RECIPES FROM LAUREN
ZUCCHINI, CHARD & CHICKPEA TACOS
I love this dish over the grill for the char I get, but also because I love cooking outside as much as possible this time of year, but it does require one of those fancy grill pans that could keep small zucchini pieces and chickpeas from falling into the fire. If you don’t have one of those, do the broiler method instead. Both are mentioned below. Lauren.
Makes a lot of little tacos
Serves 6-8 with a side dish (4-6 as a meal)
Takes 30 minutes
2 medium zucchini, cut into strips (about 1/4-inch wide by 3/4-inch long as best you can)
1 (15 ounce can) chickpeas, rinsed
1/4 cup olive oil, divided
2 teaspoons chili powder
1 teaspoon ground cumin
1 teaspoon salt + pinch or two
1/2 teaspoon garlic powder
1/2 teaspoon onion powder
1/2 teaspoon paprika
1/2 teaspoon ground coriander
1/4 teaspoon black pepper
1 bunch chard, ribs removed and sliced, leaves rinsed, left wet, and roughly chopped
1/4 teaspoon red pepper flakes
1/2 lime
3-4 scallions, sliced
Corn tortillas
3-4 avocados
Sour cream
- Preheat your grill to medium high or preheat the broiler of your oven.
- In a large bowl, combine zucchini and chickpeas. Toss with two tablespoons of olive oil until well-coated. Add chili powder, cumin, 1 teaspoon salt, garlic powder, onion powder, paprika, coriander, and pepper. Toss until zucchini is as evenly coated as possible. Place on a grill pan or baking sheet. If using the grill, cook for 15-20 minutes until charred in spots. If using the oven, broil for 10-15 minutes until charred in spots. I had to do mine on two pans (or in two batches) for the best char.
- Meanwhile, heat remaining two tablespoons olive oil over medium high heat. Toss the sliced chard stem into the pan and cook for 2-3 minutes. Add the just rinsed chard leaves (while still wet). The pan will spit and splatter a bit, but don’t worry about it. Add a pinch or two of salt and the red pepper flakes and stir a couple times. Let cook over high heat until wilted. Again, it will char in a couple spots and that’s fine. Squeeze half a lime over the chard once it’s cooked to your liking and remove from heat.
- Just before serving, toss your corn tortillas on the grill to warm. Serve with grilled zucchini and chickpeas, chard, sliced scallions, a generous amount of avocado and sour cream.
.
SPRING COBB SALAD
I love a good cobb salad this time of year when we’re all swimming in lettuce and craving something hearty. I always put bacon, egg and feta cheese on mine but you could certainly also add some cold cuts (turkey and ham are common) or substitute blue or gorgonzola for the feta. The veggies too can be super versatile but I love things that are fresh and crunchy so I put scallions, bok choy stems and sliced snap peas into the mix. Lauren.
Serves 4 as a meal (more as a side salad)
Takes 25 minutes
8 slices bacon, preferably thick-cut
6 eggs
1/2 head lettuce (or approximately 8-12 cups), washed, dried and roughly chopped
4 scallions, white and pale green parts only (dark green tops saved for dressing), sliced
4-6 bok choy stems, sliced
1/3 pound snap peas, ends trimmed and sliced
4 ounces feta, crumbled
Parsley Buttermilk Ranch
Makes 1 cup
4 scallions, dark green tops only
1/2 bunch parsley
3/4 cup buttermilk
3 tablespoons Greek yogurt
2 tablespoons lemon juice
1 teaspoon Kosher salt
1 teaspoon garlic powdder
1/2 teaspoon freshly ground black pepper
1/4 teaspoon dried dill
1/4 cup olive oil
- Cook bacon however you usually do. Or if you want to try what we do at our home, preheat your oven to 400 degrees and lay bacon on a baking sheet. Place in oven (right away- before its preheated) and set the timer for 20 minutes. Ta da! Perfect bacon every time. If you did find the thick-cut stuff, it may take more like 26-28 minutes to get it crispy.
- While the bacon cooks, hard-boil your eggs. Bring a medium saucepan of water to a boil. Once boiling, add the eggs and cook for 12 minutes. Remove to an ice bath for at least 2 minutes (this will make the eggs easier to peel) and then get to peeling.
- Then, prepare your dressing. Toss your scallion greens and parsley in the bowl o f a food processor and process until finely chopped. Add buttermilk, yogurt, lemon juice, salt, garlic powder, pepper and dill. Process until smooth. With the top of the food processor open, drizzle in olive oil until the dressing comes together. Taste and adjust seasonings as desired. (This is easiest in a food processor but if you don’t have one you can just finely mince your dark green scallions tops and parsley leaves and combine all ingredients in a medium bowl and whisk until smooth).
- Serve your salad by putting a quarter of the lettuce in each of four bowls. Add cooked bacon, sliced hard-boiled egg, scallions, bok choy stems, snap peas and feta. Drizzle with dressing and serve/eat immediately!
.
Week #3, June 7/8, 2018
- On: June 06, 2018
- 0
Farm Updates
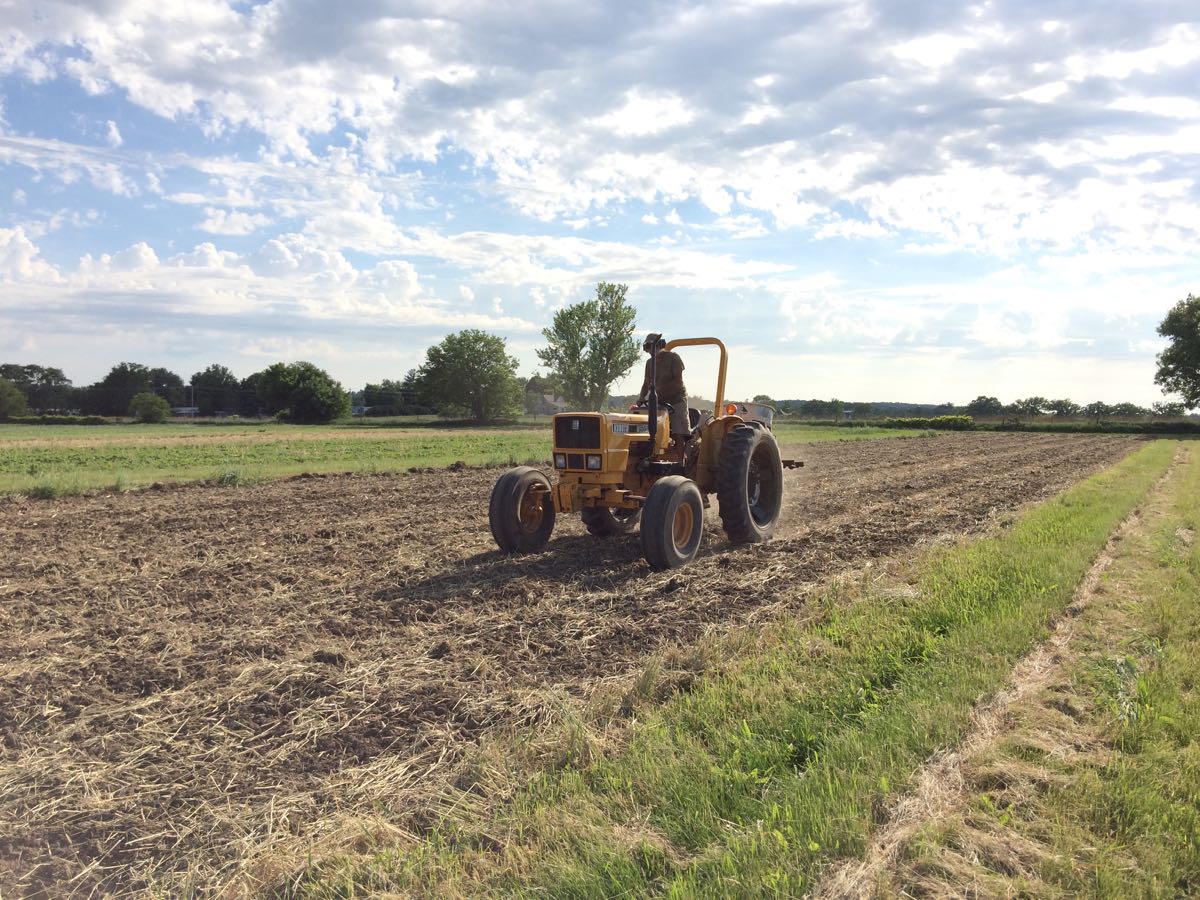
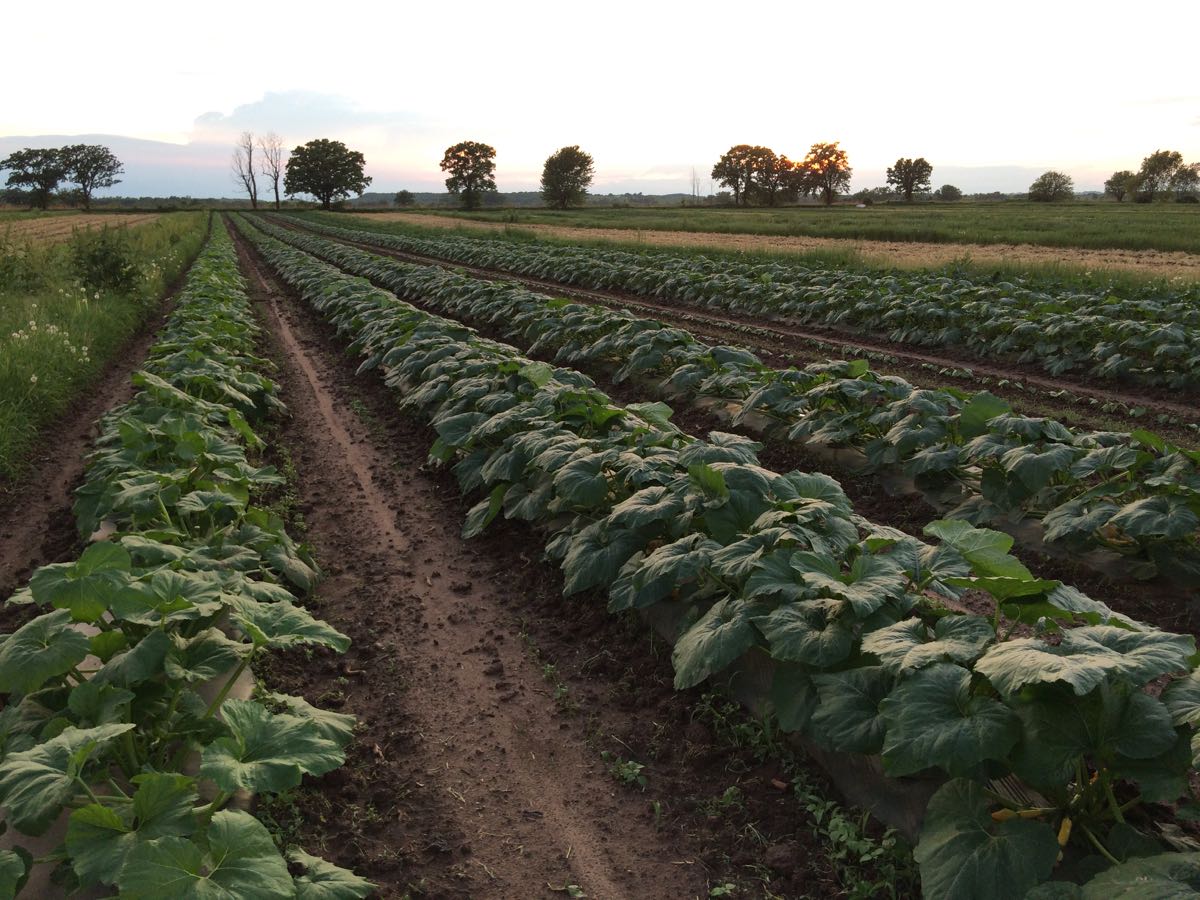
Almost all our summer crops are in the ground. Tomatoes, peppers, melons, greens, zucchini, cucumbers, sweet corn, etc; they are all planted and growing. We still have winter squash and pumpkins to transplant this week. After that we move on to seeding fall crops like cauliflower and sweet potatoes. Soon we’ll spend most of our time harvesting and weeding. This moment is an annual milestone for Steve. He really hustles to get the farm ready with tilled cover crops, compost and final tillage to smooth the fields. This week, he stayed one step ahead of the crew, preparing beds just ahead of the transplant crew.
Steve spreads composted chicken manure to prepare the next melon field. You can see straw-like cover crop residue which has been chopped and incorporated into the soil, and beginning to decay. The cover crops feeds our soil microbes and release nitrogen as they decompose. The chicken compost provides nutrients before the cover crops decay.
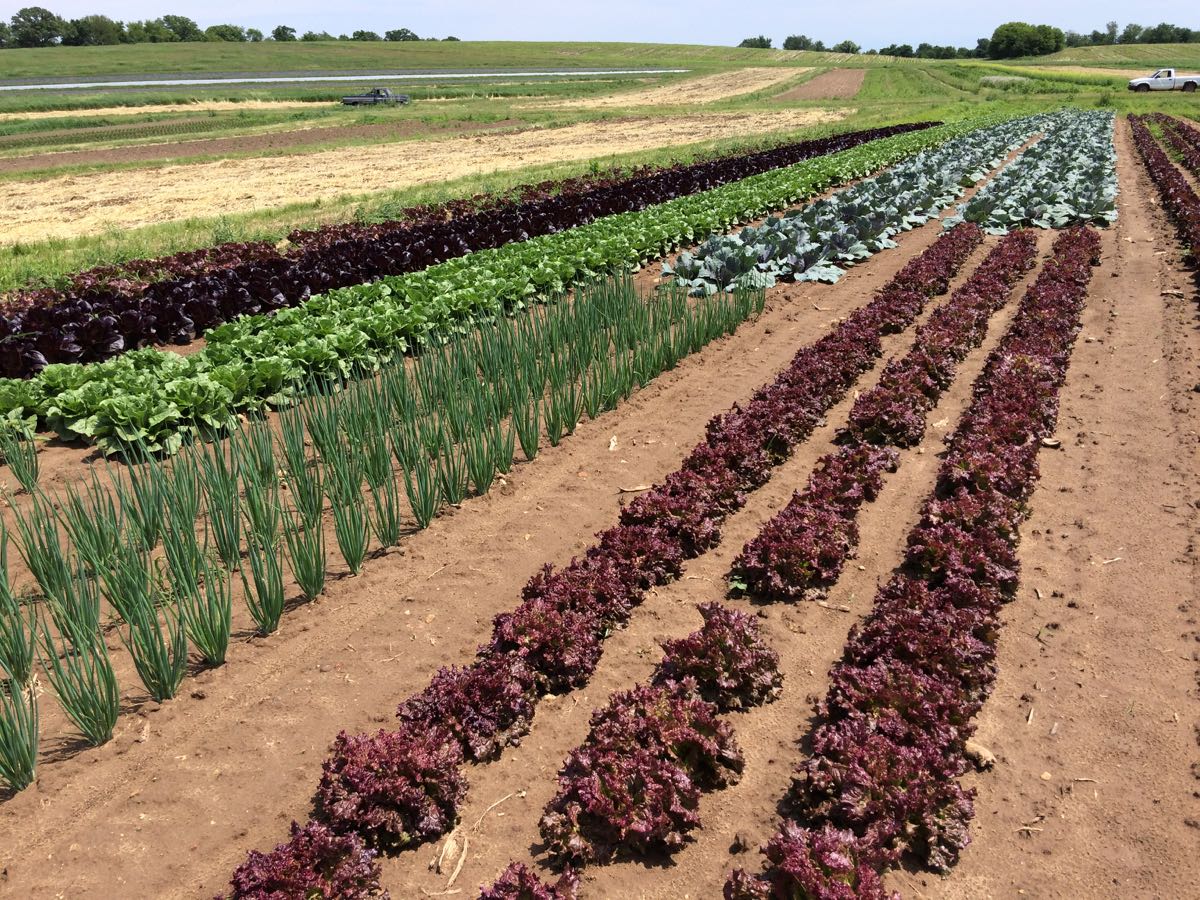
This photo shows our next field of lettuce, scallions and cabbage but it also the tapestry of the farm, a mix of planted fields, green crops and tan chopped cover crops.
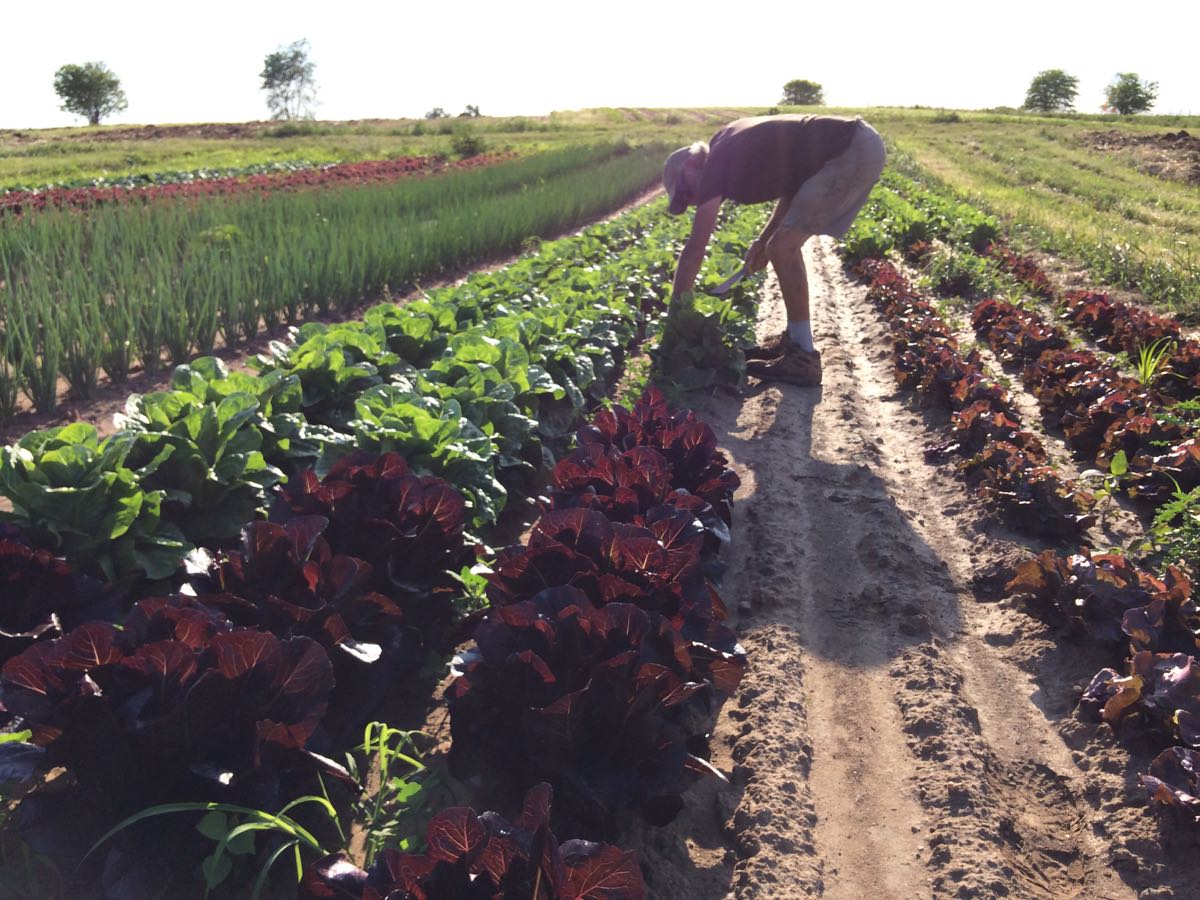

The colors are beautiful right now! At top, Steve checks the same lettuce and scallion field late in the day. At bottom, gorgeous red chard glows in the sun.
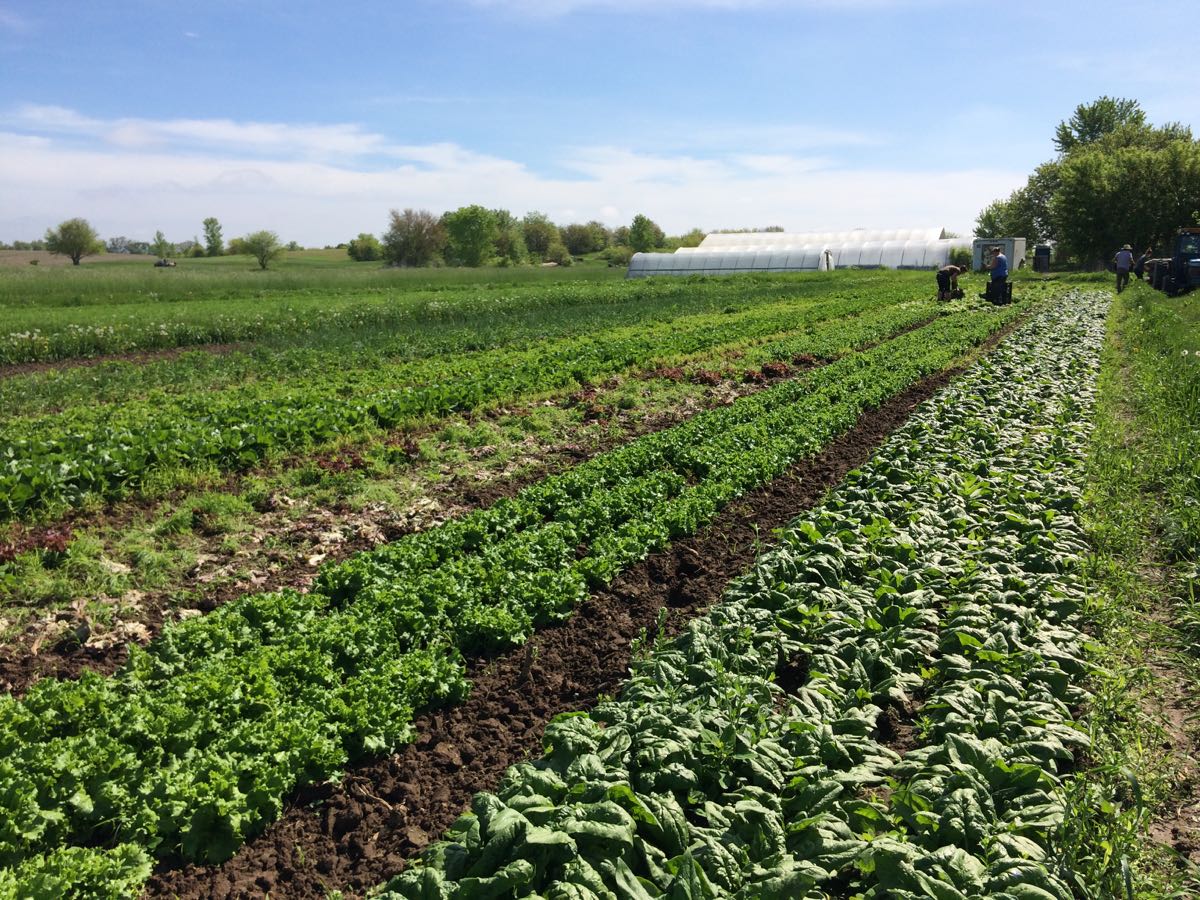
We all enjoyed the cooler weather this week. It’s make our lives much more pleasant. Above, all hands on deck for the arugula harvest.
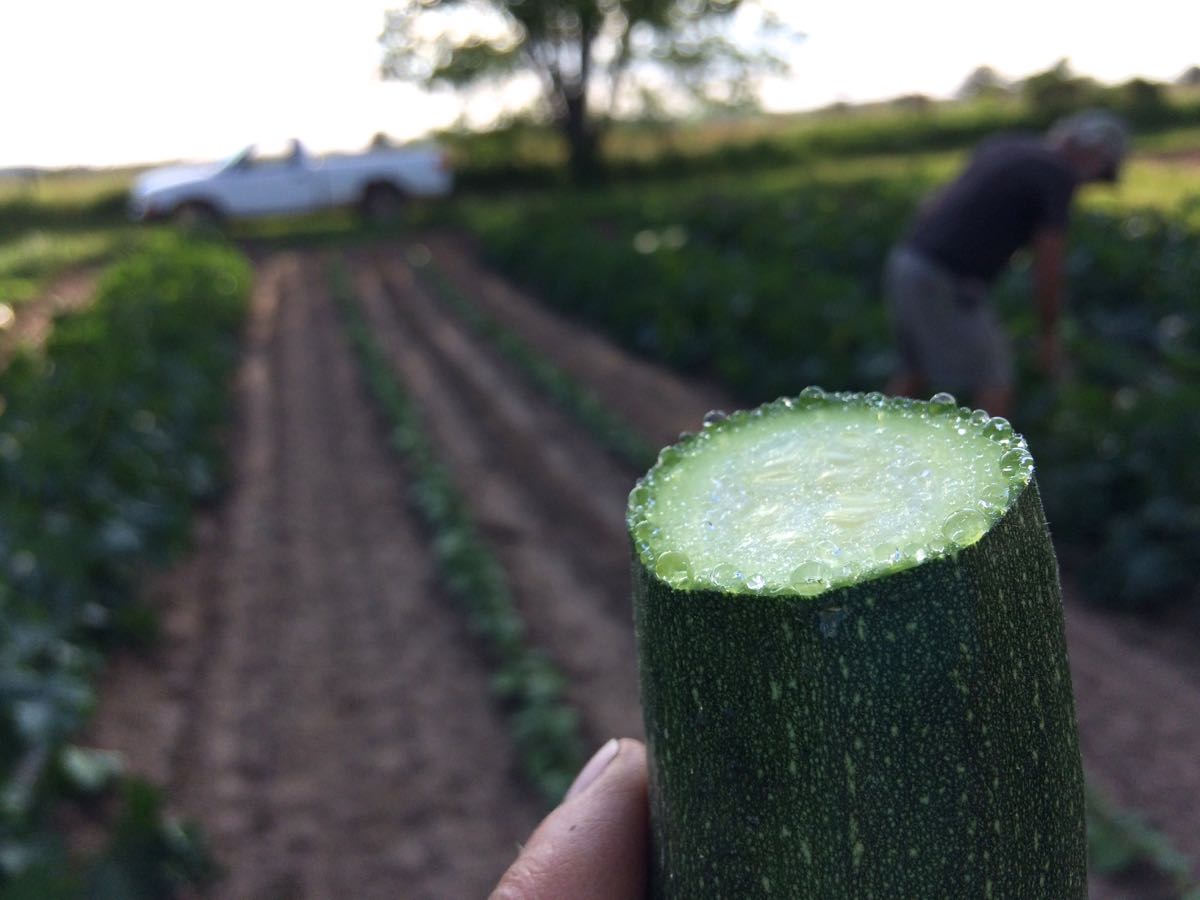
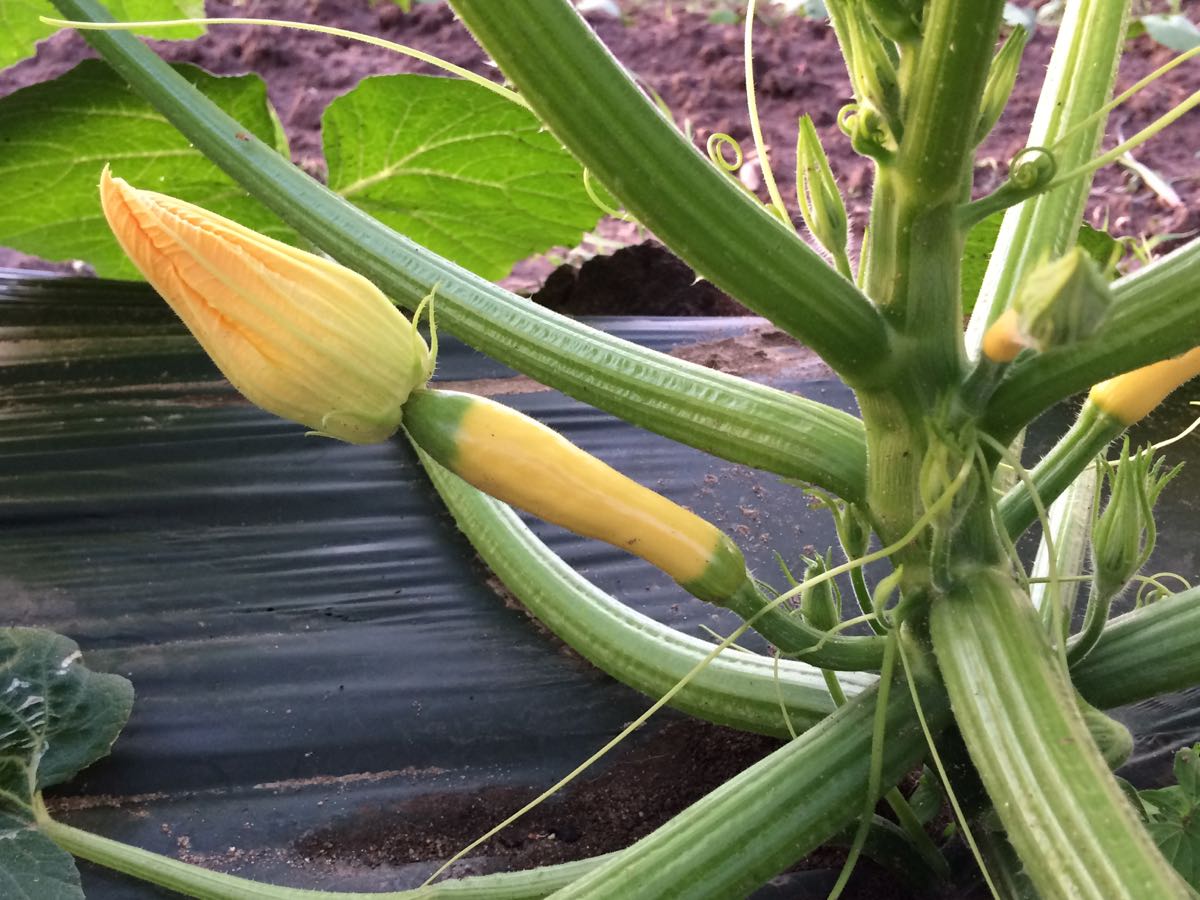
We picked the first zucchini for you this week. The plants are healthy and bursting with sap. Look how much juice emerged immediately after cutting.
How to wash greens efficiently
Members asked this week how to remove grit from greens like lettuce and spinach. Here’s our approach. It works.
1. We have one kitchen sink so we use a 4 gallon Rubbermaid basin. Fill halfway with cold tap water. If you have two sinks, fill one sink partway with cold water.
2. Chop your lettuce or spinach to the size you wish.
3. Dump it into the water and swish around gently but thoroughly.
4. Working in two batches (for average lettuce head) or more batches (big spinach bunches, Romaine), pull handfuls out of the water and drain in the basket of a salad spinner.
5. After all the greens have been rinsed one time, dump the water. Rinse the basin and refill with cold tap water.
6. Repeat the process.
7. Spin your greens dry and store in a dry container. They store much better when spun dry.
This works because …
– By pre-chopping the greens, you free soil trapped in the head.
– You are using a large amount of water to wash and dilute away the grit.
– By pulling the greens out of the water, you take advantage of the draining action to pull the grit with it.
I hope this helps!
Veggie List and Veggie Notes
Tomato juice, 1 quart
Romaine lettuce
Asparagus, 0.4 – 0.5 lb
Spinach, 1 medium bunch
Zucchini, 2 – 2.4 lb
Shiitake mushrooms, ~6 oz
White salad turnips & greens, 1 bunch
Radishes, 1 bunch
Arugula (spicy!), 1 bunch
Scallions, 1 bunch
Green garlic, 2 stalks
Next week’s box will probably contain kale, lettuce, zucchini, scallions and more.
Tipi tomato juice – We had this juice bottled from our tomatoes last summer. It’s a great way to capture ripe tomatoes at peak season, at a moment when we are swimming in tomatoes. Drink it or try making an easy soup. Simmer diced zucchini in the juice. Add spinach, minced scallions and green garlic near the end of cooking. Voila! Soup!
Storage: Store the juice out of sunlight at room temperature when unopened. Refrigerate after opening. The juice is already seasoned so do not add salt if you cook with it.
Ingredients: organic tomatoes from Tipi Produce, salt, organic garlic, organic onion, organic black pepper. I’ve posted the nutritional information here.
Romaine lettuce – It’s a robust head of lettuce this week! We plan to make lettuce wraps and Caesar Salad this week.
Asparagus – This is the final asparagus. It was a short season but we need to let the plants regrow and replenish their root reserves for next year. We had trouble with weeding last year and it showed up in this year’s small harvests. The hot spell did not help. We’ll coddle the plants well this summer.
Zucchini & summer squash – The first picking!
Shiitake mushrooms – These are from Hidden Valley Mushrooms, the same people who grew last week’s button mushrooms. Most years, we buy portobellos for this box but decided to try the shiitakes instead because I think they will combine well with the spinach and green garlic. These must be cooked. A small subset of people can have a toxic reaction to raw or undercooked shiitakes. Once cooked, they are harmless. And tasty!
Storage: Refrigerate in a paper bag. These are perishable so use soon. Lightly sauce in butter and add to any dishes. I used mine this week in a a frittata (favorite Smitten Kitchen recipe below), as well as sauteed and mixed into pasta salad. Sauteed shiitakes and spinach are a great toppings for rice bowls, e.g. bibimbap.
Arugula – This arugula is very spicy, a legacy of the recent hot weather. I suggest that you add it to other dishes in small amounts, either raw or cooked. That helps dilute the heat but you still get the arugula flavor.
Scallions (bundle of green onions) – These are useful raw or cooked. Thinly-sliced raw scallions can be folded into biscuit dough or sprinkled on top of soups or salads. Terrific garnish for pasta dishes. Think pad thai. We will send both scallions and green garlic so see photo below.
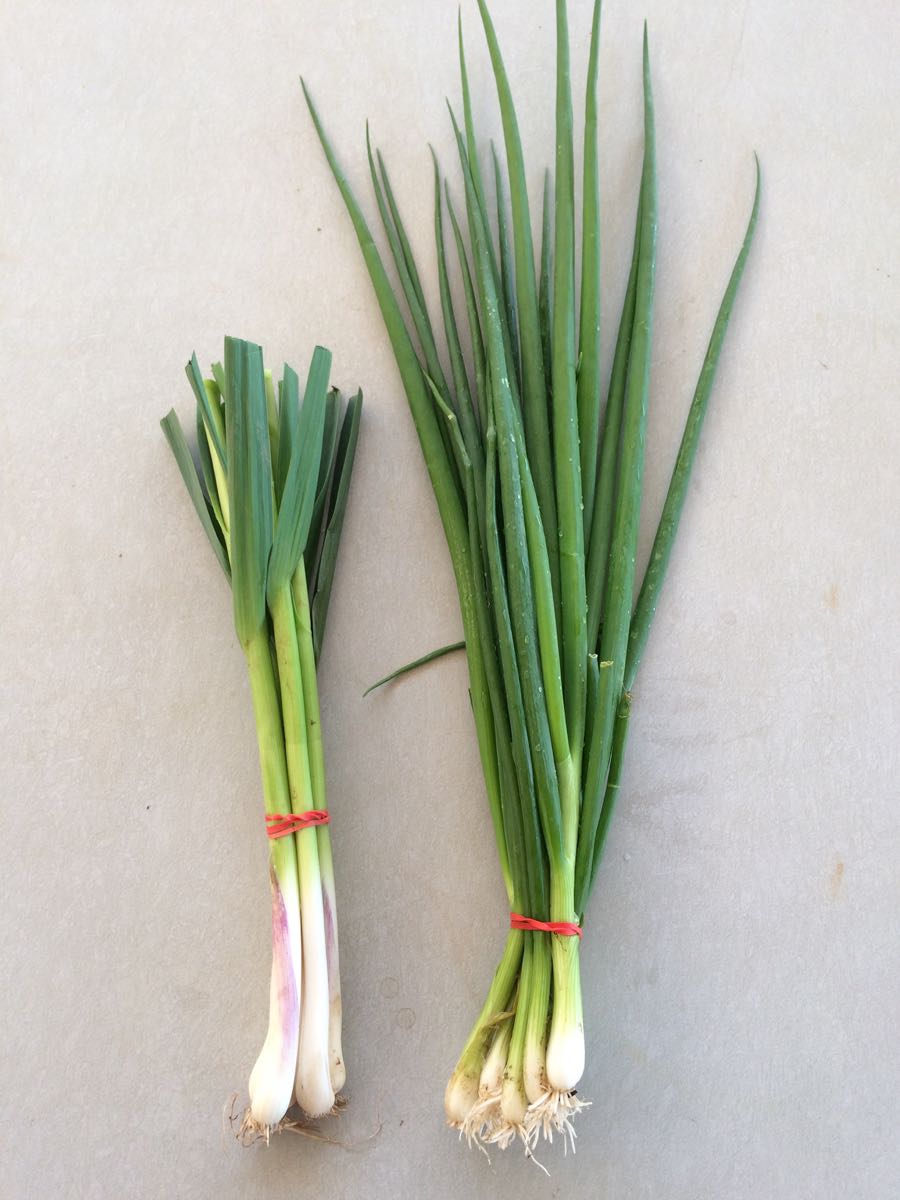
Green garlic (left) and scallions (right) look so much alike! Distinguish them this week by whether the leaves are trimmed (green garlic) or untrimmed (scallions). They smell very different too. However, it’s not a crime if you interchange them in recipes. The green garlic leaves are increasingly fibrous; use just the white and pale green sections. You can use scallions all the way to the tips. You will get just two green garlic stalks this week and they probably be loose not bundled.
RECIPES
Visit our 2018 Recipe Log, a week-by-week list of 2018 recipes.
Visit our 2017 Recipe Log, a week-by-week list of last year’s recipes.
Beth’s Favorite Frittata Recipe
Smitten Kitchen has a terrific, easily adapted frittata recipe. The egg to milk ratio and the cooking times are perfect. I’ve made the recipe several times, starting with frozen roasted peppers and early spinach, then moving on to asparagus, spinach, mushrooms and green garlic. I tried shaving the asparagus (as in the recipe) but find it easier to just save a handful of cooked asparagus to use with this recipe. Sautee the mushrooms in the pan, remove, then proceed to the recipe.
LOCAL THYME/ Comforting Classics
Zucchini Scallion Fritters
Asparagus, Salad Turnip and Shiitake Stir-Fry
Asparagus and Arugula Frittata
Honey Braised Radishes
LOCAL THYME/ Outside the Box Recipes
Greek Stewed Zucchini with Tipi Tomato Juice
Grilled Shiitake Mushroom Salad on Arugula with Ponzu Dressing
Chicken Positano with Arugula and Tomato Juice Dressing
Blackened Catfish with Radish Raita
LOCAL THYME/ Quick & Easy Meal
CousCous Salad with Arugula, Radish and Feta
LAUREN/ Spring Harvest Grain Salad
I fell in love with grain salads last summer thanks to a beautiful Bon Appetit recipe that featured loads of herbs, steamed veggies, raw veggies and a tangy, sweet, salty dressing. I had never had such a variety of textures and flavors in one bowl of food. I’ve been experimenting with those elements every since. Since there aren’t herbs in your box this week I used arugula, scallions and green garlic as the “herbs”. You could easily add a whole lot more than I used here so make as instructed, taste and then add more greens if you desire. Lauren
Serves 4-8 depending on whether it’s a meal or a side
Takes 30 minutes
1 cup quinoa
1-1/4 cup beef broth
1/3 pound asparagus, cut into 1-inch pieces (spears halved if larger)
2 tablespoons butter
6 ounces shitakes, sliced
2 green garlic stalks, white and pale green portions only, minced
1/2 cup (or more) arugula
1 cup (or more) spinach
3-4 scallions, ends trimmed, sliced
1 tablespoons toasted sesame oil
1/4 cup olive oil
2 tablespoons rice wine vinegar
2 tablespoons low-sodium tamari (or soy sauce)
1 tablespoon maple syrup (or honey)
1-3 avocados, optional
- This first step is my fool-proof method for making quinoa (learned from I am a Food Blog). If you have your own tried and true method, feel free to do that instead and ignore this first step. Rinse your quinoa is a fine-mesh strainer. Add to a medium saucepan and toast over medium heat for 1-2 minutes until fragrant but way before it begins to burn. Add broth and bring to a boil. Reduce to a simmer, cover and cook for 15 minutes. Once the timer goes off, turn off the heat but leave the pan on the burner and leave the cover on for 5 minutes more.
- Meanwhile, steam your asparagus for 5 minutes until just tender (but still crisp). I don’t have a steamer so I put a metal colander with handles in a stock pot and cover it to get that steamed effect.
- Then in that same stock pot (if you used one), drain the asparagus water and melt butter over medium heat. Add shitakes and green garlic. Saute for 7 minutes until mushrooms begin to release their juices and are cooked but not too soft.
- Combine your quinoa, asparagus, mushrooms, and green garlic together in a large bowl.
- Cut your greens into a delicate chiffonade (roll a stack of leaves and slice them thinly; then roughly chop the thin strands of greens) and add them to your bowl with the scallions.
- In a small bowl combine oils, vinegar, tamari and maple syrup. Whisk until smooth. Pour over salad and stir to combine. Serve at this temperature or cold with avocado slices or cubes on top.
.
LAUREN/ Radish & Turnip Yogurt Salad
This dish is just screaming to be served next to a nice juicy cut of steak or something else delicious just off the grill. It is cold and refreshing with just enough spice and bite. It’s also incredibly simple and even simpler if you have a mandolin (which makes for very easy slicing) and coming together in 10 minutes flat. Lauren.
Serves 4-6 as a side
Takes 10 minutes (less with a mandolin)
1 bunch radishes, ends trimmed and greens removed, sliced as thin as you can
1 bunch turnips, ends trimmed and greens removed, sliced as thin as you can
3-4 scallions, ends trimmed and sliced
3/4 cup Greek yogurt
3 tablespoons olive oil
2 tablespoons fresh lemon juice
1/2 teaspoon Kosher salt
1/4 teaspoon freshly ground black pepper
- In a large bowl combine sliced radishes, turnips and scallions together.
- In a small bowl, combine yogurt, oil, lemon juice, salt and pepper. Whisk until smooth and yogurt has thinned a bit.
- Toss yogurt dressing over veggies.***
***If you don’t plan to eat this all at once, just toss enough dressing to coat the veggies you plan to eat tonight. This doesn’t store well as the dressing gets a little runny. I store the veggies and dressing separately in my fridge if there are leftovers.
.
Week #2, May 31/June 1, 2018
- On: May 31, 2018
- 0
June 1 check reminder
Many of you paid us with checks dated to June 1. We will deposit the checks on Monday June 4.
Fast-moving week
The heat this week was ridiculous. Perhaps you noticed. Madison set a record with four days in the 90’s. We are proud of our work crew – they soldiered through, drinking lots of water and gatorade and taking breaks in the shade. Even seasoned farmhands (like most of our crew) have to re-acclimate to hot weather.
The heat wave advanced most of our crops. We’ve quickly switched from running behind schedule to running ahead of schedule. It is head spinning. This week’s box contains next week’s spinach, escarole and mint. In turn, some of the following week’s crops will be ready next week (lettuce field #2, zucchini). We lost a few spring plantings that couldn’t handle the heat: radishes, some spinach, and the new Abyssinian mustard we planted. We have more radish and spinach plantings and will see how those younger plants fare. The asparagus did not respond well to the hot weather. We’ll harvest again next week but then have to decide whether to end the asparagus season early to let the plants recover and store root reserves for next year. We’ll let you know.
Bright spots of the week: It was a big relief when the temperatures dropped. It rained gently on Wednesday. The heat-loving crops grew a lot (tomatoes, peppers, squash). Our mama farm cat moved her kittens back into the garage where we can tame them. Life is good again.
Top; the strawberry field is blooming beautifully. You can see young berries forming in the bottom photo. Steve thinks the first berries might be ready in two weeks but that’s a guess.
The zucchini and summer squash fields loved the heat! These should be ready to pick next week.
Veggie List and Veggie Notes
May 31/June 1, 2018 (Thurs/Fri sites)
Week #2, purple EOW and sun Sampler
Remember, we list storage, prep and cooking information on each vegetable the first time we pack it in the CSA boxes. See last week’s newsletter for info on asparagus, spinach, lettuce, green garlic and rhubarb. If we have special instructions or insights to offer, we’ll list them here. For example, I’ve included freezing instructions for rhubarb.
Asparagus, 0.6 lb
Escarole, 1
Spinach, 1 big bunch
Button mushroom, 12 oz
Red leaf lettuce
White salad turnips & greens, 1 bunch
Green garlic, 1 bunch
Mint, 1 sprig
Rhubarb, ~1.75 lb
Next week’s box will probably contain kale, lettuce, white salad turnips, scallions, shiitake mushrooms and more.
Escarole (large head of wavy green leaves) – This member of the chicory family can be eaten raw or cooked. Its slightly bitter flavor is a good addition to mixed salads. It is excellent cooked alone or mixed with other greens. It cooks quickly, but not as quickly as spinach. Cover and refrigerate.
Button mushrooms – These organic mushrooms are from Hidden Valley Mushrooms from Wisconsin Dells. We buy mushrooms from Mary every year; they are a great addition to spring salads and quiches. Here are Mary’s suggestions for storing the mushrooms. Store separate from leafy greens, which hasten mushroom aging. If storing for more than a few days, remove from the box and store in a paper bag with holes punched in the side. Keep dry. Don’t wash to clean, just wipe with a damp cloth.
White salad turnips (bunched white roots with green tops) – I know that returning members look forward to these sweet and delicious turnips, which taste nothing like the turnips that are harvested in fall.
– Storage: Cover and refrigerate.
– Uses: Both the turnip roots and tops are edible. The roots are excellent raw; Slice and add to salads. They can be cooked and are especially good when lightly sauteed in butter. Stir as little as possible so they brown on at least one side. The turnips greens are excellent cooked. Treat them like mustard greens.
– Our favorite use: Slice the roots very thinly and combine with a mixture of rice vinegar, mirin, soy sauce, sesame oil. Eat immediately or marinate.
Mint – Everyone gets one sprig with about 6 to 8 leaves. Refrigerate in a small container.
Rhubarb – Remember, rhubarb is easy to freeze. Simply chop and freeze in a freezer bag. It does not need to be blanched. When it’s time to bake, just add the frozen rhubarb to your batter. You’ll need to cook baked goods a few minutes longer, e.g. about 5 minutes longer for a cake in a 9 x 13 pan.
RECIPES
Visit our 2018 Recipe Log, a week-by-week list of 2018 recipes.
Visit our 2017 Recipe Log, a week-by-week list of last year’s recipes.
Beth’s box logic: The mint sprig is small but we included it specifically so you can make spring rolls with mint, spinach or lettuce, plus a few spears of cooked asparagus. We usually add strips of marinated cooked tofu but shrimp are good if you have them.
– Here’s a useful recipe for how to handle the rice paper wrappers: Rainbow Vegetable Spring Rolls.
– Use any vegetables you like.
– We make a dipping sauce of soy sauce + rice vinegar + thinly sliced scallions or green garlic. It’s easier to dip or spoon the sauce into your spring rolls as you eat them, rather than adding the sauce to the rolls as described in the recipe.
LOCAL THYME/ Comforting Classics
Asparagus and Spinach Pasta Salad with Feta
Wilted Escarole with Pine Nuts and Raisins
Farro Salad with Salad Turnips, Turnip Greens, Mint and Walnuts
Shaved Asparagus and Maple Mint Salad
LOCAL THYME/ Outside the Box Recipes
Green Curry Shrimp Soup with Spinach and Salad Turnips
Escarole, Salad Turnip and Apple Salad
Pan Seared Chicken with Creamy Spinach and Mushroom Sauce
Rhubarb Mint Vinaigrette
LOCAL THYME/ Quick and Easy Recipe
Spinach Frittata with Turnip Greens
Recipes from Lauren
SPRING SALAD WITH TURNIPS & LEMON CREAM
Every winter I get a new cookbook focused on vegetables to expand my repertoire of recipes and every year I am surprised by the variety of textures and flavors I discover within familiar foods. Re-discovering vegetables in new ways is my favorite thing about cooking. Inspired by Joshua McFadden’s Six Seasons cookbook, this recipe made me fall back in love with spring lettuces and salads. The lemon cream dressing is delicate and feminine really letting the fresh lettuce and floral turnip flavors take center stage. Enjoy! Lauren
Serves 4-6
Takes 20 minutes
1 bunch turnips
1/2 head red leaf lettuce, rinsed and dried well
5-10 fresh mint leaves, torn
1/2 cup lemon cream dressing (below)
Salt and pepper to taste
1/2 cup salted roasted sunflower seeds
- Remove the greens from the turnips. Wash, remove any yellowed pieces and pat dry. Roughly chop and add to a large bowl. Roughly chop lettuce and add to bowl. Trim the ends off the turnips and very thinly slice them (use a mandolin if you have one). Add the sliced turnips to the bowl of greens along with the mint leaves.
- Prepare the lemon cream dressing (below) and add to greens. Use your hands to evenly distribute the dressing (though tongs may also work). Season with salt and pepper. Taste and adjust seasonings as desired.
- Top with sunflower seeds.
.
Lemon Cream Dressing
Makes 1 cup
2-3 green garlic, quartered and sliced
2 tablespoons fresh lemon juice
1/2 teaspoon grated lemon zest
1/2 cup heavy cream
1 teaspoon Kosher salt
1/4 teaspoon freshly ground black pepper
2 tablespoons olive oil
- In a small bowl combine garlic, lemon juice and lemon zest. Add cream, followed by salt and pepper. Whisk to combine until it starts to thicken then add olive oil. Continue whisking until dressing gets a bit lighter and airy. Use within a day of making.
.
SHAVED ASPARAGUS, SPINACH & MUSHROOM QUICHE
One 9-inch quiche
Serves 4-6
Takes 50 minutes
1 batch favorite pie dough (this makes two servings) or a store-bought pie crust
2 tablespoons butter
12 ounces button mushrooms, cleaned and sliced
1 bunch spinach, leaves torn or roughly chopped
1-1/2 teaspoon Kosher salt, divided
1/2 pound asparagus, shaved
4 eggs
1/2 cup heavy cream
1/4 cup whole milk
1/2 cup shredded Parmesan
1/2 teaspoon freshly ground black pepper
- Preheat oven to 400 degrees.
- If you made your pie dough from scratch, pre-bake the crust with pie weights for 15 minutes. If you are using a store-bought crust, follow package directions.
- Meanwhile, in a large saute pan, melt butter over medium heat. Add mushrooms and 1/2 teaspoon salt. Saute for 5-10 minutes until just beginning to release their juices then add the spinach. Stir to combine and cover. Turn off the heat but leave pan on burner for five minutes just to steam the spinach. Add shaved asparagus along with remaining salt and pepper. Stir to combine and then pour into pre-baked crust.
- In a medium bowl, combine eggs, cream and milk. Whisk until smooth then add Parmesan. Pour over asparagus mixture. Shake pan to even out the filling. Bake for 30-35 minutes until cooked through.
.
Week #1, Let’s start!
- On: May 23, 2018
- 0
Welcome to our CSA! Deliveries begin this week for weekly members and for green every-other-week (EOW) members. Go here to check the delivery schedule for other shares.
Things you need to know.
♦ We post this newsletter/blog each Wednesday night, with a list of veggies for the week, quantities, information about storage and preparation, news of the farm, recipes, and a forecast for the next week’s box. We alert you by email on Wednesday night once the newsletter is posted and ready to read.
♦ Want earlier notice of what will be in the box? Check the sidebar on our website homepage around 7 p.m. on Wednesday night. I’ll post the list under “Box Contents.” I also provide a tentative list for the following week in the Veggie List section of this newsletter. The next week’s list is rarely complete but the items listed are ones we feel confident about.
♦ EOW, sampler and weekly members, we assume you read all the newsletters, even on your “off” weeks. This newsletter (and our emails to you) are our means to communicate with you.
♦ The first few boxes of the season are often the lightest. EOW members, do not worry that you have signed up for the wrong share. Our deliveries get heavier and more abundant as the season progresses.
♦ We will sometimes write “OR” in the produce list, e.g. green leaf OR red bibb lettuce. You will receive one of these crops. All the boxes at each site are identical; we pack the same crops for all the members at each site. Please don’t open other members’ boxes.
♦ Wash your produce well this week to remove grit. It has rained a lot lately, driving grit into the asparagus and anything that forms a head (lettuce, bok choy, spinach). Our crew took extra care with washing but expect to wash everything. You should always wash your produce!
♦ On Thursday, we deliver CSA boxes to Evansville, Fitchburg, Madison, McFarland, Middleton and Oregon.
♦ On Friday, we deliver CSA boxes to Brookfield, Janesville, Mequon, Milwaukee, Waukesha and Wauwatosa.
A Tricky Spring Decision
In mid-April, we had to decide whether to transplant our precious greenhouse seedlings the day before a predicted snow storm. Seems crazy, right? Why not just wait? Well, we were already two weeks behind schedule, the plants were growing actively and our greenhouses were completely full. We had a CSA schedule to meet!
We decided to plant. As a rule, we use every opportunity to plant and transplant in late March and early April. If the ground gets soaked, it can take a long time to dry. We use row cover (a lightweight fabric) as an insurance policy, to moderate the cold and wind and to gather the sun’s warmth. This is a situation where experience is so helpful. We’ve been through this before and have yet to lose a crop by putting it out too early. Of course, we did wait for the 15 degree nights to pass before transplanting. That’s just common sense.
Our greenhouse seedlings are precious. It takes 6 to 8 weeks for them to grow to transplanting size, which means that we cannot replace them.
We transplanted on a beautiful sunny day, and covered the plants with floating row cover. It snowed the next day, weighing down the plants and freezing the row cover to the ground.

The plants did fine. The row cover makes a nice shelter and traps heat from the ground.
The row cover was seriously beaten up by the weather. We patched it together because we did not want to replace it with a new $300 piece. Your bok choy has some insect damage as a result; the flea beetles snuck in through the holes.
Otherwise, everything did very, very well.

Harvest day!
The happy resolution to the story.
Veggie List and Veggie Notes
May 24/25, 2018 (Th/Fri sites), week #1, green EOW
Asparagus, ~1 lb
Spinach, 1 big bunch
German Butterball potatoes, 3.5 lb
Green leaf lettuce
Salad radishes, 1 bunch
Green garlic, 1 bunch
Bok choy, 1 large
Rhubarb, 2 lb
Next week’s box will probably contain asparagus, spinach, button mushrooms, lettuce, green garlic, Abyssinian mustard, rhubarb and more.
Asparagus – Enjoy this spring treat! Your asparagus will be green or purple. The purple variety turns dark green when cooked. Its flavor is almost identical to normal green asparagus. Wash your asparagus thoroughly to remove hidden grit. Submerge in water with the tips pointing down, soak briefly, then swish vigorously and pull out of the water. The draining action helps pull the grit out of the asparagus tips. Repeat several times.
Storage: Asparagus is perishable, so eat it as soon as possible. Store it in the paper bag we packed it in, and wrap loosely in a plastic bag. The paper bag protects the asparagus tips from direct contact with the plastic bag. The plastic bag keeps the asparagus from wilting.
Preparation: We snap our asparagus at harvest, rather than cutting. Therefore, there is no need to snap the stalks to remove fibrous ends. For the same reason, it is not necessary to peel the asparagus stalks. It’s OK to trim the cut end a bit.
Cooking: If your asparagus stalks vary greatly in size, you will want to cook the thicker ones longer. Put an empty steamer pot over water, and bring the water to a boil. Add the asparagus. Cover and steam over medium heat until just tender. Use two forks or a spatula to turn the asparagus during cooking, rotating the bottom spears to the top. Drain and serve. Alternatively, you can lay spears flat in the bottom of a broad pan, with ½ inch of water. Also excellent broiled or grilled. Good dressed with vinaigrette, or with lime juice, salt and pepper.
German Butterball potatoes – Please refrigerate these potatoes. They are in great shape now but will sprout within days if stored at room temperature. They’ve been stored all winter and want to grow. Store in a paper bag to protect from light, even in the fridge. We grow everything we send in our CSA boxes except potatoes, some of the garlic, and mushrooms, all of which we buy from organic growers that we trust. We purchased these potatoes from Jesse Perkins at Vermont Valley Farm. German Butterballs are good all-around potatoes with outstanding flavor. This variety was the first place winner in Rodale’s Organic Gardening “Taste Off.” Best uses are roasted, boiled or fried. With the predicted weather this weekend, you might want to make potato salad! Jesse says the potatoes have a higher sugar content because of starch to sugar conversion during cold storage. The potatoes taste a bit sweet, and will blacken slightly when fried. It’s a harmless color change due to the sugar conversion.
Lettuce and spinach – Wash your greens to remove grit splashed into the heads by rain. Cut to the size you like, submerge in water, swish gently, then pull from the water and drain in a colander. Some weeks, you will need to repeat in fresh water.
Storage hint – To extend the storage life of your tender greens, wash them, dry in a salad spinner, then store in a dry container or bag. Lettuce and spinach last much longer when handled this way.
Bok choy (large rosette with thick white stems and green leaves) – This Asian green is good for stir-frying or sautéing or in soup. You can think of the stems and leaves as two separate vegetables. The stems require longer cooking. The leaves will cook almost as quickly as spinach. Bok choy stores well, so feel free to pull off leaves as you need them, or use the whole head at once. Refrigerate in a plastic bag.
Green garlic (looks like scallions, tastes like garlic) – Last fall, we planted garlic cloves that grew into the stalks we harvested this week. If left to grow until mid-summer, the slim white bulb on this week’s garlic will divide and form the usual cluster of cloves in a garlic bulb. This year’s green garlic is robust.
Preparation: Green garlic is more pungent than scallions, so slice thinly and use sparingly when raw. It mellows when cooked. Chop and add to any cooked dish that would benefit from garlic. Use the white bulbs and pale green stems. Avoid the dark green stems and leaves, as these are fibrous.
Rhubarb – Refrigerate in a plastic bag. FYI, 2 lb of rhubarb yields 6 – 6.5 cups when chopped.
Stewed rhubarb: This is the simplest way to prepare rhubarb. Chop rhubarb into one inch chunks. Stir over medium heat with a small amount of water in the bottom of the pan. The rhubarb will release moisture as it cooks. Stew until it softens and falls apart. Sweeten to taste with honey or sugar. Eat warm on its own, over vanilla ice cream, on pancakes, etc.
Recipes from chef Pat Mulvey at Local Thyme
Comforting Classics
Spinach Salad with Pan Seared Asparagus, Steamed Potatoes, Chickpeas and Oven Poached Egg
Pureed Potato and Asparagus Soup with Spinach
White Bean Stew with Potato and Bok Choy
Rhubarb Compote with Fresh Ricotta
Outside the Box Recipes
Grilled Pizza with Wilted Spinach and Shaved Asparagus
Saag Paneer
Rhubarb Glazed Bok Choy and Radish
Spatchcocked Chicken and Potatoes with Rhubarb Butter
Quick and Easy Recipe
Classic Warm Spinach Salad
Recipes from Lauren
BEEF & GREENS STIR FRY WITH RHUBARB SAUCE
Not many people realize that rhubarb is as amazing in savory dishes as it is in desserts. Just like citrus, rhubarb lends a complex acidity and sweetness to dishes. I love to use rhubarb in Asian style recipes with powerful flavors that can balance it (like toasted sesame oil and soy sauce). Whip up this dish for a quick weeknight meal and remember why you waited so long for fresh produce. Lauren.
Serves 4.
Takes 45 minutes.
1 large head Bok Choy
3 tablespoons toasted sesame oil, divided
2 tablespoons water, plus more as needed
1/2 pound spinach
2 cups rhubarb, diced
3 green garlic, minced
3 tablespoons soy sauce
2 tablespoons apple cider vinegar
2 tablespoons white sugar
1 tablespoon honey
1 teaspoon garlic powder
1/4 teaspoon red pepper flakes
1 pound raw flank steak, cut into strips
2 cups cooked rice
Toasted sesame seeds, optional
- If you don’t have cooked rice in the fridge, begin your rice according to package directions.
- Remove individual leaves from the bok choy and thoroughly wash. Thinly slice the stalks (like you would celery). Roughly chop the leaves and keep in a separate pile from the stalks.
- In a large wide saute pan, heat 1 tablespoon toasted sesame oil with 2 tablespoons water over medium heat. Add bok choy greens and spinach and toss with oil and water to coat. Cover pan and steam for 5 minutes until just wilted. Remove greens from pan with tongs and set aside. Leave juices in pan.
- Add 1 tablespoon toasted sesame oil, rhubarb, green garlic, soy sauce, white sugar, honey, garlic powder and red pepper flakes to the same pan you cooked greens in. Simmer gently (and reduce mixture) over medium heat for 10-15 minutes, adding a tablespoon or two of water if it gets too thick. Remove sauce to a small bowl and again, don’t wipe out your pan.
- Add last tablespoon of toasted sesame oil to the pan along with bok choy stalks and steak. Cook over medium high heat 5-7 minutes until meat is cooked through. Add sauce and greens back to pan. Stir to combine and cook for about a minute, just to warm. Serve over rice and garnish with sesame seeds, if using.
.
SPRING HASH
Ingredients adapted from Smitten Kitchen recipe
I have no shortage of amazing asparagus recipes in my repertoire but for some reason or another, I come back to this one every year. I love the combination of smoky bacon and fresh tender asparagus, but I also love the versatility and heartiness of this dish created by Smitten Kitchen. This time around I added green garlic and radishes. It’s a perfect place to hide radishes if you aren’t a huge fan. Cooked radishes don’t taste all that different from a potato and you’ll relish the slight spice and bite they bring. Enjoy! Lauren.
Serves 4 depending what you serve with it.
Takes 45 minutes.
1/2 pound bacon, cut into 1/4-inch dice
2 cups potatoes, cut into 1/2-inch dice
1 cup radishes, cut into 1/2-inch dice
2 green garlic, thinly sliced
0.90 – 1 lb asparagus, ends trimmed and cut into 1-inch pieces
Salt and Pepper to taste
- Heat a 12-inch cast iron skillet or other large frying pan over medium heat. Fry the bacon, turning it frequently so it browns and crisps evenly. This should take about 10 minutes. Remove it with a slotted spoon and drain on paper towels. Leave the heat on and the bacon grease in the pan.
- Add the potatoes and radishes and donít move them for a couple minutes. Use this time to season them well with salt and pepper. Once theyíve gotten a little brown underneath, begin flipping and turning them, then letting them cook again for a few minutes. The idea is not to fight them off the frying pan, once theyíve gotten a little color, itís easier to flip them and youíve gotten closer to your goal of getting them evenly browned.
- When the potatoes and radishes are as crisped and brown as youíd like them ó this takes about 20 minutes ó add the green garlic and asparagus. Stir to combine and then add a lid. (It doesnít have to fit perfectly). Cook for an additional 5-10 minutes (thin spears of asparagus will take closer to 5 minutes, thick spears will take a bit longer) until asparagus is softened. Remove the lid, return the bacon to the pan for another minute, to reheat. Taste for seasoning and adjust if needed.
- Serve immediately with a fried egg on top and maybe a small salad of lettuce and thinly sliced radishes on the side.
.
Spring news
- On: April 09, 2018
- 0
If you haven’t enrolled yet, we encourage you to sign up during the next two weeks. We need to know whether to plant for you!
– Returning Tipi CSA members, go here to enroll.
– New Tipi CSA members, go here to enroll.
CSA Updates (revised 4/14/18)
– We plan to delay our first CSA delivery by one week because of the cold spring weather. The plants have to grow! We’ll announce the delivery schedules during the first week of May. Watch for emails from us then.
– A few members have contacted me in search of someone to split a CSA share. If you are in the same situation, tell me your pickup site and I will try to match-make.
– Rebates for CSA share purchases are available to some people insured by the WEA Trust State Health Plan. The rebate is $100 for individual plans and $200 for family plans. Read more here.
Toasted Orzo Salad with Roasted Sweet Potatoes, Celeriac and Carrots

We are soooo close to our spring produce. Let’s enjoy the last of our lingering winter stash, and start thinking about spring recipes. Here is my current favorite winter recipe, which should adapt easily to spring or summer produce. Soon, I’ll try the dish with steamed asparagus and minced green garlic added to the lemon dressing. Olive oil is repeated multiple times in the ingredients list because it’s used in several steps. The rich fragrance of this dish comes from toasting the orzo and from the sumac spice. It’s worth hunting up sumac if you can find it. (I bought mine at Basics Coop in Janesville.) *Otherwise, substitute with paprika. Beth
Adapted from Food52.
Vegetables
1-1/2 lb sweet potatoes
1 medium celeriac
2 large carrots
olive oil
Dressing ingredients
4 tsp dijon mustard
4 Tbsp. lemon juice
1 clove garlic, minced
1/2 tsp salt
1/4 tsp pepper
4 Tbsp olive oil
1-2 medium shallots, minced
Pasta
2 cups orzo
1 Tbsp olive oil
Spices. Combine in a small bowl.
1 tsp oregano
1 tsp cumin
1 tsp sumac*
1 tsp sesame seeds, toasted and crushed
Toppings
3 – 4 oz feta cheese, crumbled
roasted cashews or your favorite nut
1. Heat the oven to 425o.
2. Peel the celeriac and carrots. Dice the sweet potatoes, celeriac and carrots into bite-sized pieces.
3. Oil a baking sheet (or two sheets). Keeping the vegetables separate by type, toss with olive oil and spread into a single layer.
4. Roast, turning once, until fork-tender and blackened in spots. The sweet potatoes will be ready in 20 – 25 minutes, the carrots and celeriac might take longer.
5. Make the dressing. Put the lemon juice, dijon mustard, garlic, salt and pepper in a pint jar. Mix with a fork, then add the oil in a slow stream and whisk to combine. Add the minced shallot. Set aside.
6. In one pot, bring 6-8 cups water to a boil. In a second pot, stir the dry orzo over medium heat until it is lightly browned and smells toasty. Turn off heat, wait 30 seconds, then add the boiling water. Watch out for steam! Be ready to stir! Turn the heat back on and cook until al dente. Drain, transfer to a mixing bowl and toss with 1 Tbsp. olive oil.
7. Sprinkle the spice mixture over the orzo and combine. Add the dressing and combine. Add the roasted veggies and mix gently. Transfer to bowls and top with feta and cashews.
Hints to speed the process
– Make the spice mixture in advance and store in a sealed jar.
– You can prep the dressing the morning of. The minced shallots pickle nicely in the dressing.
Farm News
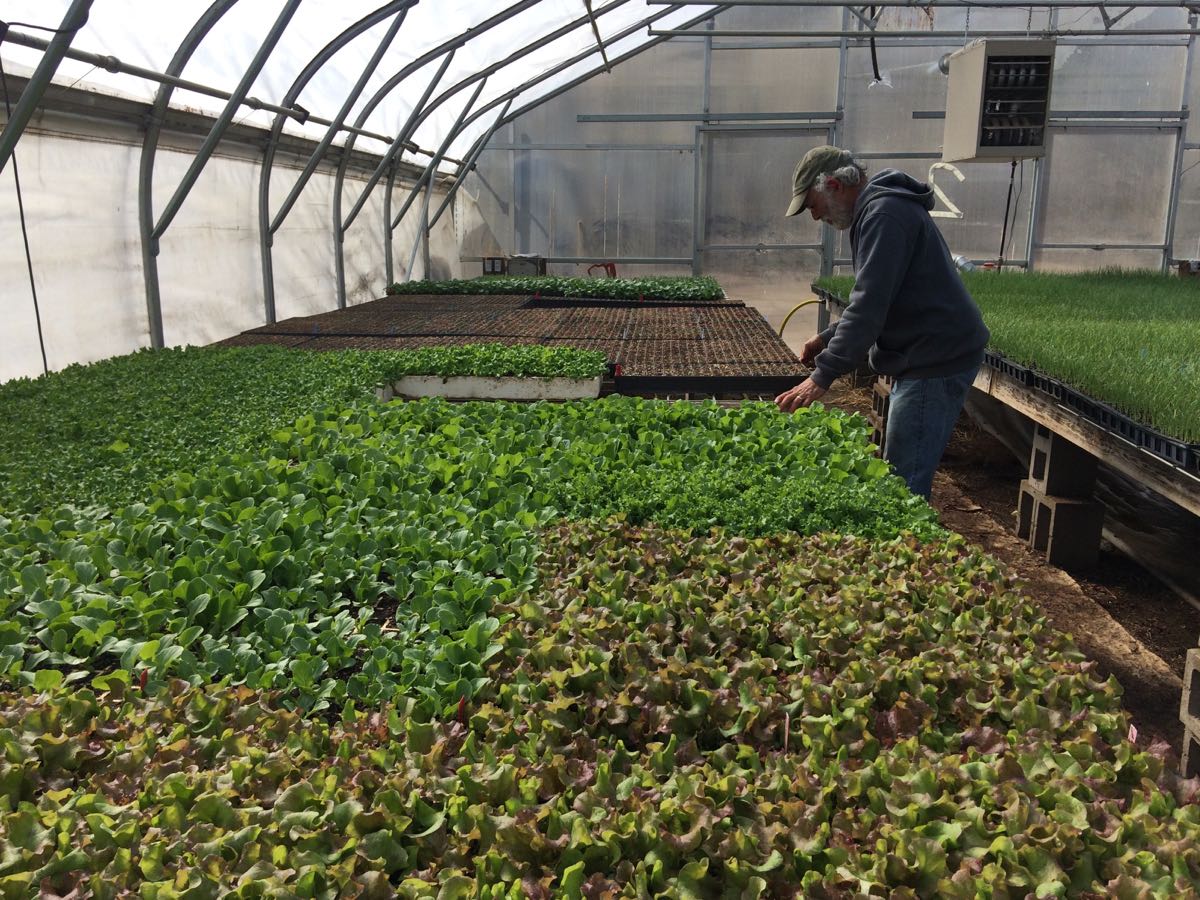
The sunny greenhouses are my favorite place. Above, Steve checks lettuce seedlings. In a normal year, we might have transplanted two weeks ago. Instead, we waited until the cold nights were over. We’ve experimented over the years with how much cold these early seedlings can handle. They are pretty resilient, and can tolerate temperatures down to about 20o if protected with floating row cover. The recent 11 and 14 degree nights were just too risky.
![]()
We transplanted lettuce, spinach, scallions and bok choy on Wednesday. The time was right; we needed to get the plants in the ground before this weekend’s rain. Everything is sheltered under row cover and will be fine, even if it snows. From left, Charlotte, Raul and Kristen feed lettuce seedlings into the transplanter. Maggie checks the planting depth. Steve comes to see how the job is progressing. Wow, it felt great to get so many plants in the ground.
![]()
From left, Simone, Kerry and Maggie move pepper seedlings into larger pots.
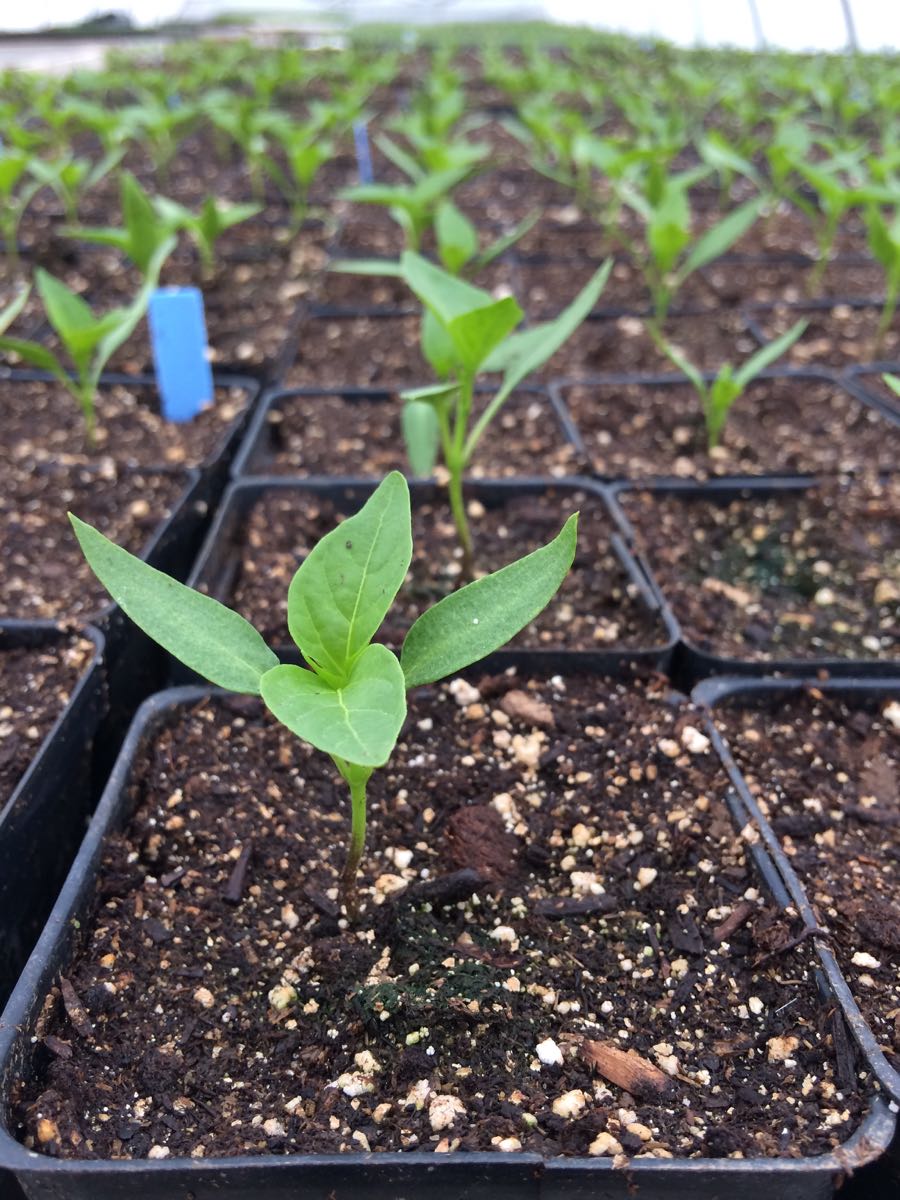
We’re raising an army of bell peppers. Chiles and Italian peppers get planted this coming week.
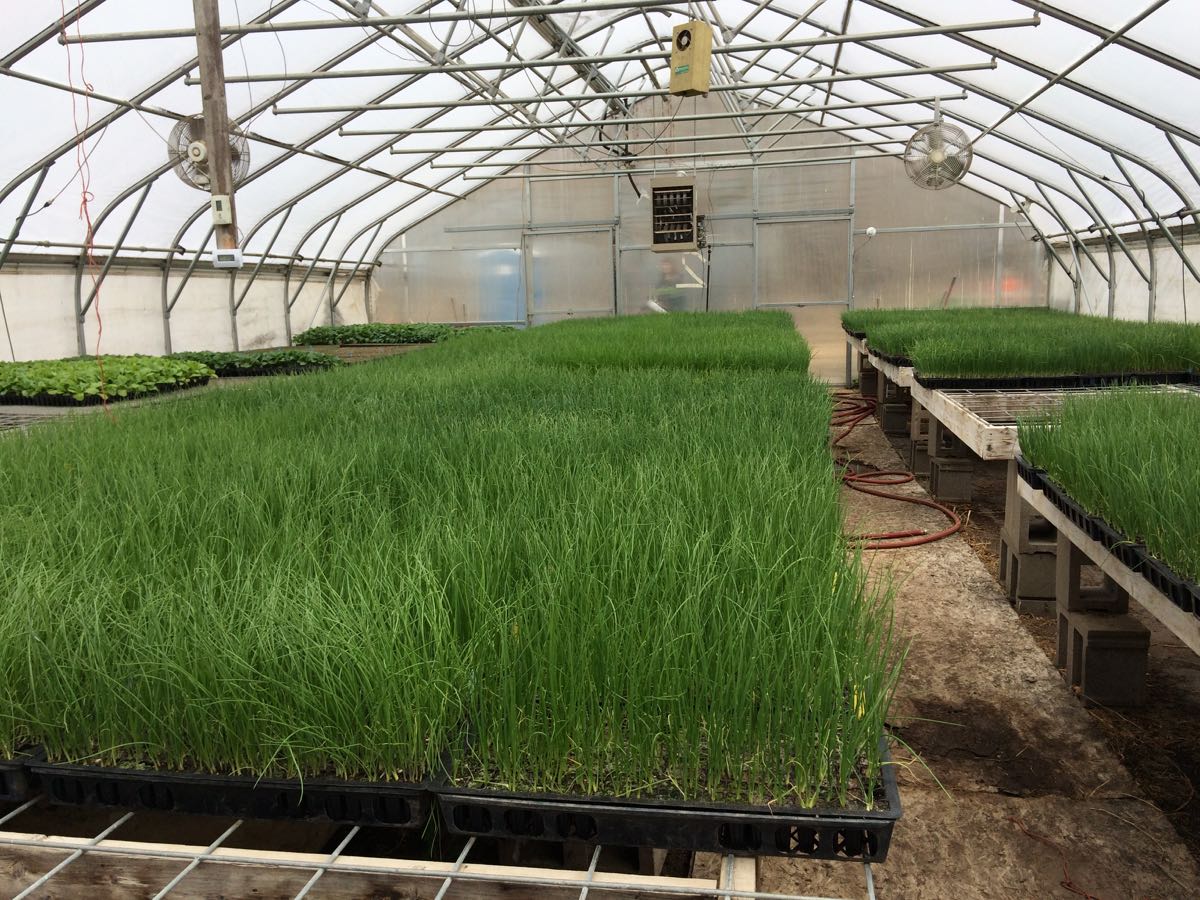
Lush, beautiful onion seedlings.
Steve planted cold-hardy spinach, radishes, arugula and sweet salad turnips outside weeks ago. The seedlings have slowly emerged. They are covered with floating row cover for protection and to warm the soil on sunny days.

I am apprenticing with the local Prairie Enthusiasts to learn fire management. It is both fascinating and scary. Healthy caution is a good idea, right?? We are raising prairie plants from seed I collected with the Enthusiasts last summer. The seedlings will go into our expanding habitat to support pollinators and beneficial insects. I love this project. Beth
Online forum to share cooking ideas?
- On: January 28, 2018
- 0
Let’s brainstorm. Many of you have expressed interest in how other Tipi CSA members use their CSA produce. (This has come up in the end-of-season survey for several years.) Members often devise recipe or cooking ideas that never occurred to me when planning the CSA box! Let’s share that creativity through an online forum where you can exchange ideas.
Help me choose the best platform to use on a weekly basis. I’ll post the box contents list (and maybe a photo), then you share your cooking plans or successes. Honestly, this needs to be community-based without too much input from me. I get so busy during the farming season.
What’s the best approach? A Facebook group (public? closed?)? Instagram? Something else I don’t know about? Is the comments section of our farm newsletter too out-of-the-way? We should choose a platform that people are already visiting. Posts to our Facebook page (i.e. not to a Facebook group) won’t work because of new algorithm changes at Facebook.
Send me an email if you have ideas or advice, or share in the comments section below. Thank you in advance. Beth

