
Yearly Archives: 2019
Week #6, Strawberries & Peas
- On: June 26, 2019
 0
0
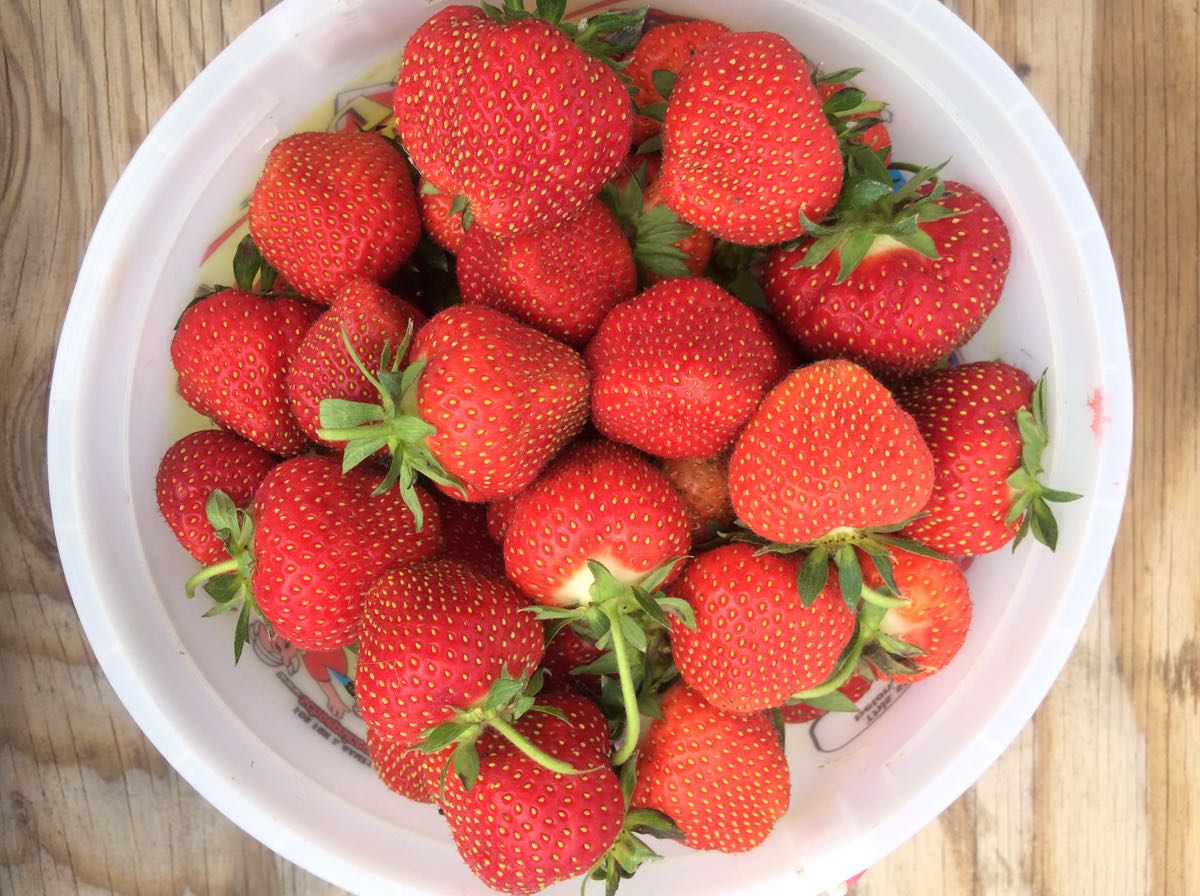
We picked many, many pails of berries this week.
Strawberries & peas – that’s all we can think about right now. They take over our lives for a few weeks each year. We can barely spare a few thoughts for spinach, scallions, world events. The strawberries you receive this week are ripe and some were picked on a rainy day. This means you need to eat them soon. They are perishable. And delicious.

Steve volunteered at a community event last week, the local Strawberry Festival. Even there, he couldn’t escape strawberries.
Farm Recipe; Strawberry Cannoli Cake

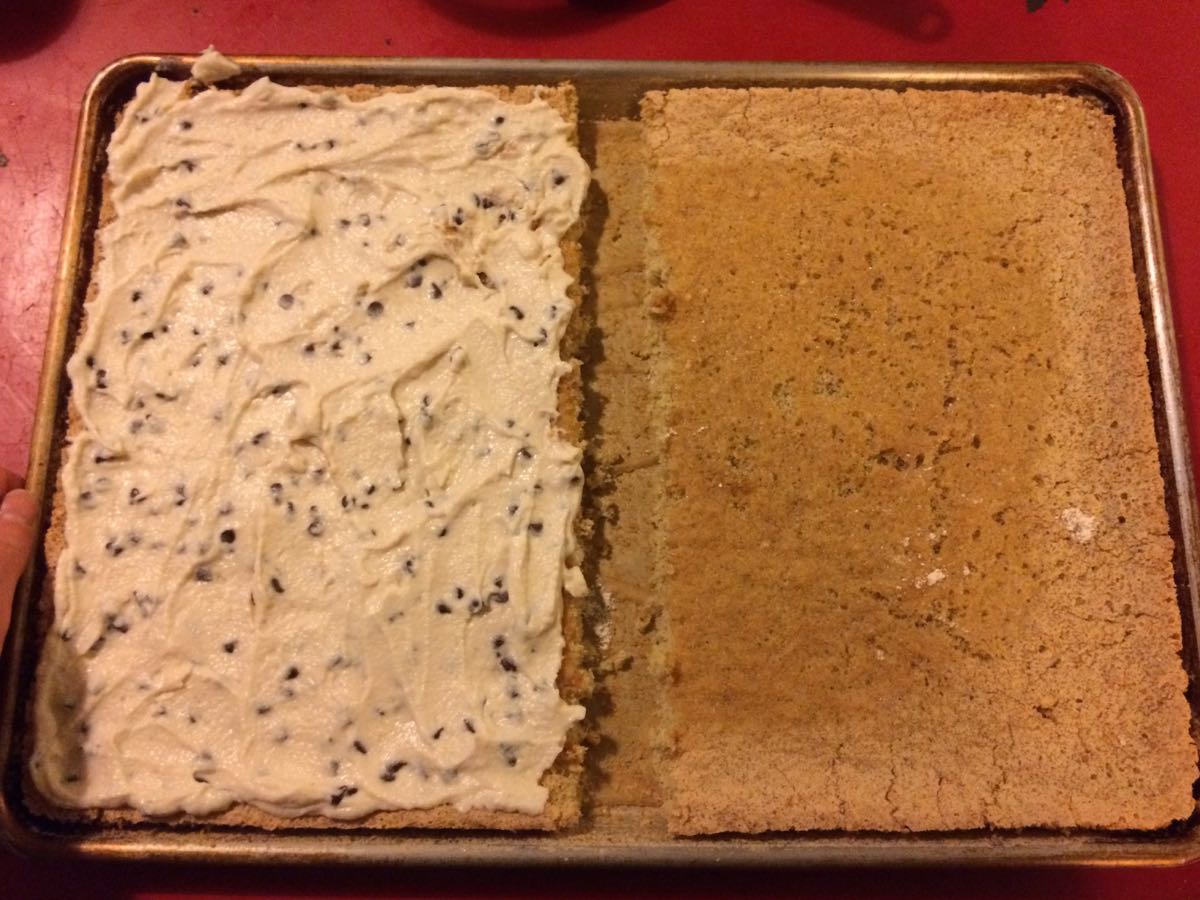
I tried a new cake to celebrate Steve and Maggie’s half-birthdays. It’s an annual tradition. Born on December 25 and December 31, their birthdays are neglected so we celebrate again in June. This creation combines vanilla cake, ripe strawberries and cannoli cream. I’ll show you the cake recipe I used, but you could use any cake recipe you are comfortable with.
Cake
Choose and prepare your cake recipe. I followed this recipe for Easy Sponge Cake, but was intimidated about trying to cut a baked cake into layers. Instead, I baked the batter in an 11 x 17 rimmed pan lined with ungreased parchment paper. This is a half baking sheet, with a 1-inch rim. I baked it at 350 F for 20 minutes. Cooled fully, then cut in half.
Cannoli Cream
1.5 lb whole milk ricotta (I used a supermarket brand)
3/4 to 1 1/8 cup powdered sugar
3/4 tsp. vanilla
1/4 tsp. cinnamon
3 oz mini chocolate chips
Starting with 3/4 cup powdered sugar, mix all ingredients together. Taste and gradually add more sugar (up to 1 & 1/8 cup total) until the flavor ‘pops.’ You’ll know when this happens. The ricotta mixture suddenly changes from bland to flavorful.
Strawberries
Slice strawberries and refrigerate. I used an extravagant amount of berries. If you are short on berries, slice and top the cake with a single layer in a pretty pattern.
Assembly
– Spread half the cannoli cream on one cake layer.
– Top with the second cake layer. I used the underlying parchment paper to flip the second layer onto the first. Peel off parchment. Carefully flip the layered cake onto your serving plate or pan. Peel off the rest of the parchment.
– Spread with the remaining cannoli cream.
– Refrigerate until just before serving.
– Top with sliced strawberries and serve.
????
Veggie List and Veggie Notes
Week #6, June 27/28, 2019
– Weekly shares
– EOW/ green
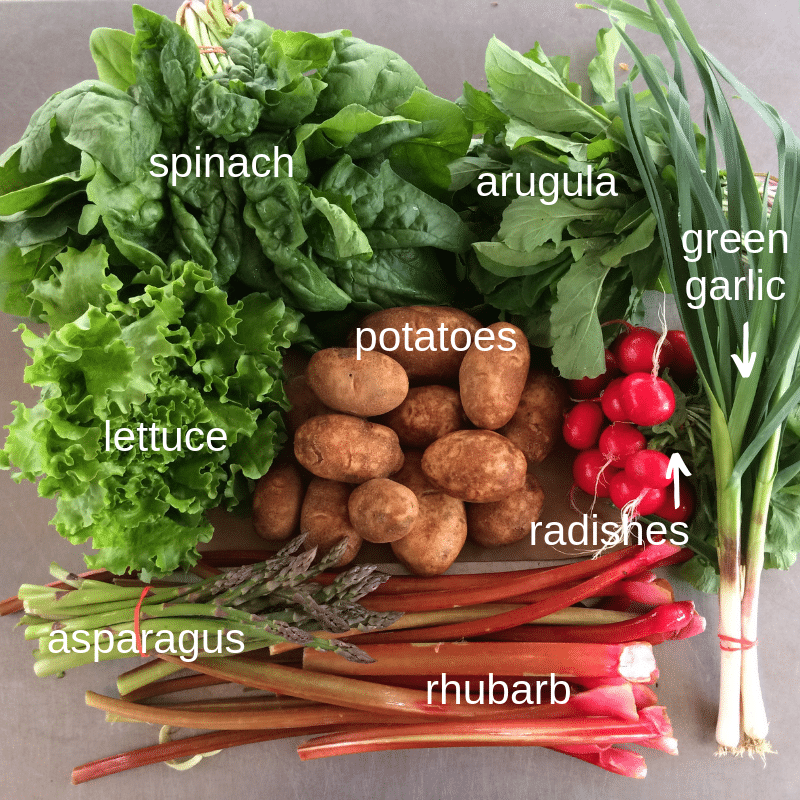
Strawberries, 2 quarts
Snap peas, 1 lb
Snow peas, ~0.9 lb
Zucchini &/or summer squash, 2.5 – 3 lb
Spinach, 1 medium bunch
Lettuce, iceberg or red leaf
Scallions, 1 bunch
Oregano, 1 small bunch
– Some sites get 1 medium broccoli
– Some sites get 1 modest bunch lacinato kale
Note: All boxes at each site are identical, i.e. they all have broccoli or they all have kale. Please do not open boxes looking for a different selection.
Next week’s box will probably contain strawberries, Caraflex cabbage, snap & snow peas, zucchini & summer squash, Romaine lettuce, kohlrabi and more.
Strawberries – Refrigerate and eat soon. You will receive two quarts. Judge which quart looks the most perishable and eat that one first.
♦ Most berries are quite clean. If you want to clean your berries, rinse gently. Don’t soak them, just rinse.
♦ Please recycle your strawberry containers. We no longer collect them for re-use. Please don’t return them to your pick-up site.
Snap peas and snow peas. Both types have strings to remove. Snap off the stem end and pull the string down the concave side of the pod (the inward-curing side). Throw away the string and eat the pod. The thicker pea pods will usually have a string along both edges. Remove them when you snap off the stem.
– Snap peas (plump pea pods) – These peas should be eaten pod and all. They are delicious raw, or very lightly cooked or stir-fried. Preparation: They will need a quick rinse to remove faded gray blossoms. Storage: Refrigerate.
– Snow peas (larger, flatter pea pods) – These are excellent stir fried or in raw salads.
Greek oregano – To store your oregano, you can …
– Wrap in a cloth or paper towel, place in a plastic bag and refrigerate.
– Alternatively, you can wash it well then hang it up to dry in a place with good air movement.
RECIPES
Visit our 2019 Recipe Log or our 2018 Recipe Log or join our Facebook discussion group.
LOCAL THYME/ Comforting Classics

Strawberry Truffle Pie
Squash Enchiladas
Snap Pea Salad with Grilled Shrimp
Snow Pea Salad with Scallion Chili Garlic Sauce
LOCAL THYME/ Outside the Box Recipes
Lettuce, Pea and Strawberry Salad
Lemon Oregano Marinated Zucchini and Lamb with Red Quinoa
Grilled Salmon with Summer Squash, Oregano and Snap Pea Relish
Charred Snap and Snow Peas with Spicy Buttermilk Aioli
LOCAL THYME/ Quick & Easy Meal
Chicken Soup with Spinach, Peas and Oregano
????
RECIPES FROM LAUREN
GRILLED ZUCCHINI & SPINACH SALAD with WALNUTS
Takes 30 minutes
Serves 2 as a meal, 4 as a side
1-2 pounds zucchini, cut lengthwise into 1/8-inch slices (this is easiest with a mandolin if you have one)
1 bunch scallions, ends trimmed
3 tablespoons olive oil, divided
3/4 teaspoon Kosher salt, divided
1/4 teaspoon freshly ground black pepper, divided
1 tablespoon lemon juice
2 teaspoons maple syrup
1/2 teaspoon red pepper flakes
All spinach, roughly chopped
2 tablespoons diced fresh oregano
1 cup toasted walnuts
- Preheat grill to medium high heat.
- On a large sheet pan, combine zucchini slices with scallions on a large sheet tray and drizzle with 2 tablespoons olive oil, 1/4 teaspoon Kosher salt and a good amount of freshly ground black pepper. Use your hands to evenly coat.
- Place veggies on grill and cook on each side 3-5 minutes until grill marks appear and veg are well softened. Return to sheet pan and allow to cool while you prepare the rest of your salad.
- In a large bowl, combine remaining 1 tablespoon olive oil with lemon juice, maple syrup, red pepper flakes, remaining 1/2 teaspoon Kosher salt and a bunch more freshly ground black pepper. Whisk to combine until smooth. Add in spinach and using your hands, toss to coat with dressing.
- Remove scallions from pan and roughly chop. Add to dressed spinach along with grilled zucchini, fresh oregano and walnuts. Toss gently until well-combined. Serve immediately.
.
????
.
STRAWBERRY, SNOW PEA & KALE SALAD
Takes 15 minutes
Serves 2 as a meal or 4 as a side
3/4 pound snow peas, ends trimmed
1/2 pound snap peas, ends trimmed, optional
1 teaspoon Kosher salt
1/4 cup olive oil
2 tablespoons balsamic vinegar
2 tablespoons honey or maple syrup
1/4 teaspoon freshly ground black pepper
1 bunch lacinato, cut into small, bite-size pieces
1 quart strawberries, sliced
2 ounces soft fresh goat cheese, crumbled
- Bring a large pot of salted water to a boil on the stove. Once boiling, add peas and cook for three minutes. Drain and rinse well under cold water until cool to the touch. Let drain.
- In a small bowl, whisk together olive oil, balsamic vinegar, honey or maple syrup, salt and pepper.
- Before serving, divide kale, peas, strawberries and goat cheese into 2-4 large salad bowls. Dress right before serving.
.

Week #5, A Beeautiful Field
- On: June 19, 2019
- 0
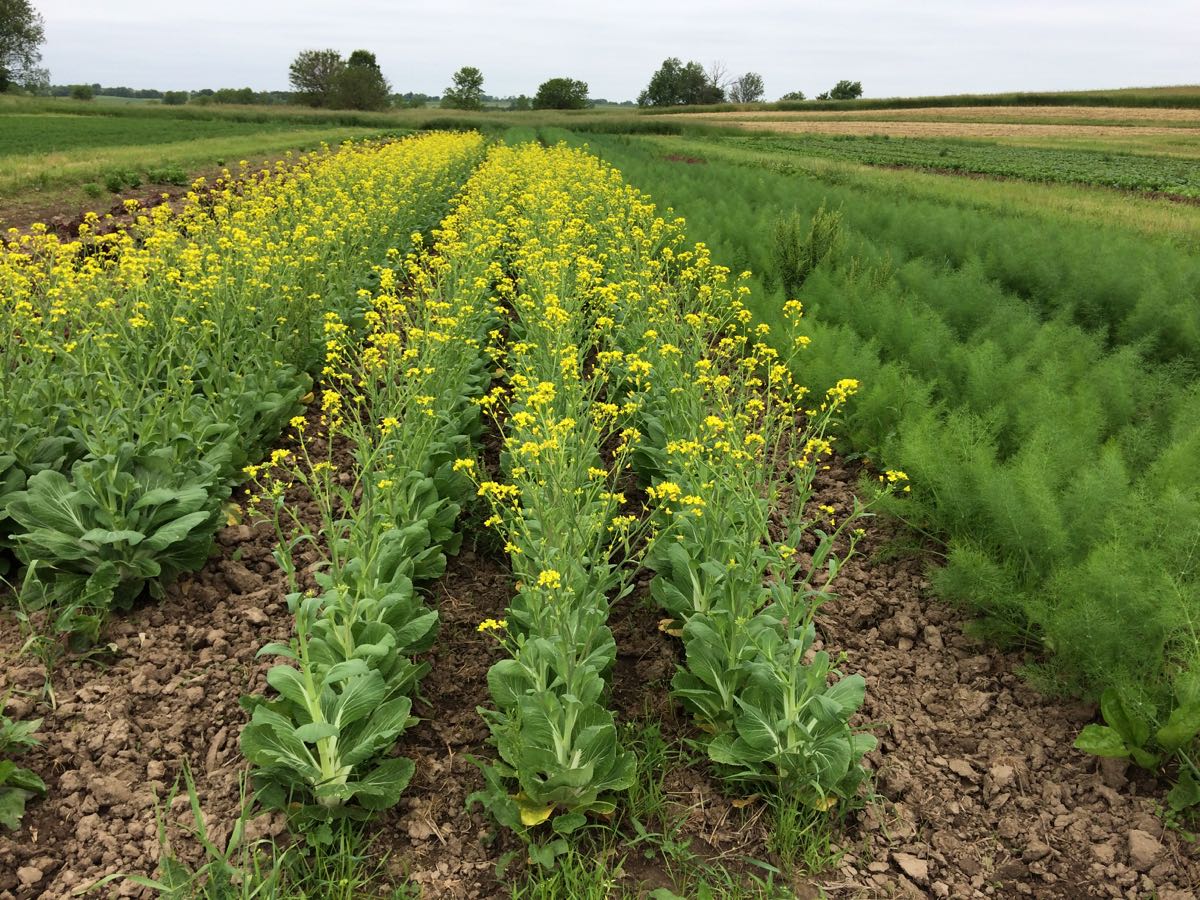
The bok choy we intended for last week’s CSA boxes flowered prematurely. It was disappointing but not unexpected following the temperature swings we’ve seen this spring. It’s been years since we lost an entire planting like this.
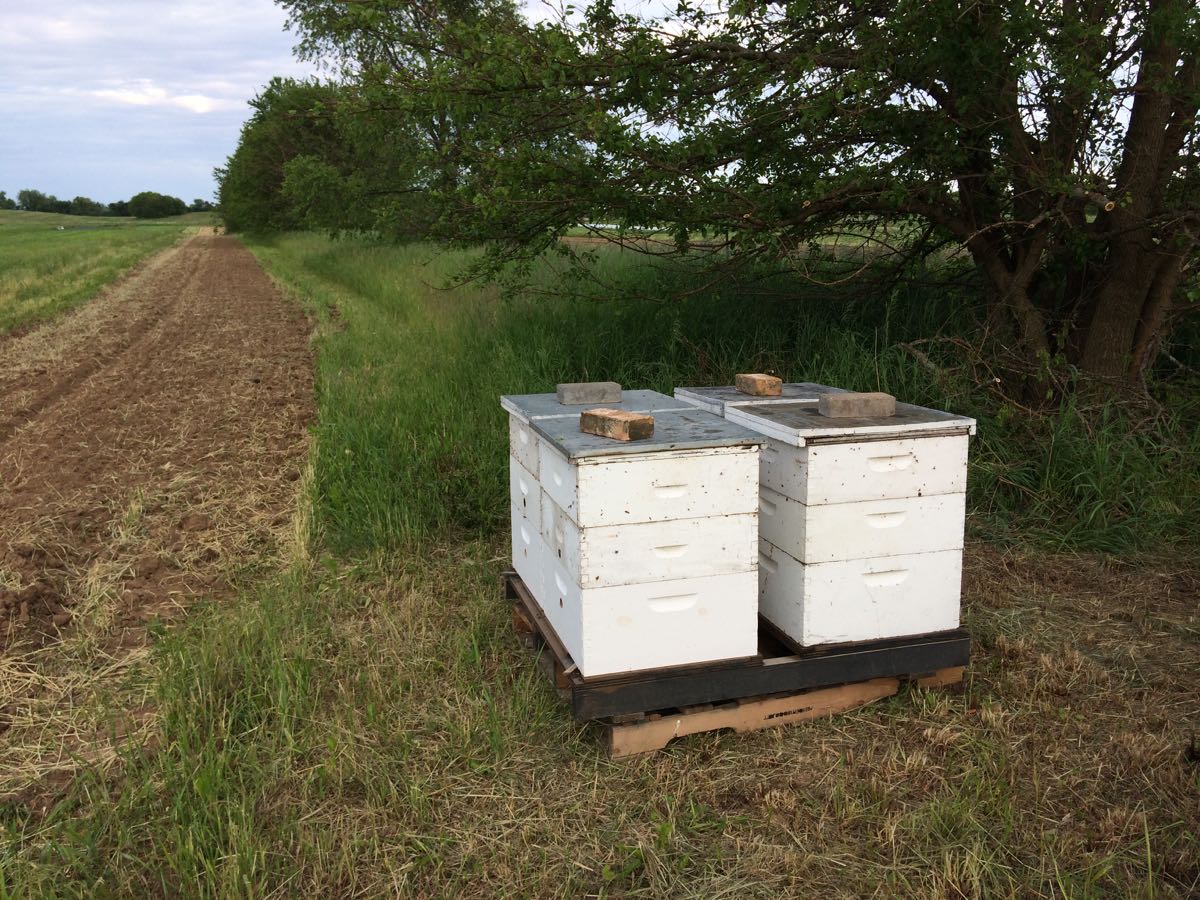
The plants are in full, glorious bloom, and we plan to keep them as long as possible. What value do they have now? The bok choy flowers are loaded with nectar and pollen, scarce commodities when few plants are blooming in spring. Beneficial insects and pollinators need food this time of year. Look at that field – it’s a smorgasbord. Walk in and it is filled with buzzing, frantic insects. I don’t get stung and haven’t observed territorial behavior. There’s enough food to share.
Happily, this is National Pollinator Week. Do the insects know?
I decided to identify species visiting these plants, to test our theory that a planting like this is valuable. I sent photos to P. J. Liesch of the UW Insect Diagnostic Lab. He was very helpful, even though exact identification wasn’t possible with photos.
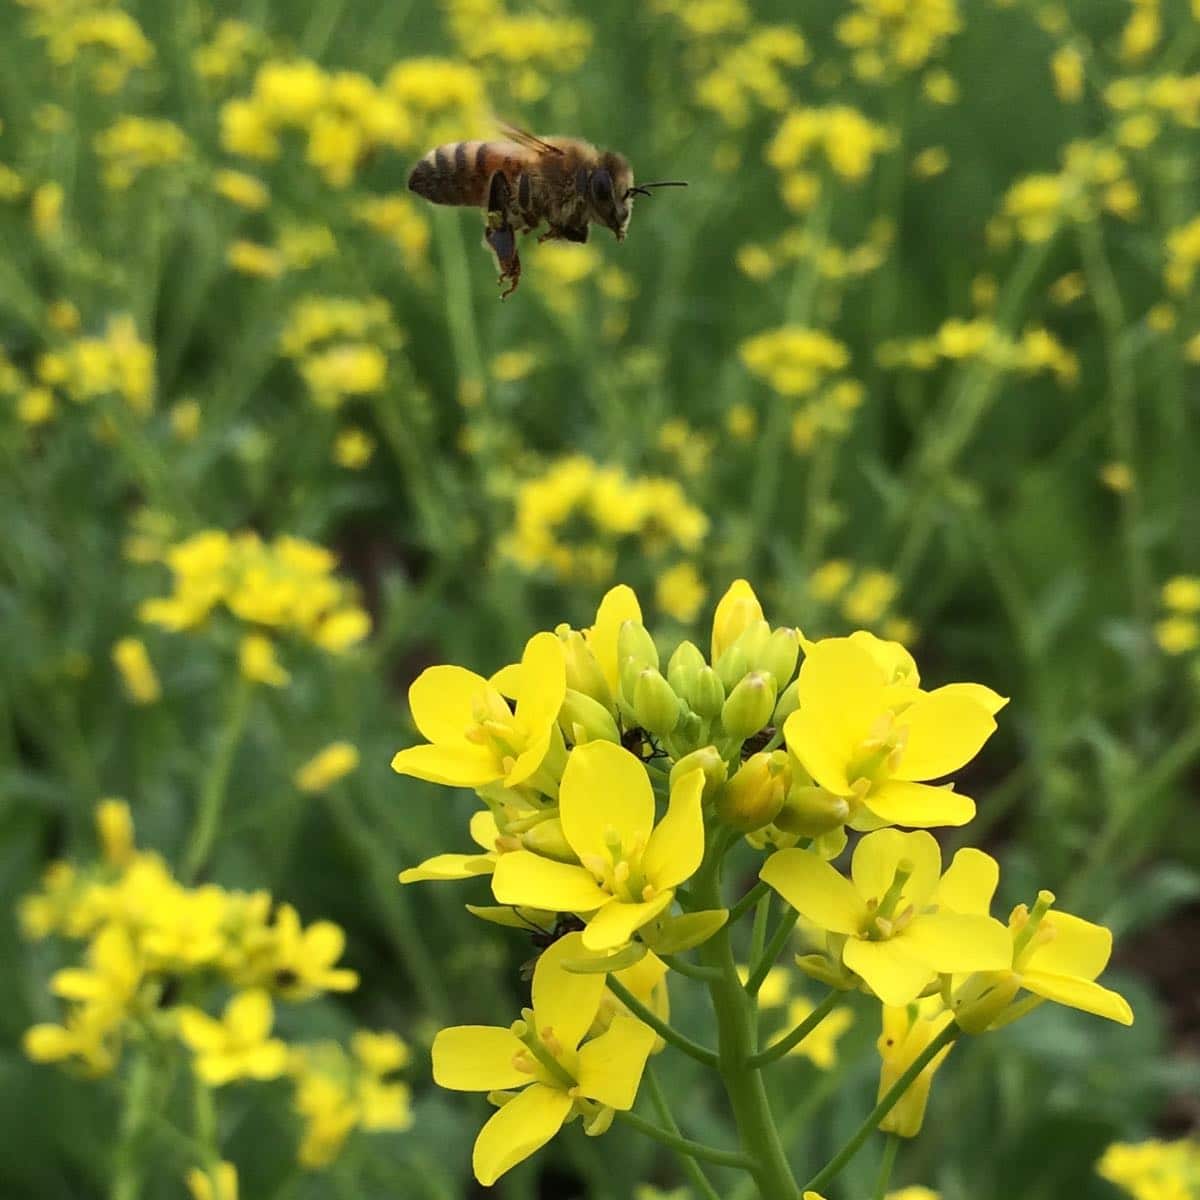
Honeybee, coming in for a landing.
We rent hives from a local beekeeper, to ensure pollination of crops like zucchini, cucumbers, etc. However, honeybees are not our only pollinators. Our strawberry field was loaded with wild bees during bloom this year, well before the beehives arrived. Good pollination increases strawberry yields so this is valuable.
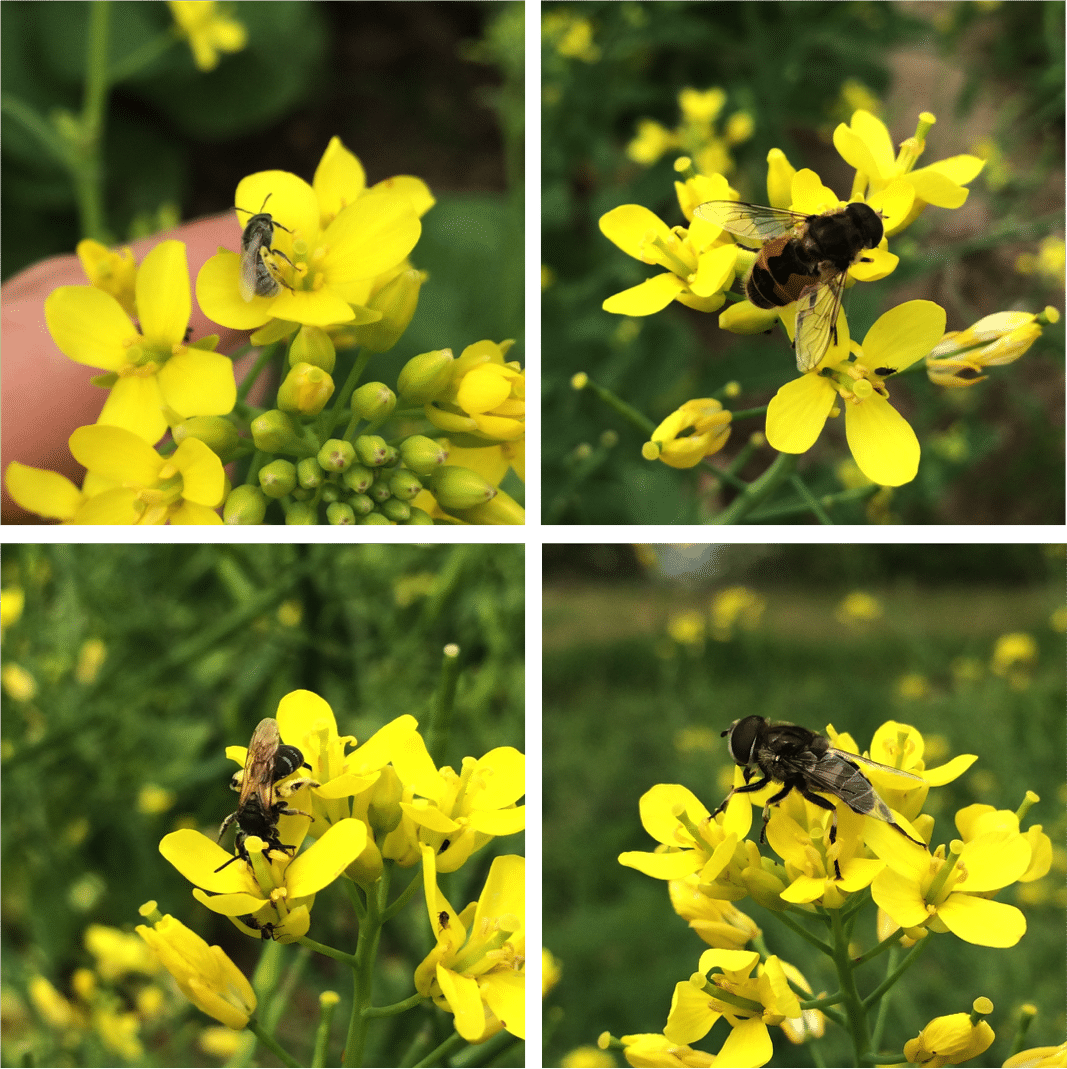
P. J. says the two insects on the left “are definitely wild bees of some kind. Spring often sees a spike in wild bee activity once flowers pop out.” Take a look at how much pollen each bee carries. The two insects on the right are likely types of hover flies, beneficial insects whose larvae eat tons of crop pests. These are all ‘good guys.’
For those interested, the top right insect “appears to be the European Drone Fly (Eristalis arbustorum) from the hover fly family or a very close relative. The adults go to a wide range of flowers.”
Bottom right “also looks like a hover fly. The general appearance and banding on the legs reminds me of some of the species from the genera Chalcosyrphus or Xylota.”
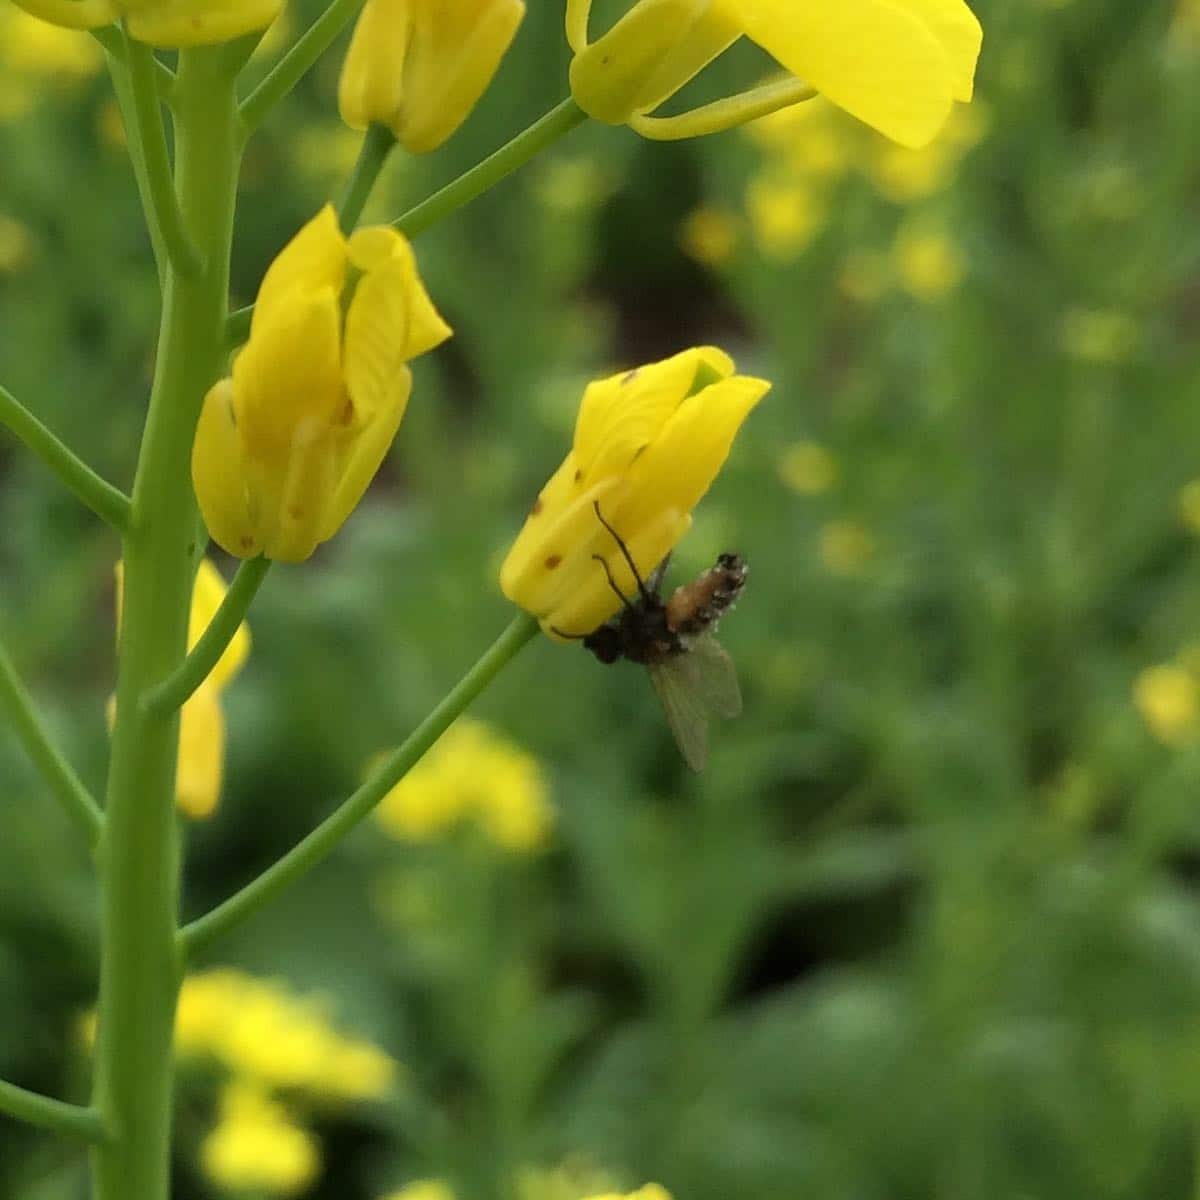
What about crop pests?
They are there, including flea beetles and cabbage maggots that damage radish and turnip roots. Take a look at the fly in this photo. It’s dead, handing upside down, glued to a flower at the top of the plant, and covered in fungal spores. P.J.: “Looks like a fly taken out by the Entomophthora fungus. Not too surprising given our rainy start to the growing season! Could be cabbage maggot or another Muscoid type fly.”
This fungus is so cool! We find infected flies like these in onions and in flowering brassicas, and appreciate any reduction in crop pests that results. Read an excellent and gruesome short article about Entomophthora here.
These photos show a fraction of the insects in the bok choy field, just a few of the ones slow enough to photograph. We are more than happy to keep this field intact. We’ll do the same throughout the season, allowing finished crops to flower for a few weeks. Building habitat for beneficial insects has become an important part of our farm. Thanks for reading and geeking out with me. Beth
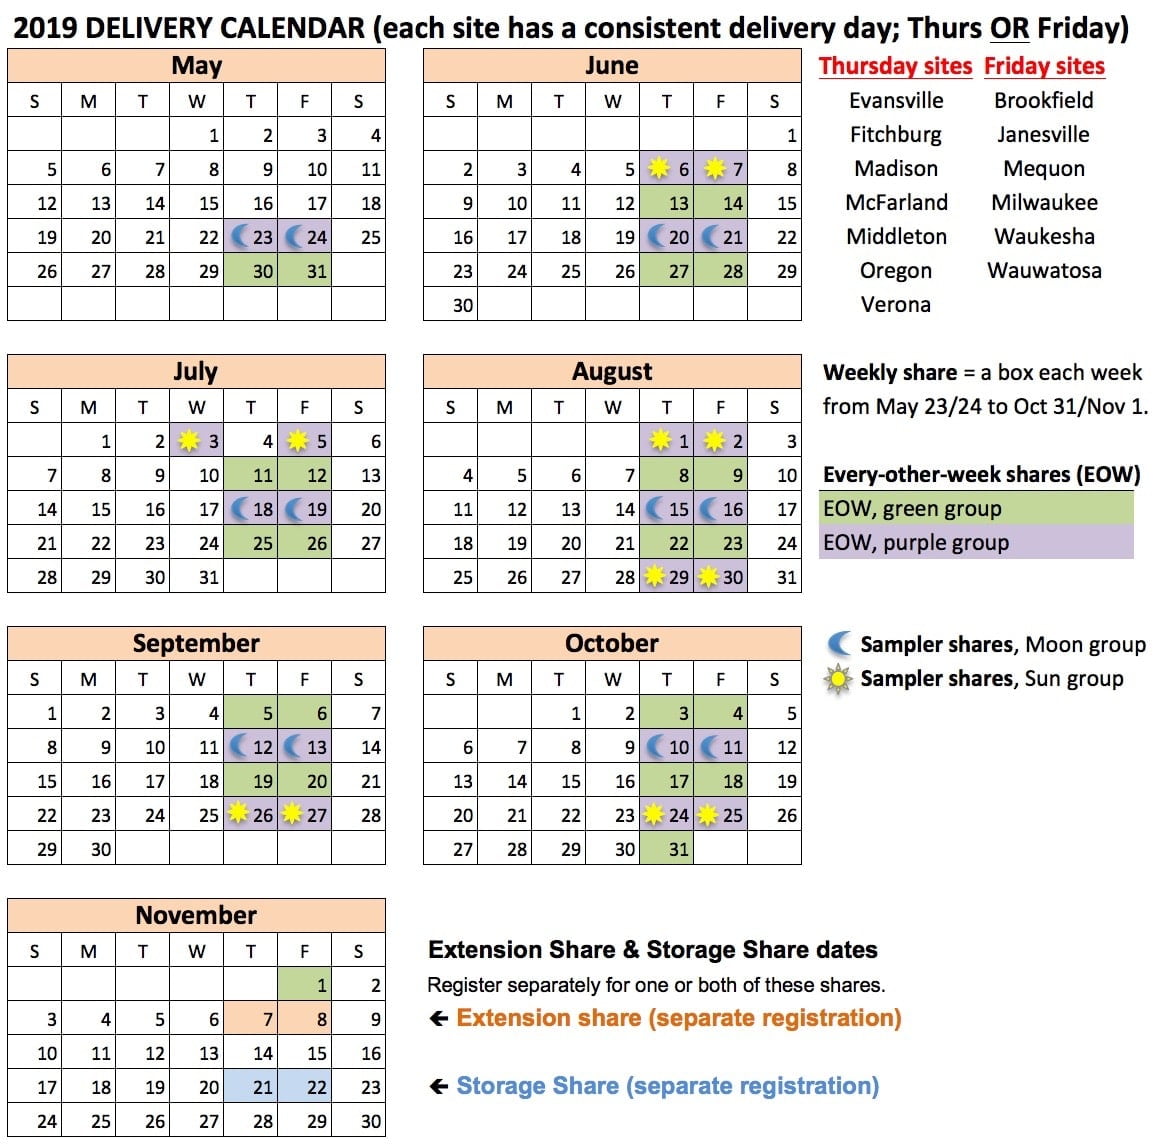
Reminder, July 3 delivery for Thursday sites.
Let’s review our schedule during the July 4 holiday week.
– Thursday sites, we will deliver on Wed. July 3 to avoid the holiday. No changes in site hours. This affects Weekly EOW/purple, and Sampler/sun members.
– Friday sites, we will deliver on Friday July 5, as usual.
– Here is our calendar, in case that helps.
– Need to reschedule? Go here. Deadline = Sunday night before the week of delivery.
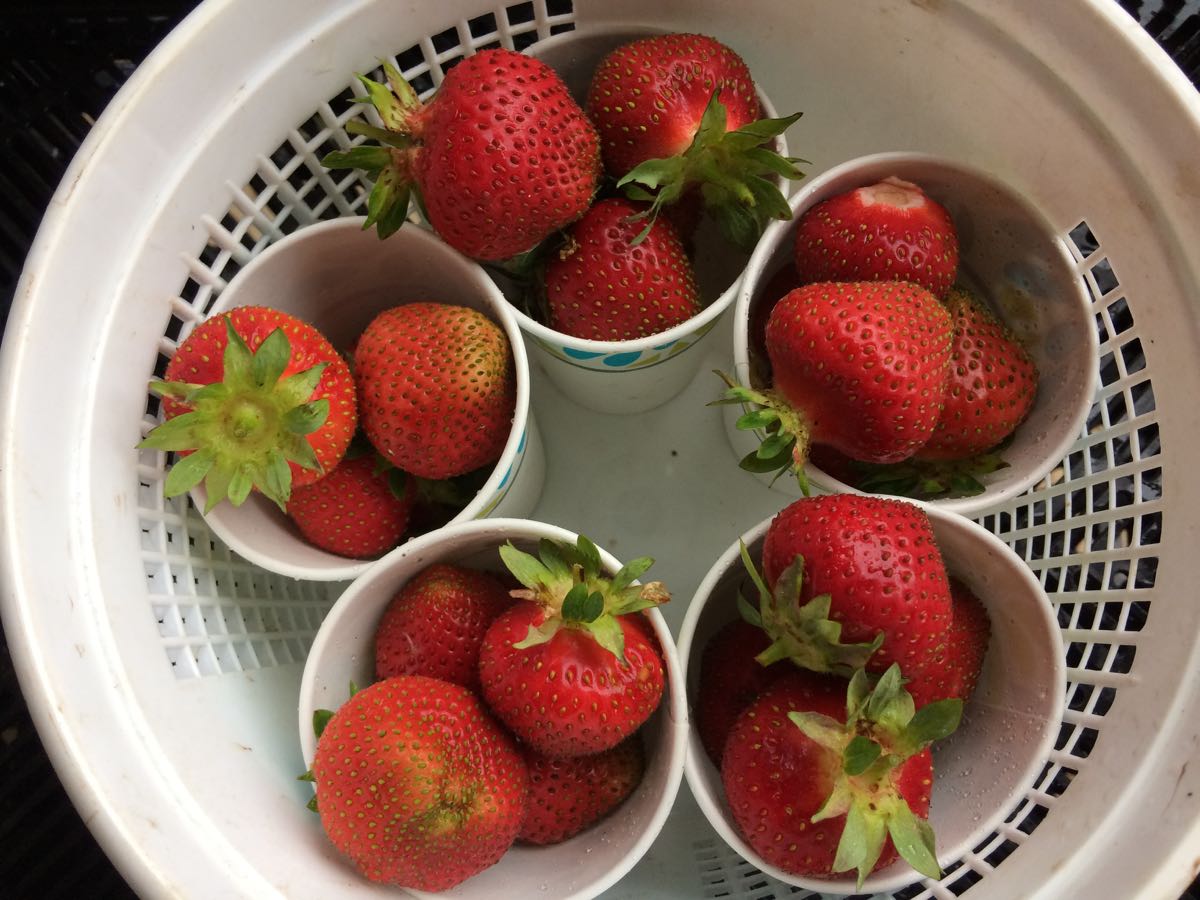
We have just enough strawberries for everyone to get a paper cup of berries. We picked these in the rain, which means they are perishable and you should eat them right away.
Veggie List and Veggie Notes
Week #5, June 20/21, 2019
– Weekly shares
– EOW/purple
– Sampler/moon
Strawberries, 1 paper cup
Sugar snap peas, ~1/2 lb
Zucchini, 2 to 2.5 lb
Napa cabbage
Spinach, 1 big bunch
Broccoli, ~ 1 lb
Lettuce, iceberg OR red leaf
White salad turnips, probably 2 – 3 big roots without greens
Scallions, 1 bunch
Next week’s box will probably contain strawberries, sugar snap peas, zucchini, spinach, lettuce, scallions, garlic scapes and more.
Sugar snap peas (plump pea pods) – These peas should be eaten pod and all. They are delicious raw, or very lightly cooked or stir-fried.
Preparation: They will need a quick rinse to remove faded gray blossoms.
Remove the strings before eating: snap off the stem end and pull the string down the concave side of the pod (the inward-curving side). Throw away the string and eat the pod.
Storage: Refrigerate.
Zucchini & summer squash – This is the first picking, so a few will be lumpy, the result of incomplete pollination while the plants were under row covers. Zucchini and summer squash need refrigeration but do not do well at very cold temperatures, as they will soften and form pits in their surface. Refrigerate these squash but in the warmest part of your fridge.
Napa cabbage (large, pale green cabbage with crinkled leaves) – This week’s napa might have an internal flower stalk, also the result of fluctuating temperatures this spring. Cut it lengthwise and you’ll find out. The stalks are still tender (and surprisingly sweet) so there’s no harm including them in your dishes.
Napa cabbage is an interesting vegetable, useful for both fresh, raw salads and for cooking. Its most famous use is fermented kimchi. I like to prepare a fresh, unfermented kimchi. Same seasonings, but it’s ready to eat right away. You will be amazed at how much shredded napa cabbage shrinks when prepared this way. See here for an example, but cut the salt in half (or less): Grilled Flank Steak with Kimchi-style Coleslaw.
Storage: Napa stores very well. Cut off wedges as needed and keep the rest covered and refrigerated, and it will keep for several weeks. Peel off the outer layer and it will be ready to use. Here are a few preparation ideas from the ‘Asparagus to Zucchini’ cookbook.
– Chop raw napa into green salads.
– Substitute napa in traditional coleslaw.
– Chinese cabbage cooks quickly. Steam 3-5 minutes, or until leaves are wilted down but remain slightly crisp.
– Substitute napa cabbage for common cabbage in recipes, but reduce the cooking time by 2 minutes.
– Napa cabbage is the main ingredient in egg rolls. Try making an egg roll mixture to eat as a cooked side dish instead of preparing time-consuming egg rolls.
Broccoli – Refrigerate in a plastic bag or a container. Make sure there’s no free water puddled in the bag or container, to avoid rot. It’s a bad idea to store broccoli uncovered in the fridge; it will wilt.
White salad turnips – This is our third delivery of white salad turnips. They are incredibly sweet this year. If you are tiring of them, check our Facebook discussion page. People are coming up with lots of creative ways to use the turnips. Also, Pat and Lauren have given us turnip recipes the past two weeks. Peruse the recipes in our 2019 Recipe Log.
Storage: Refrigerate in a bag or box. These keep quite well, now that the greens are removed. Should store without trouble for three to four weeks.
RECIPES
Visit our 2019 Recipe Log or our 2018 Recipe Log or join our Facebook discussion group.
LOCAL THYME/ Comforting Classics
Braised Napa Cabbage with Prosciutto
Beef and Vegetable Stir Fry
Spinach Gomae
Broccoli, Zucchini and Cabbage Curry
LOCAL THYME/ Outside the Box Recipes
Chickpeas and Veggies Makhani
Kimchi-Style Sauteed Cabbage
Warm Spinach Salad with Smoked Trout
Ground Turkey and Vegetable Lettuce Wraps with Peanut Hoisin Sauce
LOCAL THYME/ Quick & Easy Meal
Stir Fry of Snap Peas, Zucchini and Ground Meat atop a bed of Napa Cabbage
????
RECIPES FROM LAUREN
SPICY NAPA CABBAGE SALAD WITH TURNIPS & PEANUTS
Recipe adapted from Bon Appetit
Let me just begin by saying this recipe does not need to be spicy. It will only be spicy if you use the full amount of red pepper flakes but if you’re a person who knows they don’t like things with spicy in the title by all means leave them out or perhaps halve the amount called for.*
1 medium head Napa Cabbage, shredded (6-8 cups)
3 turnips, shredded (with a cheese grater) (approx 2 cups)
1/2 teaspoon Kosher salt, plus more to taste
Zest of 1 lime
2 tablespoons fresh lime juice
2 tablespoons rice wine vinegar or white wine vinegar (champagne or apple cider vinegar would both also work)
2 tablespoons white miso
1 tablespoon soy sauce (or tamari)
1 tablespoon fish sauce
1 teaspoon red pepper flakes (or less if you don’t like things spicy)
1/2 teaspoon sugar
2 tablespoons vegetable oil
4 scallions, ends trimmed and sliced
1/2 cup coarsely chopped salted, roasted peanuts
2 teaspoons black sesame seeds
- Toss cabbage, turnips and 1/2 teaspoon salt in a large bowl. Place in a colander to drain while you prepare the dressing. Pour out any liquid that remains in your bowl.
- Mix together lime zest, lime juice, vinegar, miso, soy sauce, fish sauce, and sugar in the large bowl you tossed the cabbage in earlier. Whisk until smooth and then slowly whisk in oil. Add cabbage and turnips back in along with scallions and toss to combine*.
- Serve salad topped with peanuts and season seeds.
*Feel free to also add sliced radishes from last week along with any herbs you have lying around (parsley, cilantro, or mint would all be welcome additions). You can also add thinly sliced snow or snap peas if you didn’t immediately devour them. If you want this to be more of an entree style salad you can consider adding some shredded chicken or turkey to the bowl as well!
.
????
.
GREEN MACHINE FRITTATA
2 tablespoons butter, olive oil or coconut oil, divided
1-2 zucchini, diced
1 pound broccoli, florets roughly chopped
2 scallions, sliced (white and pale green portions only)
1/2 teaspoon Kosher salt
1/4 teaspoon freshly ground black pepper
2 cups roughly chopped spinach
8 eggs
1/4 cup heavy cream or whole milk
1/2 cup favorite cheese, optional (I love feta or an aged Cheddar)
- Melt 1 tablespoon butter (or oil) in a large (at least 10 inches wide) non-stick or cast-iron skillet that is oven proof. Add zucchini, scallions and broccoli along with salt and pepper. Cook for 8-10 minutes over medium heat until broccoli is pretty tender and bright green.
- Add spinach to the pan and continue to saute veggies over medium heat until spinach has wilted. It will likely release some water. Don’t worry about this too much.
- In a large bowl whisk together eggs and cream. Using a spatula, remove the veggies from the pan and pour them into the egg bowl. Stir to combine. Wipe out the skillet with a towel and heat remaining tablespoon butter or oil over medium-low heat. Pour the egg/veggie mixture into the pan and sprinkle with cheese if using. Cook for 8-10 minutes over medium-low heat until the edges begin to firm.
- Meanwhile, preheat your broiler to low. Once frittata edges have begun to firm, transfer to the top rack of your oven and broil for 5-10 minutes (making sure to check after 5 minutes as every broiler has a different intensity level!) until the eggs are set and golden brown at the edges. Remove from the oven and allow to cool for 5 minutes before serving.
.
Week #4, Seven Dry Days
- On: June 12, 2019
- 0
We needed a dry week and finally got it. Our spring planting schedule was mucked up by a month of rain, so we were more than ready once the rain stopped. A little desperate, maybe? We began transplanting last Thursday afternoon on fields just barely dry enough to work. Those were rough fields! By Tuesday evening, seven acres were filled with melons, tomatoes, peppers, eggplant, sweet corn, sweet potatoes, winter squash, and Brussels sprouts. What a relief.
This was a big effort. Our stellar crew worked on the weekend plus a few evenings, under threat of more rain. We try to limit our work schedule to Monday – Friday, but they understood. We were lucky. A few forecasted storms didn’t develop as predicted but were a big motivation to work quickly. We also weeded and harvested everything to feed you this week. There’s a gentle rain tonight and we are happy. Beth & Steve
![]()
The traffic jam is over. Last week, these benches and our wagons were overflowing with unplanted seedlings.
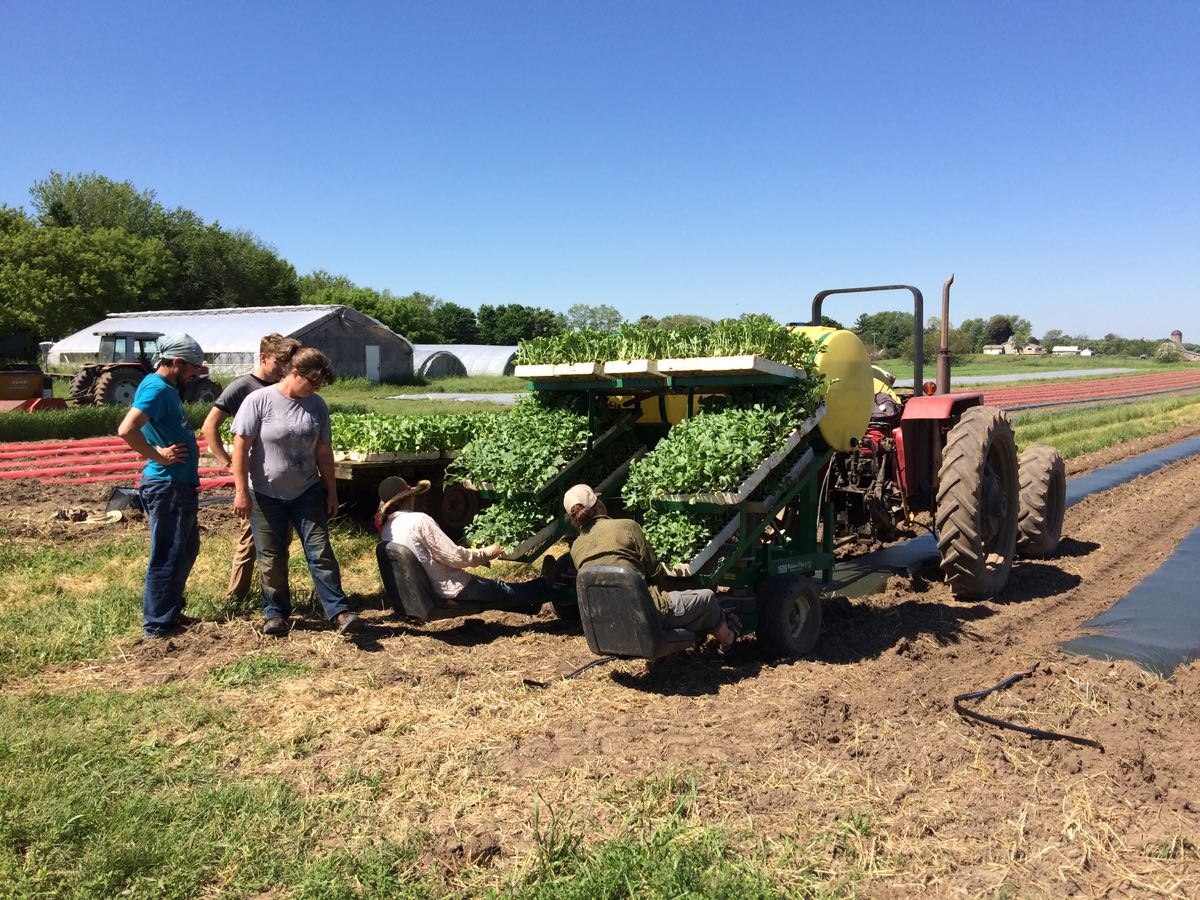
Our Saturday crew transplanted melons, the highest priority for us. Maybe for you too.
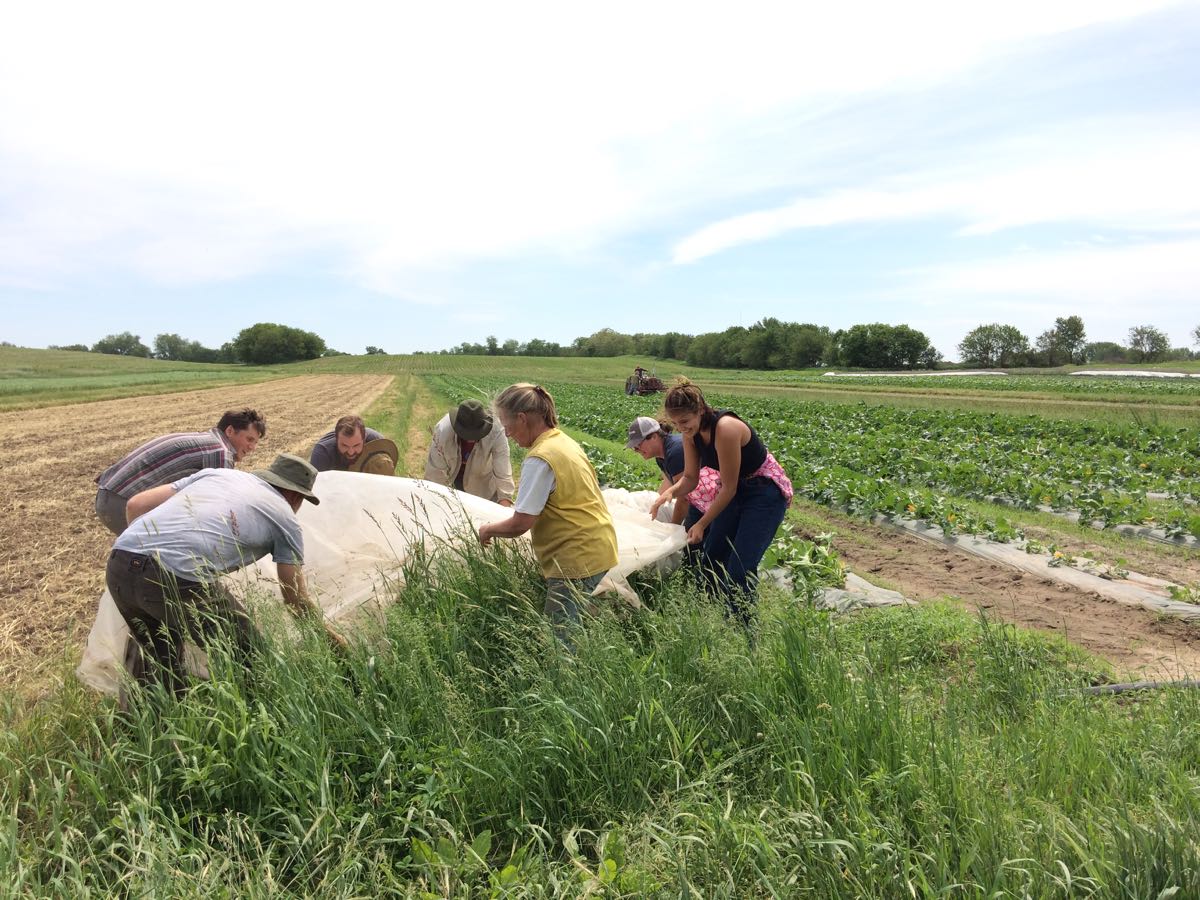
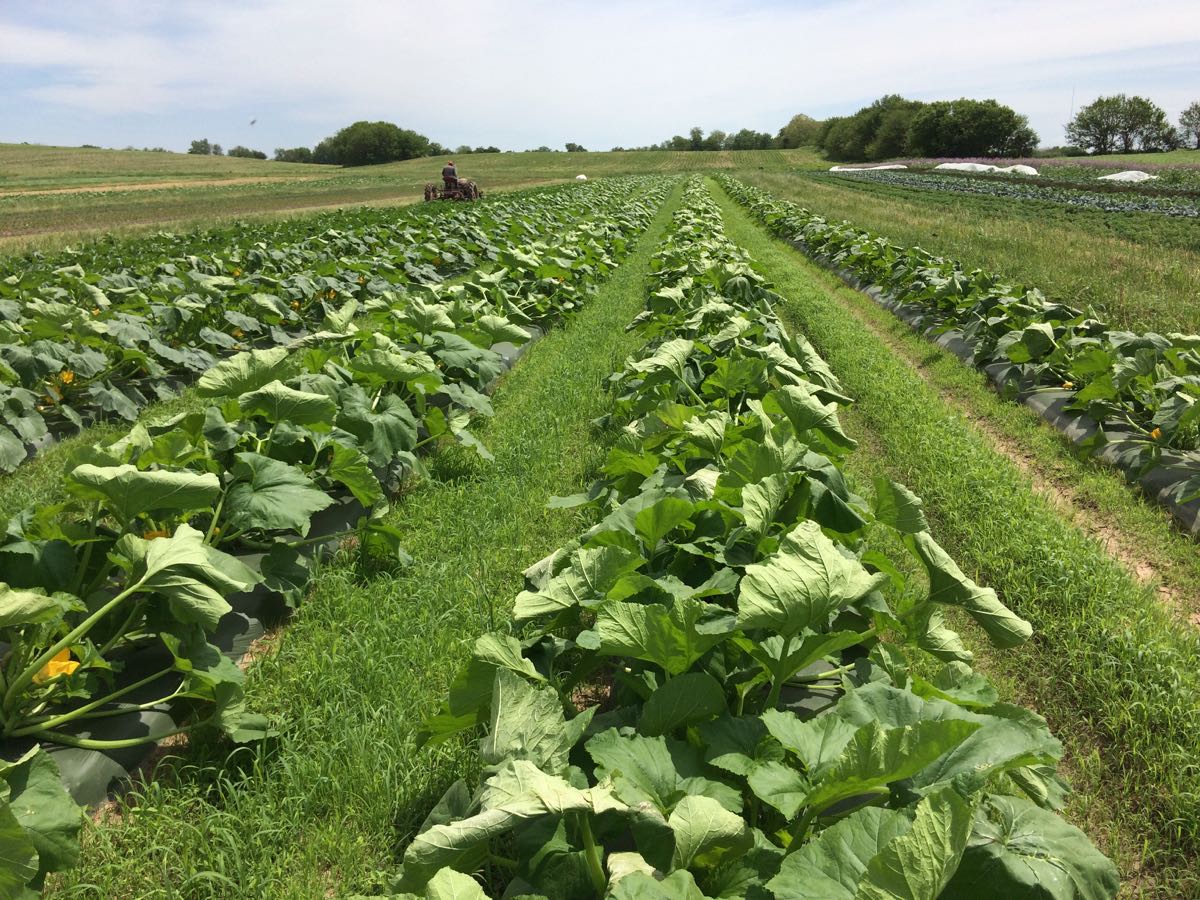
Rolling back row cover from the zucchini and summer squash field. You can only do this when the covers are dry. They are already heavy and unwieldy. Imagine how difficult this would be if the fabric was wet. It was time to uncover the squash to allow pollination. We’ll have zucchini in the CSA boxes next week.
The row cover didn’t nurture just the zucchini. It coddled a carpet of weeds too.
No problem, Raul cleared out the weeds with tractor cultivation.
Tens of thousands of new workers arrived this week. That joke never gets old.
Veggie List and Veggie Notes
Week #4, June 13/14, 2019
– weekly shares
– every-other-week/ green
Asparagus, 0.4 – 0.5 lb
Kale or collards, 1 bunch
A small lettuce, probably red Romaine
A second small red bibb lettuce OR two small broccoli
White salad turnips, 1 big bunch
Salad radishes, 1 bunch
Kohlrabi, 1 medium
Scallions, 1 bunch
Mint, ~2 sprigs
A few sites get a small broccoli.
Next week’s box will probably contain spinach, snap peas, zucchini, lettuce, scallions and more. We’re hoping for strawberries and napa cabbage but no promises yet.
Kale or collards – Each site gets either Red Russian kale (flat, green leaves, pink midveins), Redbor kale (ruffled, green with red highlights), or collards (flat leaves, green with waxy sheen). They can be used interchangeably. Super nutritious, this first picking of the year is great cooked or used in raw salads.
Storage: Cover and refrigerate.
Lettuce – Everyone gets two small lettuces OR 1 small lettuce + some broccoli. The most common combination is red bibb (round head with buttery leaves) plus a red Romaine (slender, dark red leaves).
Kohlrabi (pale green, round vegetable with thick skin) – Crunchy and sweet, kohlrabi is a great addition to salads.
Storage: Kohlrabi bulbs will store for a month in the refrigerator.
Uses: Kohlrabi are good peeled and eaten out of hand, or added to sandwiches, or added to salads. It makes a nice salad on it’s own. You can grate it, slice it, or cut it into matchsticks. It’s also good cooked. If you have it, the Asparagus to Zucchini cookbook has a long list of kohlrabi suggestions.
Mint – You’ll get about two sprigs. Refrigerate in a small container. Avoid bruising until you are ready to use it.
Broccoli – Refrigerate in a plastic bag or a container. Make sure there’s no free water puddled in the bag or container, to avoid rot. It’s a bad idea to store broccoli uncovered in the fridge; it will wilt.
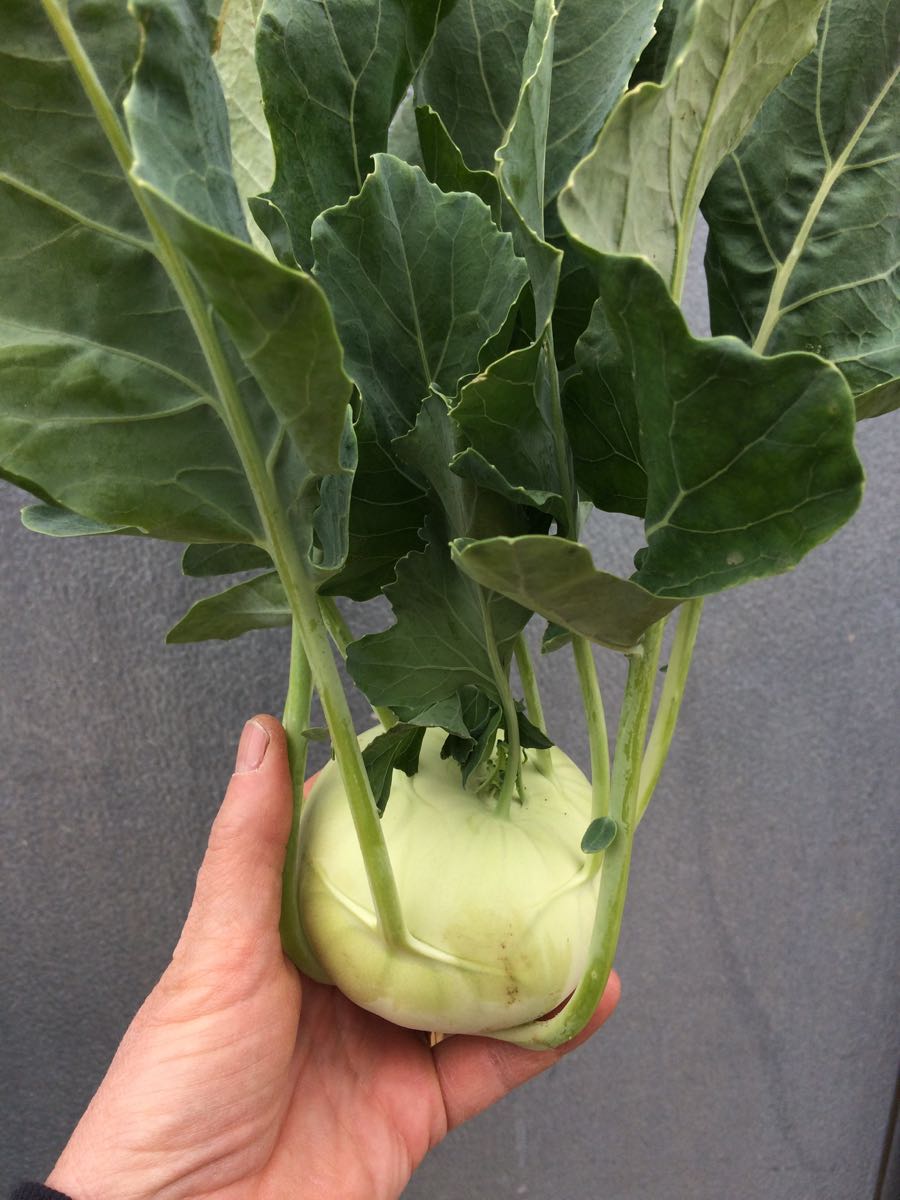
Kohlrabi
RECIPES
Visit our 2019 Recipe Log or our 2018 Recipe Log or join our Facebook discussion group.
LOCAL THYME/ Comforting Classics
Rigatoni and Kale or Collards al Forno
Cider Braised Pork Shoulder with Salad Turnips
Kohlrabi, Greens and Fontina Frittata
Springtime Salad with Scallion Yogurt Dressing
LOCAL THYME/ Outside the Box Recipes
Barley Salad with Kale or Collards, Radish and Feta
Herbed Steak Salad with Rice Noodles, Salad Turnips and Greens
Lazy Lady’s Pickled Kohlrabi
Aloha Chicken Salad
LOCAL THYME/ Quick & Easy Meal
Curried Kohlrabi Cakes
????
RECIPES FROM LAUREN
KALE SALAD & QUINOA SALAD WITH RICOTTA SALATA
Recipe adapted from Smitten Kitchen
If you aren’t a big quinoa fan, feel free to leave it out or substitute any favorite grain to take this salad from a side to an entree-sized dish.
Serves 2-3 as a meal or 4-5 as a side salad
Takes 30 minutes
1/2 cup uncooked quinoa (or 1-1/2 cups cooked)
1 cup water
1 bunch kale or collards, ribs removed
1 cup diced pecans, toasted and cooled
1 bunch turnip roots, grated (with a cheese grater) or cut into matchsticks
1 bunch radish roots, thinly sliced
2-3 scallions, thinly sliced
2 ounces ricotta salata (if you can find it– if you can’t feel free to use feta or a favorite goat cheese), crumbled
Few gratings of fresh lemon zest
Dressing
3 tablespoons olive oil
1-1/2 tablespoons white wine vinegar
1 tablespoon Dijon mustard
1 tablespoon honey or maple syrup
Salt and freshly ground black pepper
- Rinse quinoa well in a fine-mesh sieve. Place rinsed quinoa and water in a small saucepan and bring to a boil with a couple pinches of salt. Reduce to a simmer, cover and cook at a very low temperature for 15-20 minutes.
- Stack your de-ribbed kale or collard leaves into a pile as best you can, roll them tightly the long way and cut the roll crosswise into thin ribbons. Roughly chop a few times and then add to a large salad bowl. Add remaining salad ingredients to kale and toss to mix.
- Whisk dressing ingredients together in a small dish, and pour the dressing over the salad. Season with salt and pepper to taste.
.
????
KOHLRABI CHICKEN SALAD
I have a real aversion to boneless, skinless chicken breast because I can’t handle eating meat that doesn’t at all resemble the animal from which it came from. I know boneless, skinless chicken breast is by far the most popular cut but I prefer split chicken breast halves. These breasts have bones and skin still attached making them much juicer when cooked. The are also usually much cheaper. It doesn’t really matter too much which cut you use but know that the meat I call for likely takes 10-15 minutes longer to cook than just a plain old chicken breast. If you are using a different cut of meat, go low on the cooking time in the oven and use a meat thermometer to ensure it’s properly cooked. Lauren.
Takes 1 hour
Makes 8 sandwiches
3 tablespoons olive oil
1-1/2 pounds split chicken breast halves*
2-1/2 teaspoons Kosher salt, divided
1-1/2 teaspoon freshly ground black pepper, divided
1/2 teaspoon garlic powder
1/2 teaspoon onion powder
1/2 cup dried cranberries, currants, cherries or dates
1 kohlrabi, peeled and diced (about 3/4 cup)
3-4 scallions, trimmed, thinly sliced
1/2 cup finely chopped pecans
1/2 cup Greek yogurt
1/2 cup mayonnaise
1 tablespoon red wine vinegar
1 tablespoon lemon zest
Juice from 1/2 a lemon
Mint, roughly chopped
Lettuce
Croissant or favorite buns, optional
- Preheat your oven to 400 degrees.
- In a large heavy pan or cast-iron skillet (anything non-stick and oven-proof will work fine here), warm olive oil over medium high heat. Season chicken with 2 teaspoons of the salt, 1 teaspoon of the pepper, garlic powder and onion powder. Please in pan and cook for 5 minutes until skin is golden. Flip and cook 5 minutes more on the other side.
- Place pan in the oven and cook for 20-25 minutes. Again remember that cooking times will vary depending on the cut you ended up using. Use a meat thermometer to get the best and most accurate results. You want it to be at least 165 degrees. Remove from oven place in a bowl and allow to cool for 15 minutes while you dice your veggies.
- Shred chicken right in the bowl, removing bones but leaving the crispy skin in there. Add dried fruit (if using), kohlrabi, scallions and pecans. Stir to combine.
- In a small bowl combine yogurt, mayonnaise, vinegar, lemon zest, lemon juice and remaining salt and pepper. Stir until smooth then add to chicken mixture along with mint. Use a spatula to fold sauce into chicken until well-incorporated.
- Serve at room temperate or chilled on buns (with several pieces of lettuce) or just beds of lettuce. Keeps well in the fridge for 4-5 days.
.
Week #3. A little biology goes a long way.
- On: June 05, 2019
- 1
Biological knowledge that is. Let’s talk about two situations where knowing just a little more biology makes a big difference.
Perplexing Ginger
![]()
Kristen plants ginger on Friday.

Jory holds a beautiful cluster of baby ginger harvested during the outstanding 2015 season.
I nearly quit growing ginger. We’ve raised ginger for the CSA for 8 years. Yields have always been discouragingly low, except 2015 when growth was tremendous. That year, the ginger ‘seed’ we bought (cut pieces of gingerroot) arrived more sprouted than usual. We get the seed in March and keep it in a warm growth chamber for one to three months until it sprouts. I’ve tried to replicate early sprouting in subsequent years, without success. I love this crop and didn’t want to give up.
Instead of quitting, I contacted the nursery manager at our ginger seed supplier. I explained our low yields. Dan wrote back, “Hi Beth. The main reason the ginger sprouts faster has to do with the moisture content of the rhizome. It is facilitated by leaving it to dehydrate for a few weeks in a dry room. Dryer ginger sprouts faster.”
Who knew?? Everything I’ve read said nothing about this. I’ve always kept the seed carefully wrapped in towels so it wouldn’t dry out. We followed Dan’s advice and shortened the sprouting time by a full month. That gives the ginger an entire extra month to grow. That’s a big deal. I’m glad I made the small effort to learn more. This should be a good ginger year. We’ll find out this fall. Beth
Coddle Your Watermelons Seedlings

Left, watermelon seedlings, wilted after a cold night. Right, same seedlings, a few hours later.
Watermelon seedlings faint in cold weather. If their roots are cold and wet, the plants wilt dramatically. The roots stop taking up water but the tops continue to transpire. It can be fatal; the roots will die if left cold and wet. The seedlings look like they need watering but that’s the last thing you want to do. The solution is to warm the plants, and do not water until the root balls have warmed. We’ve learned over the years to be very cautious watering melon seedlings during chilly weather.
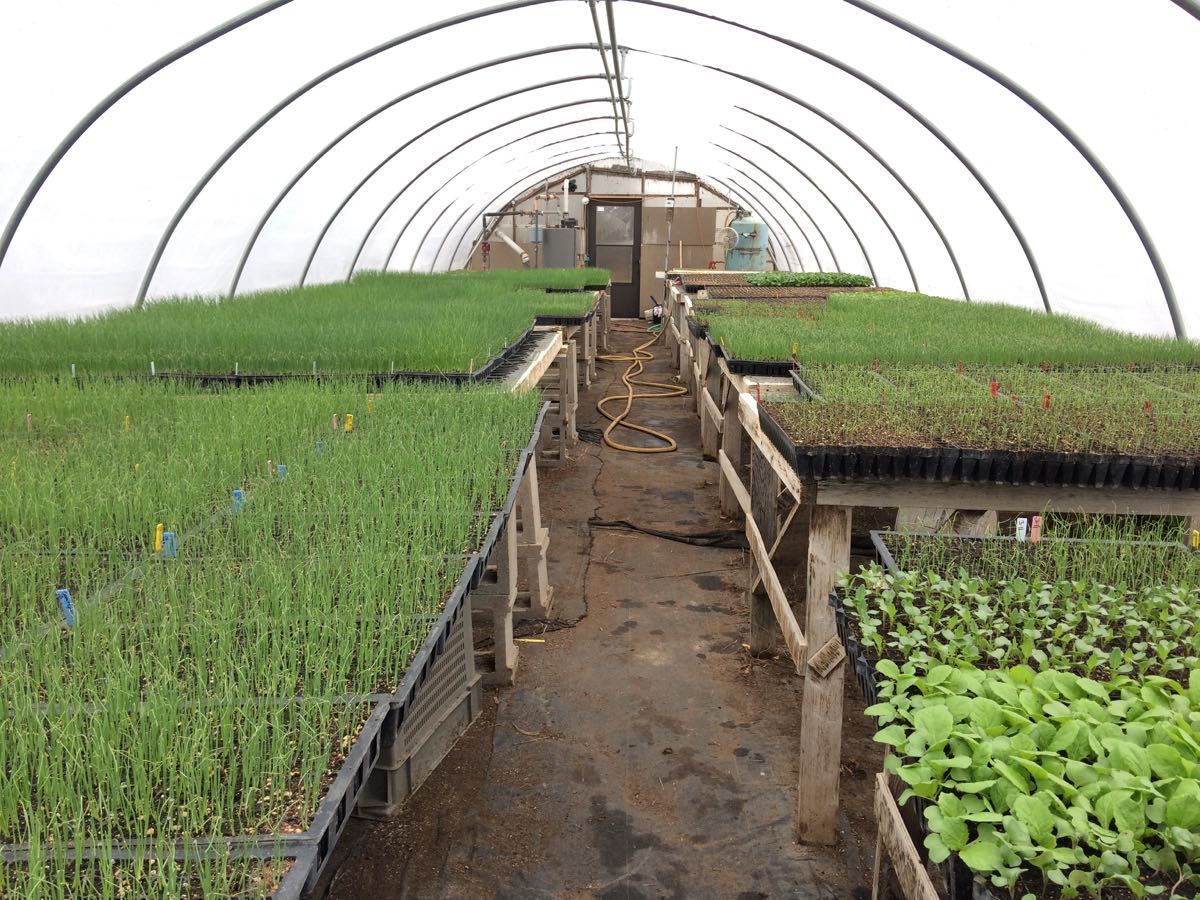
Farm News; Spinning Our Wheels
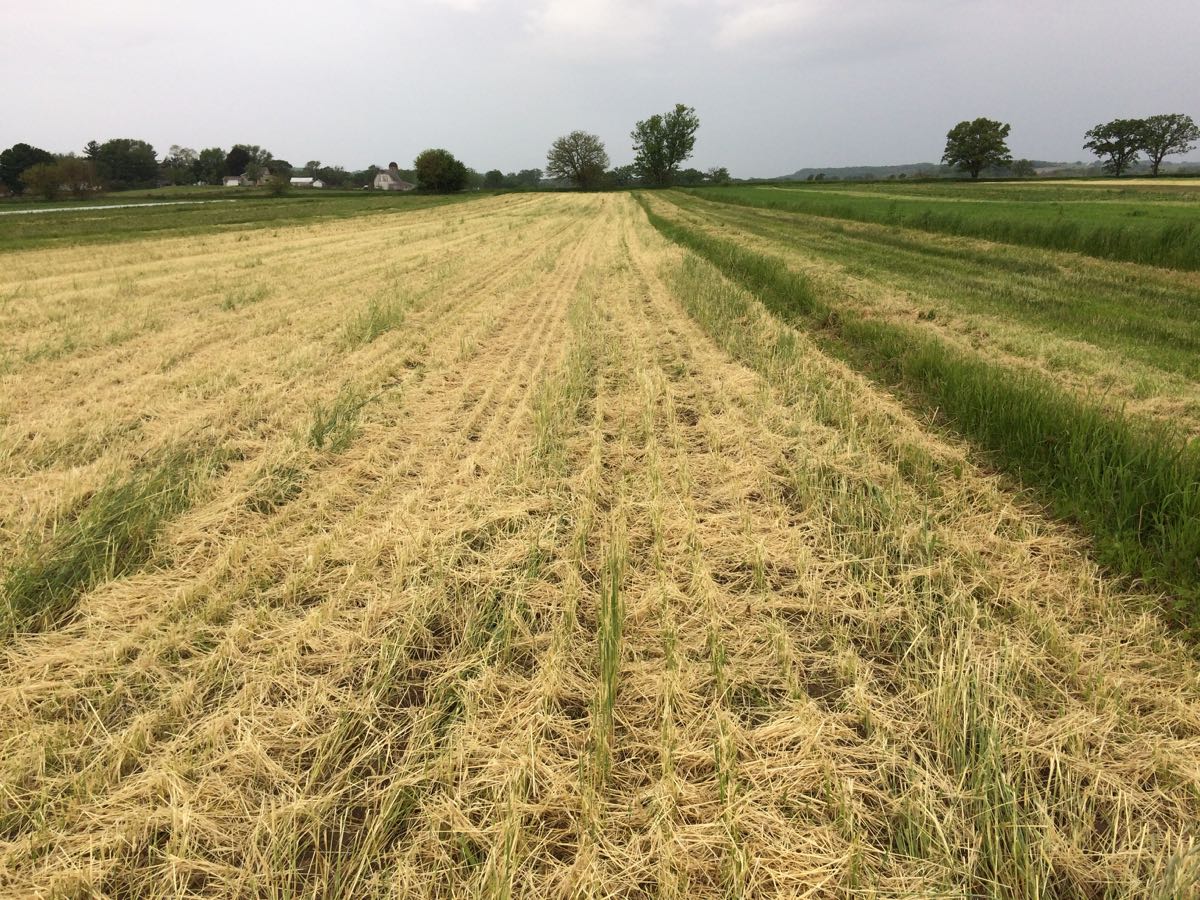
Chopped rye cover crop awaits tillage.

There’s a traffic jam at the greenhouses. All the outdoor benches (plus two wagons) are filled with plants ready to go in the ground.
The wet weather has slowed us down, and stopped all field operations except harvest. Our field tillage is stalled. We mowed down our rye cover crops but it’s too wet to work the residue into the soil. Steve is getting very impatient. We have many transplants ready to go in the ground. By this week last year, we had already transplanted all of our summer crops. Last spring was fast-moving with many warm days. Not this year. Unfortunately, there’s nothing we can do, except gather a crew to work on Saturday before it rains again on Sunday. We really need a break from the rain.
How to wash greens efficiently
Everything needs careful washing this week. All the rain splashed grit into the lettuce, escarole, etc. Here’s our approach. It works.
1. We have one kitchen sink so we use a 4 gallon Rubbermaid basin. Fill halfway with cold tap water. If you have two sinks, fill one sink partway with cold water.
2. Chop your lettuce, spinach, escarole or other green to the size you wish.
3. Dump it into the water and swish around gently but thoroughly.
4. Working in two batches (for average lettuce head) or more batches (big spinach bunches, Romaine), pull handfuls out of the water and drain in the basket of a salad spinner.
5. After all the greens have been rinsed one time, dump the water. Rinse the basin and refill with cold tap water.
6. Repeat the process.
7. Spin your greens dry and store in a dry container. They store much better when spun dry.
This works because …
– pre-chopping the greens frees soil trapped in the head.
– the large amount of water washes and dilutes away the grit.
– By pulling the greens out of the water, you take advantage of the draining action to pull the grit with it.
If you don’t have a salad spinner, try crew leader Kerry’s approach to dry her washed greens. She puts them in a colander, wraps the colander in a towel, and spins it around her head. This is a good job for outdoors. I hope this helps!
Veggie List and Veggie Notes
Week #3, June 6/7, 2019
– weekly shares
– every-other-week/ purple
– sampler/ sun
Asparagus, 2/3 lb
Shiitake mushrooms, 8 oz
Spinach, 1 bunch
Escarole, 1 large or 2 small
Romaine lettuce, 1 large or 2 small
White salad turnips, 1 bunch
Scallions, 1 bunch
Next week’s box will probably contain asparagus, greens, lettuce, white salad turnips, radishes, scallions & more.
Asparagus – Some of this week’s harvest is from our farm. Some is from our friends at LOTFOTL. All is certified organic.
Shiitake mushrooms – These are from Hidden Valley Mushrooms, the same people who grew last week’s button mushrooms. I love shiitakes cooked with spinach or other greens. Shiitakes must be cooked. A small subset of people can have a toxic reaction to raw or undercooked shiitakes. Once cooked, they are harmless. And tasty!
Storage: Refrigerate in a paper bag. These are perishable so use soon. Lightly sauce in butter and add to any dish. I will use mine in a frittata, as well as sauteed and mixed into pasta salad. Sauteed shiitakes and spinach are a great topping for rice bowls, e.g. bibimbap.
Escarole (broad head of wavy green leaves) – This member of the chicory family can be eaten raw or cooked. Its slightly bitter flavor is a good addition to mixed salads. It is excellent cooked alone or mixed with other greens. It cooks quickly, but not as quickly as spinach. Cover and refrigerate.
Romaine lettuce (upright head of lettuce with crisp leaves) – More sturdy and less fragile than our other spring lettuces. Great for Caesar Salad or lettuce wraps. Many heads have rusty spots at the base. However, what you see on the outside is the worst of it. Cut away the base just above those spots and you’ll eliminate the ones inside too.
White salad turnips (bunched white roots with green tops) – I know that returning members look forward to these sweet and delicious turnips, which taste nothing like the turnips that are harvested in fall. Don’t be fooled by how big the turnips are. These might be the best turnips we’ve ever grown.
– Storage: Cover and refrigerate.
– Uses: Both the turnip roots and tops are edible. The roots are excellent raw; Slice and add to salads. They can be cooked and are especially good when lightly sauteed in butter. Stir as little as possible so they brown on at least one side. The turnips greens are excellent cooked. Treat them like mustard greens.
– Our favorite use: Slice the roots very thinly and combine with a mixture of rice vinegar, mirin, soy sauce, sesame oil. Eat immediately or marinate.
Scallions (bundle of green onions) – These are useful raw or cooked. Thinly-sliced raw scallions can be folded into biscuit dough or sprinkled on top of soups or salads. Terrific garnish for pasta dishes. Think pad thai.
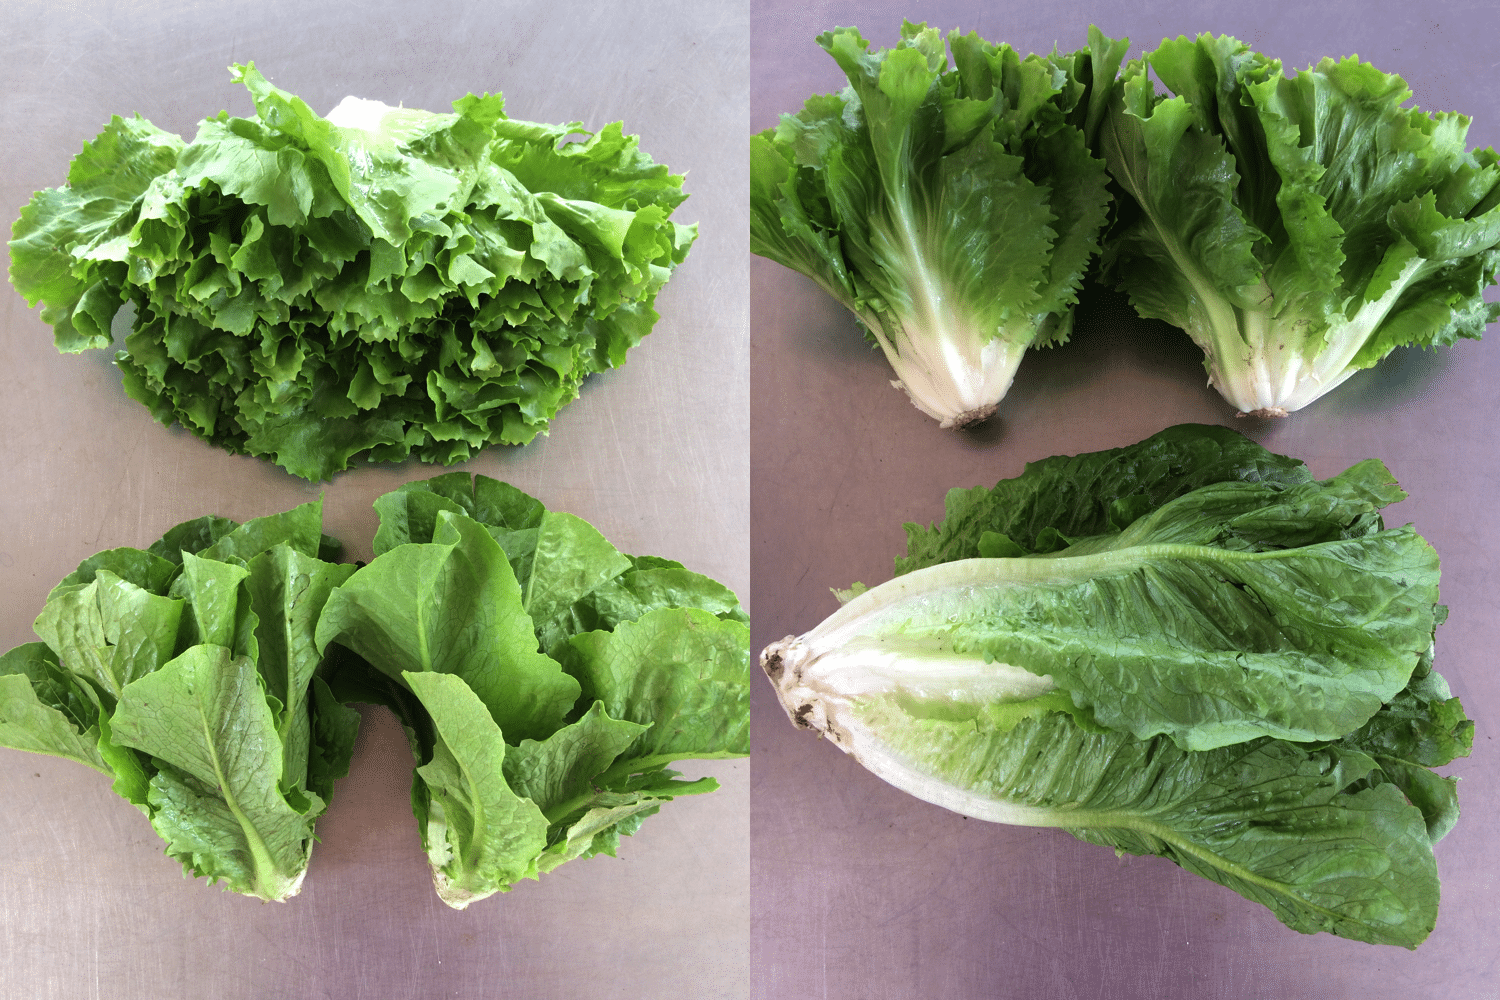
Escarole and Romaine lettuce look superficially similar. Escarole (top in both photos) has a broader fan shape and more bitter leaves. Romaine (bottom in both photos) is more upright and tastes like … Romaine. Most people get …
1 large escarole + 2 small Romaine OR
2 small escarole + 1 large Romaine.
RECIPES
Visit our 2019 Recipe Log or our 2018 Recipe Log or join our Facebook discussion group.
LOCAL THYME/ Comforting Classics
Cobb-ish Salad
Warm Escarole Salad
Scallion Pancake
Two Green, Salad Turnip and Feta Scramble
LOCAL THYME/ Outside the Box Recipes
Roasted Stuffed Romaine
Pan-Fried White Beans and Escarole
Grilled Salad Turnips and Asparagus with Scallions and Chili Garlic Sauce
Turnip Greens and Fish Tacos with Quick Pickled Salad Turnips
LOCAL THYME/ Quick & Easy Recipe
Spinach and Asparagus Pasta Salad with Feta
RECIPES FROM LAUREN
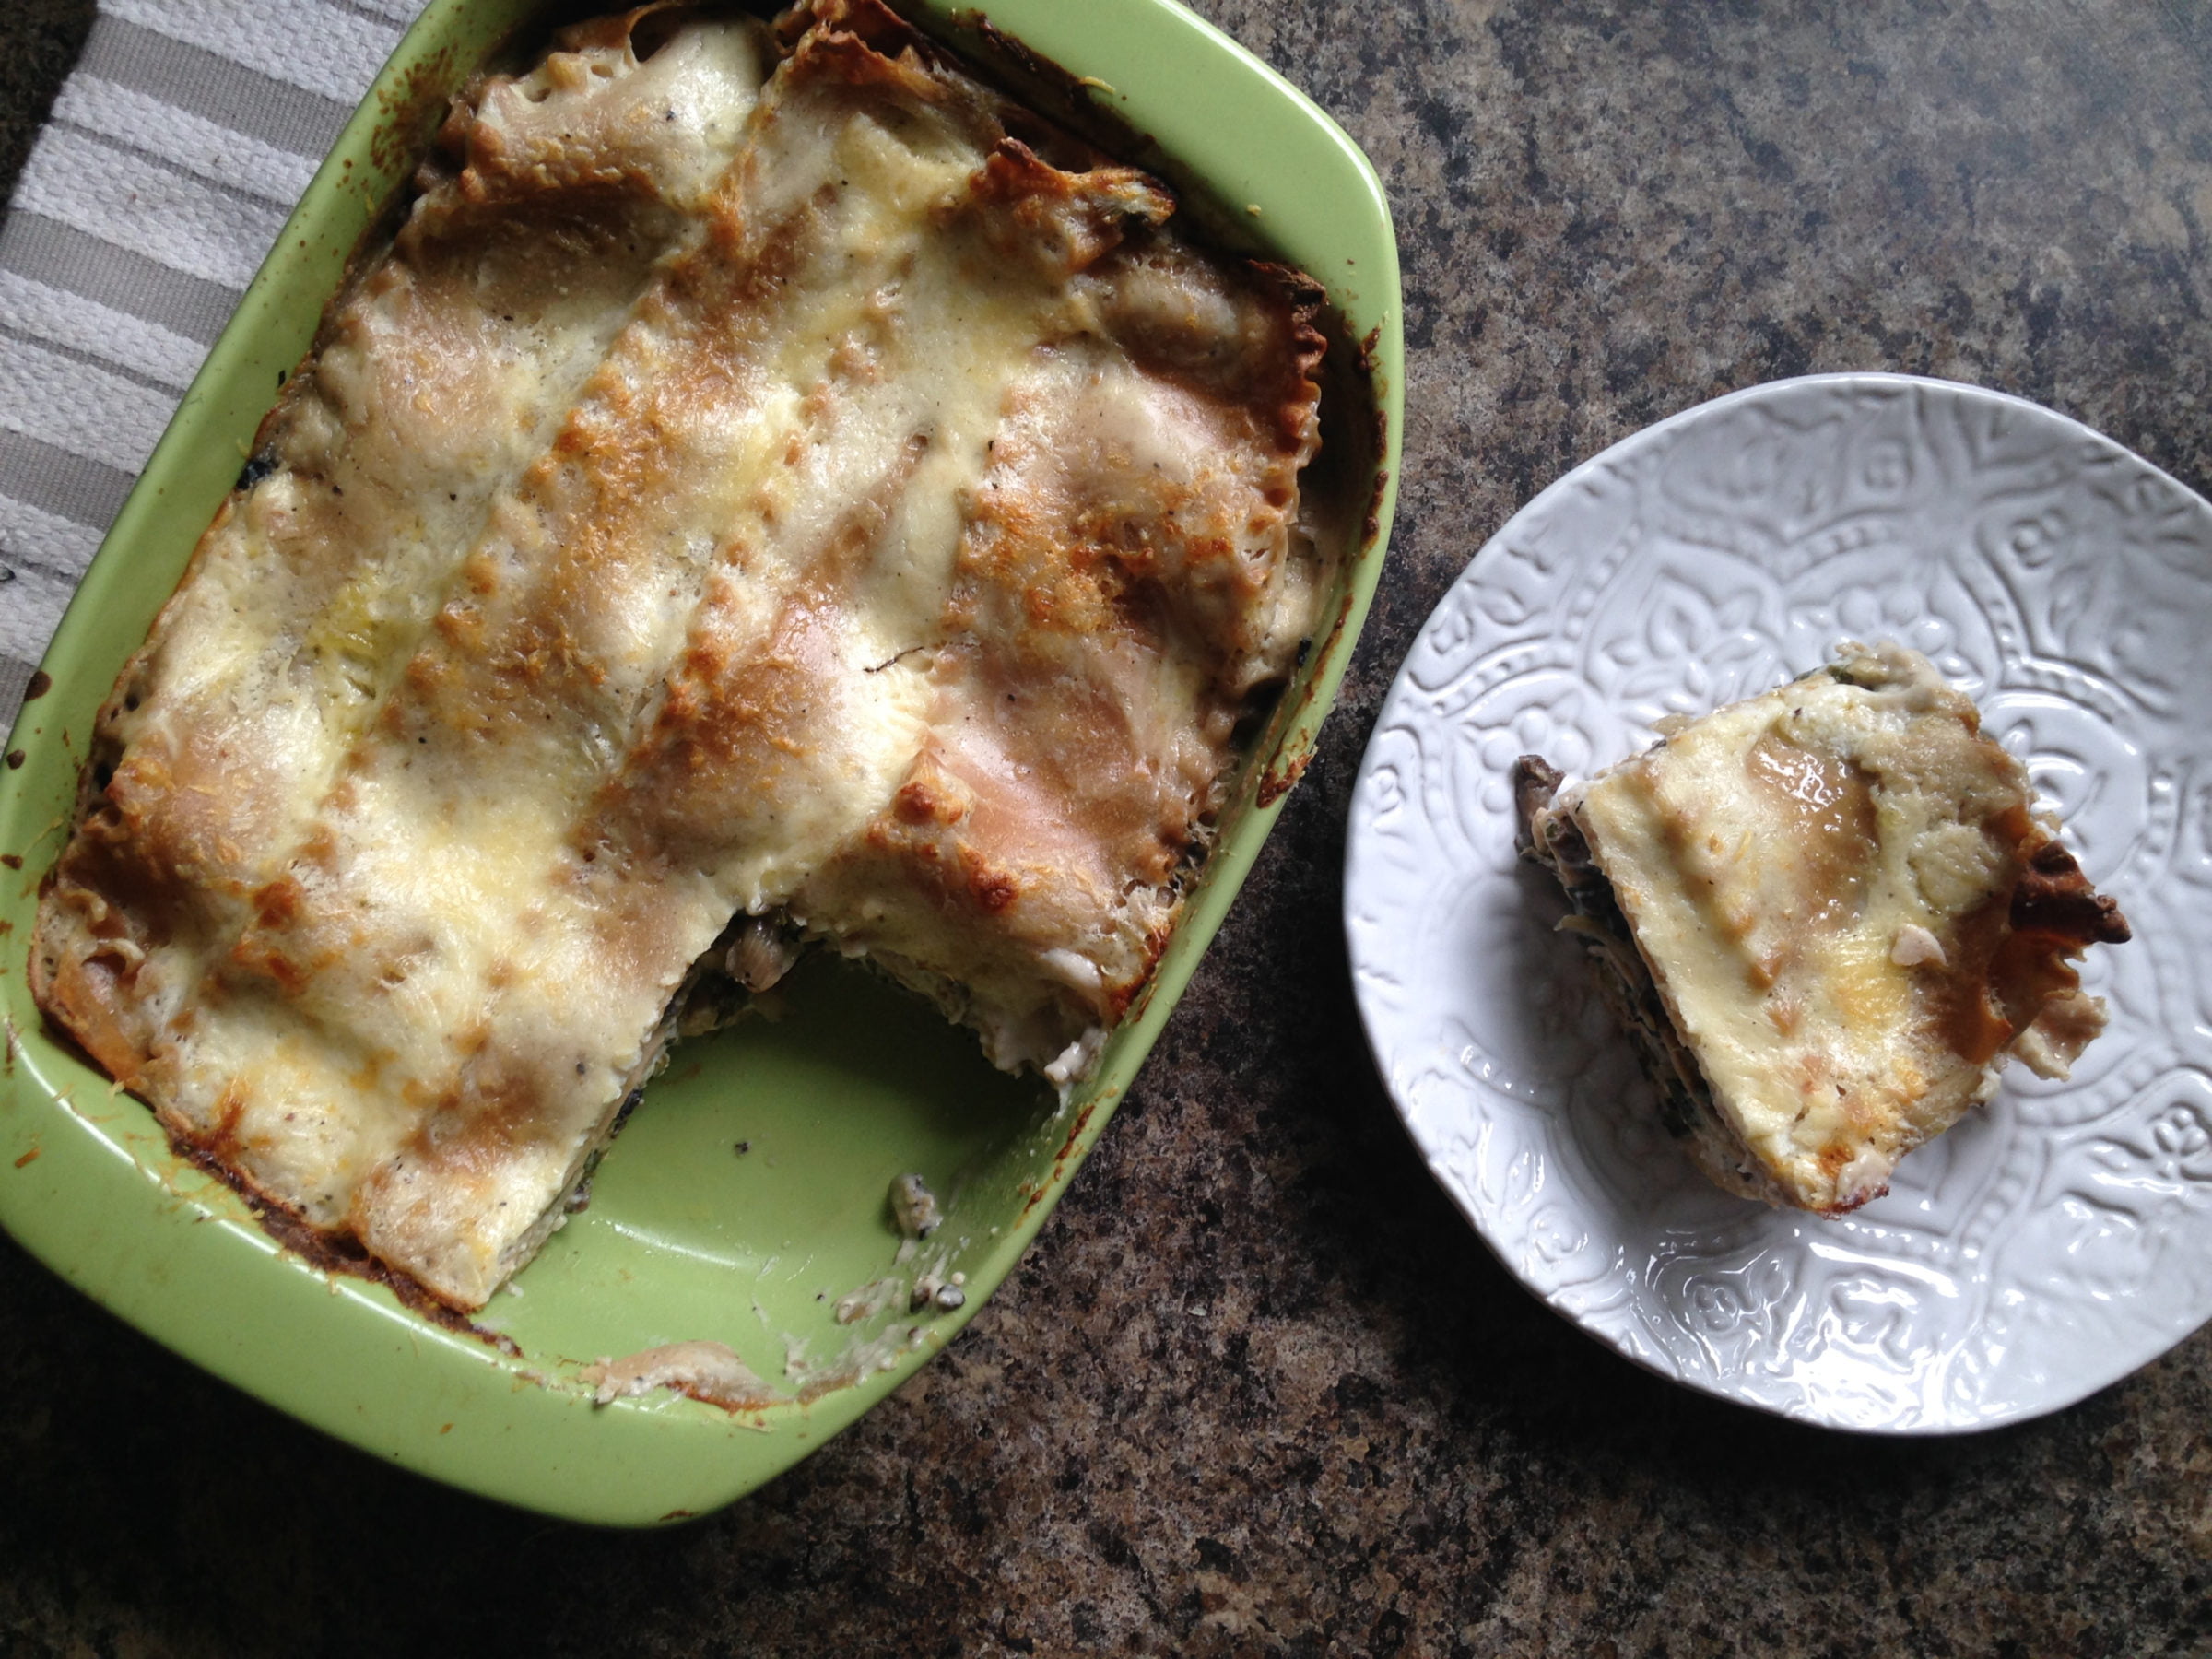
Photo credit Lauren Rudersdorf
SHIITAKE, ESCAROLE & SPINACH LASAGNA WITH WHITE SAUCE
Inspired by the great Ina Garten
Takes 1 hour, 30 minutes
Serves 6-8 depending on your appetite
10 tablespoons butter, divided
1/2 cup flour
4 cups warm whole milk (whole is preferred, but 2% will also work fine), I throw mine in the microwave for 60 seconds to warm it
1 tablespoon Kosher salt, divided
1/2 teaspoon freshly ground black pepper
1 pound dried lasagna noodles
3 garlic cloves, minced
3 scallions, white and pale green parts only, thinly sliced
8 ounces shittake mushrooms, cleaned and sliced
1 head escarole, roughly chopped (about 6 cups)*
1 head spinach (or turnip greens), roughly chopped (about 3 cups)*
1-1/2 cups freshly shredded Parmesan
- Preheat the oven to 375 degrees.
- Bring a large pot of salted water to a boil.
- While waiting for the water to boil, begin your white sauce. Melt 8 tablespoons of butter in a large saucepan over medium low heat. Once fully melted, add the flour and stir constantly with a whisk for 1 minute. Pour in the warm milk, 1 tablespoon Kosher salt, 1 teaspoon black pepper and whisk consistently for 15 minutes, scraping the bottom and edges of the pan occasionally, or until mixture is thickened. Remove from heat.
- By now, your water is likely boiling. Add the lasagna noodles and cook for 10 minutes or until al dente. Strain, toss with olive oil in colander and set aside.
- Meanwhile, melt remaining butter in a large saute pan (or even Dutch oven– you need a big pot to fit all these greens!) over medium heat. Add garlic and scallions. Saute for 3-5 minutes until fragrant. Add mushrooms and sprinkle with salt and pepper. Cook for about 3 minutes until just beginning to release their juices. Add the escarole and spinach and cook until greens are wilted, about 5 minutes longer. There will likely be a lot of liquid in the pan. That’s fine.
- In a 9×13-inch pan, begin to layer the lasagna. First spread about a 1/2 cup of white sauce on the bottom of the pan, just enough to cover it followed by three noodles, overlapped slightly. Add 1/4†of the remaining sauce followed by 1/3 of the mushroom mixture, and 1/4 cup of Parmesan. Continue this layering two more times: noodles, sauce, mushroom mixture and Parmesan. Finishing with a fourth layer of noodles, the remaining sauce and cheese.
- Bake the lasagna for 45 minutes, until the top is browned and bubbly. Let set for 15 minutes before diving in. Serve with a simple green salad.
.
*Much like the “Lots o’ Greens” quiche, this recipe really just needs 9 cups of any greens. I used escarole and spinach in my testing, but turnip greens, kale, radish greens, or anything else you have lying around (or want to use up first) would also work great!
.????
.????
BRIGHT SPRING SALAD WITH TURNIPS & APPLE
1 head lettuce, leaves washed, dried and separated, roughly chopped into bite-sized pieces
5 turnips, cut into match-sticks
1 sweet-tart apple (such as Pink Lady), cut into match-sticks
3 scallions, trimmed, thinly sliced
1/4 cup fresh lemon juice
1/2 cup olive oil
1 teaspoon finely grated peeled ginger
1 teaspoon poppy seeds
1/2 teaspoon Kosher salt
1/4 teaspoon freshly ground black pepper
1/2 cup chopped toasted walnuts
1/4 cup finely shredded Parmesan, optional
- Divide lettuce into four small bowls. Top with turnips, apples and scallions.
- In a large bowl, combine lemon juice, olive oil, ginger, poppy seeds, salt and pepper. Taste and adjust seasonings as desired.
- Drizzle a couple tablespoons of the dressing over each salad. Toss gently and add more to taste. Top with walnuts as well as shredded Parmesan if using.
.
Week #2, May 30/31, 2019
- On: May 29, 2019
- 0

Biscuits with green garlic. Make your favorite biscuit recipe, but add lots of sliced scallions or green garlic.
Food as love
Our daughter Sophie came home from college for a week before starting a summer internship in Minneapolis. This is her first summer living away from home. Her visit fell during my busiest week, as we prepared for the first CSA delivery. My head was spinning with all the details. After watching us race around, she offered to cook dinner, a throwback to our ‘Wednesday night challenge.’ A few years ago, I challenged Sophie and Ari to cook dinner every Wednesday night. Actually, it was a command. On Wednesday, I am busy getting ready for the CSA pack and don’t have time for much else. The kids were young teens but they took this seriously, making lasagne and other sophisticated meals. Our kids know how to cook, and have been kitchen helpers since they were young.
For dinner, Sophie made us green garlic biscuits, turkey sausages and a huge mixed lettuce, spinach and arugula salad. I was thrilled for the help and pleased with her competence. During her school break this past winter, we sat down with my recipe folder and picked out favorites, choosing a list of 15 recipes she wants to learn. We accomplished a dozen before calling it quits. The fridge was stuffed with food and we were sick of cooking.
During the current visit, we added a few more favorites to her repertoire, including Penne with Spinach and Green Garlic. Tonight, this became the first meal she cooked at her new home in Minneapolis! The night before leaving, she regretted that we didn’t have time to make her favorite Rhubarb Pudding Cake so I got up early and baked one to send with her when she left. She wasn’t going to starve on the drive with a rhubarb cake in the car.
Food is central to our family life, so it’s not surprising that I mother my kids with food. I bet some of you do too. Beth

Rhubarb Custard Cake, so good warm from the oven. I’ll type up my recipe and post it in the Facebook page this week.

Sophie’s Penne with Spinach and Green Garlic, with chicken sausages mixed in.

Sophie and Beth (with Steve and Ari off-camera) at our favorite restaurant because it’s OK to eat out sometimes too.
Speaking of food love …
You folks have posted so many amazing dishes and recipes on our Facebook discussion page! I am in awe, but have been too busy to chime in. I counted at least 15 rhubarb recipes plus loads of vegetable dishes. It’s a closed Facebook group, just for our CSA membership. Go here to join. Take a look at last week’s posts; many will be useful with this week’s produce.
Veggie List & Veggie Notes
Week #2, 5/30/19
– Weekly shares
– Every-other-week/ green group
Asparagus, ~1 lb
Bok choy, 1 large
Spinach, 1 bunch
Button mushrooms, 12 oz
Red leaf lettuce
Arugula, 1 small bunch
Salad radishes, 1 bunch
Green garlic, 1 bunch
Rhubarb, 1.5 lb
Next week’s box will probably contain asparagus, spinach, escarole, shiitake mushrooms, white salad turnips, Romaine lettuce, scallions.
See last week’s newsletter for storage and cooking information for these vegetables:
Asparagus, spinach, lettuce, arugula, salad radishes, green garlic, rhubarb
Asparagus – This week’s asparagus is from our farm and from LOTFOTL Farm in Elkhorn, run by our friends Tim Huth and April Yuds. Tim is managing an organic asparagus field that’s larger than they need, and that they don’t have enough helpers to pick. Our asparagus is less productive this year because of Japanese beetle attacks last summer. We have the perfect joint solution; Steve, Karen and Kristin went down this week and harvested the asparagus, to deliver to you folks. This week’s delivery is about half our crop and half LOTFOTL.
Bok choy (large rosette with thick white stems and green leaves) – This Asian green is good for stir-frying or sautéing or in soup. You can think of the stems and leaves as two separate vegetables. The stems require longer cooking. The leaves will cook almost as quickly as spinach. Bok choy stores well, so feel free to pull off leaves as you need them, or use the whole head at once. Refrigerate in a plastic bag or other container.
Button mushrooms – These organic mushrooms are from Hidden Valley Mushrooms from Wisconsin Dells. We bring in mushrooms from Mary every spring, because I think they combine so perfectly with our spring vegetables, for salads, quiches, etc.
Storage: Here are Mary’s suggestions for storing the mushrooms:
– Store separate from leafy greens, which hasten mushroom aging.
– If storing for more than a few days, remove from the box and store in a paper bag with holes punched in the side. Keep dry.
– Don’t wash to clean, just wipe with a damp cloth.
Storage Tip – Rhubarb
Rhubarb is so easy to freeze for later use in muffins, cakes, stewed rhubarb, etc. Wash and dry your rhubarb stalks. Chop into the size pieces you want. Put in a freezer bag or container and place in the freezer.
That’s it! No blanching, no need to spread on a cookie sheet. The frozen chunks will stick together but are easy to break apart by slapping the bag of frozen rhubarb against your counter.
RECIPES
Visit our 2019 Recipe Log or our 2018 Recipe Log or join our Facebook discussion group.
LOCAL THYME/ Comforting Classics
Rhubarb Cream Scones
Asparagus Mimosa with Radishes, Capers, and Green Garlic Vinaigrette
Bok Choy and Tofu Fried Rice with Sesame Oil
Tortellini en Brodo
LOCAL THYME/ Outside the Box Recipes
Rhubarb Butter Glazed Bok Choy and Radish
Miso Roasted Asparagus
Coconut Curry Glass Noodle Soup with Bok Choy, Mushrooms, Radish and Chicken or Tofu
Roasted Trout, Radishes, and Asparagus on Wilted Spinach and Radish Greens
LOCAL THYME/ Quick & Easy Meal
Spinach, Arugula, and Radish Salad with Feta and Tuna or Chickpeas
RECIPES FROM LAUREN
MIDWEST BOK CHOY RAMEN SALAD
Takes 15 minutes.
Serves 2-4.
1 head bok choy, sliced thinly (stems and greens)
1 bunch radishes, greens removed, cut into matchsticks
2 green garlic, white and pale green parts, minced
1/2 cup roasted and salted cashews, roughly chopped
1/4 cup white or black sesame seeds (or a mixture)
Noodles from 1 package of beef ramen
Dressing:
5 tablespoons vegetable oil
1 tablespoons toasted sesame oil
2 tablespoons rice wine vinegar
2 tablespoons honey
Flavor packet from 1 package of beef ramen
Pinch Kosher salt
- In a large bowl, combine bok choy, radishes, green garlic, cashews, sesame seeds and ramen noodles. Toss to combine.
- In a small bowl, whisk together all dressing ingredients until smooth and uniform. Pour over bok choy mixture and stir well to evenly coat. Let sit 15 minutes before eating.
.
.
.
MUSHROOMS & “LOTS OF GREENS” SHEET PAN QUICHE
Inspired by Smitten Kitchen
Because this is a sheet pan quiche, it’s a little trickier to use store bought pie crust. I promise you that following the techniques below, you can make pie crust from scratch, but if you really don’t want to or don’t have the time, you could do this quiche in two store-bought frozen 9″ pie crusts. Trader Joe’s has really stellar frozen pie crust! You can also go crustless entirely and just make a delicious egg bake in a well-greased pan.
Takes 1 hour, 45 minutes if making the crust from scratch (much of it inactive) or 45 minutes with store-bought (or no) crust.
Serves 12-16.
Pie Crust:
1 cup butter (2 sticks)
1 cup water
2-1/2 cups all-purpose flour
1 tablespoon sugar
1 teaspoon salt
Filling:
2 tablespoons butter
2 green garlics, white and pale green parts only, minced
12 ounces button mushrooms, sliced
2-3 cups arugula, roughly chopped
2-3 cups spinach, roughly chopped
2-3 cups radish greens, roughly chopped
1/4 cup water
1 teaspoon Kosher salt
1/2 teaspoon freshly ground black pepper
1/4 teaspoon red pepper flakes
6 ounces cream cheese, softened
2/3 cups whole milk
6 large eggs
1 cup shredded cheddar cheese
1/2 cup finely grated parmesan
- Begin preparing your crust (if you plan to make it; if you don’t skip to step #8). Cut the butter into small cubes and place in the freezer until ready to use. Fill measuring cup with 1 cup cold water and place in the freezer.
- In a large bowl, combine flour, sugar and salt. If you have a food processor, combine flour, sugar and salt in there. This is my favorite way to make pie crust and it whips up in a snap!
- Add butter to bowl and use your fingers to incorporate the butter into the flour (or add it to the food processor and pulse until the butter is mostly broken up). You will pinch the butter cubes into smaller pieces until they are about the size of peas and uniformly incorporated. Some pieces of butter will be small and some will be larger; that’s absolutely fine!
- Remove†the water from the freezer and pour in half. Use a rubber spatula to press the dough together. If it’s still dry (it likely will be) continue to add water until the dough comes together. You may need to knead with your hands a little bit. (Here is where a food processor comes in great, turn the food processor on as you pour in about 3/4 cup of water and just leave it running until the dough begins to come together. It should take about 30 seconds, add a little more water if it seems to not be coming together).
- Wrap pie dough in plastic wrap and place in freezer for 20 minutes or in the fridge overnight.
- Remove dough from the freezer and roll out to an approximately 12×16-inch rectangle. Carefully, fold it in half and then in half again. Move the dough to a 10×14-inch baking sheet and unfold. Press gently into pan. Remove any excess dough from the edges. Prick the crust with a fork and place pan in the freezer.
- Preheat the oven to 425 degrees and while you wait for it to preheat, begin slicing your mushrooms and chopping your greens!
- Once the oven is preheated, line your pie crust with foil and fill with pie weights (or dried beans or rice you don’t plan to cook). Bake for 20 minutes. Remove the foil and weights and bake 5 minutes longer. If using store-bought crust, follow package directions for pre-baking.
- While the crust bakes, melt the butter for the filling in a large, deep saute pan (the larger the better, you’re going to be throwing a lot of greens in here– if you don’t have a large saute pan use a soup kettle) over medium low heat. Add the green garlic and cook for a couple minutes until fragrant. Add mushrooms and saute until soft, about 10 minutes more. Add all the greens, water, salt, pepper and red pepper flakes to your pan. Saute until the greens are well wilted.
- In a large bowl, beat softened cream cheese with a wooden spoon until smooth. Add the milk and whisk until smooth. Add the eggs, two at a time, again whisking until smooth after each addition. Stir in sauteed mushrooms and greens along with the cheeses.
- Pour filling into the prepared, prebaked crust and bake until filling is set, about 30 minutes.
.
Week #1. Let’s get started!
- On: May 22, 2019
- 2

Simone leads a windswept rhubarb harvest, while she and Raul (back, right) train new employees. Our training program is simple. We pair new employees with experienced folks, and have them work side-by-side. There are so many details when you grow 40 crops and 400 varieties. We are fortunate to have enough returning employees to outnumber the new people 2:1. That eases bringing new people on board during the spring rush.
First Delivery!
Welcome to our CSA! Deliveries begin this week for:
– Weekly members,
– Every-other-week/ purple group
– Sampler/ moon group
Go here to check the delivery schedule for other shares.
Things you need to know.
♦ We post this newsletter/blog each Wednesday night, with a list of veggies for the week, quantities, information about storage and preparation, news of the farm, recipes, and a forecast for the next week’s box. We alert you by email on Wednesday night once the newsletter is posted and ready to read.
♦ Want earlier notice of what will be in the box? Check the sidebar on our website homepage around 7 p.m. on Wednesday night. I’ll post the list under “Box Contents.” I also provide a tentative list for the following week in the Veggie List section of this newsletter. The next week’s list is rarely complete but the items listed are ones we feel confident about.
♦ EOW, sampler and weekly members, we assume you read all the newsletters, even on your “off” weeks. This newsletter (and our emails to you) are our means to communicate with you.
♦ The first few boxes of the season are often the lightest. EOW members, do not worry that you have signed up for the wrong share! Our deliveries get heavier and more abundant as the season progresses.
♦ We will sometimes write “OR” in the produce list, e.g. green leaf OR red bibb lettuce. You will receive one of these crops. All the boxes at each site are identical; we pack the same crops for all the members at each site. Please don’t open other members’ boxes.
♦ Wash your produce well this week to remove grit. It has rained a lot lately, driving grit into the asparagus and anything that forms a head (lettuce, arugula, spinach). Our crew took extra care with washing but expect to wash everything. You should always wash your produce!
♦ On Thursday, we deliver CSA boxes to Evansville, Fitchburg, Madison, McFarland, Middleton, Oregon and Verona.
♦ On Friday, we deliver CSA boxes to Brookfield, Janesville, Mequon, Milwaukee, Waukesha and Wauwatosa.
Veggie List and Veggie Notes
May 23/24, 2019 (Th/Fri sites)
Asparagus, 0.6 lb
Spinach, 1 big bunch, ~1.5 lb
Green leaf lettuce, 1
Arugula, 1 bunch
Salad radishes, 1 big bunch
Green garlic, 1 bunch
‘Goldrush’ russet potatoes, ~3 1/2 lb
Rhubarb, ~2 lb
Next week’s box will probably contain asparagus, spinach, button mushrooms, lettuce, green garlic, bok choy, salad radishes, and rhubarb.
Asparagus – The asparagus is growing slowly because of the chilly weather, especially the cold nights.
Enjoy this spring treat! Your asparagus will be green or purple. The purple variety turns dark green when cooked. Its flavor is almost identical to normal green asparagus. Wash your asparagus thoroughly to remove hidden grit. Submerge in water with the tips pointing down, soak briefly, then swish vigorously and pull out of the water. The draining action helps pull the grit out of the asparagus tips. Repeat several times.
Storage: Asparagus is perishable, so eat it as soon as possible. Store in a paper towel, cloth or paper bag, then wrap loosely in a plastic bag. The paper bag protects the asparagus tips from direct contact with the plastic bag. The plastic bag keeps the asparagus from wilting.
Preparation: We snap our asparagus at harvest, rather than cutting. Therefore, there is no need to snap the stalks to remove fibrous ends. For the same reason, it is not necessary to peel the asparagus stalks. It’s OK to trim the cut end a bit.
Cooking: If your asparagus stalks vary greatly in size, you will want to cook the thicker ones longer. Put an empty steamer pot over water, and bring the water to a boil. Add the asparagus. Cover and steam over medium heat until just tender. Use two forks or a spatula to turn the asparagus during cooking, rotating the bottom spears to the top. Drain and serve. Alternatively, you can lay spears flat in the bottom of a broad pan, with ½ inch of water. Also excellent broiled or grilled. Good dressed with vinaigrette, or with lime juice, salt and pepper.
Lettuce and spinach – Wash your greens to remove grit splashed into the heads by rain. Cut to the size you like, submerge in water, swish gently, then pull from the water and drain in a colander. Some weeks, you will need to repeat in fresh water. I find it useful to use a kitchen tub for this job, so you don’t have to run an entire sink of water.
Storage hint – To extend the storage life of your tender greens, wash them, dry in a salad spinner, then store in a dry container or bag. Lettuce, spinach and arugula last much longer when handled this way.
Arugula – (bunch of green leaves with pungent scent) – This is a spring treat! Arugula is good mixed with lettuce or spinach in salads, or added to cooked dishes such as lasagne or quiche. I love it on sandwiches. This arugula is thin-leaved and tender and will not store for long. Eat soon. Cover and refrigerate.
Salad radishes – These are so good right now; tender, crisp and not too spicy. They are great in salads or thinly sliced on sandwiches. A few years ago, I was served open-faced radish and butter sandwiches on toast and was impressed with how tasty they were. Use good quality butter.
Storage: cover and refrigerate.
Green garlic (looks like scallions, tastes like garlic) – Last fall, we planted garlic cloves that grew into the stalks we harvested this week. If left to grow until mid-summer, the slim white bulb on this week’s garlic will divide and form the usual cluster of cloves in a garlic bulb. This year’s green garlic is robust.
Preparation: Green garlic is more pungent than scallions, so slice thinly and use sparingly when raw. It mellows when cooked. Chop and add to any cooked dish that would benefit from garlic. Use the white bulbs and pale green stems. Avoid the dark green stems and leaves, as these are fibrous.
‘Goldrush’ russet potatoes – Please refrigerate these potatoes. They are in great shape now but will sprout within days if stored at room temperature. They’ve been stored all winter and want to grow. Store in a paper bag to protect from light, even in the fridge. We grow everything we send in our CSA boxes except potatoes and mushrooms, both of which we buy from organic growers that we trust. We purchased these potatoes from Jesse Perkins at Vermont Valley Farm. ‘Goldrush’ are good all-around potatoes with outstanding flavor. With the predicted weather this weekend, you might want to make potato salad! Jesse says the potatoes have a higher sugar content because of starch to sugar conversion during cold storage. The potatoes taste a bit sweet, and will blacken slightly when fried. It’s a harmless color change due to the sugar conversion.
Rhubarb – Refrigerate in a plastic bag. FYI, 2 lb of rhubarb yields 6 – 6.5 cups when chopped.
Stewed rhubarb: This is the simplest way to prepare rhubarb. Chop rhubarb into one inch chunks. Stir over medium heat with a small amount of water in the bottom of the pan. The rhubarb will release moisture as it cooks. Stew until it softens and falls apart. Sweeten to taste with honey or sugar. Eat warm on its own, over vanilla ice cream, on pancakes, etc.
Recipes from chef Pat Mulvey at Local Thyme
Comforting Classics
Quinoa Salad with Spinach, Radishes, and Green Garlic Dressing
Turkey, Arugula and Cranberry (or rhubarb) Chutney Wraps
Rhubarb Sorbetto
How to make a great salad
Outside the Box Recipes
Velvety Lemon Pasta with Spinach
Green Garlic Arugula Pistachio Pesto
Caramelized Rhubarb
Spinach Salad with Rhubarb Vinaigrette
Quick and Easy Recipe
Hummus, Radish, Spinach and Arugula Pesto Wraps
Recipes from Lauren
SPRING NICOISE SALAD
Takes 45 minutes
Serves 4
4 eggs
1 pound russet potatoes, peeled and cut into rough 1-inch pieces
1 teaspoon Kosher salt plus more for seasoning
Lettuce, washed and cut into rough pieces
Arugula
1/2 pound asparagus, cut into 1-inch pieces, steamed
2 5.5-ounce cans Italian or Spanish tuna, packed in olive oil, drained and shredded
2-4 radishes, very thinly sliced
2 tablespoons capers
1/4 cup favorite olive, preferably kalamata or nicoise, optional
Freshly ground black pepper
Creamy Green Garlic Dressing:
3 green garlic, white and pale green part only, minced
1/4 cup white wine vinegar
2 tablespoons Dijon mustard
3/4 cup olive oil
- Bring a medium pot of water to a boil. Carefully lower eggs into water using a slotted spoon. Cook for 9 minutes. Remove to an ice bath for a couple minutes so they are easy to peel.
- Refill pot 1/2 full with water along with 1 teaspoon salt and bring to a boil. Add potatoes and boil for 10-15 minutes until potatoes are soft and easily pierced with a fork but not beginning to fall apart.
- While cooking, peel and slice hard-boiled eggs.
- Whisk together green garlic, vinegar and mustard together in a small bowl until smooth. Slowly drizzle in olive oil while whisking mixture until dressing becomes emulsified (thick and creamy).
- When ready to serve, combine lettuce and arugula into four bowls. Top with eggs, potatoes, steamed asparagus, tuna, radishes, capers, and olive oil. Drizzle with dressing and season with salt and freshly ground black pepper.
.
SPINACH, RADISH & GREEN GARLIC DIP
Adapted from Bon Appetit
Takes 30 minutes
Serves many
2 tablespoons butter
2 green garlic, white and pale green parts only, minced
1 bunch radishes, roots shredded and greens, roughly chopped
Spinach, roughly chopped
1 teaspoon Kosher salt
8-ounce cream cheese
2 ounces Parmesan cheese (about 1 cup)
1/2 teaspoon freshly ground black pepper
- Melt butter in a medium saucepan. Add garlic and saute for 1 minutes over medium heat until very fragrant. Add radishes and cook, tossing, until well-coated in butter, 1-2 minutes longer. Add spinach and radish greens along with salt. Cook until wilted and most of the liquid is cooked off., 5-10 minutes. Add cream cheese and cook until melted. Stir in Parmesan and pepper until melted and creamy. Taste and adjust seasonings.
- Serve warm with toast, in a bread bowl or with crackers.
.
Forward motion
- On: March 25, 2019
- 2
Spring farm awards
We are making progress here. Let’s recognize our outstanding players.
AWARD: Best posture
AWARD: Cutest hats
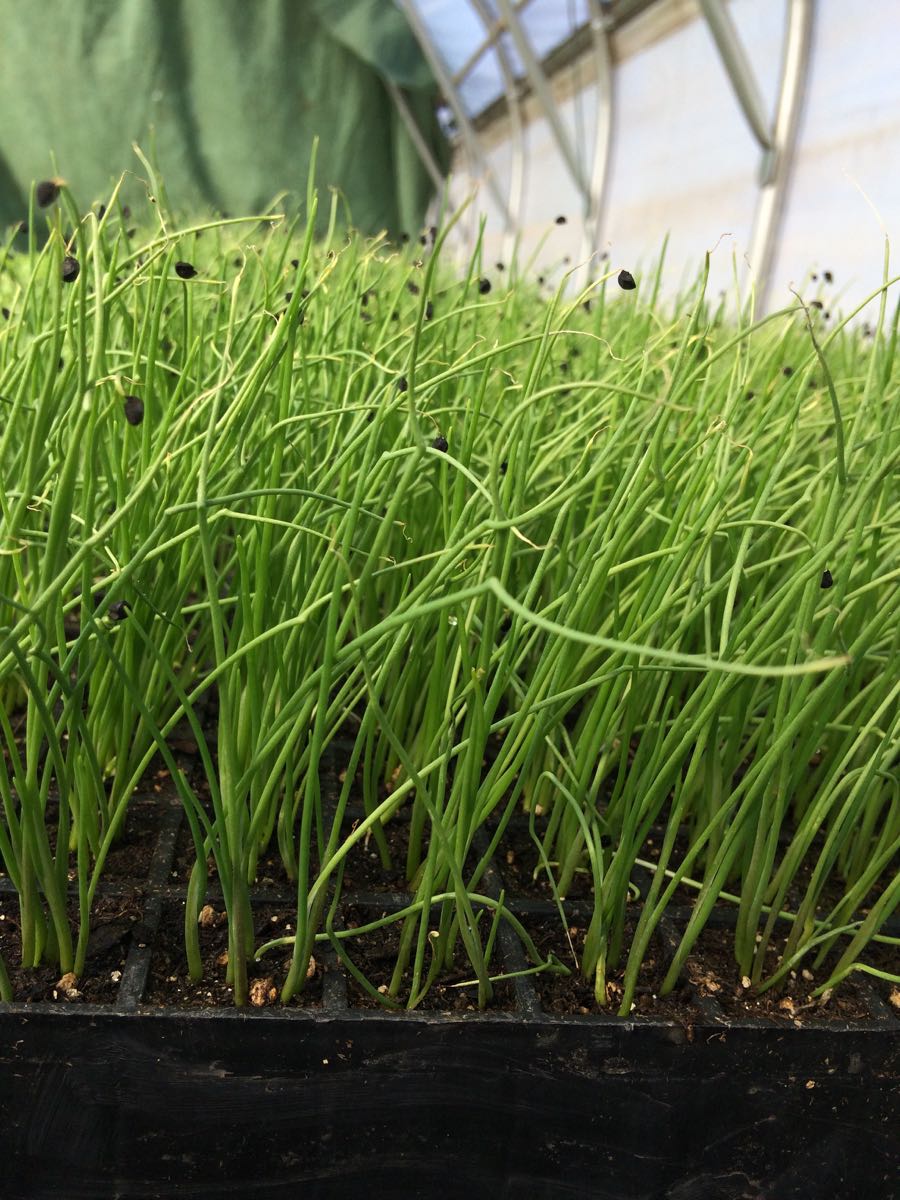
Scallions win two awards! Each ‘hat’ is a seed coat stuck to the tip of the plant’s first leaf. So stylish!
AWARD: Beauty Queen/King
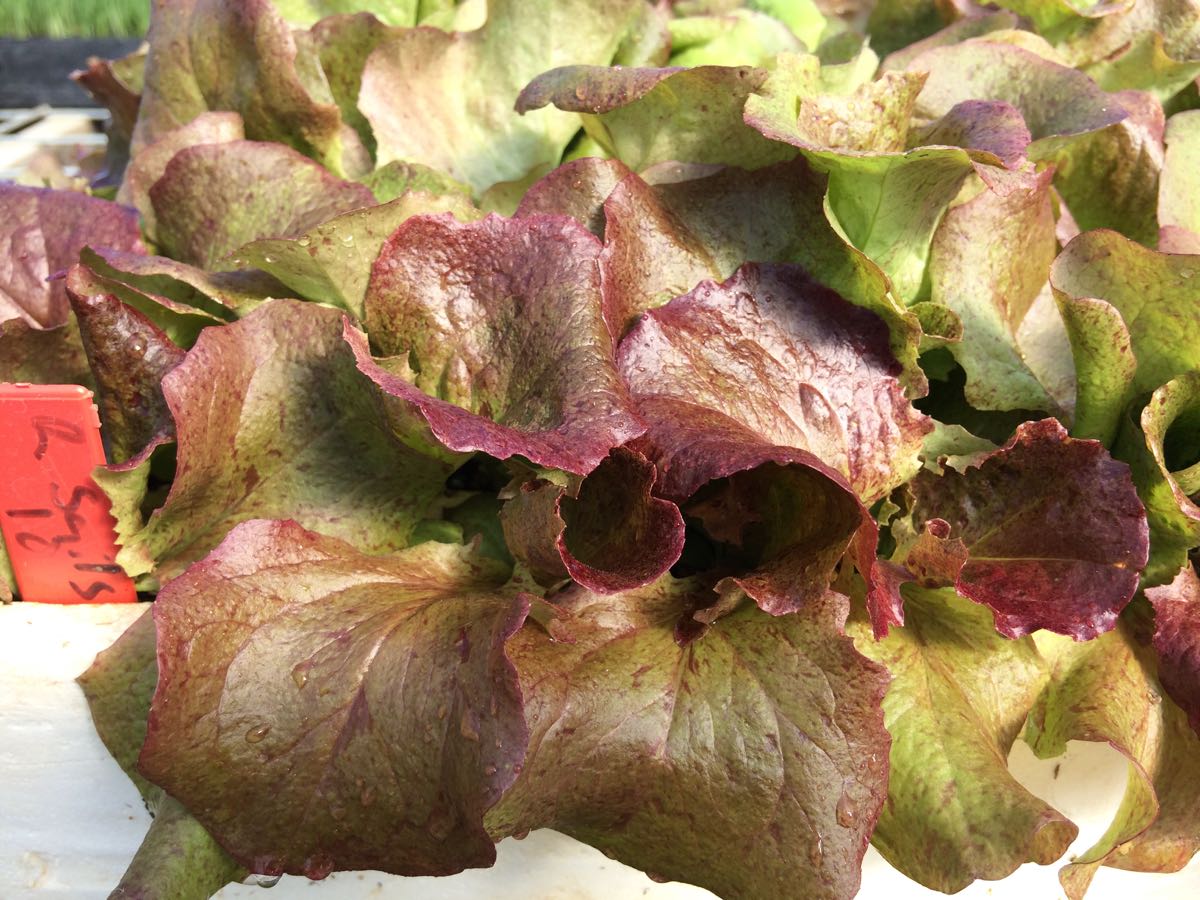
‘Red Sails’ lettuce wins the beauty contest every year for her gorgeous speckled leaves and green to red shading. We coddle these babies, nurture them in the field and … then we eat them. This lettuce will be in the first or second CSA box.
AWARD: Favorite place on the farm
Hands down, it’s greenhouse #1. The thermostat is set to 74 degrees but the greenhouse warms to the mid-80’s on a sunny day. We’ve got two greenhouses in operation now. For a cooler place to eat lunch, greenhouse #2 is perfect, set to a pleasant mid-60’s.
AWARD: Most welcome

These tiny crocuses are the first flowers each spring. They’re in a sunny, warm spot in our yard.
AWARD: Most perseverant
It’s a tie! Both these plants shrug off cold winters.
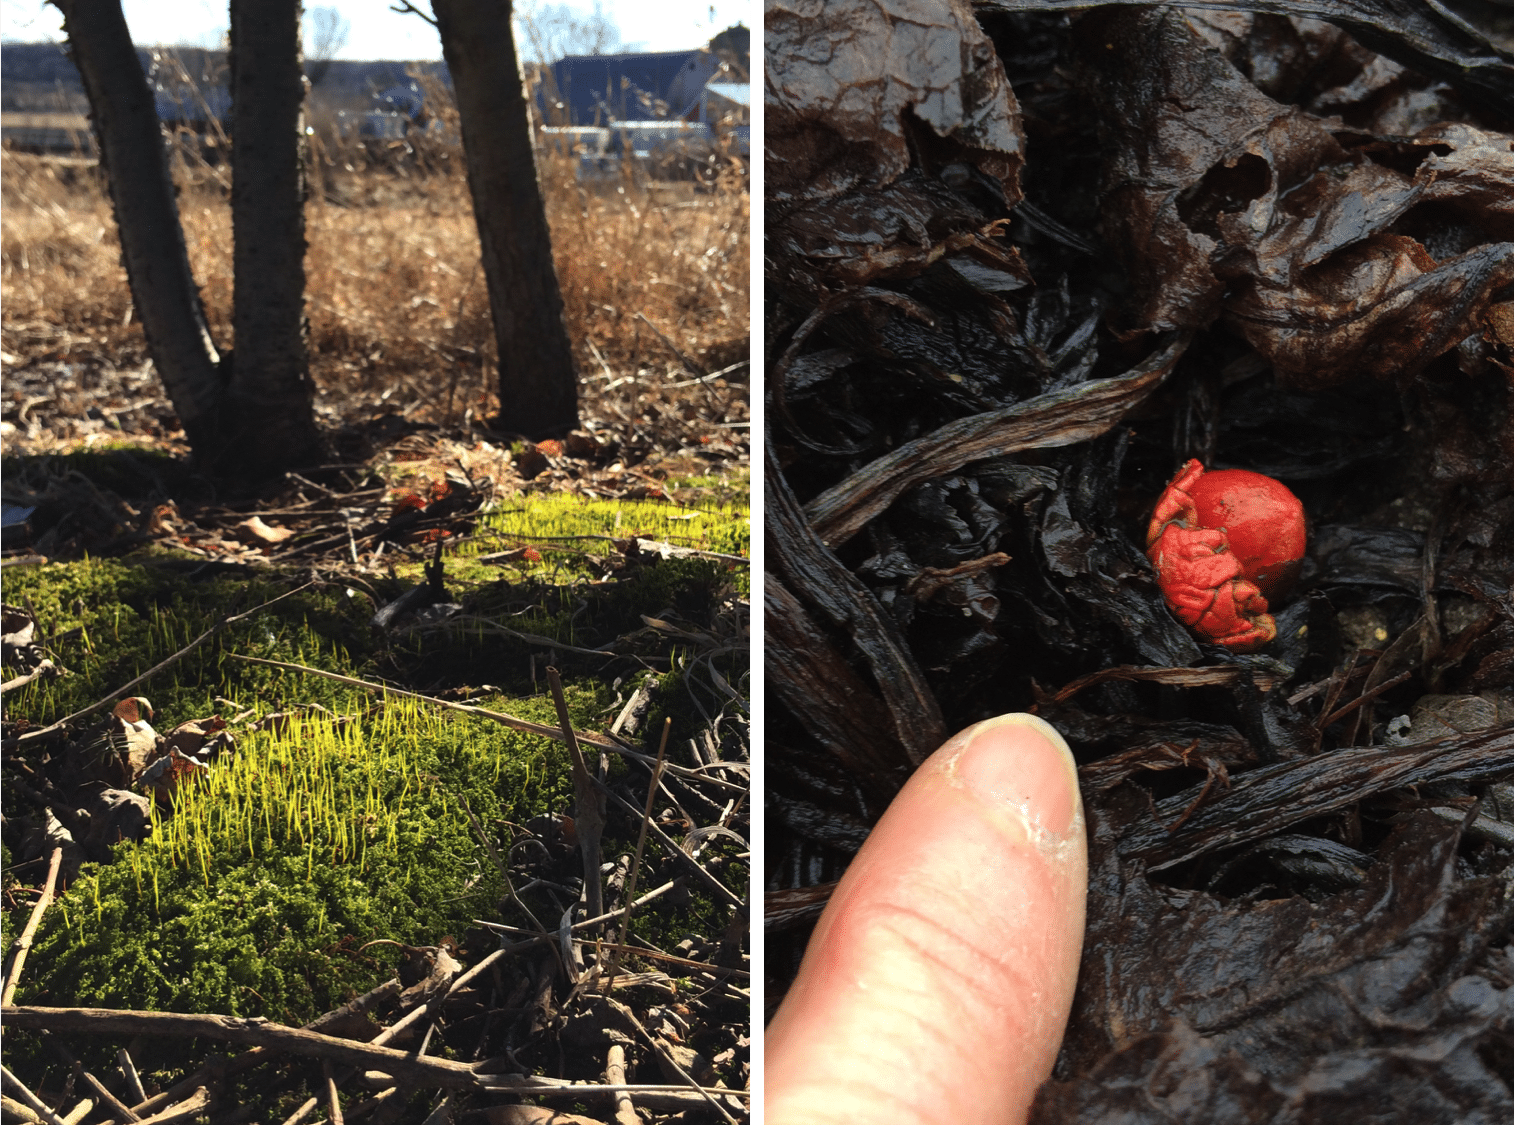
At left, even a little sunshine gets the moss growing.
At right, brilliant rhubarb buds emerge even when there’s snow on the ground.
AWARD: Most displaced holiday

We celebrated Easter very early this year, while our daughter was home from college. Left, Steve hides eggs in my flower garden. The farm has many hiding places; egg hunts are epic in length. The eggs at right are dyed with red cabbage (blue eggs) or onion skins (brown eggs). Steve jokes that we should hide the afikoman matzoh, and celebrate Passover early too.
It’s time to sign up for your CSA share!
Our shares are selling quickly this year.
– New members, go here to enroll.
– If you were a Tipi CSA member in the past, enroll here.

