
Yearly Archives: 2019
Week #16, Farm landscape vernacular
- On: September 04, 2019
 0
0


We had our house re-roofed this year. The material choice was easy. Metal roofs last for a long time, and avoid landfill-clogging asphalt shingles. The color required thought. Red, to harmonize with our cream yellow siding? No, we have plenty of red farm buildings. Golden brown? Too dull. Deep purple? I would love that but we couldn’t get metal roofing in purple. We settled on forest green, a look that I treasure, maybe because the first farmhouse Steve and I shared was white with a green roof.
I didn’t think about the emotional tug of this color combination until making this decision. There’s a “vernacular” in the Wisconsin farm landscape. The classic look is a light-colored farmhouse with a green roof, paired with red barns. That’s what we have! We’re not comformists, we’re not bound by tradition. We just love this class Midwestern look. It’s nice in the summer when surrounded by green fields but really stands out in winter. In a white snow-covered landscape, the colorful buildings beckon as ‘home.’
We hired the Amish carpenters who built our pack shed. I asked Raymond if they could re-roof our house. He said, “Oh Beth, it’s going to be a year.” We waited. They’re in demand because they do a good job. This younger crew did not sing as they worked. The older crew who built our pack shed sang while they worked, and their music changed as they built the building around themselves. It was a delight. Beth

Our big red barn. We couldn’t reach the peak with our lift and paint wand. Drives me nuts.
Grape tomatoes in paper bags
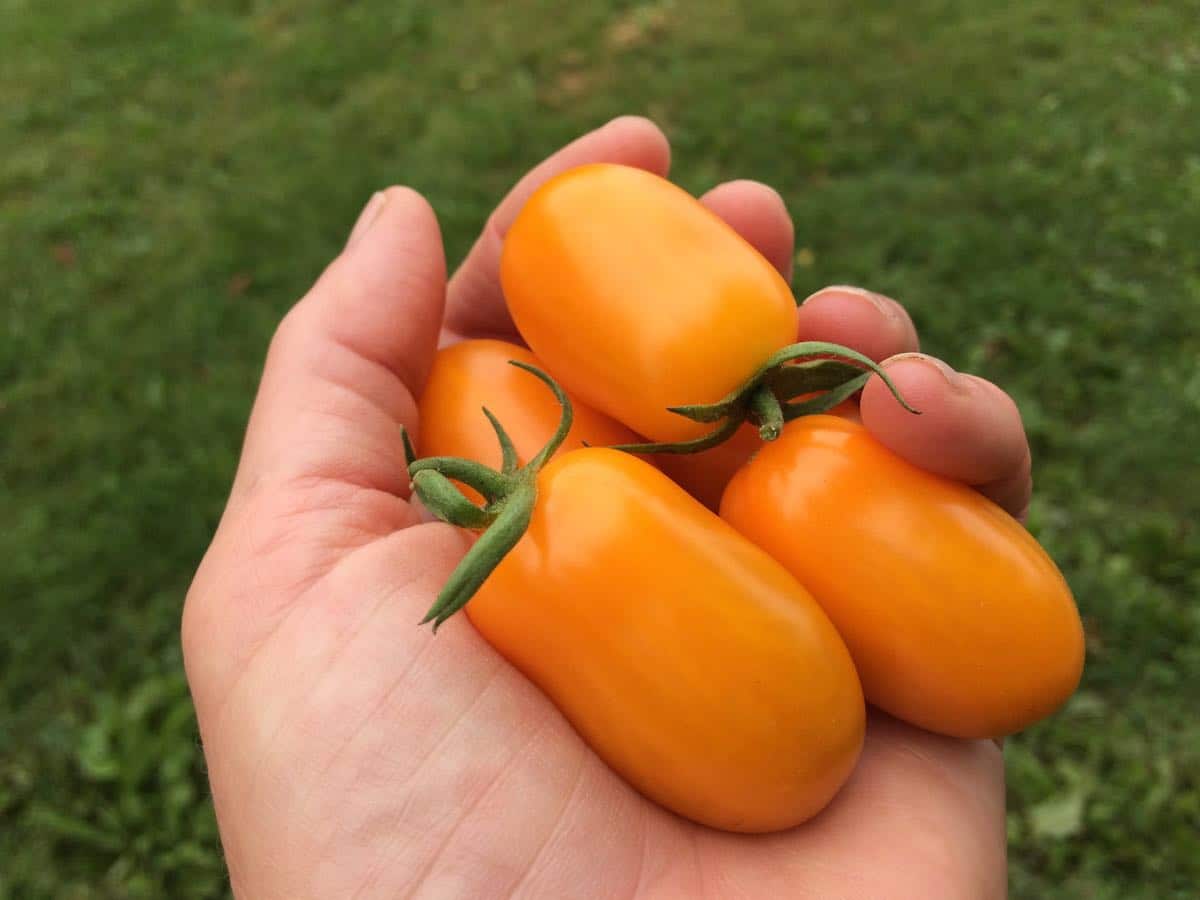
The ‘Nova’ orange grape tomatoes are really, really good.
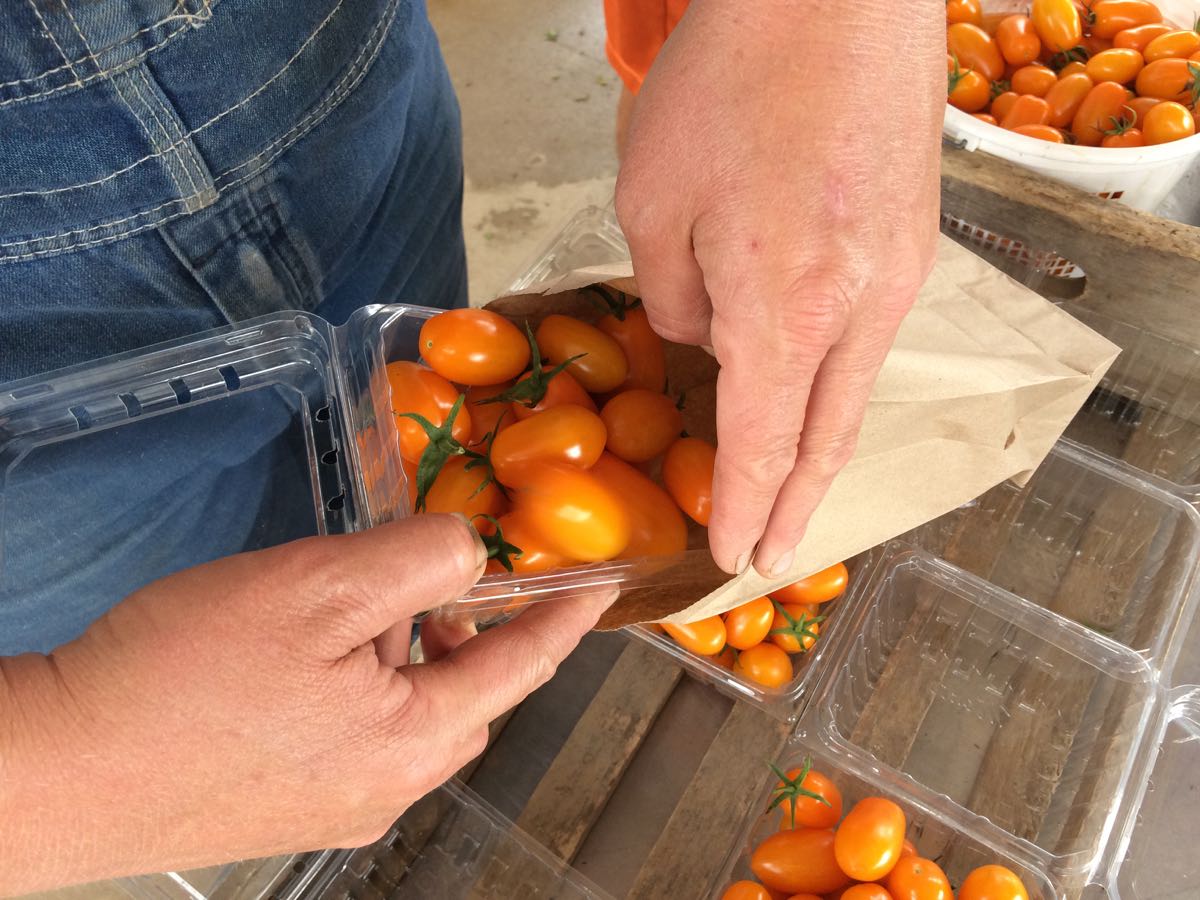
We continue trying to reduce plastic use, so we’re sending your grape tomatoes in a paper bag. Why use a plastic clamshell if we can use a paper bag instead? Watch out, these small bags are thin. You’ll probably want to transfer the tomatoes to a container once home. The Romano beans are in a paper bag again too.
I asked a few weeks ago if beans in paper bags worked OK, and only got positive replies. It’s been an easy switch. We will have to return to plastic bags for heavy root crops (carrots, beets, etc) that will blow out the bottom of a paper bag. In the meantime, we’ll keep using paper bags whenever we can. Could you all let me know if they are problematic with any of the crops? Beth
Veggie List and Veggie Notes
Week #16, Sept 5/6, 2019
– Weekly shares
– EOW/ green
Red watermelon
Slicing tomatoes, ~5 lb total
Romano beans, 1.7 lb
Edamame soybeans, 1 bundle
Kale, 1 medium bunch
Orange grape tomatoes, 1 pt in paper bag
Green bell pepper, 1
Colored bell pepper, 1
Orano snack pepper or yellow pepper, 1
Cucumber, 1 – 2
Walla Walla onion
Garlic, 1 bulb
Fresh dill seed
Next week’s box will probably contain tomatoes, peppers, onions, carrots, edamame and more.
Slicing tomatoes – The plants are mostly healthy, so the tomatoes should be OK stored on your kitchen counter. Take them out of the bag so you can keep an eye on them. Be strategic; use the ripest tomatoes first, or any that develop flaws. Store slicing tomatoes resting on their shoulders, with the stem side down. Plum tomatoes can be stored in any direction.
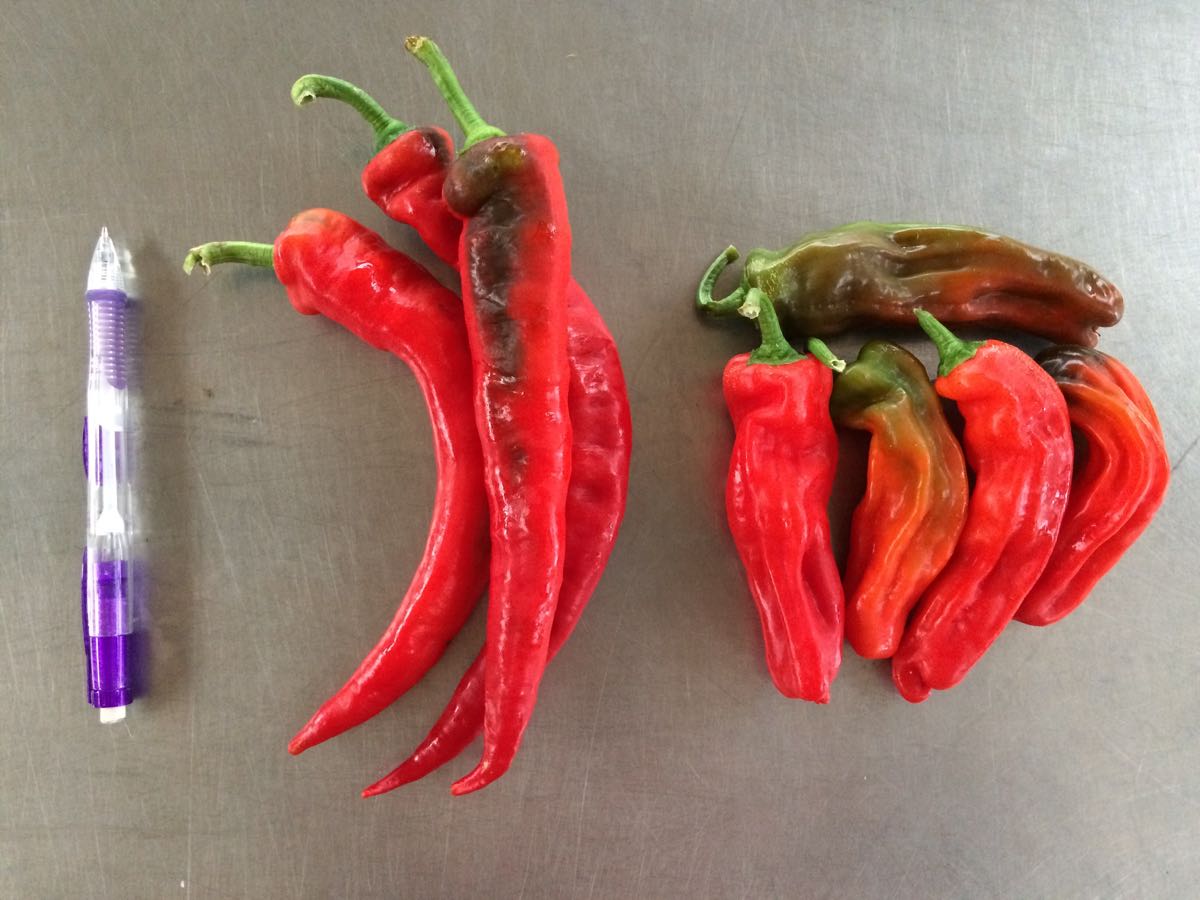
Romano beans – Romano beans are more robust and meaty than green beans. They are excellent raw but really shine when gently cooked for a long time. Pat has some good recipes below. I notice that most people who love Romano beans are dedicated to a particular recipe. Here are a few recommendations:
– Lauren asked me to remind you about last year’s African Peanut Stew recipe, which is easily adapted for this week’s veggies. It’s an excellent dish for this time of year.
– Former Tipi crew member Jon Fagan raves about Braised Green Beans with Tomato and Fennel Seeds (in previous newsletter, scroll down).
– My favorite Romano bean recipe (which I recommend every year but also look forward to every year!) is Sausages and Summer Beans with Tomatoes & Caramelized Onions.
– Finally, here’s a 2017 quote from Tipi member Steve Rankin:
“You have finally sold me. I have never been a fan of Romano beans. This week I have been sautéing them with various peppers and garlic, as well as the oregano from earlier this season. They are especially tasty with poblanos. Lots of black pepper and some soy sauce, which make the pan sticky. I deglaze the pan with wine and braise them in the wine. I’m sold!”
Edamame soybeans (bundle of green stems with pods attached) – These edible soybeans are a treat. Pull the pods from the stem and wash well. It helps to submerge the pods and rub them together. Boil in water until the pods have split and the beans are quite tender. Season with salt and pop the beans out of the pods into your mouth.
Storage: Remove the pods from the stems promptly and refrigerate.
Fresh dill seed – We’re sending the dill to use with the Romano beans. They are dill seed umbels. The seeds are young, not dried. You can use them to make a batch of refrigerator pickled beans or in a different bean dish. Dill is also good in tomato soup.
Preparation: Use the intact head when making pickles. When cooking, strip the seeds from the umbel. Lay on a cutting board. Crush with the flat side of a large knife, to release the flavor.
Storage: Refrigerate.
RECIPES
Visit our 2019 Recipe Log or our 2018 Recipe Log or join our Facebook discussion group.
LOCAL THYME/ Comforting Classics
Romano Beans with Walnuts and Dijon Dressing
Summer Wind Roasted Tomato Sauce
Garlicky Greens and Cranberry Beans
Niçoise Salad Chickpea Bowl
LOCAL THYME/ Outside the Box Recipes
Dilly Beans
Kale, Tomato, Three Cheese Galette
Tomato Cucumber Salad with Watermelon Vinaigrette
Watermelon and Pepper Salsa with Sriracha
LOCAL THYME/ Quick & Easy Meal
Watermelon Gazpacho
????????????
RECIPES FROM LAUREN
KALE SESAME GRAIN BOWL
Takes 40 minutes.
Serves 4-6.
1 cup salted water
1/4 cup quiona
1/4 cup favorite quick cooking rice (can also use a full 1/2 cup of either if you prefer)
1 bundle edamame soybeans, pods removed from stalks
1 pound romano beans, ends trimmed and cut into 1-inch pieces
5 garlic cloves, minced
1 orano pepper, minced
2 tablespoons rice wine vinegar
2 tablespoons peanut butter
2 tablespoons soy sauce or tamari
1 tablespoon maple syrup
3 tablespoons olive oi
1 tablespoon toasted sesame oil
1 bunch kale, stems removed and thinly sliced
1 cucumber, seeds removed and cut into small pieces
1 cup peanuts, roughly chopped
2 tablespoons white and/or black sesame seeds
- Bring 1 cup salted water to a boil in a small stock pot. Once boiling, add quinoa and rice. Reduce to a simmer, cover and cook for 18 minutes. After that remove from heat, cover the pot with a thin towel and then re-cover for 10 minutes.
- Bring a large pot of water to a boil over high heat. Once boiling, add edamame . Cook for 5 minutes and then rinse under cold water. Once cool enough to handle, remove the edamame from the shells. Set aside.
- Bring the pot back up to boiling and then add romano beans. Cook for 4 minutes and then rinse under cold water.
- In a small bowl, whisk together garlic, orano, vinegar, peanut butter, soy sauce, and maple syrup until smooth. Gently whisk in olive and sesame oils until dressing comes together. Taste and adjust flavors as desired.
- Toss kale, cucumber, quinoa, rice, edamame and romano beans together in a large bowl with half the dressing. Serve in smaller bowls topped with peanuts and sesame seeds.
.

Week #15. Here come the tomatoes.
- On: August 28, 2019
- 0
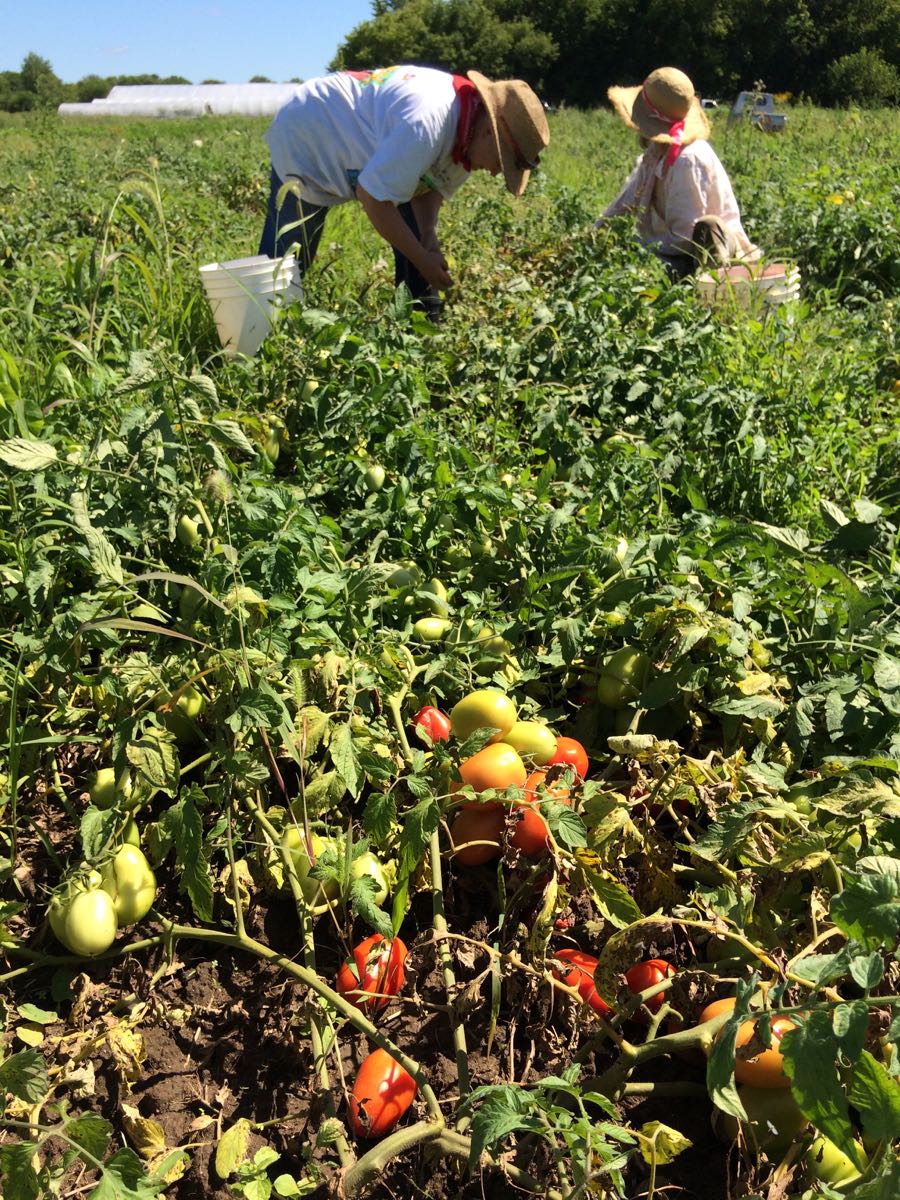
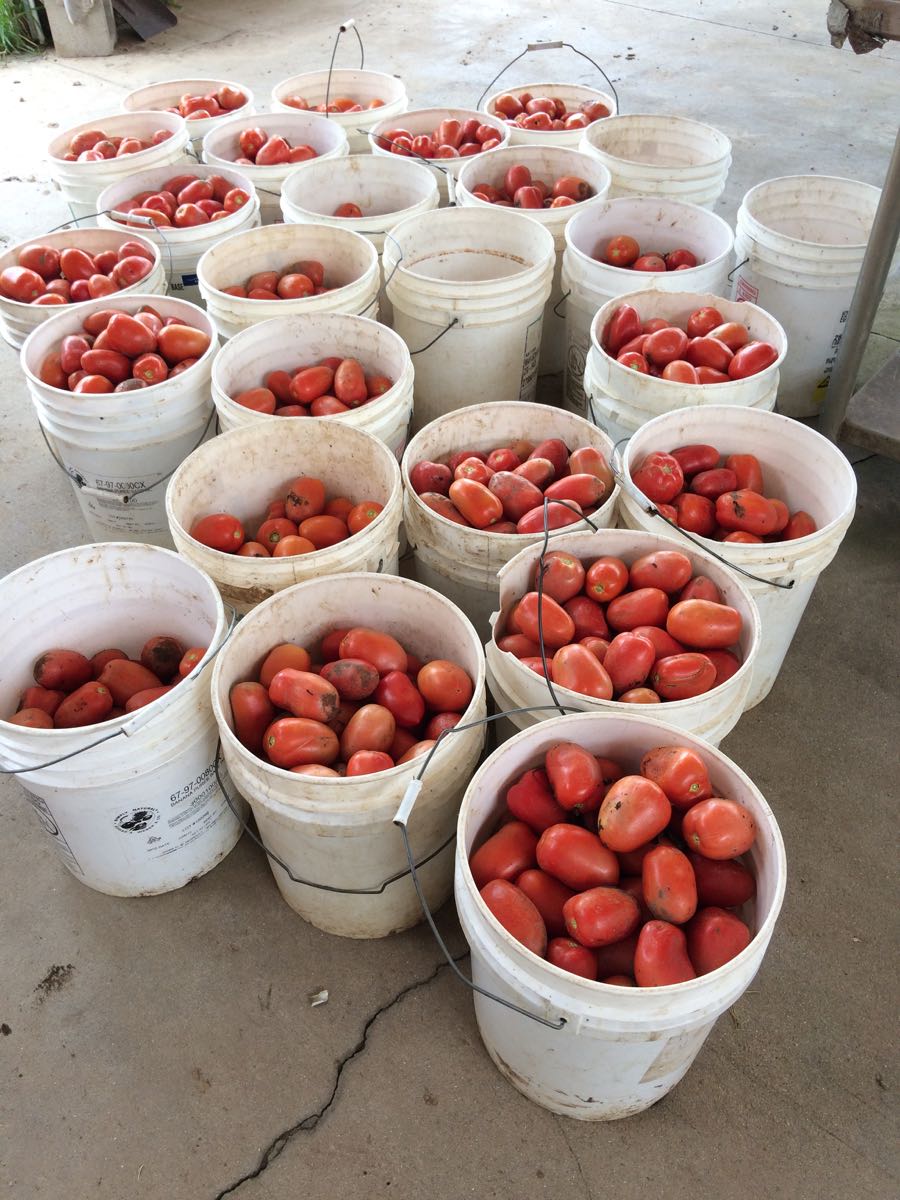
Now our tomato harvests begin in earnest. Linda and Kerry harvest plum tomatoes.
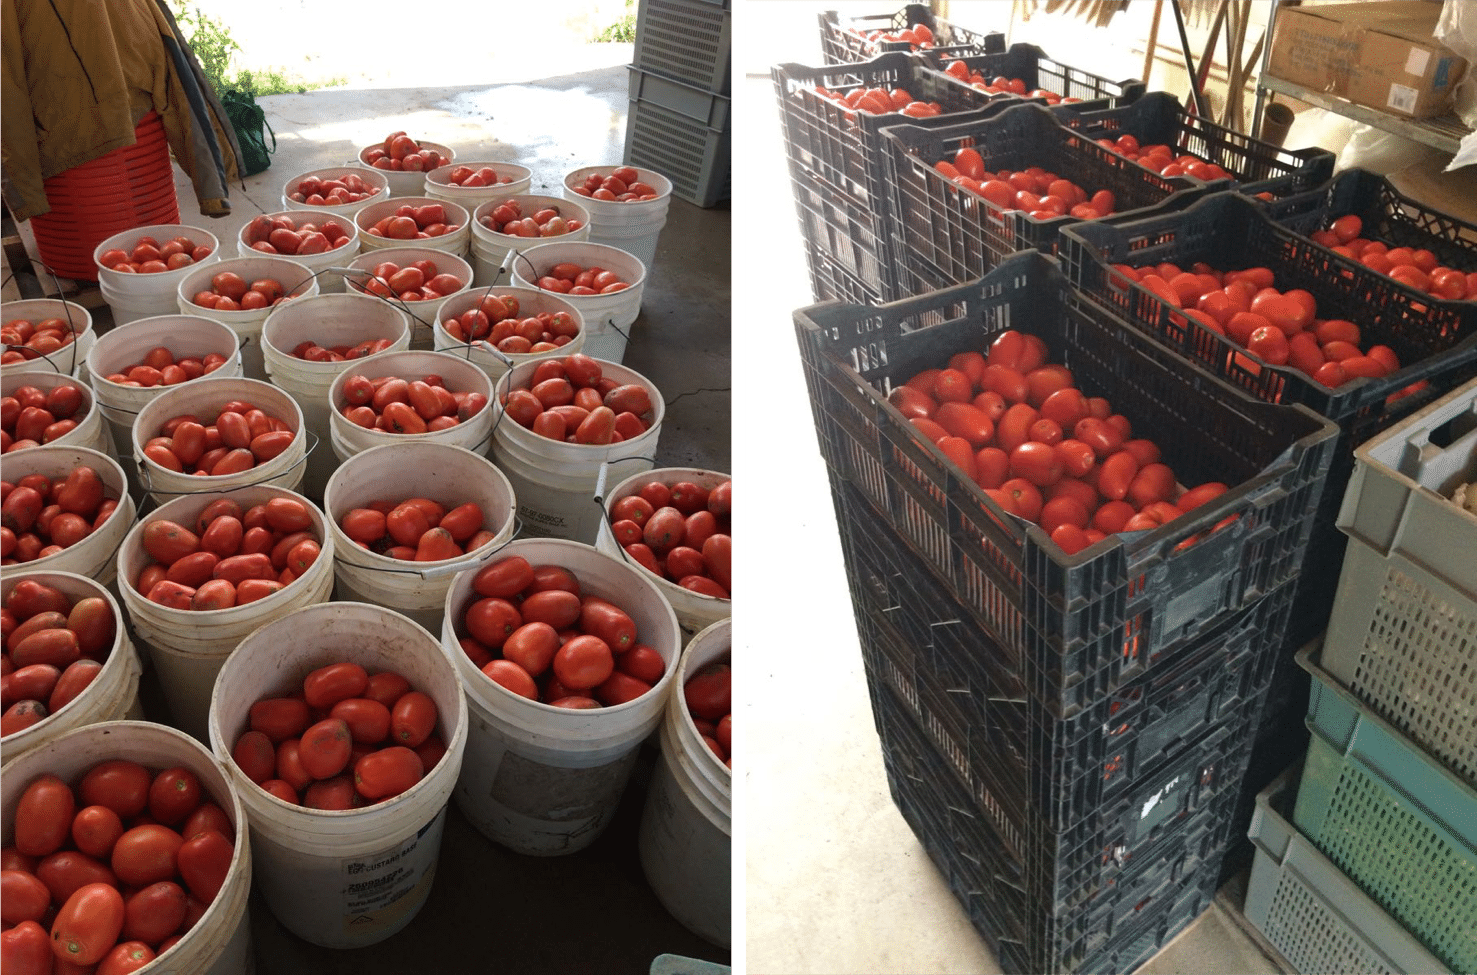
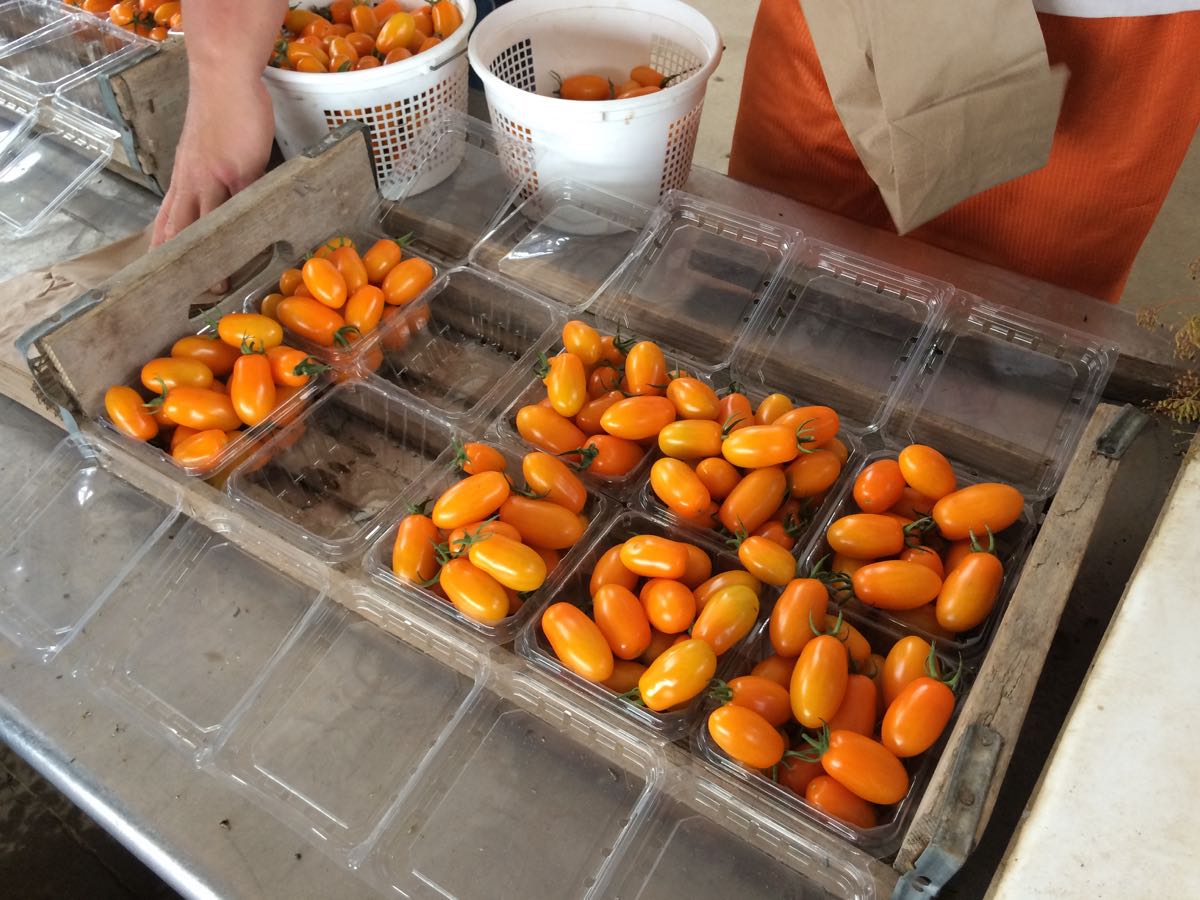
Some of this week’s tomatoes, before weighing and bagging.
Let’s talk tomatoes
They are a big part of our lives right now. We have transitioned from tomato planting #1 to our much bigger tomato planting #2. You should notice a jump in quality, as this week’s tomatoes were all picked from younger plants. As tomato plants age, the tomato flavor and quality decline. This is typical with organic tomatoes; our options to control diseases are limited. We, and the crew, and all of you will appreciate the switch to a new field.
We will have lots of tomatoes for you in September, weather- and disease-permitting. This field is ripening late, mostly due to the cool spring weather. We will pack many in the CSA boxes. We expect to offer bulk plum &/or slicing tomatoes for sale to CSA members. We’re also planning a members-only plum tomato u-pick in September, date TBD. Watch for emails with more information about the u-pick and the bulk sales.
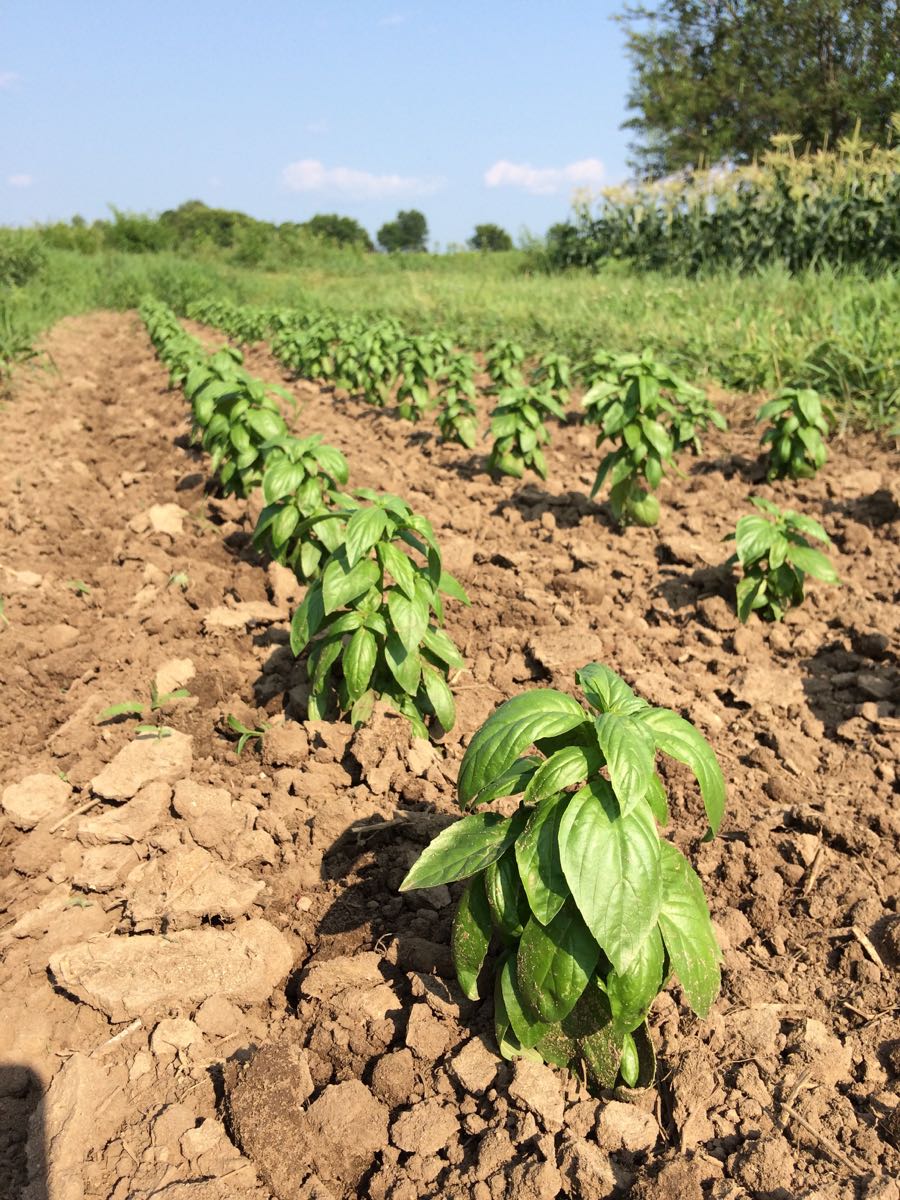
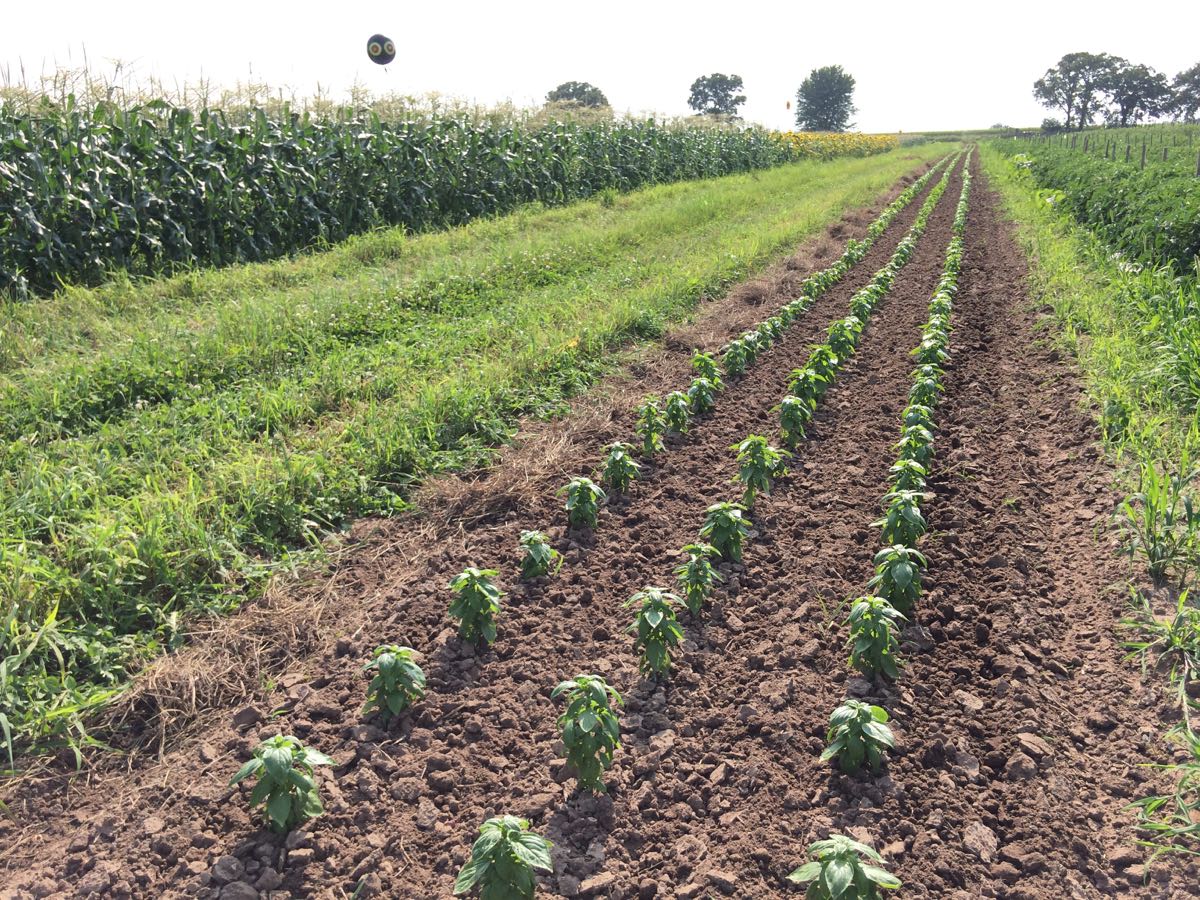
Progress with basil!

We host basil trials for plant breeder Adrienne Skelton of Vitalis Organic Seeds. She visited last week to see how her breeding lines are faring.
Once again, we are battling Basil Downy Mildew (BDM), a disease that risks our basil crop most years. After years of struggle with BDM, we are making progress. BDM showed up on our farm in 2010, shortly after it was discovered in the US for the first time. Spores have to blow into Wisconsin each year – it doesn’t survive our cold winters. The best tool in this situation is plant resistance. There’s been a worldwide effort to develop resistant varieties, and we had interesting ones to try this year. I planted varieties from Vitalis Seeds, from an Israeli breeding program, and from a program based at Rutgers University. This year’s varieties are a big improvement.
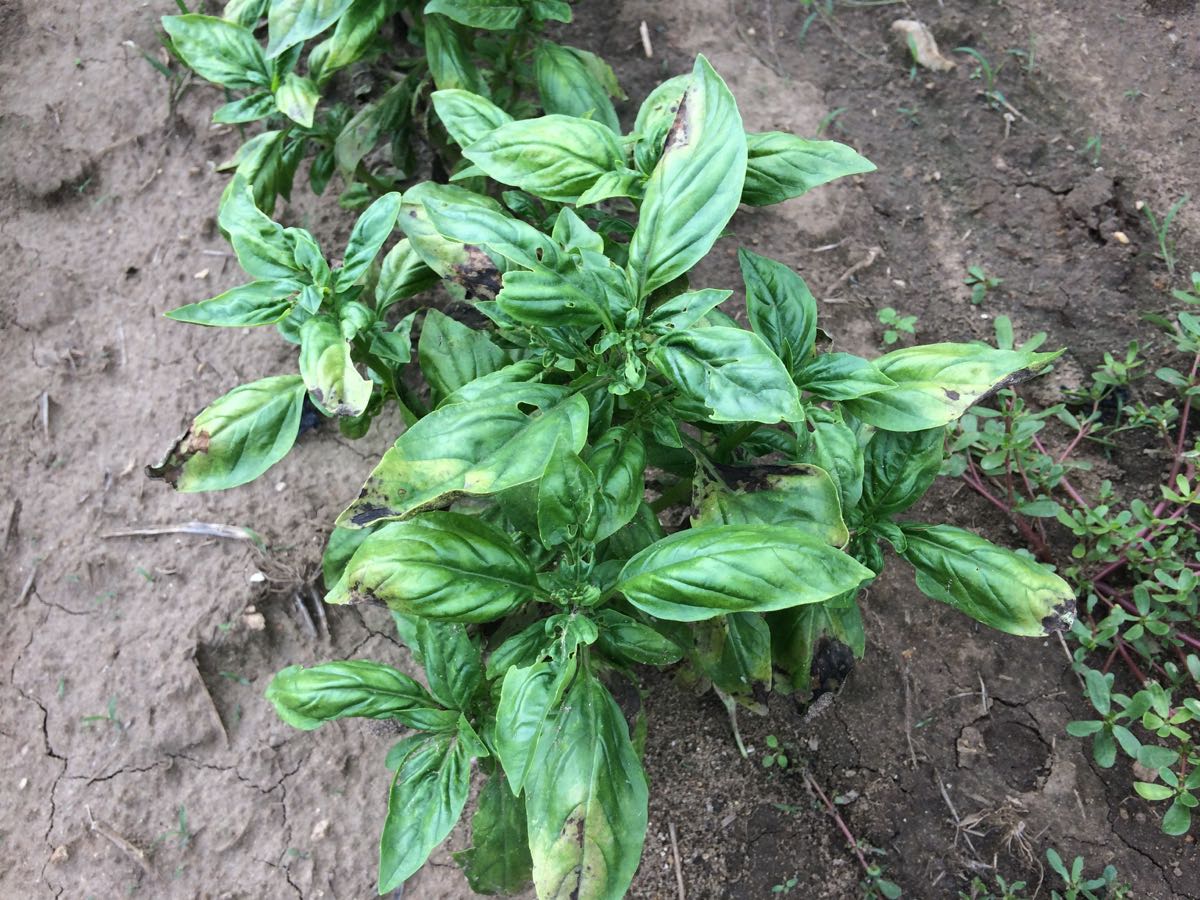
Susceptible basil infected with downy mildew. Look for the yellow and brown patches on the leaves.
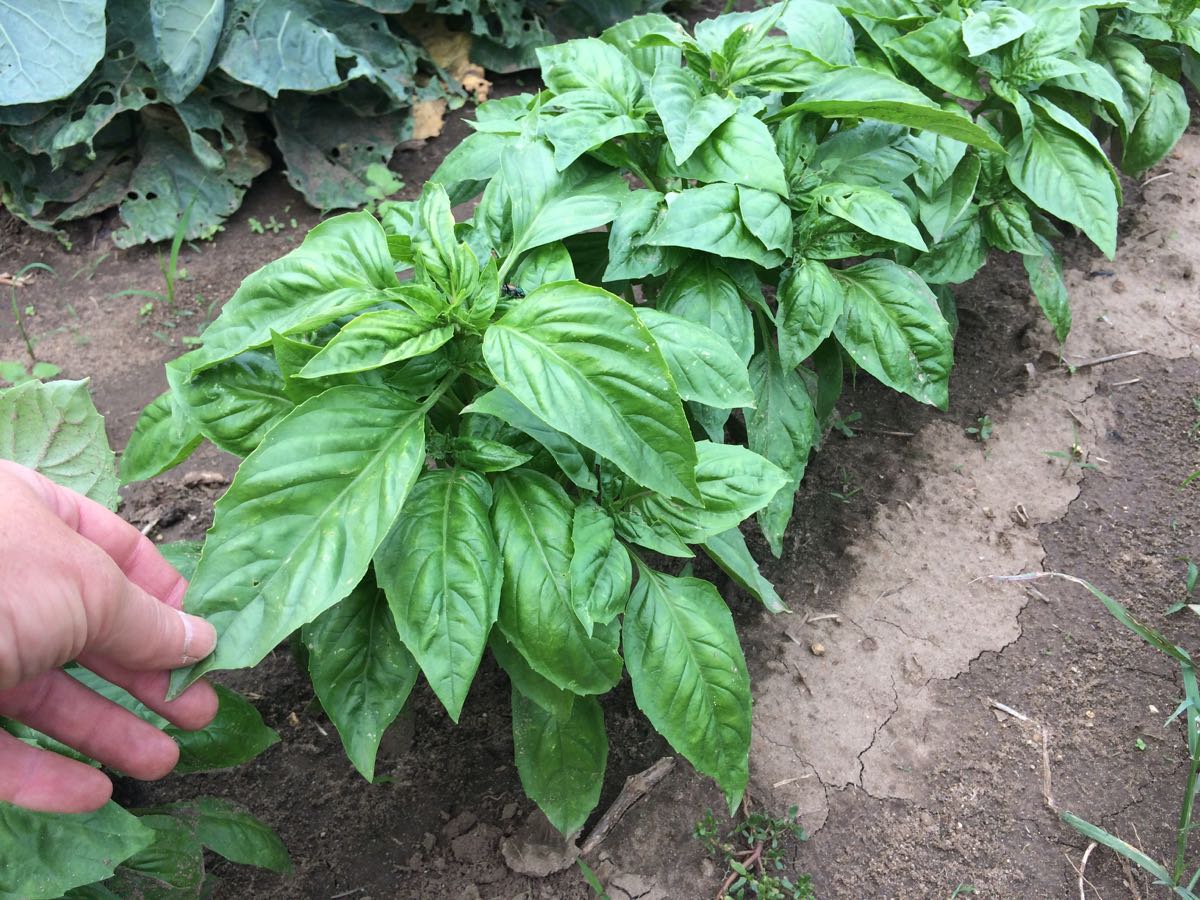
The new ‘Prospero’ variety grown in the same field, but with almost no disease. This is a big improvement! This variety was selected in an Israeli breeding program.

Because of BDM, we have to plant multiple basil fields, then harvest the plants young. Usually four or five basil plantings per year, with two harvests per planting, maybe three if we’re lucky. You can have low levels of BDM in a field but it doesn’t explode until the canopy closes. It’s the humidity. We have to harvest the basil before the plants are touching each other. Also, I scout our basil fields a lot. If I find a small amount of DM, I cut the plants at the soil, put them in a plastic bag, and put the bag in the sun to solarize.
Harvesting young means the quality is excellent, but the plants don’t have a chance to bulk up. As a result, we are unlikely to have bulk basil to sell to you folks. It’s too precious and scarce and we need it all for the CSA boxes. I will let you know if this changes with the new resistant varieties. By next year, I expect to be able to sell bulk basil again. Beth
Cucumber updates
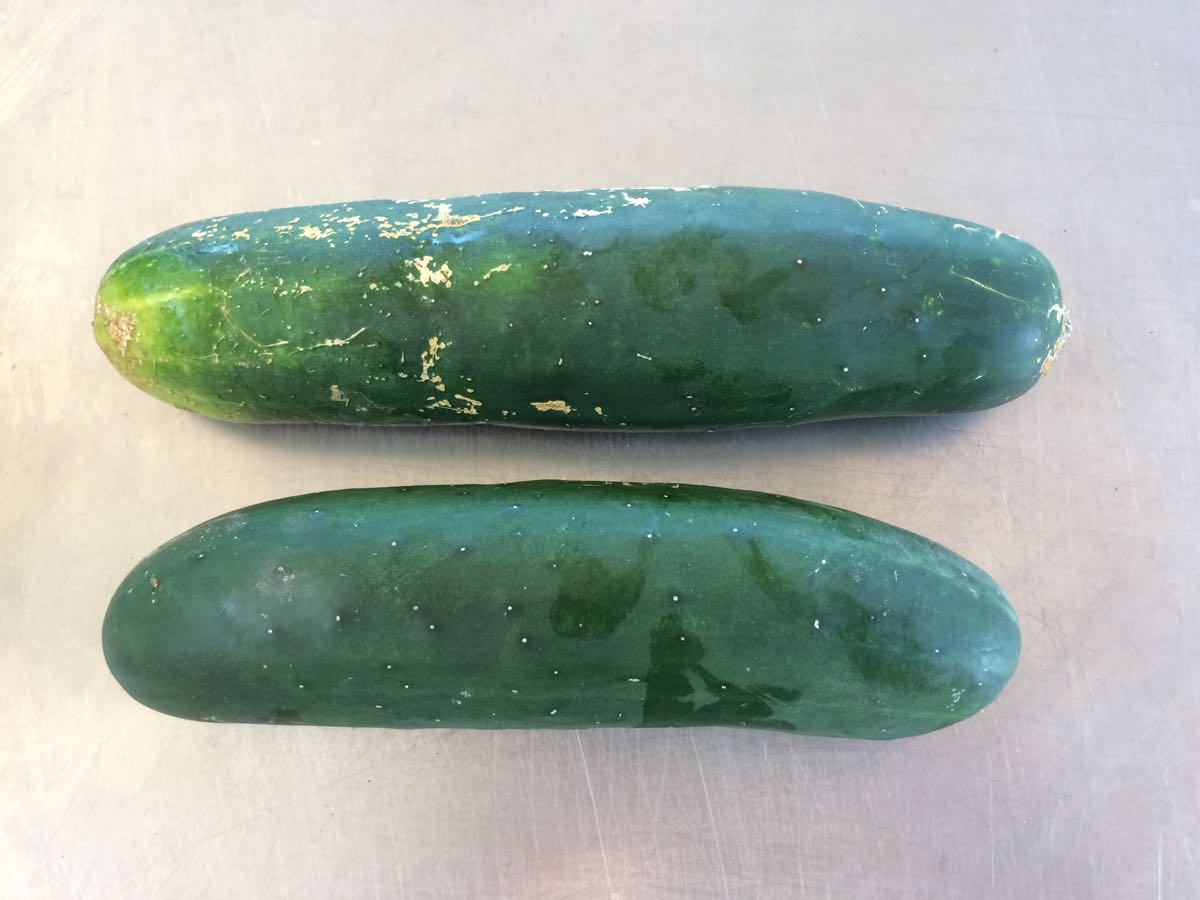
We are transitioning between cucumber fields. The top cucumber is from a field we just finished harvesting. The scarring accumulates from bug damage and from handling the plants during harvest. The cucumbers taste fine but you’ll want to peel these ones. The pretty, unscarred cucumber at bottom is the first harvest from a new field.
We experimented with direct seeding cucumbers this year, a way to avoid the effort of growing and transplanting seedlings. Transplants are useful in spring; they let us get a jump on the season. By summer, that’s less valuable. We planted seeds directly, cultivated with the tractor to keep the weeds down, and now we have a nice small patch of fresh cucumbers to harvest. We’ll do this again.
Get ’em while they’re young

Chance, Andrew, Ari, Riley and Owen. Billy (at right) manages the group.
Our high school employees are finished for the season. This is a good group of kids and we will miss their help. We routinely hire four or five high school students to work over summer break. It’s a good job for teenagers. We limit their hours to 8 am to 12 noon, and send them home before it gets too hot. It gets them out of bed in the morning, then they have the rest of the day to themselves. Their work is more routine than our main crew, who handle a wide variety of vegetables with finesse. The high school employees weed, pick peas, strawberries and beans, and harvest many, many onions.
This group did something different. One day, we were under intense pressure, with too much work and too little time. We were faced with a choice of which crop to harvest, knowing that the neglected crop would be lost for good. The high schoolers talked together, then approached us and offered to work in the afternoon too. They saved the day, and are the primary reason that you got big bags of peas earlier this year. No high school crew has done this. We were touched and impressed. Beth
Veggie List and Veggie Notes
Week #15, August 29/30, 2019 (Th/Fri sites)
– Weekly shares
– EOW/ purple
– Sampler/ sun
Sweet corn, 8 or 9 ears
Watermelon, yellow (most sites) or red (one site)
Tomatoes, slicing & plum, 4.75 lb total
Bell peppers, red or green or yellow, ~2
Cucumber, green or silver, 1
Walla Walla onion, 1
White onion, 1
Jalapeno chile (HOT), 1
Basil, 1 small bunch
Garlic, 1 bulb
– Some sites get a small lettuce, and some sites get an extra cucumber.
– Everyone gets a few specialty peppers, of one type: Oranos snack peppers OR Jimmy Nardello frying peppers OR shishito peppers OR a red frying pepper. All the specialty peppers are sweet, although an occasional shishito will be hot.
Next week’s box will probably contain tomatoes, peppers, melon, onions, kale, carrots, garlic and more.
Sweet corn – This is the final corn delivery for the year. We hope you enjoyed it! This delivery is a mix of yellow corn plus a yellow-and-white bicolor. You might get one type or a mix.
Watermelon – Most sites get a yellow watermelon.
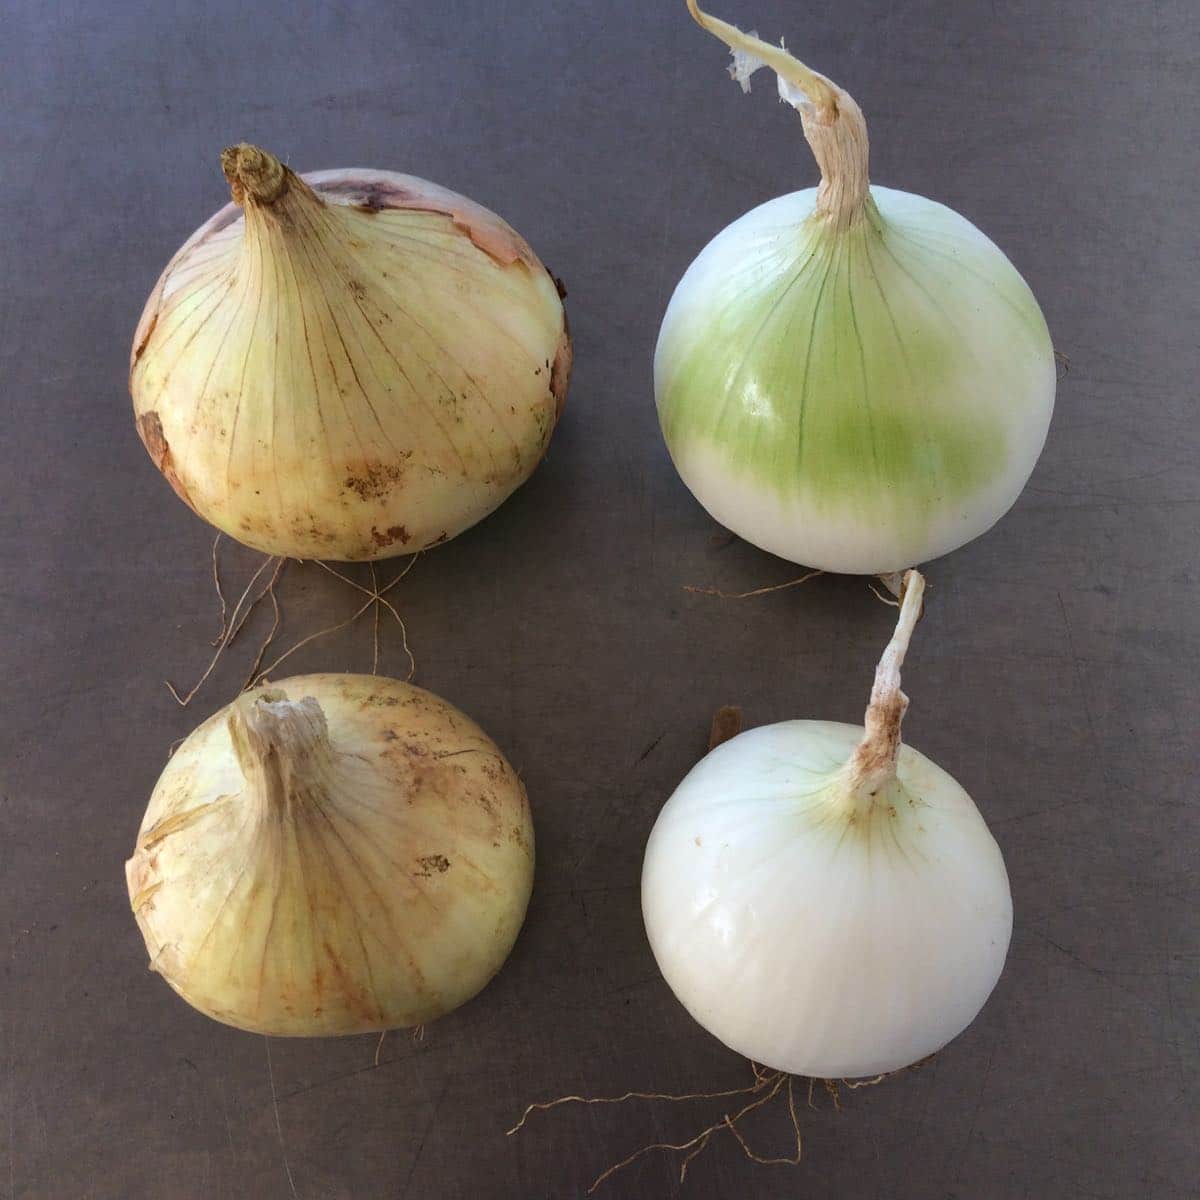
You’ll receive both a Walla Walla onion (left) and a white onion (right). Walla Wallas are sweet, excellent for salads or grilling. White onions are intermediate in pungency between sweet onions and yellow storage onions. They will fry better than a Walla Walla but not as well as a yellow storage onion. We’re sending these two types together because they have different uses, and you can tell them apart.
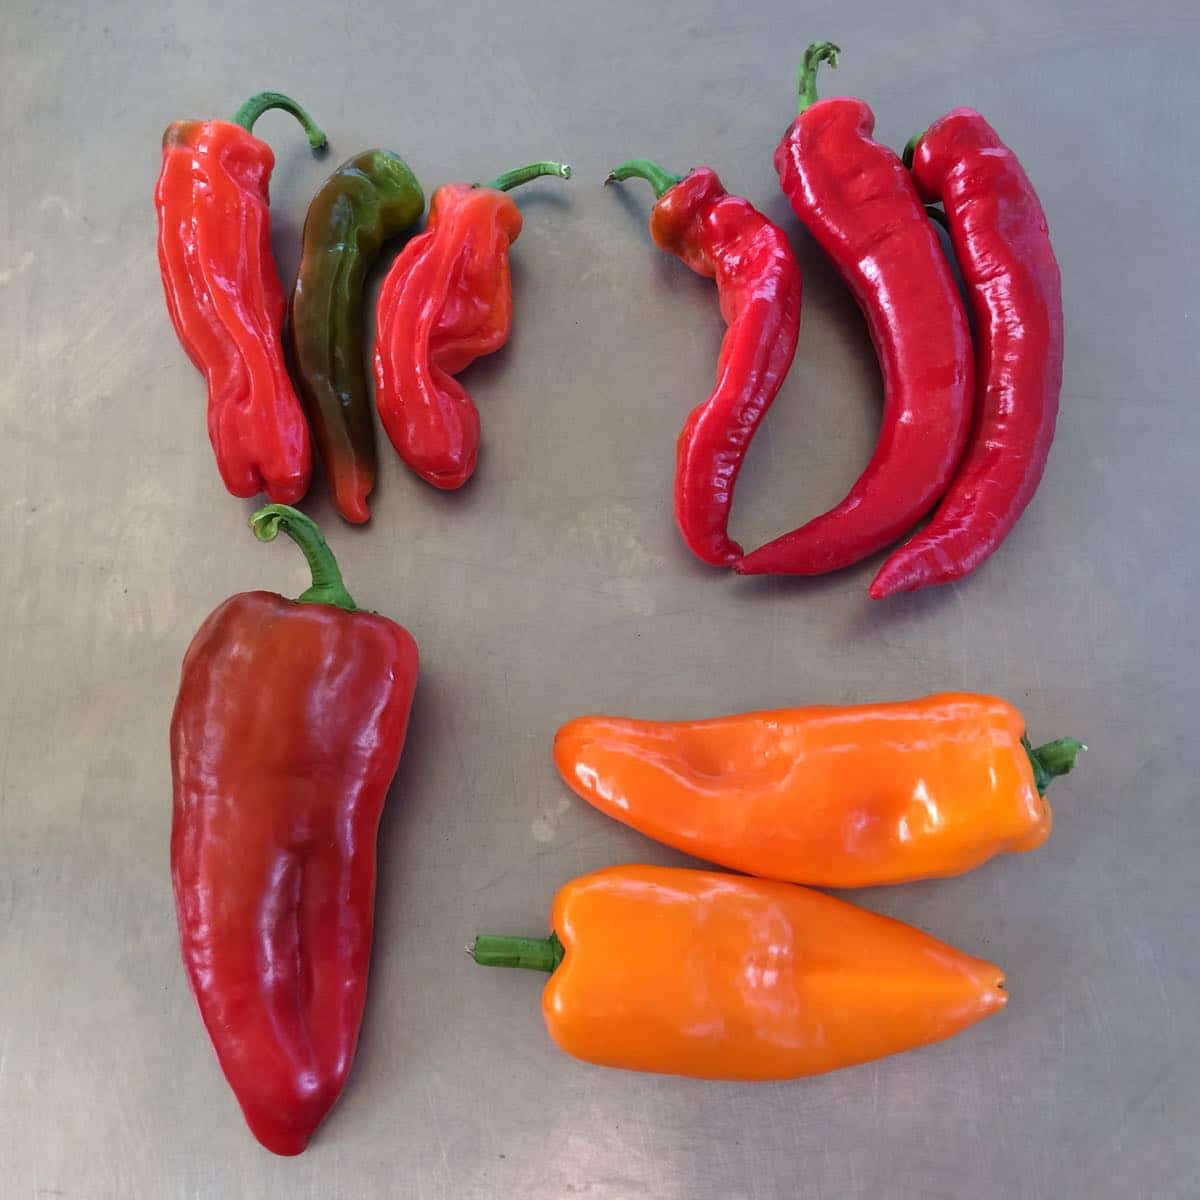
Each site gets one type of specialty pepper. Clockwise from top left; shishito peppers OR Jimmy Nardello frying peppers OR Oranos snack peppers OR a red frying pepper. All types are sweet, although the shishitos will occasionally be hot.
RECIPES
Visit our 2019 Recipe Log or our 2018 Recipe Log or join our Facebook discussion group.
LOCAL THYME/ Comforting Classics
Roman Chicken and Peppers
Corn and Pepper Frittata with Cheddar and Bacon
Pesto Baked Tomato
Cajun Kale and Corn Salad
LOCAL THYME/ Outside the Box Recipes
Jalapeño and Corn Studded Cheddar Polenta with Roasted Pepper Salsa
Grilled Corn with Miso Butter
Whole Wheat Pasta with Chunky Pine Nut Sauce and Marinated Tomatoes
Hamburgers with Romesco Sauce (or choose your fave veggie burger)
LOCAL THYME/ Quick and Easy Meal
Turkey and Bacon Sandwich with Lightly Pickled Vegetables
????????????
RECIPES FROM LAUREN
TOMATO & SWEET CORN PASTA SALAD
Serves 8-12 as a side.
Takes 40 minutes.
1 pound pasta, the type is your choice
4 ears corn, husks removed
1 cucumber or silver slicer, seeded and diced
1/2 Walla Walla onion
1 pound tomato, seeded and roughly chopped
1 jalapeno, diced
1/2 cup basil leaves, roughly chopped
Dressing:
1/4 cup mayo
1/4 cup Greek yogurt
1 tablespoon white wine or white vinegar
1 tablespoon kosher salt
1/2 tablespoon sugar
1/2 teaspoon freshly ground black pepper
- Bring a large pot of well-salted water to a boil on the stove over high heat. Once boiling, add pasta and cook to al dente according to package directions.
- While pasta cooks, prepare your dressing by whisking together all ingredients.
- Drain pasta in a colander and let sit for a minute to lose some of the water, then add to a large bowl. Add dressing to noodles while they’re still warm and toss to combine. Set aside.
- Refill stock pot with salted water and bring to a boil. Once boiling, add sweet corn and cook for 4 minutes. Meanwhile, chop your other veggies. Rinse corn under cold water to cool and then cut off kernels with a knife. Add cucumber, onion, tomatoes, jalapeno, corn, and basil to bowl. Toss to combine.
- Taste and adjust salt and pepper as desired.
.
????????????
.
MARINATED TOMATO SALAD
Serves 4-6.
Takes 20 minutes, plus time to chill.
6 plum tomatoes, cut into large chunks or wedges (or 1 pint cherry tomatoes, halved)
3 bell or sweet peppers, any color, diced
1 white onion, diced
1 cup (or so) pitted whole black olives
Dressing:
2/3 cup vegetable oil
1/4 cup vinegar
1/4 cup fresh basil, loosely chopped
1/4 cup minced garlic
1 teaspoon salt
1/4 teaspoon pepper
1 teaspoon sugar
1/2 teaspoon dried parsley
1/2 teaspoon dried marjoram
- Place all sliced vegetables in a large bowl. Add olives.
- Whisk together dressing ingredients and pour over vegetables. Refrigerate 3-4 hours before serving.
.
Week #14, August 22/23, 2019
- On: August 22, 2019
- 0
Our second tomato field is finally ready to harvest. It was delayed by the cold spring weather, long ago. We’ve been waiting and watching for weeks, and are glad to move into a fresh field. The quality is better (which we all appreciate) and picking is easier. We are still harvesting from our early planting, and will continue until the new field is in full production.
Please eat your slicing tomatoes quickly. They are from the early planting, were picked ripe, and we know they will not store for long. Eat your slicing tomatoes first this week, then your plum tomatoes. Beth
Veggie List and Veggie Notes
Week #14
– Weekly shares
– EOW/ green
Sweet corn, 6 or 7 ears
Watermelon, orange or yellow
Tomatoes, plum & slicing, ~2.25 lb total
Bell or frying peppers, green or red or yellow, ~2
Cucumber, 1
Green & yellow wax beans, 1 to 1.2 lb
Walla Walla onion, 1
Basil, 1 sprig
Each site gets something from this list:
– a small globe eggplant.
– Silver Slicer cucumbers.
– Oranos (orange snack pepper).
Some sites get Jimmy Nardello or shishito peppers.
Next week’s box will probably contain melon, tomatoes, peppers, onions, lettuce and more.
Watermelon – Refrigerate these melons. The orange ones are more perishable than typical red watermelons.
Tomatoes – Eat your slicing tomatoes first. The plum tomatoes will hold up better.
FOR A FEW SITES THIS WEEK, Jimmy Nardello peppers (sweet, not hot) – We planted a small patch of these as an experiment, and we will share them among the sites are they are ready to harvest. Here is the seed catalogue description. “This fine Italian pepper was grown each year by Giuseppe and Angella Nardiello, at their garden in the village of Ruoti, in Southern Italy. In 1887 they set sail with their one-year-old daughter Anna for a new life in the U.S. When they reached these shores, they settled and gardened in Naugatuck, Connecticut, and grew this same pepper that was named for their fourth son Jimmy. This long, thin-skinned frying pepper dries easily and has such a rich flavor that this variety has been placed in “The Ark of Taste” by the Slow Food organization. Ripens a deep red, is very prolific, and does well in most areas.” Can you see why we want to grow this one?
FOR A FEW SITES THIS WEEK, Shishito peppers (sweet, not hot) – We also have a small patch of shishito peppers to share as they ripen. From the Johnnys Seed catalogue: “Heavily wrinkled fruits are thin walled, mild (no heat) when green and slightly sweet when red. Popular in Japan where its thin walls make it particularly suitable for tempura. Also very good in stir fries or sautés. In Asia, fruits are always cooked green but they also may be used red. Thinly sliced, the red fruits are excellent in salads and coleslaw.”
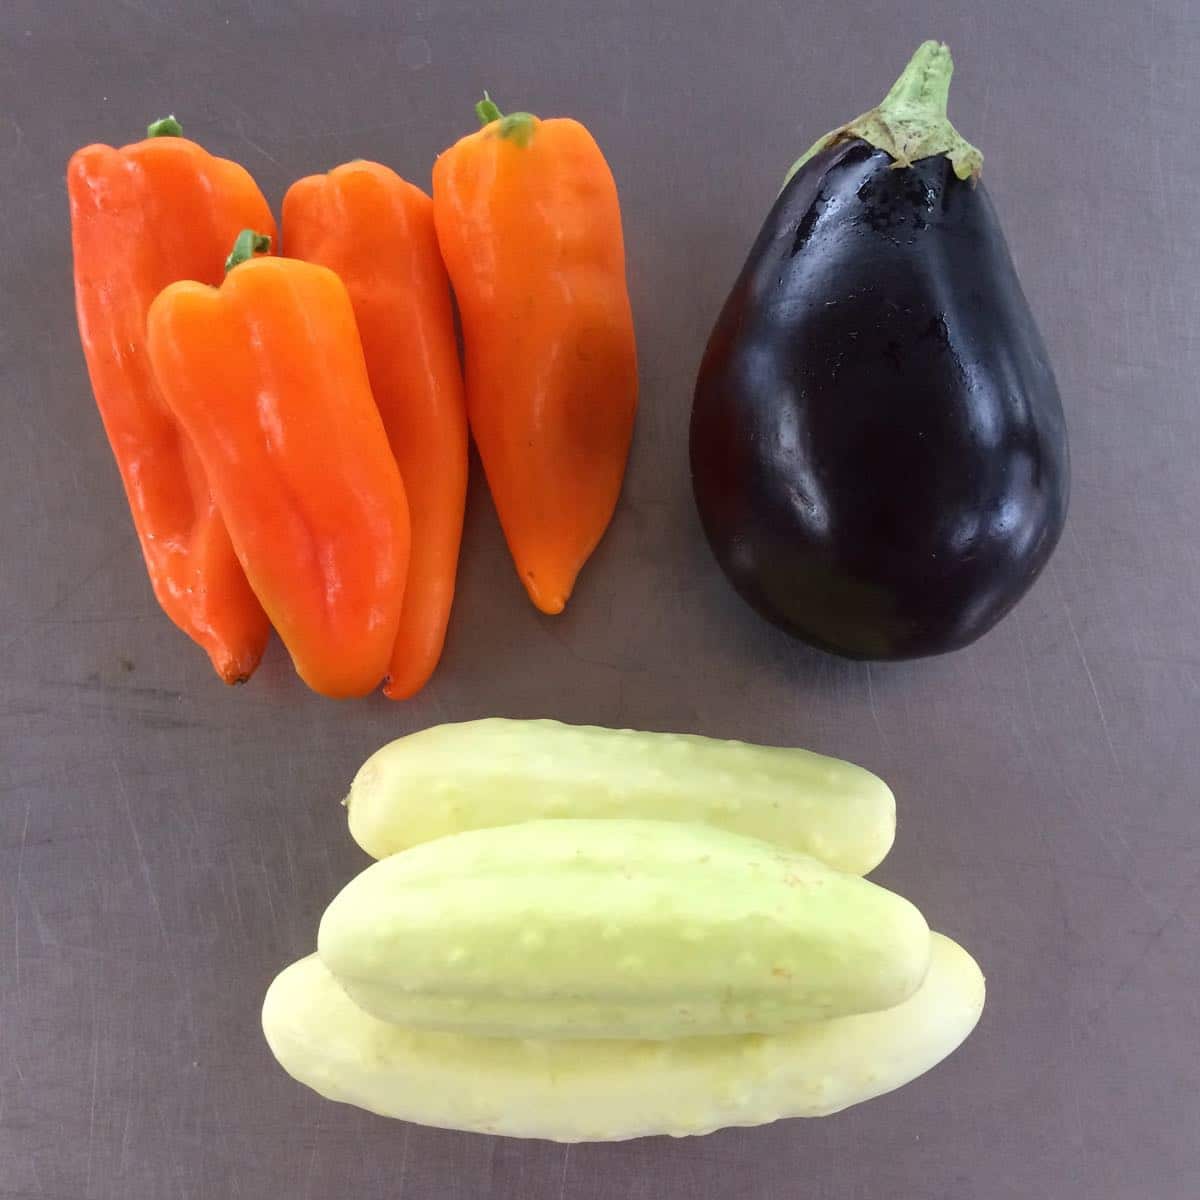
Everyone gets one of these. From top left; Oranos snack peppers OR globe eggplant OR Silver Slicer cucumbers.
A few sites get one of these specialty peppers. We’ll share them among the sites as they ripen. Left; Jimmy Nardello peppers. Right; shishito peppers.
RECIPES
Visit our 2019 Recipe Log or our 2018 Recipe Log or join our Facebook discussion group.
Four Bean Salad
Wax Bean and Tomato and Olive Salad
LOCAL THYME/ Comforting Classics
Light Vegetable Corn Soup
Four Bean Salad
Watermelon Basil Agua Fresca
Rigatoni alla Norma with Eggplant and Fresh Tomatoes
LOCAL THYME/ Outside the Box Recipes
Sweet Corn and Basil Lasagna
Wax Bean and Tomato and Olive Salad
Citrus and Spice Pickled Watermelon Rind
Keralan Braised Vegetables with Green Beans, Eggplant and Corn
LOCAL THYME/ Quick & Easy Meal
Simple Summery Pasta Salad with Corn, Tomato and Basil
????????????
RECIPES FROM LAUREN
CORN, TOMATO, and AVOCADO CHICKPEA SALAD
Adapted every so slightly from Half Baked Harvest
Takes 15 minutes
Serves 4
Basil spring, roughly chopped
1 can (14 ounce) chickpeas, drained
4 ears grilled or steam corn, kernals removed
3 cups diced tomatoes, seeds removed
1 colored pepper, seeded and diced
1 cucumber, diced
1/2 Walla Walla onion, diced
1 cup cubed feta cheese
1 avocado, diced
Dressing:
1/3 cup extra virgin olive oil
1/2 Walla Walla onion, finely chopped
2 tablespoons fresh lemon juice + the zest of 1 lemon
2 teaspoons honey
2 tablespoons red wine vinegar
1 pinch crushed red pepper flakes
Kosher salt and black pepper
- To make the salad, combine the basil, chickpeas, corn, tomatoes, and cucumbers to a large bowl.
- Make the dressing by heating the olive oil in a medium skillet over high heat. Add the onion and cook until fragrant, 2-3 minutes. Remove from heat and let cool slightly. Add the lemon zest, lemon juice, honey , and red wine vinegar. Season with red pepper flakes, salt and pepper to taste.
- Pour the dressing over the salt, tossing to combine. Top the salad with avocado and feta.
.
????????????
GREEN BEANS WITH CARAMELIZED ONION
Adapted from Bon Appetit
Takes 30 minutes
Serves 2-4
2 tablespoons olive oil
4 garlic cloves, minced
1 pound green beans, ends trimmed
1 onion, thinly sliced
1/4 teaspoon red pepper flakes
Kosher salt and freshly ground black pepper
- Heat olive oil over medium heat in a large saute pan. Add garlic and saute for 1-2 minutes until fragrant.
- Add beans, onion, red pepper flakes, salt and pepper. Saute over medium heat, stirring every couple minutes, for 10 minutes. Some seasoning will stick to the bottom of the pan. After 10 minutes, add a tablespoon or two of water and scrape up any bits from the bottom of the pan. Simmer until reduced to a nice sauce, about 5 minutes more. Add additional salt and pepper to taste. Serve warm.
.
Week #13; Garlic harvest!
- On: August 14, 2019
- 0
We have a beautiful crop of garlic this year. The bulbs need to dry for a few weeks, then we’ll start packing them in the CSA boxes.
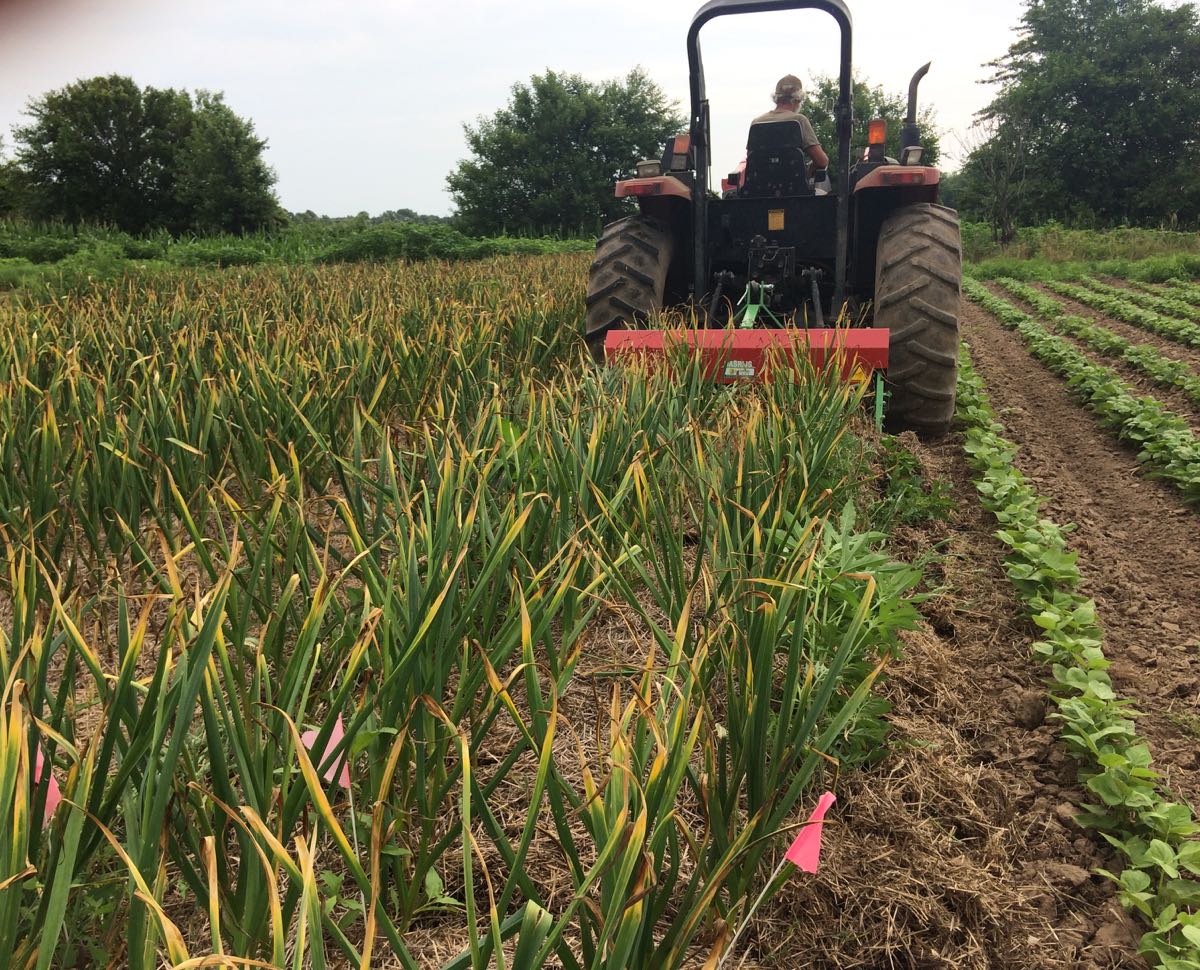
Above, Steve loosens the garlic with our imported undercutter, the new tool I wrote about last month. I rolled my eyes when he suggested it for this job but it worked amazingly well. In the photo above, he has already undercut the bed of garlic. The undercutter lifted the plants up enough to loosen them, then dropped them back in place, still standing upright. We pull the garlic by hand when the ground is moist but (at that moment) it was too dry. This was an excellent moment to use the undercutter instead of digging the garlic up with shovels.
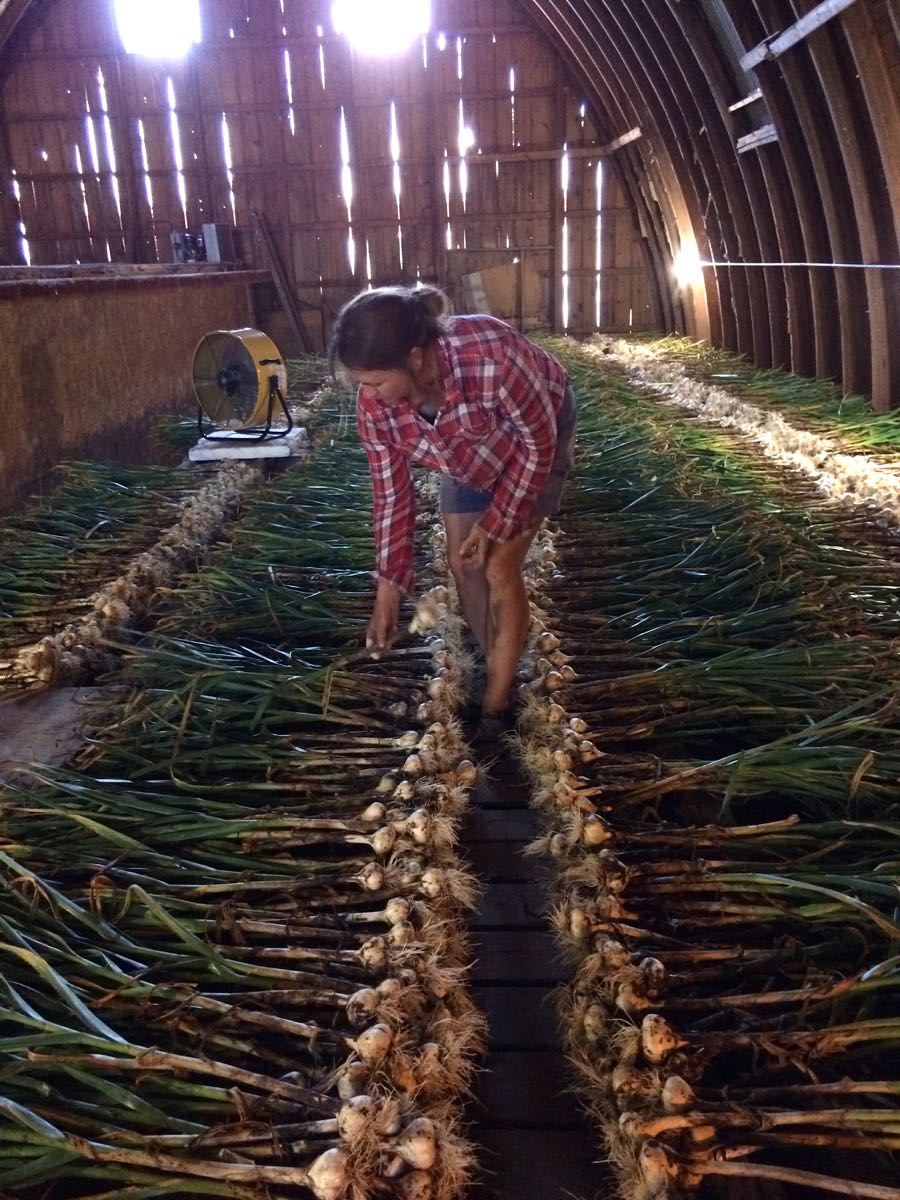
Above, Karen lays harvested garlic in shallow piles. Our barn loft stays very dry, a good place to cure the garlic.
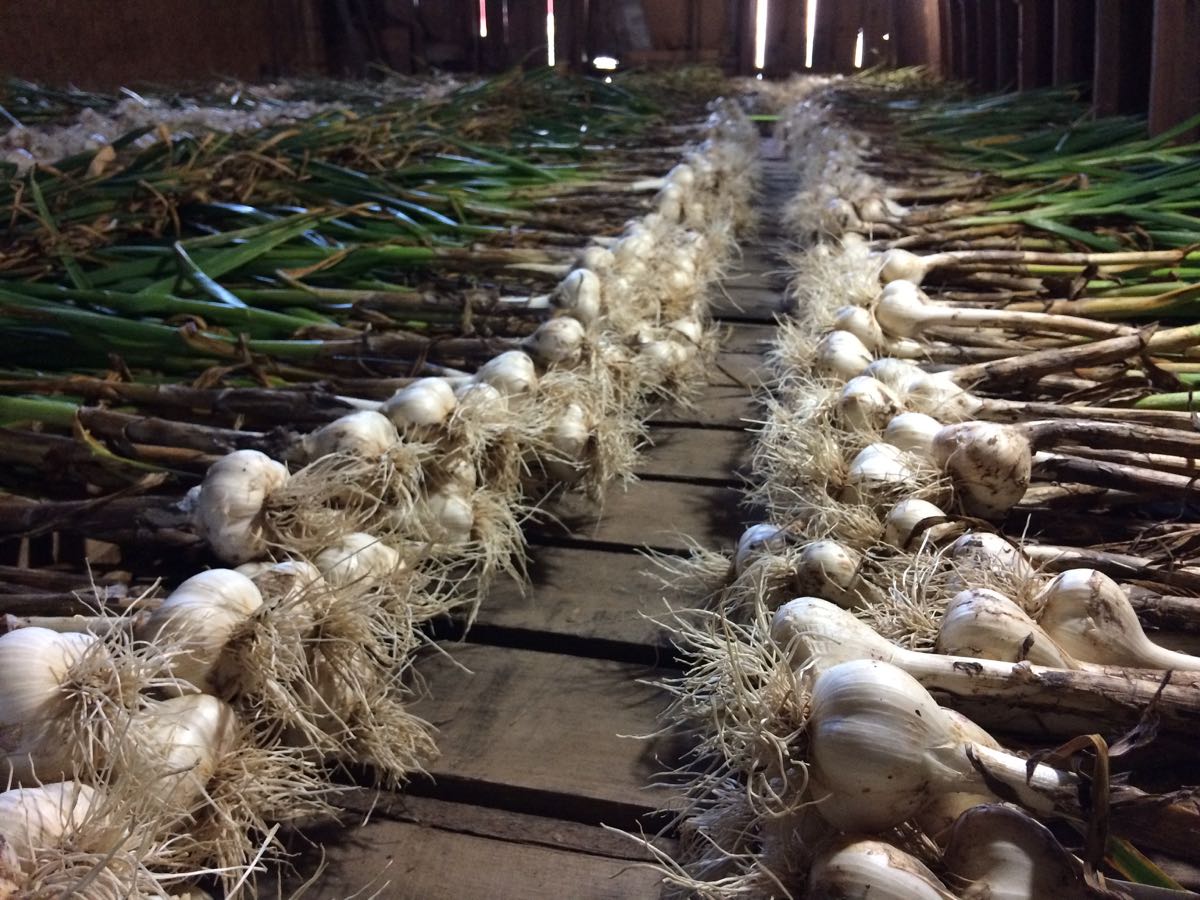
It looks like we standing on the floor but we’re actually five feet in the air, standing on overturned wooden bins. We store carrots and other roots in these bins in winter. They are empty right now, a great surface to spread the garlic. The bins have slatted sides, so air circulates through them.
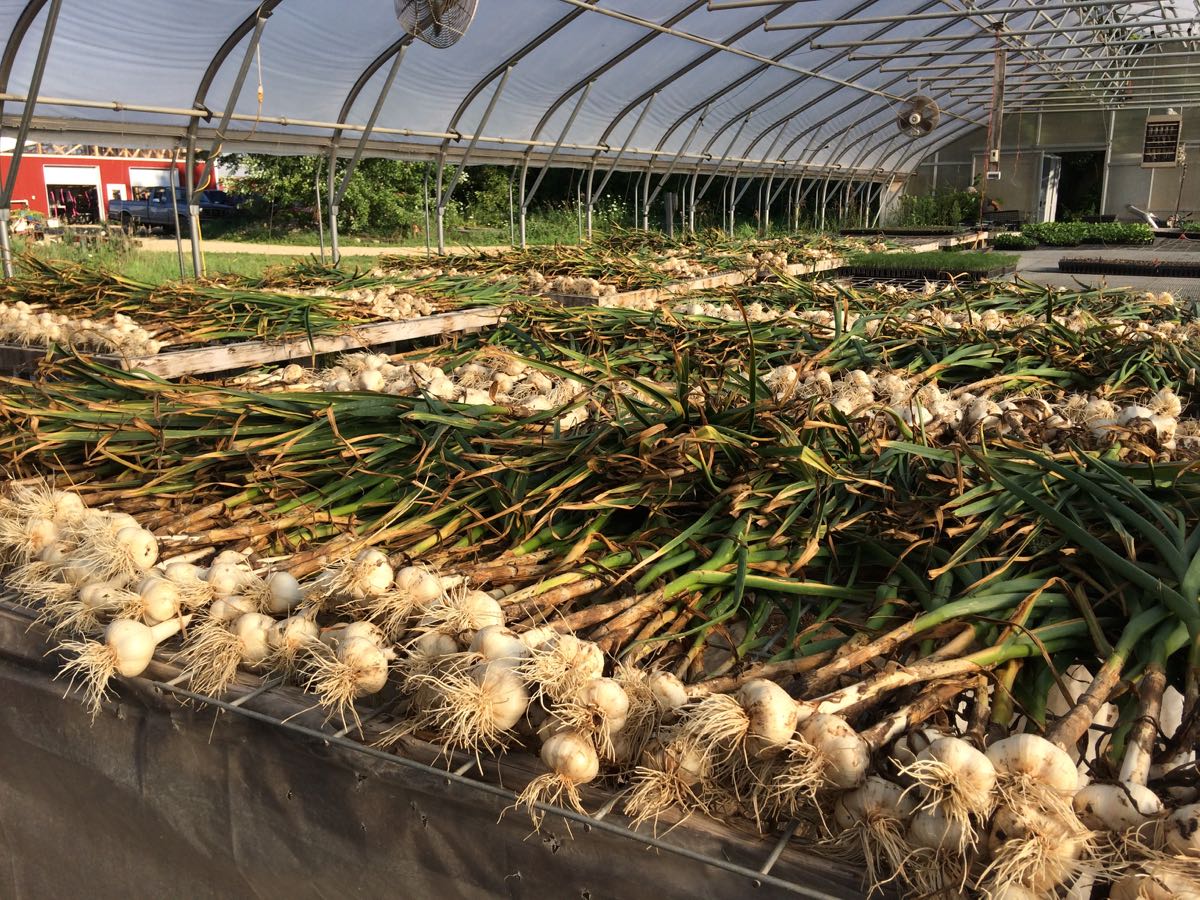
We ran out of room in the barn and filled some empty benches in the greenhouse. The friend who grew half our garlic in past years has retired from farming, so we planted much more than usual this year.
Veggie List and Veggie Notes
Week #13, August 15/16, 2019
– Weekly shares
– EOW/ purple
– Sampler/ moon
Sweet corn, 9 or 10 ears
Muskmelon, green or orange
Yellow or green beans, 1/3 lb
Tomatoes, mixed slicing & plum, ~ 2.5 lb total
Pepper, 2 red or green, bell or fryers
Cucumbers, ~2
Walla Walla onion
Red onion
Parsley, 1 bunch
Basil, 1 small sprig
Jalapeno chile (HOT), 1
Some sites get a Silver Slicer cuke OR orange snack pepper (Oranos)
Next week’s box will probably contain sweet corn, melon, tomatoes, peppers, cucumbers, onion and more.
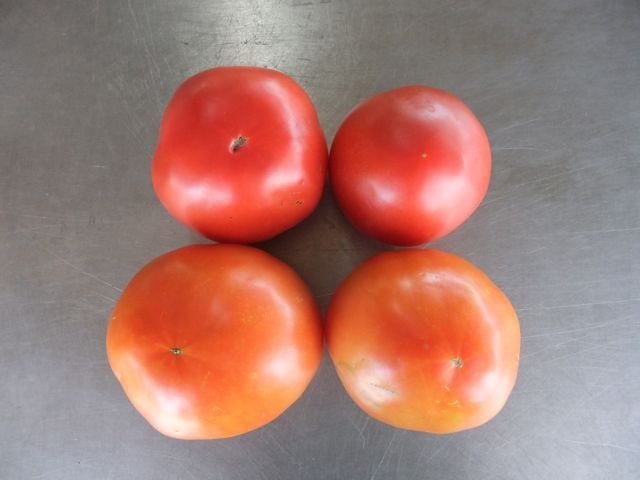
Ripe (top) and less ripe tomatoes (bottom).
Tomatoes – As usual, we pack a mix of ripe and less-ripe tomatoes so you can stretch them through the week. The top tomatoes in the photo are ready to eat. The bottom tomatoes can ripen at room temperature for a few days. Put on your counter or keep in a brown paper bag.
Storage: Tomatoes retain their best flavor and texture when stored at room temperature, no lower than 55 F. However, you should refrigerate your tomatoes if they are fully ripe and you don’t expect to eat them right away. It is better to sacrifice a little flavor and texture than lose your tomatoes to rot. Also, fully ripe tomatoes are less sensitive to chilling injury.
Sweet corn – There are not many caterpillars at the tips this week. Nonetheless, if you are squeamish about bugs, I suggest that you cut off (and discard) the tips of the ears before you husk them. That way, you can avoid seeing the bugs.
Muskmelon – Everyone gets either a green or an orange muskmelon. The green variety is new and unusual but tastes like a typical orange melon. Both types have the typical netted exterior. Storage: Some are ripe and ready to eat. Some need to ripen a day or two on your kitchen counter. Keep at room temperature but refrigerate if not eaten within 2 – 3 days.
Jalapeno chiles – These are hot.
Cucumbers – We now have both normal and Silver Slicer cucumbers to share. We’ll scatter the Silver Slicers among the boxes as they are ready. They are medium-sized white cucumbers with thin skins. They can be used interchangeably with slicing cucumbers in recipes, or mixed together. However, their best use is as a snack. Hand these to the kids on the ride home from picking up your CSA box. There’s no need to peel them. As usual, store all types of cucumbers in the warmest part of your fridge.
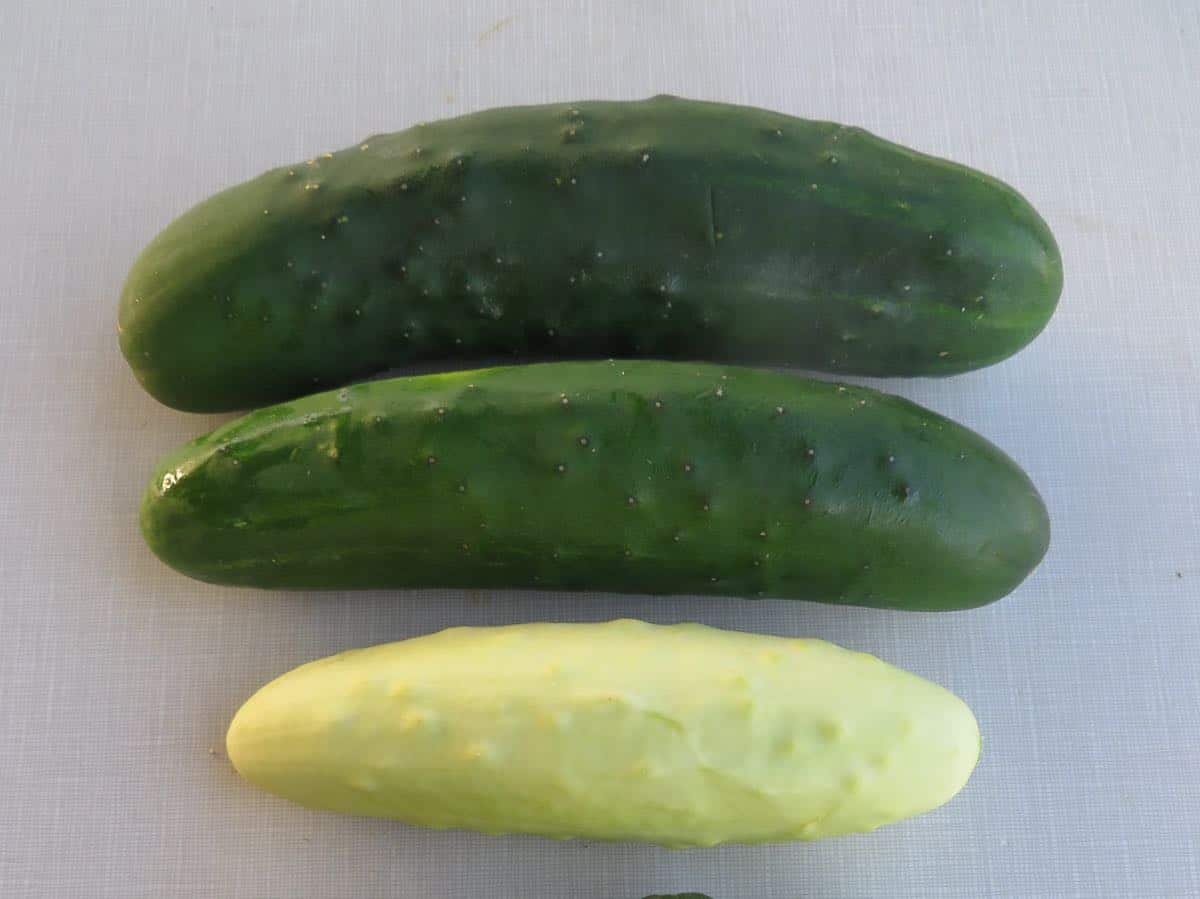
Some sites get slicing cucumbers (top). Some sites get a mix of slicing cucumbers and ‘Silver Slicer’ cukes (bottom).
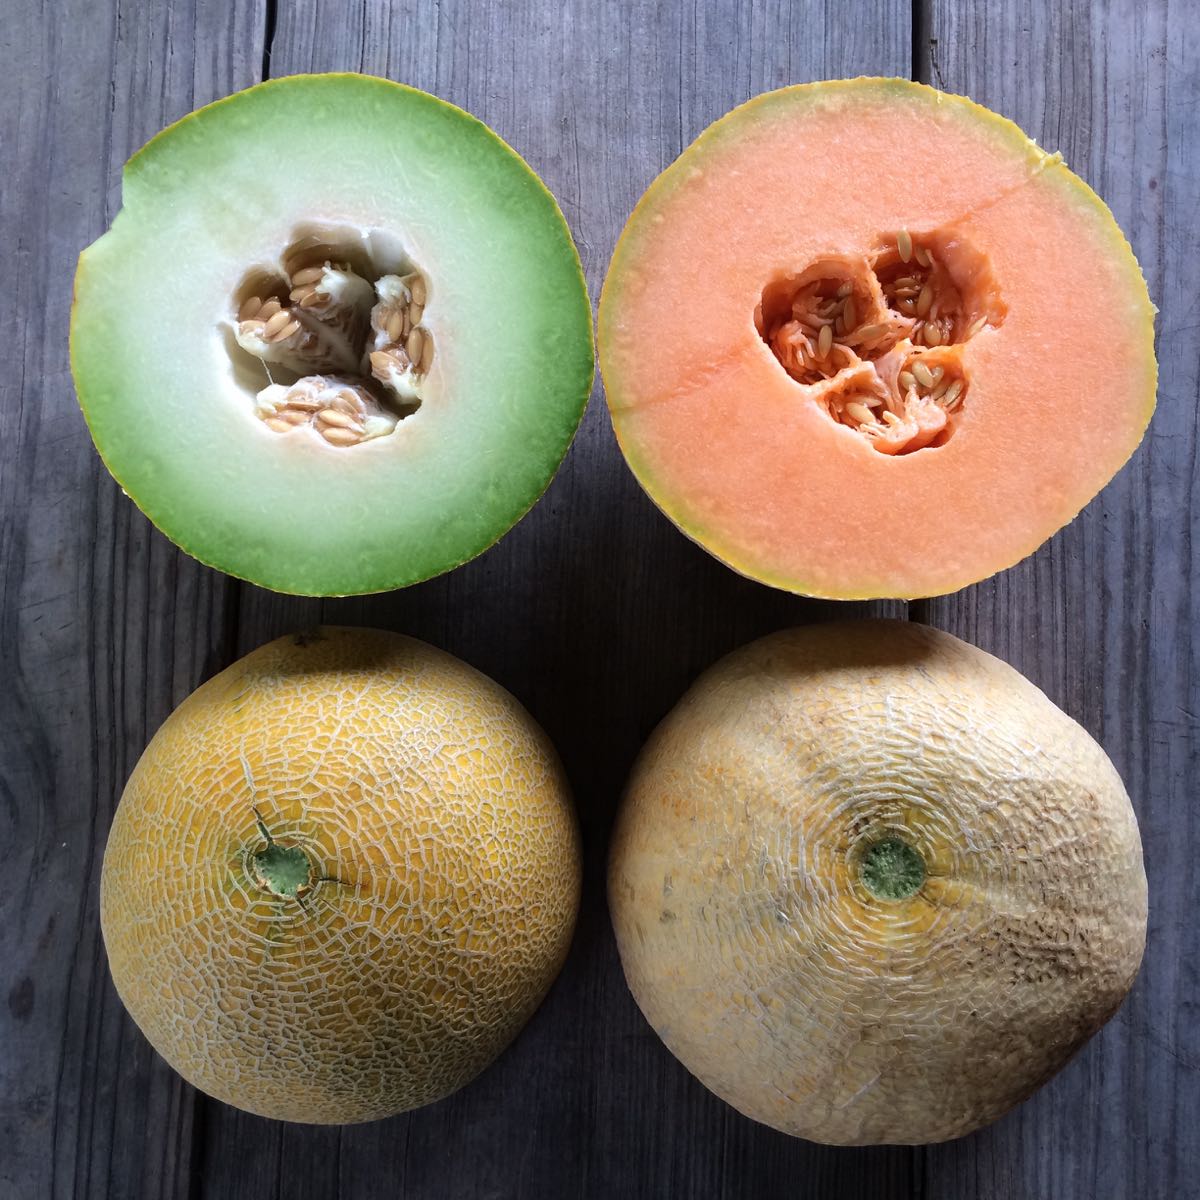
Everyone gets a green or orange muskmelon.
RECIPES
Visit our 2019 Recipe Log or our 2018 Recipe Log or join our Facebook discussion group.
LOCAL THYME/ Comforting Classics
Tomato Gazpacho with a Kick and Polenta Croutons
Grill Blistered Italian Frying Pepper Salad
Tuscan Rigatoni with Tomatoes and Pancetta
Velvet Chicken and Corn Soup
LOCAL THYME/ Outside the Box Recipes
Quinoa Tabbouleh with Corn
Mediterranean Stuffed Peppers
Spicy Chicken Paella
Mustardy Grilled Corn and Sausage Kebabs
LOCAL THYME/ Quick & Easy Meal
Spiced Shrimp with Corn Cakes
????????????
RECIPES FROM LAUREN
SWEET CORN FRITTERS
Adapted from Bon Appetit
Takes 30 minutes.
Serves 2-4.
1 green frying or bell pepper, seeded and cut into quarters
1 jalapeno, seeded, cut in half
1/2 Walla Walla, roughly chopped
1/2 cup flour
2 eggs
1/2 cup parmesan
1 teaspoon Kosher salt
1/4 teaspoon freshly ground black pepper
2 cups sweet corn kernals (not cooked!)
1/4 cup vegetable oil, divided
Basil Yogurt Sauce (recipe below)
Hot sauce, optional
Diced tomatoes, optional
1/4 cup vegetable oil, divided
- In a food processor combine peppers and onion. Process until finely chopped. Add flour, eggs, parmesan, salt and pepper. Process until eggs are fully incorporated. Add corn and pulse 3-4 times until uniformly mixed throughout.
- Heat a large heavy skillet over medium heat. Warm a tablespoon of oil for about 5 minutes. When the pan is quite hot and the oil is glistening, add a scant 1/4 cup of batter to the pan. You should have room for 3-4 fritters at a time. Fry for 4 minutes per side and until nicely browned. Set on paper towels so that most of the oil drains off. Continue cooking until you get through all your batter, adding more oil when the pan gets dry and adjusting the temperature as needed.
- Meanwhile, prepare your sauce.
- Serve 4-5 fritters on a plate with a heafty dollop of sauce, some hot sauce and diced tomatoes.
.
Basil Yogurt Sauce
1/4 cup mayonnaise
1/4 cup plain yogurt
1 teaspoon Dijon mustard
1 small spring basil, finely chopped
1/4 teaspoon Kosher salt
Few grinds fresh black pepper
In a small bowl, combine all ingredients and stir to combine.
????????????
HEAPED HUMMUS
Adapted from the amazing Smitten Kitchen
Below you will find links to my favorite simple hummus and pita recipes. You absolutely can make them from scratch. I have. It can be very fun if you have the time, but it’s also really fun to get a vat of incredible hummus and pile of pita from a great Mediterranean restaurant (like Banzo in Madison), whip up this quick salad, and pour it on top of the hummus for a very simple, very affordable, very fresh dinner. Do not feel like you need to avoid making life easy.
Also, if you still have any eggplant left in your box from last week, feel free to chop that into large chunks and toss it with 2-3 tablespoons of olive oil and roast it for 30 minutes at 400 degrees. Serve on the side of your heaped hummus plate. It will pair beautifully.
Serves 8-12 (as a snack) or 4-6 (as a meal).
Takes 20 minutes (if just making the salad) or 2 hours if making hummus and pita from scratch.
3-4 cups diced tomatoes
2 cucumbers, seeded and chopped
1 red onion, diced
1 red fryer, diced
1/2 cup diced parsley
2 tablespoons olive oil, plus more for drilling
1/2 lemon, juiced
1 teaspoon Kosher salt
1/4 teaspoon freshly ground black pepper
1 batch ethereally smooth hummus, preferably at room temperature
1 batch whole wheat pita, cut into triangles
- In a large bowl, combine all veggies with parsley, olive oil, lemon, salt and pepper. Stir well, taste and adjust seasonings as desired.
- Prepare you hummus and then spread it out (or maybe 1/3 of it out if not serving all 8-12 people at once) on a large platter. Using a slotted spoon, heap hummus with veggies placing them on top and in the center (so some hummus is still visible on all sides). Drizzle with olive oil and enjoy with pita triangles!
.
Week #12
- On: August 12, 2019
- 0
Veggie List and Veggie Notes
Week #12
– Weekly shares
– EOW/ green
2 – 2.5 lb tomatoes, mostly slicers + some plums
1 pint cherry tomatoes
1.6 lb beets
2 – 3 cucumbers, green or Silver Slicer
3 – 4 zucchini/ squash
2 green + 1 purple bell peppers
Walla Walla onion
red onion
a red or yellow watermelon
a yummy Korean melon, crisp and sweet
1 nice bunch basil
Next week’s box will probably contain sweet corn, melon, tomatoes, peppers, onions, and more.
Tomatoes – Tomatoes fare best if stored at room temperature, in a paper bag or laid on a plate with the shoulders down. We send a mix of ripe and ready to eat, as well as a few that are slightly less ripe. This helps extend your tomatoes through the week.
Watermelon – Can be stored at room temperature. Refrigerate once cut.
Korean melon (yellow, oblong) – These unusual melons are sweet and crisp, reminiscent of a good honeydew. This new variety ‘Torpedo’ is an improvement over last year’s Korean melons. They are ready to eat. OK to store at room temperature for up to three days (they will continue to ripen). Refrigerate once cut.
Red onion – This week’s red onions sunburned while curing in the field last weekend. We can’t throw these beautiful onions away. Please cut off the flat , sunburned area before using; the rest of the onion is in good shape. Refrigerate and use soon. We don’t know if storage is affected.
RECIPES
Visit our 2019 Recipe Log or our 2018 Recipe Log or join our Facebook discussion group.
LOCAL THYME/ Comforting Classics
Sweet Zucchini Pickles
Spice Rubbed Chicken and Zucchini, Pepper and Onion Tacos with Chipotle Cream
Chicken and Andouille Jambalaya
Bruschetta with Beets and Goat Cheese
LOCAL THYME/ Outside the Box Recipes
Zucchini Brownies with Chocolate Chips
West Indian Kebabs
Hoppin John
Jade Rice Bowl with Grilled Beets, Pork Tenderloin and Feta in a Stone Ground Mustard Vinaigrette
LOCAL THYME/ Quick and Easy Meal
Cherry Tomato Pasta Puttanesca
????????????
RECIPES FROM LAUREN
ZUCCHINI & BURST TOMATO PIE
Adapted from How Sweet Eats
Takes 1 hour, 30 minutes
Serves 6
2-3 cored and sliced tomatoes
1 cup shredded cheddar cheese, divided
1 tablespoon olive oil
3 cups zucchini, cut into thick matchsticks
1 red onion, diced
1 green or purple pepper, diced
1 teaspoon Kosher salt
1 teaspoon dried oregano
1/2 teaspoon dried thyme
1 pint cherry tomatoes, halved
7 large eggs
2/3 cup milk
1/4 cup all-purpose flour
3 tablespoons chopped fresh basil
1/2 teaspoon black pepper
- Preheat oven to 375 degrees. Grease a 9 or 10-inch pie plate with butter. Line the bottom and sides of the pie plate with sliced tomatoes. Sprinkle with 1/2 cup cheese.
- Heat a skillet over medium heat and add the olive oil, zucchini, onion, pepper, salt, oregano and thyme. Saute for 5 minutes until zucchini is just beginning to get soft. Add tomatoes and cook until tomatoes are bursting, about 5 more minutes. Turn off the heat.
- In a large bowl, whisk the eggs, milk, flour, basil, pepper and another pinch of salt until combined. Add in the tomato zucchini mixture and remaining 1/2 cup grated cheese. Toss it together well. Pour the mixture into the prepared pan with tomatoes and cheese.
- Bake for 55 to 60 minutes, or until the center isn’t jiggling and the top is golden. Remove and let cool for 10 to 15 minutes. Slice into wedges and serve warm.
.
????????????
RAW BEET & CUCUMBER SALAD
Takes 30 minutes
Serves 4-6
2 pounds beets, peeled and very thinly sliced (ideally on a mandoline)
1 Walla Walla onion, halved and thinly sliced
1/4 cup balsamic vinegar
1 teaspoon maple syrup
1/2 teaspoon Kosher salt
3 cucumbers
2 tablespoons olive oil
1/4 teaspoon red pepper flakes
1-2 avocados, cubed, optional
- In a medium bowl, combine beets, onion, vinegar, maple syrup, and salt. Toss to combine and leave to sit for at least 20 minutes to lightly pickle.
- Use a vegetable peeler and peel strips of skin away from each cucumber so it has kind of a striped pattern. Halve the cucumbers lengthwise and remove the seeds with a spoon. Cut into 1/4-inch slices and place into large bowl.
- Right before serving, use a slotted spoon to remove beets and onions from pickling liquid and add to cucumbers. Toss gently and then drizzle the whole thing with two tablespoons olive oil, a tablespoon of the pickling liquid, red pepper flakes, and a couple pinches of salt and pepper. Toss again and then add avocado, if using. Taste and adjust seasonings as desired. It may need more vinegar, oil, salt or maple syrup according to your preference.
.
Week #11
- On: August 12, 2019
- 0
Veggie List and Veggie Notes
Week #11, August 1/2, 2019
– Weekly shares
– EOW/ purple
– Sampler/ sun
Quantities might not be exact.
sweet corn ~9 ears
green beans ~1 lb
carrots 2 lb
red Summercrisp lettuce
eggplant 1 or 2
cucumbers 3
Silver Slicer white cucumber 1
muskmelon
Walla Walla onion
basil 1 sprig
There might be zucchini.
Next week’s box will probably have melon, tomatoes, pepper, beets, cucumbers, onions and more.
Muskmelon – Ripe and ready to eat. Refrigerate.
Sweet corn – There are fewer caterpillars at the tips this week. Last week’s bugs were unusually early. Nonetheless, if you are squeamish about bugs, I suggest that you cut off (and discard) the tips of the ears before husking them. That way, you don’t have to even see the bugs.
RECIPES
Visit our 2019 Recipe Log or our 2018 Recipe Log or join our Facebook discussion group.
LOCAL THYME/ Comforting Classics
Salad with Cucumber, Tomato, Corn, and Fresh Mozzarella
Pancetta Braised Green Beans and Tomatoes over Mascarpone Polenta
Thai Vegetable Fried Rice
Pugliese Stuffed Eggplant
LOCAL THYME/ Outside the box recipes
Sweet Corn and Basil Lasagna
Thai Cucumber, Green Bean and Tomato Salad
Shrimp with Carrots, Green Beans and Zucchini in Tikka Spice
Basil Pesto Pizza with Grilled Eggplant
LOCAL THYME/ Quick & Easy Meal
Tomato, Cucumber, Corn Panzanella
????????????
RECIPES FROM LAUREN
LAUREN/ SWEET CORN & GREEN BEAN SALAD
Adapted every so slightly from Food & Wine No worries if you can’t find hazlenuts, almonds are an absolutely fine substitution.
Takes 20 minutes
Serves 4-6
1 cup hazelnuts
8 ears of corn, shucked
1/2 Walla Walla onion, diced
1 pound green beans
1/4 cup olive oil
2 tablespoons champagne vinegar
Salt and freshly ground pepper
- Toast hazelnuts on the stove or in a 350 degree oven until they smell delicious and are golden brown. Let cool, the rub the nuts in a kitchen towel to remove their skins. Transfer to a work surface and coarsely chop.
- Bring a large pot of salted water to a boil. Add the ears of corn and boil them over moderately high heat until just tender, about 4 minutes. Using a tongs, remove to a colander and rinse under cold water until cool to the touch. Move to a cutting board and remove kernels from the ear. Place in a large bowl with diced onions.
- Bring the water back up to a boil and add beans. Boil for three minutes. Drain and rinse under cold water. Pat dry. Cut the beans into 1-inch lengths. Add to large bowl.
- Drizzle with olive oil and vinegar then sprinkle with salt and pepper. Add hazelnuts and toss to combine before serving.
.
????????????
LAUREN/ ROASTED EGGPLANT GYRO
Inspired by Bon Appetit
Takes 1 hour
Makes enough for 6-8 pitas
1 pound eggplant, cut into 3/4-inch slices
1/4 cup olive oil
3 garlic cloves, minced
1/2 teaspoon cumin
1/2 teaspoon ground corinader
1/2 teaspoon thyme
1/2 teaspoon paprika
1/2 teaspoon sesame seeds
Pinch Kosher salt
Pinch red pepper flakes
6-8 pitas or flatbreads
1/2 cup favorite hummus (I love the Supremely Spicy hummus from Sabra)
1 cup finely chopped lettuce, optional
Hot sauce, optional
Tomato Salad
3 cups diced tomatoes
1/2 Walla Walla, thinly sliced
1/2 cup crumbled feta
2 tablespoons freshly chopped basil
2 tablespoons lemon juice
1 teaspoon Kosher salt
1/4 teaspoon freshly ground black pepper
Cucumber Yogurt Sauce
1 cup Greek yogurt
1 cucumber, seeded and diced
1 tablespoon lemon juice
1/2 teaspoon Kosher salt
1/4 teaspoon freshly ground black pepper
- Preheat oven to 450 degrees.
- In a small bowl, combine olive oil and garlic with cumin, coriander, thyme, paprika, sesame seeds, salt and red pepper flakes. Stir to combine. Place eggplant on a baking rack that fits over a baking sheet. Pour one teaspoon of the oil mixture onto each eggplant slice. Rub in gently. Bake for 25 minutes, flip and pour teaspoon of oil mixture on other side. Rub in gently and bake for another 15-20 minutes until eggplant is dark brown (but not burnt) and very tender. Allow it to cool for 5 minutes then cut into thin strips.
- While your eggplant cooks you will have plenty of time to make your tomato salad and cucumber sauce.
- For the tomato salad, combine all ingredients in a large bowl. The tomatoes will release a LOT of juice as they sit. After 10 or 15 minutes, feel free to drain the salad so it’s not so juicy.
- For the cucumber yogurt sauce, combine all ingredients in a medium bowl. Stir and let sit for 10 minutes. As the cucumbers release their juice, the mixture will become more saucy and less like cucumbers just stirred into thick yogurt.
- To serve, toast a pita or flatbread for 1-2 minutes to warm. Spread one half of the pita with a bunch of hummus. Top with sliced eggplant, followed by tomato salad and lettuce, if using. Spread cucumber yogurt on other side of pita along with hot sauce, if using and fold close. Devour immediately and don’t stress the mess. It will definitely drip all over your hands.
.
Week #10; Trust
- On: July 24, 2019
- 0
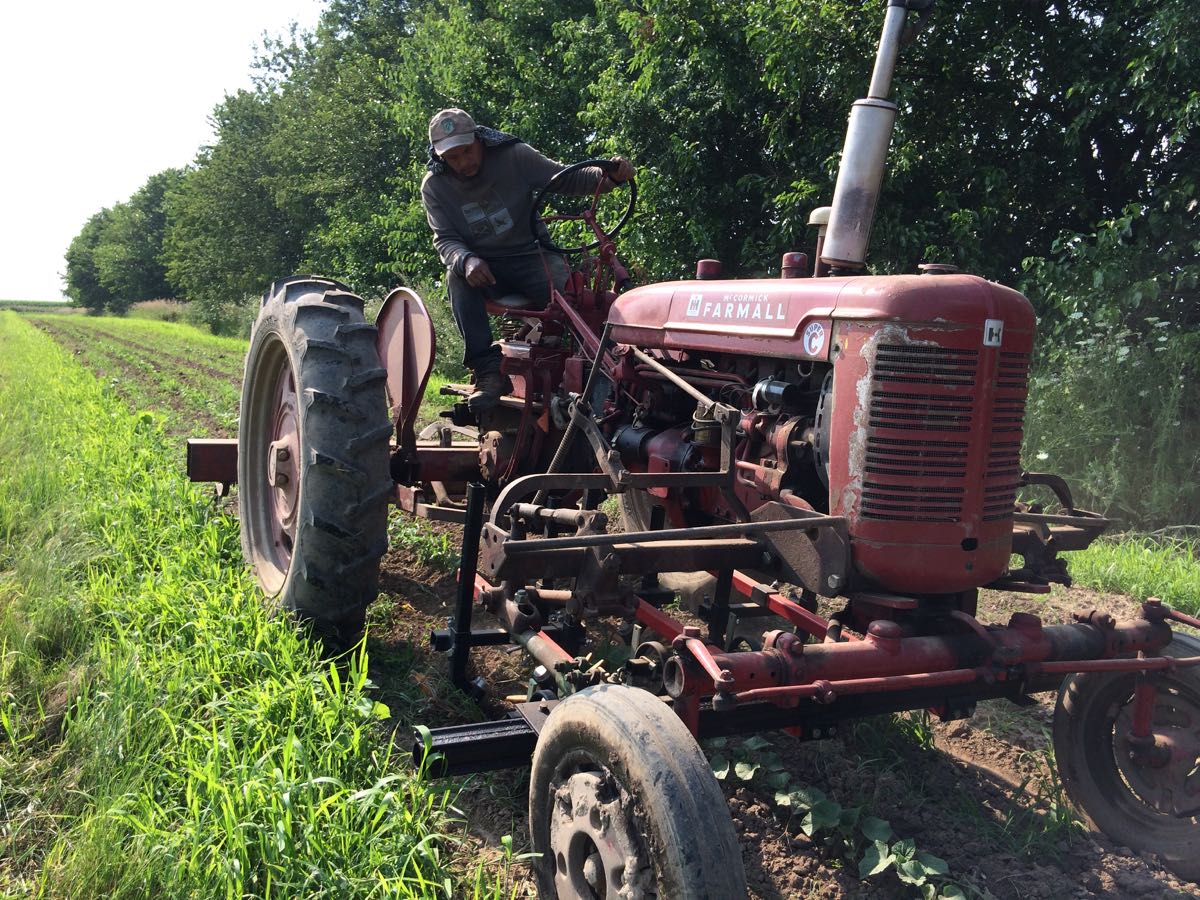
Raul cultivates cucumbers.
Employee Raul Casique Montes came to us with 17 years experience on vegetable farms in Illinois. He quickly took over most of our cultivation work. This is a high-skill job. Over the past few years, we’ve invested in a suite of modern, European-made cultivating tools, which we then mount on 65-year-old tractors. We trust Raul to decide when and how to cultivate each crop. It takes finesse and attention to the weather, soil, and how the crops are growing. There are tools to choose, plus fine adjustments to get as close as possible to the crop without damage. On a farm of our size, Steve and I cannot make every decision. We need this kind of expertise and independent decision-making. It’s such a relief to have someone trusted in this role.
Let’s explain why cultivation is so important. The #1 pest on every organic farm is weeds. If diseases or insects run amok, we might lose part of our yield. If we lose control to weeds, we lose the entire field. That happened last year for celeriac and leeks. It was too wet to cultivate in June and July, and that was the end of those crops. Keeping weeds at a tolerable level is a constant job, first with cultivation by tractor, then hoeing, then finer hand work close to the plants. Hand-weeding is expensive! And arduous! And no one likes doing it! We have to be deliberate about hand labor we assign to our crew because of the expense. The more we can accomplish mechanically, the better. We prefer to save our crew time for harvest and other jobs where their expertise is essential.
Let’s take a look at a few crops we won’t touch with a hoe at all this year. Beth
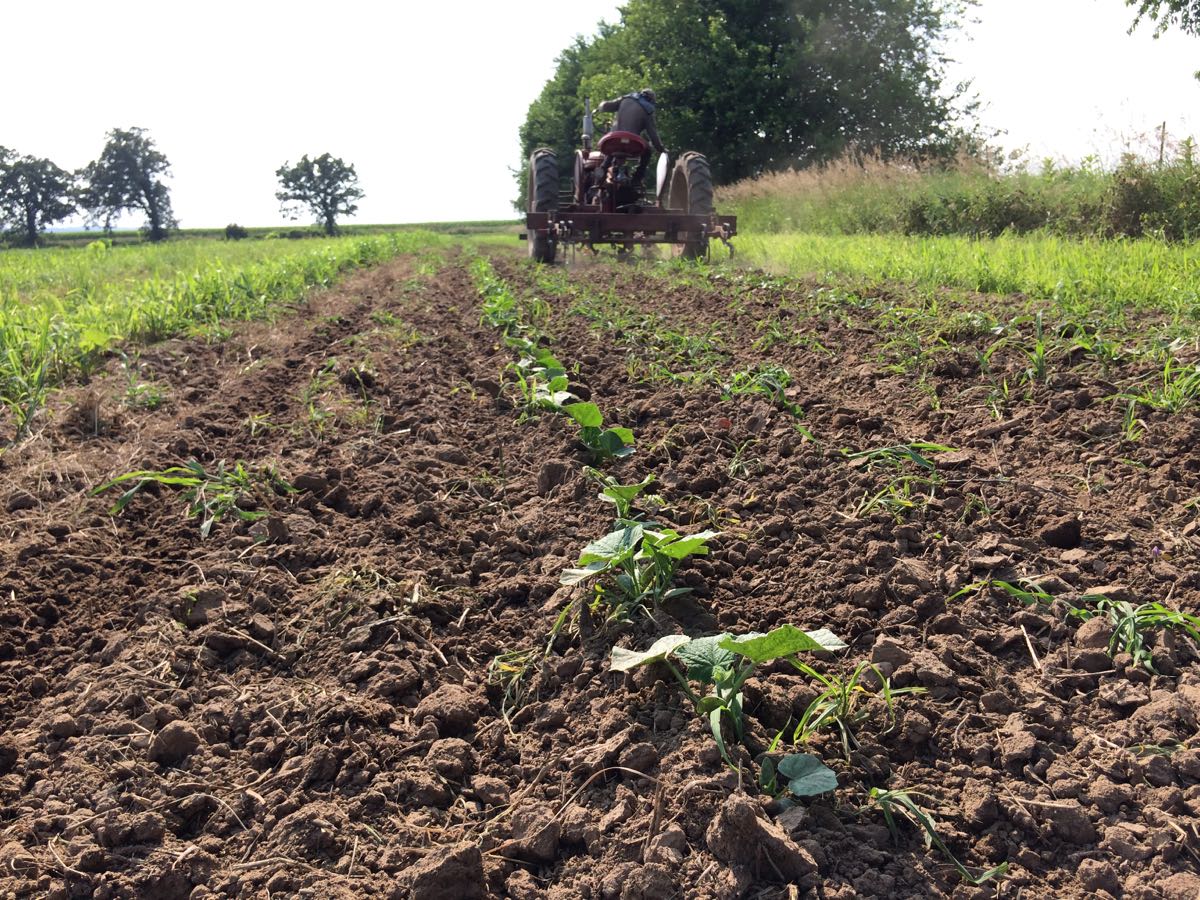
This is a small planting of direct-seeded cucumbers. Instead of growing the plants in the greenhouse, then transplanting as seedlings, we sowed the cucumber seed directly in the ground. If we can control weeds, this is a good approach because it saves the effort of transplanting the seedlings. Unlike the earlier cucumber fields, these plants don’t need protection from cold spring weather.
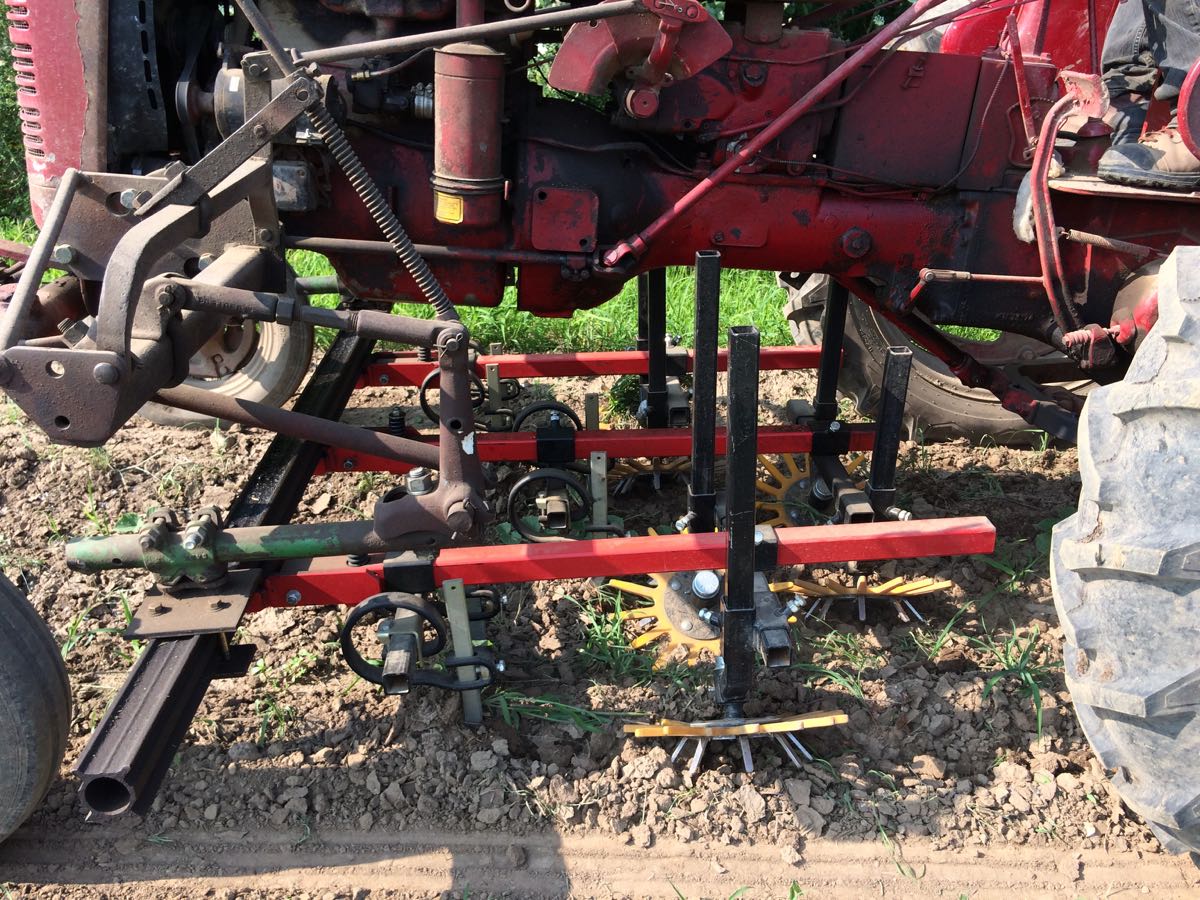
These are our fancy German-made finger weeders in action. This tool showed us how close we can cultivate crops without damage.
Look at how clean this basil field is after cultivation. We will begin harvest within two weeks, and will complete the crop without any weeding by hand. Basil is tricky. We’ve changed how we grow basil in response to a disease that showed up in the Midwest in 2010. We can no longer grow large bushy basil plants – they are too susceptible to disease. Our solution is to establish sequential plantings for harvest while the basil is young, before disease is a problem. It’s an excellent approach, as long as we don’t invest time weeding by hand, a perfect situation for close cultivation. FYI, we’re testing new disease-resistant varieties in this planting, to give us more options.
Veggie List and Veggie Notes
Week #10, July 25/26, 2019
– Weekly shares
– EOW/ green
Sweet corn, 8 or 9 ears
Caraflex cabbage, 1 head
Green beans, ~2/3 lb
Broccoli, several medium heads
Green leaf lettuce, 1 medium
Cucumbers, ~3
Zucchini &/or summer squash, 1 – 1.5 lb
Walla Walla onion
Purple bell or frying pepper, 1
Cherry tomatoes OR a small bag of plum or slicing tomatoes
Next week’s box will probably contain sweet corn, tomatoes, cucumbers, lettuce, carrots, green beans and more.
Sweet corn – Now it’s summer! Some ears have bugs at the tip. I suggest cutting off the tips before shucking the corn.
Storage. Sweet corn is best when fresh, so we encourage you to eat it asap. Store in the refrigerator, in the husks if you have the room.
Cooking. It is quicker to steam sweet corn than to boil it.
1.) Stand ears of corn upright in a tall pot. Put one inch of water in the pot.
2.) Bring the water to a boil. If the corn is cold when you begin cooking, steam for 5 – 6 minutes. If the corn starts at room temperature, steam for 4 – 5 minutes. The cooking time will vary somewhat depending on how many ears are in the pot. Pay attention to how the corn smells. The scent changes once the corn is ready. Another clue: water will bead on the corn until it is cooked. Don’t overcook it.
Caraflex cabbage – This ‘salad’ cabbage is great for slaws but also handles light cooking.
Green beans – We packed the beans in a paper bag but they will wilt if left in paper. Either transfer to a container, or cover the paper bag with a plastic bag, e.g. a bag you saved from a previous CSA delivery. Store in the warmer part of your fridge.
Broccoli – This is probably the last broccoli until fall. We’re pleased with how productive this field was. Much of this week’s broccoli has uneven heads, the result of last week’s hot weather. The unevenness does not affect flavor.
RECIPES
Visit our 2019 Recipe Log or our 2018 Recipe Log or join our Facebook discussion group.
LOCAL THYME/ Comforting Classics
Parmesan Roasted Broccoli with Pine Nuts
Southwestern Black Bean, Corn, Zucchini and Tomato Salad
Shrimp, Cabbage and Refried Bean Tostadas
Chickpea, Chorizo and Vegetable Soup
LOCAL THYME/ Outside the Box Recipes
Marinated Broccoli and Tomatoes on a Bed of Lettuce
Blistered Cherry Tomato and Corn Salad
Cabbage Slaw with Cashews and Raisins
Green Beans Sautéed with Garlic, Anchovies and Cherry Tomatoes
LOCAL THYME/ Quick & Easy Meal
Maque Choux
????????????
RECIPES FROM LAUREN
SUMMER FIESTA SALAD
If making this dressing just seems like to much keeping you from dinnertime, feel free to us something bottled. You are looking for something creamy, tomato-based if possible, and a little spicy. This one isn’t tomato-based but I do adore it.
Serves 4-6
Takes 30 minutes
8-12 pieces thick-cut bacon
1/2 head Caraflex cabbage, shredded
1 green pepper, seeded and cut into thin strips
1 tablespoon lime juice
1 tablespoon olive oil
Kosher salt
4 ears corn, cooked 5 minutes in boiling water and kernels removed
1/2 Walla Walla onion, thinly sliced
1 cucumber, halved, seeded and thinly sliced
2-4 avocados, cut into cubes
Smoky Tomato Dressing
6 dried morita chiles (I highly recommend you find them at an ethnic grocery if you have the time)
4 garlic cloves
2 crushed tomatoes, cored (about 1/4 cup if using canned stuff)
1/4 cup red wine vinegar
1/4 cup honey
1 teaspoon Kosher salt
1 cup olive oil
- Place bacon on a baking sheet. Put in the oven and turn temperature to 400 degrees (do NOT preheat ahead of time, just start the preheat process once the bacon is in the oven). Set time for 20 minutes and let cook until fully browned and crispy.
- In a food processor, prepare your dressing by combining all ingredients except olive oil and process until combined. It will be a little chunky but don’t worry about that. Scrape down the sides and get the processor running again. Drizzle in olive oil slowly until it becomes emulsified (aka begins to look a little creamy). Pour into a mason jar.*
- In a medium bowl, combine cabbage and peppers. Toss with olive oil, lime juice and a couple pinches of salt.
- To prepare your salad, combine a cup or so of chopped lettuce with a couple handfuls of slaw in a dinner bowl. Top with corn, onion, cucumber, avocado and bacon. Drizzle with dressing.
*If you don’t use this dressing right away, keeping it in a mason jar makes it easy to shake and re-emulsify whenever you are ready to serve.
.
????????????
.
SHREDDED ZUCCHINI PIZZA
Adapted from Food52
Serves 4-6
Takes 1 hour (plus time to make the dough if preparing from scratch)
1/2 batch pizza dough (my favorite recipe is from Pioneer Woman and I always make it 2-4 days in advance for the best texture)
1-1/2 pounds shredded zucchini and/or summer squash (about 5 cups)
1 teaspoon Kosher salt
6 ounces shredded mozzarella, fontina or gruyere cheese
1/4 Walla Walla onion, sliced
1 green pepper, finely diced
3 tablespoons plain breadcrumbs
- Place zucchini or summer squash in a large colander with salt. Toss it gently and then let it sit for 30 minutes.
- Preheat oven as hot as your oven with go (usually 500 or 525 degrees).
- Once time has passed, use hands to squeeze out a handful worth of zucchini at a time. Place in a large bowl and add cheese.
- Roll out pizza dough to fit a baking sheet. It might be thin and need to be seriously stretched. Don’t worry. The thinner the crust, the better the outcome. Spread zucchini mixture over crust going all the way to the edges (not leaving a crust like you would in a regular pizza). Sprinkle with onions and peppers followed by breadcrumbs.
- Bake for 20-25 minutes until golden brown throughout. Cut and enjoy!
.
Week #9; Cold Spring + Blazing Summer = Normal??
- On: July 17, 2019
- 0

Alex helped me harvest sunflowers this week. Does he remind you of anyone? Van Gogh, of course, without the happy smile.
Cold Spring + Blazing Summer = Normal??
The current weather is overcompensating for our cold spring. Are any of you familiar with “degree days”? Basically, it’s a measure of heat accumulation. Farmers use degree days to gauge a season’s warmth and development. They are useful in many ways, e.g. for predicting when pests will emerge.
During the cold spring, we were lagging below normal, by about 25%. We have accumulated so much heat in the last few weeks that our degree days have almost caught up; we are currently just 6% below normal. We are likely to surpass “normal” with the current heat wave. I say “normal” because, with climate change, any standards of “normal” are shifting.
Our summer crops are primed to use the heat. They were well-established with strong roots before the weather turned hot. Tomatoes, sweet corn, melons – they all love hot weather.
We are doing our best to keep up with the explosive tomato vines. We trellis varieties that are expected to have a long harvest season. It keeps the tomatoes off the ground so they don’t rot, makes them easier to find, and keeps paths open so we can get into the fields. Smitty and crew are keeping up with trellising. It’s an on-going job.
Watch out for the heat on Friday. We’re hustling to get our farm work done so everyone can go home early on Friday. It’s going to be a scorcher. Beth

Smitty winds twine around the tomato plants in a figure eight pattern so they are supported on both sides.

We need many posts keep the plants upright. These plants will be ready for a third string in a few days. See the taller posts in the row to the right? Those support cherry tomato plants which get quite tall.
Veggie List and Veggie Notes
Week #9, July 18/19, 2019
– Weekly shares
– EOW/ purple
– Sampler/ moon
Tipi tomato juice, 1 qt
Walla Walla onion
Green peppers, 2
Cucumbers, ~4
Zucchini &/or summer squash, 2.5+ lb
Collard greens, 1 bunch
Broccoli, several medium heads
Flowering dill, 1 small bunch
Sunflower
– Some sites get 1 green frying pepper.
– Some sites get 1 pt cherry tomatoes.
Next week’s box will probably contain Caraflex cabbage, cucumbers, Walla Walla onion, zucchini and more.

Tipi tomato juice – At peak season, we take our ripe tomatoes to a small batch processor in East Troy, to make into tomato juice for all of you. It’s a great way to capture ripe tomatoes when abundant. Drink the juice or try making an easy soup. Simmer your choice of vegetables from the box in the juice (diced zucchini, bell peppers, &/or broccoli). Add minced Walla Walla onion near the end of cooking. If you have some basil or parsley to add, that’s good but optional. Voila! Soup!
Storage: Store the juice out of sunlight at room temperature when unopened. Refrigerate after opening. The juice is already seasoned so do not add salt if you cook with it.
Ingredients: organic tomatoes from Tipi Produce, salt, organic garlic, organic onion, organic black pepper. Nutritional information is posted here.
Walla Walla onions – These fat onions are sweet, crisp and very mild. Wonderful raw or lightly cooked. Try cutting into wedges, threading on a skewer and grilling. Do not try to fry these onions – it doesn’t work because of their high water content. Storage: It’s OK to store at room temperature for up to one week. Otherwise, refrigerate.
Green peppers – Here are the first bell peppers. Refrigerate but in a warmer part of your fridge.
Flowering dill – We’ve timed the dill for delivery with lots of cucumbers, so you can make refrigerator pickles. Both leaves and flowers can be used as an herb. Storage: Refrigerate. Wash and freeze if you don’t plan to use within one week.
Sunflower – Trim your sunflower stem once you’re home and put in a jar or vase. The sunflower is for beauty and joy, not to eat! If you re-trim the stem and change the water a few times, the flower should last about one week.
RECIPES
Visit our 2019 Recipe Log or our 2018 Recipe Log or join our Facebook discussion group.
Grilled vegetables
This is a great weekend to throw vegetables on the grill and avoid heating up the house! Add your grilled veggies to pasta, rice or grain bowls, or make Lauren’s Noodle Bowl recipe below. Beth
Zucchini – Slice lengthwise, about 1/4 to 1/2 inch thick. Marinate in your favorite sauce for 15 minutes. Make sure the marinade contains some oil. Grill until soft and a bit charred, flipping once or twice. Return to the marinade to soak up flavor.
We use this mixture: 2 Tbsp soy sauce + 2 Tbsp rice vinegar + 1 Tbsp toasted sesame oil.
Walla Walla onion – Cut in wedges. Thread onto skewers. Rub or spray with oil. Grill, turning occasionally, until nicely charred and sweet.
Peppers – Even green peppers are delicious when roasted!
1. Instead of roasting intact peppers, I prefer to cut each pepper into 3 or 4 slabs (depending on the pepper’s shape), oil the pieces, and lay them flat on the grill. Start with the skin side up, then flip and grill with the skin side down until lightly charred. Do not blackened the entire skin. Place in a bowl, cover with a cloth for 5 minutes, then peel off the skins.
2. Alternatively, you can thread bite-size pepper pieces onto skewers and grill. You’ll have to pull off some charred edges but you get roasted pepper flavor, without the hassle of peeling the skins.
LOCAL THYME RECIPES

Puff Pastry Quiche with Broccoli
LOCAL THYME/ Comforting Classics
Spiced Chickpea and Chopped Vegetable Salad
New and Improved Zucchini Bread
Spiced Tomato Juice Stewed Greens
Puff Pastry Quiche with Broccoli
LOCAL THYME/ Outside the Box Recipes
German Braised Cucumbers
Lemon Blueberry Zucchini Cake with Lemon Glaze
Slow Cooker Pork Stuffed Collard Rolls
Broccoli, Cucumber and Pepper Salad with Sesame
LOCAL THYME/ Quick & Easy Meal
Szechuan Grilled Zucchini and Pepper Kebabs with Shrimp
????????????
RECIPES FROM LAUREN
CREAMY CUCUMBERS
Serves 2-4 as a side (though I am known to eat the whole bowl for dinner)
Takes 15 minutes (but gets better the longer you let it sit)
4 cucumbers, cut into 1/8-inch slices
1 Walla Walla onion, halved and sliced
1/3 cup Greek yogurt
1/3 cup mayonnaise
2 tablespoons sugar
2 tablespoon white vinegar
Salt and pepper to taste
Dill, optional
- In a large bowl, combine cucumbers and onions.
- In a small bowl, whisk together yogurt, mayo, sugar, vinegar, salt and pepper until smooth. Pour over cucumbers and onions and toss gently to combine. Garnish or season with dill (if you like).
- Serve immediately or chill for an hour to let the flavors really meld together.
.
????????????
.
MISO ROASTED VEGGIE NOODLE BOWL
Adapted from Sweet Lizzy
Serves 4-6
Takes 1 hour
1-2 pounds broccoli, cut into florets
1-2 pounds diced zucchini and/or summer squash
4 tablespoons olive oil, divided
1 tablespoon white miso paste
2 tablespoons maple syrup, divided
1 tablespoon soy sauce
1 tablespoon toasted sesame oil
4 cups roughly chopped mushrooms (I used a mixture of shittakes and cremini)
8-10 ounces rice noodles (I love the Lotus Foods Millet & Brown Rice Ramen)
1 bunch collards, stems removed and cut into very thin slices
1 tablespoon lemon juice
2-3 avocados, sliced
1/2 cup Almond Miso Dressing (see below)
2 tablespoons white or black sesame seeds, optional
Kimchi, optional
- Preheat oven to 400 degrees.
- Spread out zucchini and broccoli on a parchment paper-lined baking sheet. If you decide to use the full two pounds of each vegetable, you may want to use two parchment paper-lined baking sheets for more even browning.
- In a small bowl, whisk together 3 tablespoons olive oil, white miso paste and 1 tablespoon maple syrup until smooth. Brush broccoli and zucchini with this mixture then roast for 20 minutes. Remove from the oven, toss veggies and then roast 20 minutes longer.
- In a medium saucepan, mix together soy sauce, toasted sesame oil and remaining 1 tablespoon maple syrup. Add mushrooms and toss until they’re well-coated. Cook over medium low heat for 15-20 minutes. The mushrooms will first release a lot of liquid, then reduce down. Once fully cooked and soft, remove from the heat.
- Cook noodles according to package directions.
- Divide collards evenly into dinner bowls. Add a bit of lemon juice, olive oil and a pinch of salt to each bowl. Gently massage collards until they turn a brighter shade of green (about a minute). Top with noodles and miso roasted veg. Spoon mushroom mixture (sauce and mushrooms) over noodles. Add 1/2 avocado to each bowl. Drizzle 2-3 tablespoons of Almond Miso dressing and then sprinkle with sesame seeds. Add kimchi to your preference.
.
ALMOND MISO DRESSING
1/2 cup almonds
5 tablespoons olive oil
3 tablespoons water
2 tablespoons rice wine vinegar
1 tablespoon white miso
1 tablespoon maple syrup
In a food processor, process almonds until finely chopped (so it looks roughly like minced garlic). Add remaining ingredients and process until smooth. You may have to scrape down edges a couple times.
.
Week #8, Steve’s odd ambition
- On: July 10, 2019
- 2
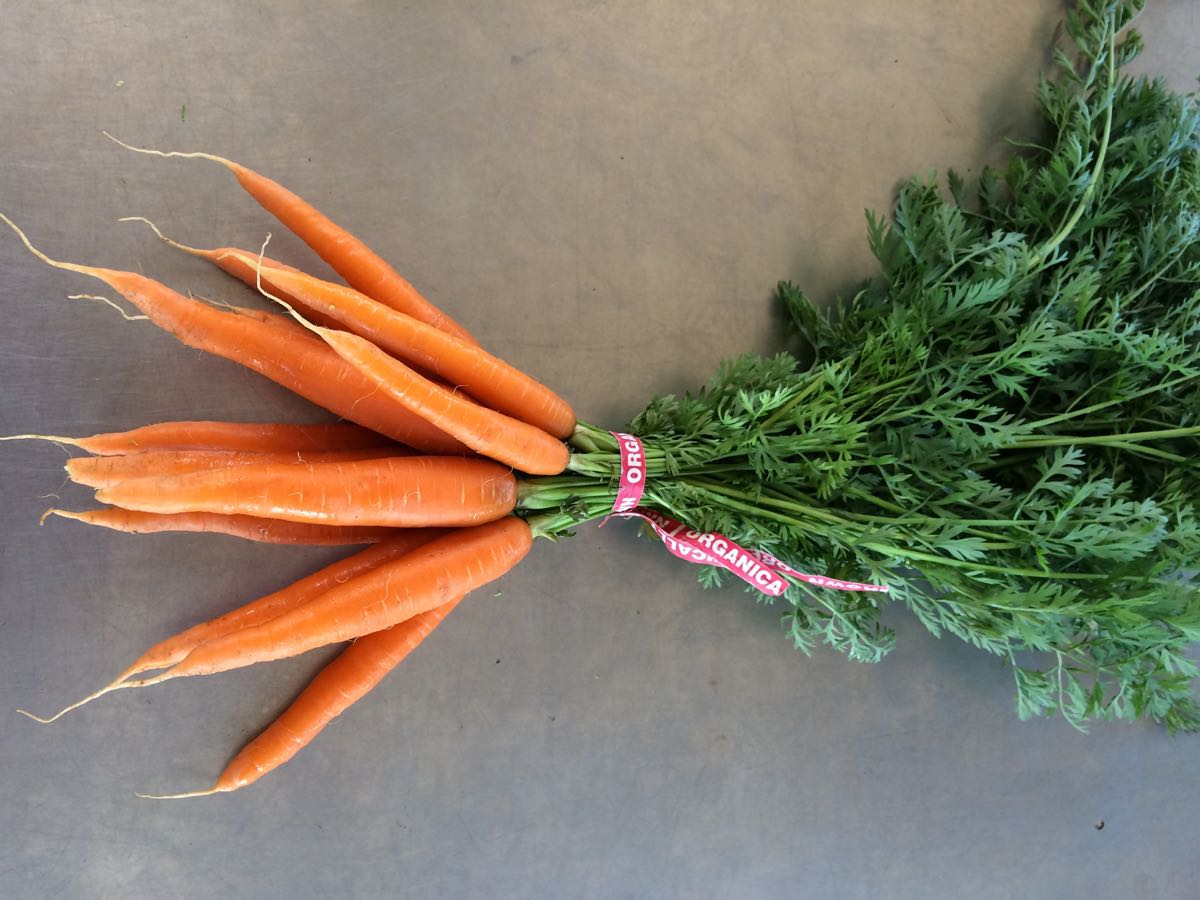
The first bunched carrots from Tipi Produce in over 25 years.
Steve surprised us by announcing a plan to bunch carrots for the CSA. “Bunched carrots” means carrots with the tops still attached. We grow many carrots but harvest just the roots. There are good reasons for that. We have the right mechanical harvester. It’s an efficient system that lets us grow lots of carrots without too much hand labor. Carrots are heavy.
Our 20-year employees were befuddled – they have never bunched carrots. Steve presented his arguments:
“We have a beautiful stand of straight, healthy carrots.”
“The sandy field they’re growing in is dry enough that the soil won’t stick to the roots.”
“These early carrots are precious and some would be lost during machine harvest.”
We pointed out the downside; it takes a lot of hand labor to do the bunching.
He maintained his arguments all week, but gradually the real reasons began to pop out. “It’s time to run our new bed lifter through its paces.” That’s a new piece of equipment we imported from the Netherlands. He’s itching to try it out. Then a few days later, “Can’t we just try something new??” There’s the real reason. Steve has grown carrots for so many years, and just wanted to try something new. We all gave in. Beth
All hands on deck to bunch carrots. From left, David, Simone, Billy, Alex, Ben, Michio, Kerry and Maggie. Steve (yellow shirt, background) is headed to the tractor to dig more of the row.

This is our new bed lifter, a type of under cutter. We bought it to ease our sweet potato harvests. We’ve been using an older re-purposed implement. This should be a big improvement. We imported it from the Netherlands.
Veggie List and Veggie Notes
Week #8, July 11/12, 2019
– Weekly shares
– EOW/ green
Carrots, 1 bunch
Swiss chard, 1 bunch
Cucumbers, 3
Zucchini &/or summer squash, 2.5+ lb
Broccoli, 1 or 2 small heads
Snap peas, ~2/3 lb
Lettuce, green leaf OR red bibb
Garlic scapes, 1 small handful
Parsley, 1 bunch
Next week’s box will probably contain cucumbers, kale/collards, beets, broccoli, Walla Walla onion and more.
Bunched carrots – Here’s the kicker. 1. Pause and admire your pretty bunch of carrots. 2. Rip off the leaves. If you leave the tops on, they pull moisture from the carrots. If you’ve read this far, now you know my primary argument against bunched carrots. Eat the carrots and feed the tops to your rabbit or your compost pile.
Swiss chard (pretty bundle of green leaves) – Our crew did a nice job mixing colors for pretty bunches. Swiss chard is a close relative of spinach, but requires a bit more cooking. Use as a substitute in any recipe that calls for spinach, just cook the chard a little longer. Both stems and leaves are delicious. The stems requite longer cooking, so cut them free from the leaves when preparing. That allows you to cook the stems longer.
Cucumbers – I bet you all know what to do with cucumbers. First of the season, these came from a field that was a terror to transplant. Conditions were very rough and we doubted the plants’ survival. We are amazed and relieved at how well the plants have done. Storage: Cucumbers need refrigeration but do best at about 48 F. Store in a warmer part of your fridge – that’s the best compromise.
Parsley – We have harvested flat-leaved Italian parsley for you this week. It looks a bit different than curly parsley but they are used interchangeably.
RECIPES
Visit our 2019 Recipe Log or our 2018 Recipe Log or join our Facebook discussion group.
LOCAL THYME/ Comforting Classics
Bibimbap with Chard, Summer Squash, Snap Peas, Cucumber and Ground Pork
Chard Soup with Sausage, Scapes, Brown Rice and Chickpeas
Cannellini and Provolone Pasta Salad with Creamy Italian Dressing
Norway’s Cucumber Parsley Salad
LOCAL THYME/ Outside the Box Recipes
Herbed Ricotta Pesto with Linguine and Summer Squash
One Pot Chicken, Chard and Rice Dinner
Carrot and Cucumber Salad with Japanese Carrot Ginger Dressing
Cucumber Parsley Buttermilk Dressing
LOCAL THYME/ Quick & Easy Meal
Shanghai Style Beef and Broccoli Stir Fry
????????????
RECIPES FROM LAUREN
WILTED GREENS WITH POLENTA
I made and loved this with chard (especially because of the beauty of the chard stems), but you can absolutely make this dish with any leafy green (kale, collards, spinach). We consider it more of a side and usually serve it with grilled sausages for a simple summer meal.
Serves 4-6
Takes 30 minutes
4 cups water
1 teaspoon Kosher salt, plus more to taste
1 cup polenta
2 tablespoons olive oil
3 garlic scapes, sliced
1 bell pepper, diced
Freshly ground black pepper
1 bunch chard, stems sliced and greens roughly chopped, divided
1/4 cup water
1/4 teaspoon red pepper flakes
2 tablespoons butter
- In a medium saucepan, bring water and salt to a boil over high heat. Once boiling, whisk in grits. Reduce heat to medium and continue whisking for a minute or two so there are no lumps. Reduce heat to medium low and cook for 20 minutes, stirring occasionally with a metal spoon (or your whisk) to prevent clumping/sticking.
- Meanwhile, prepare your wilted greens. Heat olive oil in a large heavy skillet over medium heat. Add garlic, pepper and chard stems along with a sprinkle of salt and pepper. Saute for 5 minutes until soft.
- Increase heat to medium high. Add chard greens along with another generous sprinkle of salt and pepper. Stir a couple times then add water. Let wilt down for 5-10 minutes until greens are cooked and tender. Add red pepper flakes, taste and adjust flavors to your liking.
- By now your polenta should be thick and nearly finished. Turn off heat and stir in butter. Taste and adjust these seasonings as well. Serve polenta warm with a pile of greens on top.
.
????????????
SUMMER SALAD WITH BROCCOLI FALAFEL
Takes 1 hour
Serves 2-4
1 head broccoli, cut into florets
2 garlic scapes
1/4 cup diced parsley
15.5-ounce can chickpeas, drained and rinsed
1-1/2 teaspoons salt, divided
1 teaspoon paprika
1 teaspoon cumin
1 teaspoon red pepper flakes
3 tablespoons lemon juice, divided
6 tablespoons chickpea flour
1/2 cup rice wine vinegar
3/4 cup water, divided
2 tablespoons sugar
1 cucumber, seeded and sliced
2-3 carrots, peeled and cut into 2-inch long pieces
1/2 cup Greek yogurt
2 tablespoons tahini
2 tablespoons olive oil
1/2 teaspoon dried dill
1 head lettuce
Kalamata olives
Feta cheese, optional
- Put broccoli into food processor and process until it resembles a rice. Place in a cast-iron or heavy skillet and cook for 2-3 minutes over medium heat to release the liquid.
- Meanwhile process garlic scapes, parsley, chickpeas, 1 teaspoon Kosher salt, paprika, cumin and red pepper flakes. Process until very finely chopped. Add broccoli and process until just combined. Add 2 tablespoons lemon juice and chickpea flour and process until smooth and begins to come together. Remove blade from processor and roll the mixture into balls. Place on a parchment-lined baking sheet in the freezer while you prepare the rest of your salad.
- Combine rice wine vinegar with 1/2 cup water, sugar and 1/2 teaspoon salt. Whisk until sugar has dissolved. Add cucumbers and carrots. Let sit.
- In a small bowl, combine Greek yogurt, 1/4 cup water, tahini, olive oil, 1 tablespoon lemon juice and dill. Whisk until smooth then taste and adjust seasonings.
- Heat large pot filled with two inches of vegetable oil over medium high heat. Fry broccoli falafel balls for 3-4 minutes until browned but not burned. Drain the grease on a paper towel.
- Divide lettuce into four bowls. Top with quick pickled carrots and cucumbers, broccoli falafel, olive oil and feta, if using. Drizzle with tahini dressing.
.
Week #7, Honorary farmhands
- On: July 02, 2019
- 0

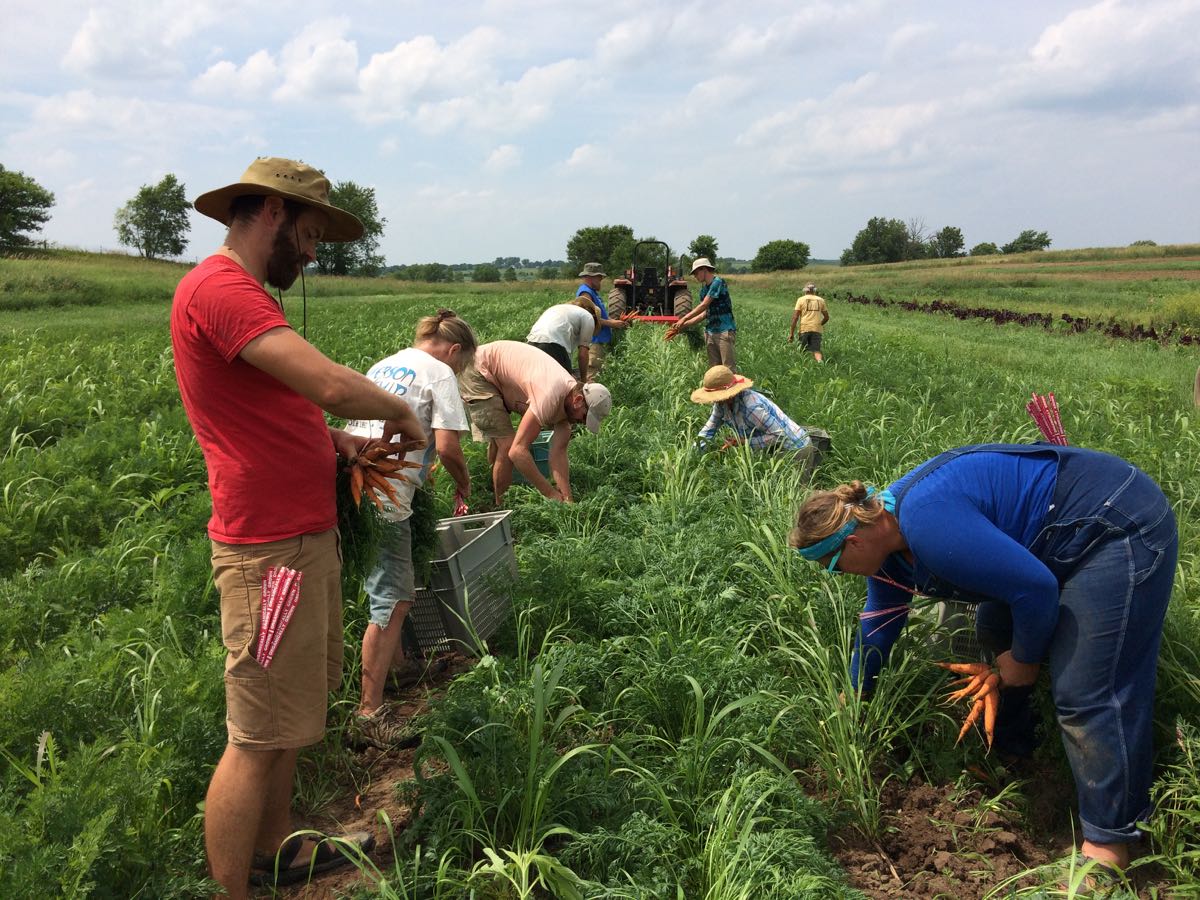
Strawberry u-pickers, toiling in the heat.
The stars aligned for our strawberry upick last weekend. We had a lot of ripe berries and just the right number of people to pick them. It balanced perfectly, with enough berries for everyone who visited. This is unprecedented. With a big crop like that, we could easily end the day with unpicked berries that would be over-ripe by this week’s delivery, and therefore wasted. Fortunately, it all worked out. Honestly, strawberries are our riskiest crop because they are so easily damaged by the weather. It’s been wet this year but the thick straw mulch saved the berries.
It was hot during the u-pick. If you visited on Saturday, then you have experienced a challenging harvest day in the fields and can now call yourself an honorary farmhand. I think everyone left the farm happy with their berries, and slightly dehydrated. Beth
More milkweed next year
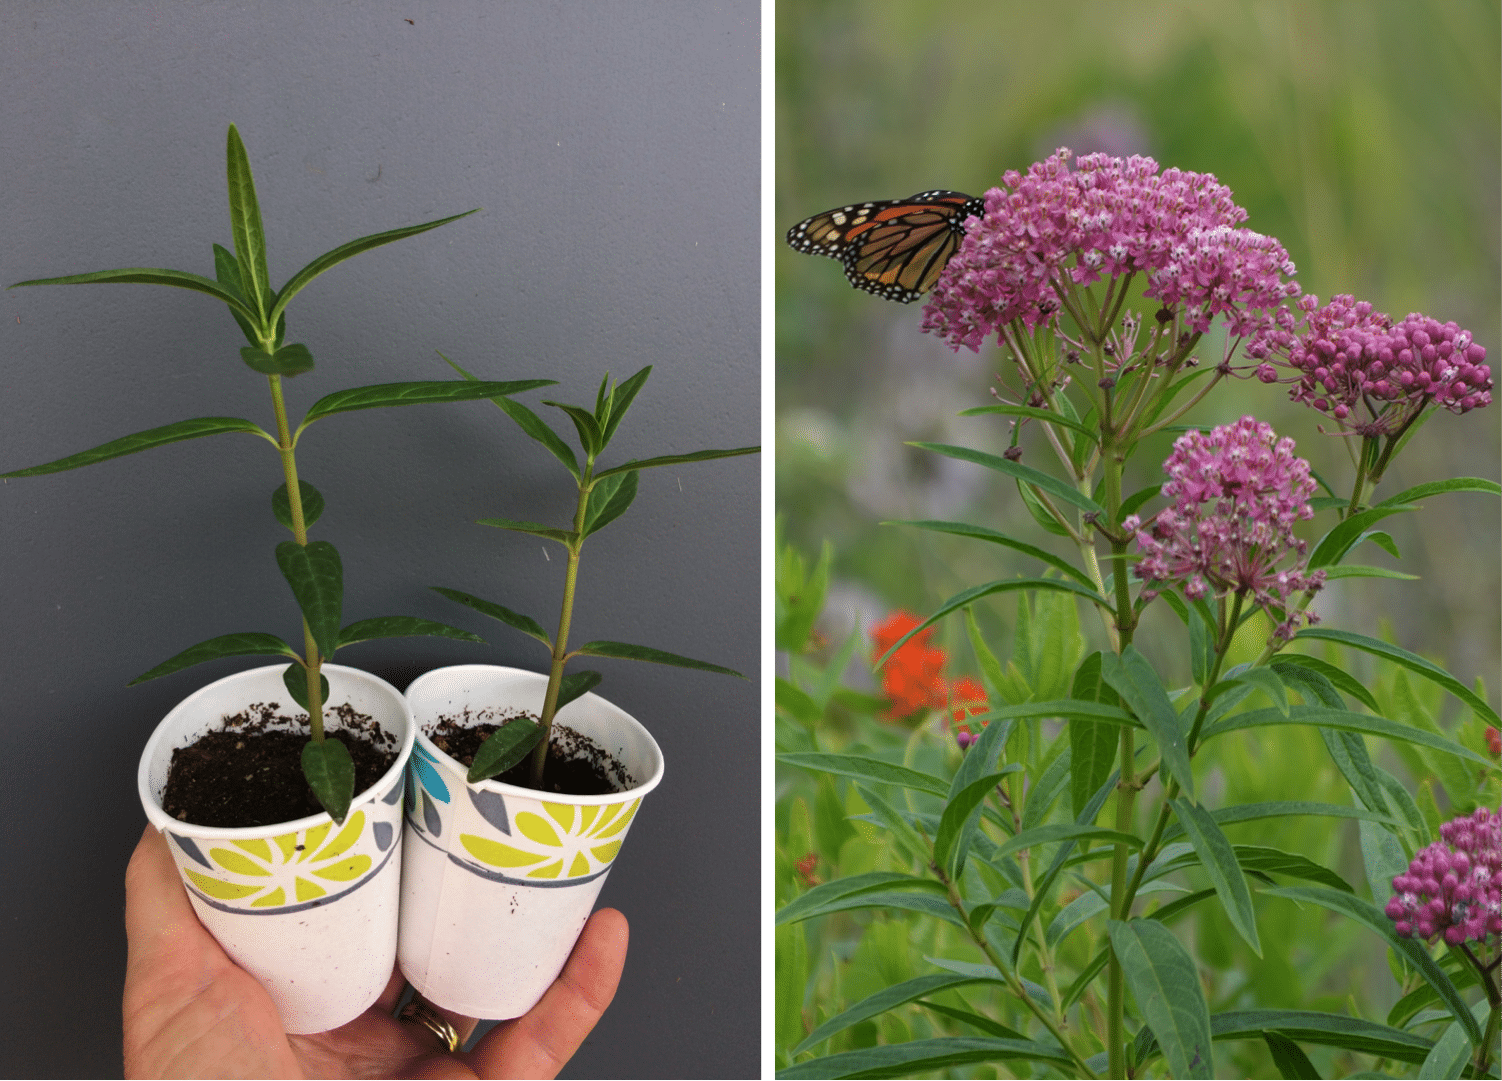
Demand was high for the milkweed seedlings I offered for retrieval at the u-pick. We have given them all away. I am pleased to know that many of you care about supporting monarch butterflies. I will grow a bigger batch of seedlings next year, enough for everyone. Sorry to disappoint some of you. Beth
Veggie List and Veggie Notes
Week #7, July 3/5, 2019
– Weekly shares
– EOW/ purple
– Sampler/ sun
Folks, do not be surprised if quantities in your box are different from the list below. I had to guess. Our harvest schedule is weird this week because of the holiday.
Strawberries, 1 quart?
Caraflex cabbage, 1 head
Sugar snap peas, 1.2 lb
Romaine lettuce, 1
Zucchini &/or yellow squash, 2.5 – 3 lb
Kohlrabi, 1
Fennel with fronds, 1 large or 2 medium
Garlic scapes, a handful
Cilantro, 1 bunch
Basil, 1 or 2 husky sprigs
Some sites get 1 sunflower per box.
Next week’s box will probably contain carrots, sugar snap peas, Swiss chard, zucchini & summer squash, lettuce, garlic scapes, an herb and more.
Strawberries – These are ripe. Eat soon.
‘Caraflex’ cabbage – This is a nice salad-type that we grow in summer. Don’t you love the pointy shape? It has thinner, more tender leaves than the usual green cabbage. Great in salads and slaws but can also be cooked. Here’s the description from the seed catalogue: “Inner leaves are tender, crunchy, and have an excellent, sweet and mild cabbage flavor. Perfect for summer salads, slaws, or cooked dishes.” We’re sending it this week so you can make slaw for your holiday picnics.
Kohlrabi (pale green, round vegetable with thick skin) – Crunchy and sweet, kohlrabi is a great addition to salads.
Storage: Kohlrabi bulbs will store for a month in the refrigerator.
Uses: Kohlrabi are good peeled and eaten out of hand, or added to sandwiches, or added to salads. It makes a nice salad on it’s own. You can grate it, slice it, or cut it into matchsticks. It’s also good cooked. If you have it, the Asparagus to Zucchini cookbook has a long list of kohlrabi suggestions.
Fennel (large vegetable with a fat bulb and lacy fronds) – Fennel is a ‘swing vegetable’; it can be used raw or cooked. Clean well and slice as thinly as possible for use in raw salads. It is good simply prepared with olive oil, lime or lemon juice, salt and shaved parmesan cheese. Cooking softens and sweetens fennel, and mellows its anise flavor. Both the bulb and leaves are edible. Here are ideas from Alice Water of Chez Panisse about how to use fennel: ‘It’s strong anise characteristic seems to suit fish particularly well. … We use fennel all the time. We add the feathery leaves to marinades for fish and to numerous salads, sauces and soups and we use them as a garnish, too. … The bulbs are sliced and served raw in salads in various combinations with other vegetables, parboiled for pastas; caramelized and served as a side dish; braised whole; or cooked in vegetable broths & fish stocks.”
Garlic scapes (curly green things) – Garlic scapes grow at the top of garlic plants. They look like flower buds but are actually clusters of tiny bulblets. We snap off the young scapes to direct the plants’ energy into forming garlic bulbs underground. Use scapes as a substitute for garlic cloves. They can be minced, mixed with olive oil, and added to stir fries or simple pasta dishes. The scapes can be sautéed, but will not brown like garlic cloves. Expect them to retain their crunch even when cooked, and to be milder than garlic cloves, closer in pungency to the green garlic we’ve sent.
Cilantro – Used in both Mexican and some Asian cuisines.
Storage: Refrigerate.
Basil – Yum, the first tender basil, perfect to combine with garlic scapes, zucchini, snap peas, etc.
Storage: Basil will blacken if stored in the refrigerator. It is best stored at room temperature with the cut ends in water, for example in a jar or vase. Treat it like a flower. Give the stem a fresh trim and change the water every day or two.
Sunflower (for some sites) – We continue experimenting with sunflowers. They are one of the few flowers that we can send in the CSA boxes. This cheerful variety ‘Vincent’s Choice’ does not produce pollen, making it a good choice to pack with vegetables. Trim the stem and place in water. Give the stem a fresh trim and change the water every day or two. It might last 5 – 7 days.
RECIPES
Visit our 2019 Recipe Log or our 2018 Recipe Log or join our Facebook discussion group.
LOCAL THYME/ Comforting Classics
Paprika and Oregano Roasted Kohlrabi
Lamb, Kohlrabi and Fennel Curry
Smoked Trout, Snap Pea and Basil Pasta Salad
Cabbage Kohl Slaw
LOCAL THYME/ Outside the Box Recipes
Kohlrabi Gorgonzola Gratinée
Fennel Summer Squash Slaw
Burrata Snap Pea Salad
Southwestern Slaw
LOCAL THYME/ Quick & Easy Meal
Creamy Zucchini and Spaghetti
.
????
.
RECIPES FROM LAUREN
PARCHMENT PACKET SALMON WITH SUGAR SNAP CILANTRO SLAW
Inspired by What’s Cooking Good Looking
Serves 4-6
Takes 45 minutes
1 pound salmon
1 lime, cut into thin slices
1 tablespoon olive oil
1 teaspoon Kosher salt, divided
1/2 teaspoon freshly ground black pepper, divided
3 cups snap peas, ends trimmed and sliced lengthwise (about 2/3 pound)
3 cups shredded cabbage
1/4 cup packed chopped cilantro
2-3 garlic scapes, minced
3 tablespoons mayonnaise
2 tablespoons Greek yogurt
2 tablespoons lemon juice
1/2 teaspoon sugar
- Preheat oven to 400 degrees.
- Take a piece of parchment and lay it on a baking sheet. Place lime slices in a row on the parchment paper and top limes with salmon. Drizzle salmon with olive oil, 1/2 teaspoon salt and 1/4 teaspoon pepper before laying a couple more lime slices on top.
- Fold up the parchment into packets by taking the two long sides and bringing them together in the middle, folding it so it seals. Take both ends and twist tightly. Fold parchment ends under salmon. Bake the salmon for 20 minutes until cooked through.
- Meanwhile, prepare your slaw by combine peas, cabbage, cilantro and scapes in a large bowl. Toss to combine then add mayo, yogurt, lemon juice, sugar, remaining 1/2 teaspoon Kosher salt, and remaining 1/4 teaspoon freshly ground black pepper. Stir until veggies are well-coated.
- When salmon is ready serve warm with slaw on top or on the side.
.
????
.
ZUCCHINI, KOHLRABI & FENNEL FRITTERS
Takes 30 minutes
Makes 8-10 fritters
Serves 2-4
1-1/2 pounds zucchini, shredded (about 4 cups)
1 large kohlrabi, shredded (about 3 cups)
1/2 fennel, cored and shaved
1/4 cup chopped basil and/or cilantro
2-3 garlic scapes, minced
1/2 cup flour
1 large egg
1/2 teaspoon Kosher salt
1/4 teaspoon freshly ground black pepper
Vegetable oil
- Place shredded zucchini, kohlrabi and fennel in a large cheese cloth and squeeze to remove most liquid.
- Add drained veggies to a large bowl with basil and/or cilantro, garlic scapes, flour, egg, salt and pepper. Stir to combine.
- In a large heavy skillet, warm 1-2 tablespoons vegetable oil over medium high heat. Reduce to medium low and add mixture in 1/3 cup portions to the skillet. Cook for 4-5 minutes until golden brown on one side and flip. Press mixture into a patty and cook additional 4-5 minutes until browned and cooked through.
- Serve warm with yogurt, ketchup or hot sauce.
.

